How to properly install laminate flooring on a wooden floor. How to lay laminate flooring on a wooden floor? Methods for leveling a wooden base - use the appropriate one
Laminate flooring can be laid on any flat, durable (stable) and dry surface. Wooden covering, concrete or other – it doesn’t really matter. There are some nuances that should be taken into account.
It is quite possible to lay laminate flooring on a wooden floor with your own hands. Many construction companies will assure you that the old wooden floor must first be dismantled and completely replaced. This step must be taken if the load-bearing joists have rotted. In the center of Moscow there are still buildings where wooden floors have not been changed since the 19th century, and when conducting a survey, the need for their complete replacement becomes obvious. However, this operation will cost the owner much more than a new floor covering.
Important! When diagnosing a wooden floor, you should pay attention not only to the safety of the joists and the condition of the floor boards, but also to their stable position - the boards should not “walk.” During operation, unstable elements of an old wooden floor will lead to displacement of the laminate panels relative to each other, increased wear of the locking joints and the appearance of cracks in the floor covering.
Diagnosis and leveling of wooden floors
In most cases, to diagnose the old floor, it is not necessary to open it. Such measures should be resorted to if a section of the floor has noticeably “sagged” and cannot be leveled with a layer of plywood. Or when there are serious concerns that the load-bearing joists have rotted. In other cases, the floor is visually inspected, tapped in search of possible cracks and places that creak when walking, and its horizontalness is checked. It is allowed to lay the laminate if there are differences in the plane within 2 mm per 2 m. To do this, apply a 2-meter level to the floor and look at the size of the differences in height.

Damaged boards of the old floor must be replaced. If the damage is superficial and minor, the board is removed, turned over and secured upward with the side that was previously bottom. Poorly secured boards are fixed using self-tapping screws. Subsequent leveling of the surface of the old wooden flooring only makes sense if the floor boards are well secured.


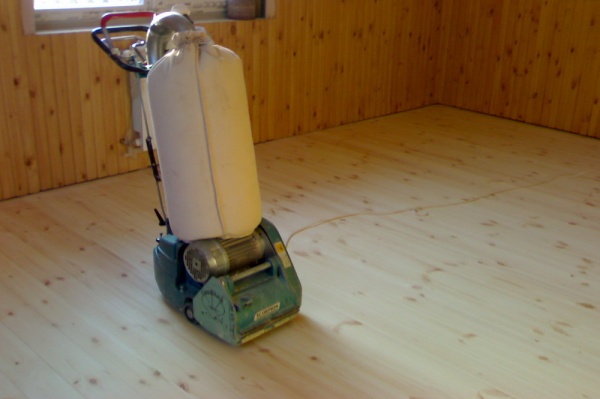
Advice . If you plan to sharpen the floor with an electric planer, use nails to fix the boards, the heads of which must be recessed into the board by 2 mm.
Old, uneven floors with significant differences in height can be leveled using an electric planer or sanding machine. Before leveling the floor with an electric planer, it is also necessary to eliminate squeaks. To do this, the boards are attached to the joists with long self-tapping screws. Self-tapping screws can be screwed into or near the holes of nails that were removed during inspection and repair. After leveling the floor, all debris is carefully removed with an electric planer, the floor boards are impregnated with an antiseptic, after which you can begin laying the laminate.

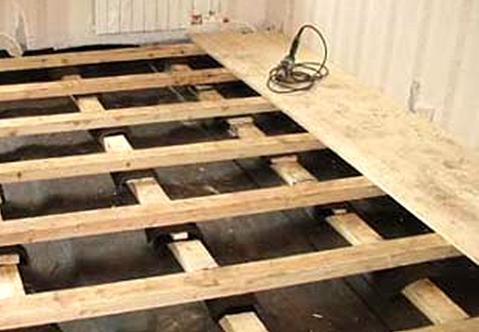
If there are a significant number of differences, which are quite difficult to remove using an electric planer, leveling the old wooden floor is done with sheets of plywood with a thickness of 10 mm or more. This can be done as long as the floor slope is satisfactory. They fasten sheets of plywood through the boards to the load-bearing joists with long self-tapping screws in order to firmly fix all the layers of the resulting “pie”. Sheets of plywood are laid staggered.

If there is a significant slope of the old wooden floor and large differences in height, the old floor is leveled using additional guides before laying the plywood. They are made from bars of different thicknesses. The plywood should first be laid out on the floor and the joints of the sheets should be marked. Laying guides from bars under the joints is mandatory. The laying step should be 500-600 mm. The bars are secured with self-tapping screws. Sound and heat insulation is laid in the gaps between the laid bars. Sheets of plywood are laid on the new guides and secured with self-tapping screws, without recessing their heads too much into the plywood. There must be a gap of 3-5 mm between the walls in the room and the sheets of plywood.


Very important! Leveling the old floor with the help of additional guides from the bars will inevitably change its level in relation to the floor in other rooms. The door may need to be replaced or rehung.
The vent that was in the old wood floor needs to be retained. To do this, a hole of the same size is cut in this place in the plywood sheet and in the laminate panels. Then the ventilation hole is closed with a decorative cover in the color of the laminate. Usually such holes are located in inconspicuous places, so it will not create problems for you, and the old floor will “breathe” and will last for a long time.
If there are concerns that the load-bearing joists require strengthening or even replacement, a part of the board is cut out in places of maximum deflection of the old floor using a jigsaw. It is better to hold the jigsaw not vertically, but at a slight angle. In this case, the cut piece of board will have a narrowing downward, and it will be easy to simply put it in place.
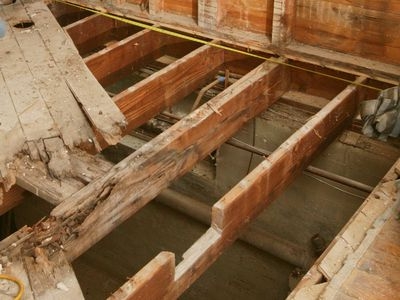
The logs are inspected through the cut hole and their condition is determined. Repair of joists may be limited to driving in wedges to level them or additionally fixing the joists to the base with anchors. Rotten or seriously damaged joists must be dismantled, which will require removing the entire floor. New ones are installed in place of the old logs. Old wood flooring can be replaced with two layers of plywood. The thickness of the plywood sheets is selected depending on the load on the floor covering in the room.
Features of laying laminate flooring on a wooden floor
Laying the substrate
Various types of laminate underlays are available:

Manufacturers claim that the substrate is able to level the base under the laminate. This is an exaggeration. The substrate must provide heat and sound insulation. The underlay can compensate for minimal unevenness in a leveled old wooden floor or plywood base, but no more.
Important! The substrate is laid end-to-end, the joints are fixed with tape. This way it will not move when laying the laminate.

Laying laminate
We determine the installation method: diagonally, perpendicular or parallel to the light. Laying diagonally is more often used in narrow spaces - this is one way to visually expand them.
Typically, laminate is laid perpendicular to the window - in daylight, the joints between the panels will be less noticeable, but in the case of a wooden floor, you need to focus on the direction of laying the boards. On such a floor, the laminate is laid perpendicular to the floor boards to reduce possible deflection.

To work you will need:
- Jigsaw or hacksaw.
- Plastic wedges.
- Roulette.
- Square.
- Mallet and die (for Lock locks).
- Pencil.

The first row is laid horizontally from the corner. The panels are connected at their ends. In order to maintain the required gap of 10 mm between the panels and the wall, plastic wedges are used. The last panel in the row is cut with a jigsaw or hacksaw and laid in a row. You can start the next row with the remaining piece of the panel (provided that its length is more than 200 mm), the main thing is that the seams in adjacent rows do not coincide.
Advice. To give panel offsets a more accurate appearance, a technique such as “offset by a third of the board” is used. One third is cut off from the new panel, after which it is laid.
SvatSv (Kursk)
I’m planning to put laminate flooring on an old wooden floor in the nursery, what are the pitfalls and which laminate to choose?
The process of laying the panels itself is not so complicated as to deny yourself the pleasure of making a new beautiful floor yourself. But laminate is very demanding on the base, which must be dry, clean, perfectly level and stable. Any vibrations of the lamellas during further operation will increase the load on the lock, which is the weak point of the floor covering. In addition, you need to select and lay the substrate correctly, and do not forget about the damper seam.
Let's start right away with the second part of the question, everything is described in detail there.
And now about the installation process itself.
Laying laminate flooring on a wooden base is always a risk. Over time, wood loses its mechanical qualities, so before laying laminate on it, you need to carefully check the condition of the boards and the underground structure, beams, and joists. The slightest problems should be corrected immediately.
Preparing the base
The preparatory stage begins with diagnosing the wooden base. Laminate can be laid if:
- No visual changes or damage;
- There are no areas through which moisture would penetrate to the floor;
- The base has a sufficient margin of strength and does not bend or creak while walking;
- The surface is smooth, without drops, protrusions and knots. Allowable height fluctuations are 2 mm per 2 m2.
If at least one of the points is not true, the subfloor requires repair.
Important! You should not believe the misconception that the substrate can compensate for any defects in the base.
Underlay for laminate laid on a wooden floor
Hydro-vapor barrier materials cannot be laid on a wooden base under a laminate; they interfere with air exchange and condensate, harmful to wood, accumulates under the floor covering. It is recommended to use natural cork and substrates based on it. In order to save money, they buy polypropylene.
Advice! In cases where a wooden floor has been leveled with plywood, it is possible to make a two-layer underlay, one between the subfloor and the plywood, and the second between the plywood and the laminate.
The thickness of the layer is selected based on the dimensions of the panel. A 3 mm underlay is placed under the 9 mm laminate. The substrate does not need any stationary fastenings. The material is laid in a joint, overlapping the edges on the wall, after which the remainder is cut off. The elements of the substrate are connected to each other by solid lines of tape or dots.

The necessary element is the substrate
Reference. If the floor is on the first floor and there is a wet basement underneath, plastic film is laid under the substrate with a 20 cm overlap. It will protect the coating from moisture from the inside. Maybe we need to think about
Features and nuances of laying laminate
Immediately before installation, the laminate is left in the room where it will be laid for at least two days. The temperature in the room being repaired should be within 30°C, and the humidity should not exceed 70%.
Laminate flooring is installed without nails, without self-tapping screws or glue, exclusively using the locking method. This type of masonry is called “floating”. The floor board is not fixed to the floor, but lies freely on the substrate and calmly changes dimensions when changing temperature and humidity indicators.
Ideally, the seams between the slats should be parallel to the flow of light from the window (this will help visually hide the gaps between the slats) and perpendicular to the floorboards of the subfloor, which will help to distribute the load evenly.
Technology for laying laminate flooring on a wooden floor
Laying the laminate begins from the corner farthest from the entrance, from the most visible place. The first panel is placed in the selected corner, the second is attached to it on the short side, and so on until the end of the room. The latter will most likely have to be filed, it is better to do this jigsaw, since the saw may leave small nicks. Pegs with a width of 1.1.5 cm are inserted between the panel and the wall. The trimming of the lamella that remains after laying the row is usually laid as the first element in the next row, if its length is not less than 30 cm.
Important! Between the flooring and walls, doors, pipes and other obstacles there should be a gap of at least 1 cm, but no more than 2. It is important that all gaps are of the same thickness; wedges are used for this. You can purchase them ready-made or use improvised materials, for example, pieces of drywall.
The second and subsequent rows of lamellas are assembled according to the same principle as the first and, when assembled, are connected to the previous one. When joining the locks, the lamellas are lightly knocked down, but the mallet is used not to hit the lock, but directly to the panel through a piece of another lamella.

During joining, the lamellas are lightly tapped with a mallet.
In the last row, as a rule, cutting the lamellas to width is required; this is done taking into account the damper seam and the installation is calculated in advance so that the width of the panel in the last row is more than 5 cm. Installation is carried out in the same way, by snapping the lock.
If it is necessary to cut holes for pipes, corner niches and any other shape, this is done jigsaw according to a pre-prepared template.
When the laminate flooring is ready, you can begin installing the baseboards and thresholds.
Video: Laying underlay and laminate
Laminate is a very beautiful finishing material that can make your interior very attractive and cozy. It can be used both in an apartment and in a private house. In this case, such cladding is mounted on any base, the main thing is to prepare it carefully. Laying laminate flooring on a wooden floor has some special features.
Laminate is an unpretentious material, so preparation for installation will be quick. Naturally, the base must be clean and dry. In addition, the rough layer must be stable.

The underlayment under the laminate will not be able to remove all the problems of the base.
Wooden floors have some features:
- Over time, its stability deteriorates. In this case, the laminate tiles will move, which will lead to breakage of the fasteners.
- During operation, the base may lose its mechanical properties.
This means that laminate flooring should only be installed on a wooden floor after careful preparation.
How to properly inspect the floor surface?
Material can be laid only after a thorough diagnosis of the rough foundation. This must be done correctly. Diagnostics involves checking not only the external surface of the floor, but also its internal frame.
It is necessary to disassemble the wooden base only if the fault cannot be eliminated.
A visual inspection of the boards will help you detect unevenness and minor damage. By tapping you can determine if there are any cracked or rotten elements. How level the base is is checked by the building level.
Laminate flooring should be laid on a wooden floor if:
- The floor surface is smooth, without any knots or protrusions. In this case, the difference in height should be no more than 2 mm per 2 m.
- There are no squeaks.
- The base has a sufficient margin of safety.
- The boards do not sag while walking.
- No damage was found on the coating, for example: cracks, large gaps between boards, rotten elements.
How to properly prepare the base?
Before you lay laminate flooring, you need to eliminate all the shortcomings that the old floor has:
- If you find rotten elements, then it all depends on the degree of damage. To eliminate a small defect, you just need to clean the board, turn it over and lay it with the wrong side up. Otherwise, the element will need to be replaced.
- Creaking or sagging can be eliminated by tightly securing the boards with self-tapping screws. Please note that the fastener heads will need to be recessed inward. Otherwise, problems with scraping and grinding may occur.
- If there is a defect in the joists, for example, they are loose, then they will need to be properly secured. To do this, you need to make a small hole through the wooden element, and then fix it to the screed using anchors.
- A large difference in height can only be eliminated by global dismantling of the frame.
- If you notice large enough gaps between the floorboards, it means they have simply dried out. This problem can be eliminated with polyurethane foam.
 You can lay laminate flooring on a wooden floor only after preparing the base - it is smooth, has no cracks or crevices, and there is no creaking. Boards and joists should not be rotten, the floor surface should be sanded.
 Features of base leveling
Before laying laminate flooring, you need to check the level of the floorboards. A small difference in height can be removed in two ways:
- . After this procedure, you should definitely check the level using special devices.
- Laying plywood. This alignment method is the simplest, but everything needs to be done correctly. First you need to level the subfloor. To do this, wooden wedges should be placed under the joists. In some cases, plastic elements can be used. It is necessary to lay plywood, constantly monitoring its horizontalness. If necessary, slats can be placed under this material.
Sheets of plywood are attached to the base so that the seams meet in different places.
This material must be fixed using self-tapping screws every 15 centimeters. This is necessary so that the plywood sheets fit tightly to the base.
 The photo shows the process of installing plywood on a wooden base. Pay attention to the location of the seams between the sheets.
 The material should be laid taking into account the technological gap between it and the walls. The fact is that wooden elements can expand and contract under the influence of temperature and moisture. Try to keep the seams as small as possible along the boards. To prevent plywood sheets from being subject to fungal growth, they must be well treated with antiseptic agents or drying oil.
After completing the work, you need to vacuum the floor well. Otherwise, remaining dust may cause squeaking after laying the laminate.
Installation technology

After all the preparatory work, you can lay the laminate on a wooden floor. This process cannot be called very fast. It provides for the following actions:
- Installation of the substrate. Before this, a waterproofing polyethylene film is laid on the plywood base. You can lay a special underlay for laminate on it. It not only compensates for all unevenness, but also provides good sound and thermal insulation. This is especially important if the rough layer is already old.
- Laying the first row. Now you can lay the planks on the old plank floor. It is correct to start work from the corner. The panels should be joined end to end, while always trying to ensure that the elements are aligned with the walls. During work, do not forget about the technological gaps between the wall and the slats. To ensure that they are the same, you can use special wooden stops. After you have managed to lay the laminate to the opposite wall, you need to measure the required length of the last panel and cut off the excess part. A jigsaw is used for this.
 Laying technology for the first and second rows.
 - The following rows must be laid offset. That is, the end seams between the elements of both rows should not coincide. To do this, first of all, you need to lay the plank that remains after trimming the material in the first row. But keep in mind that this fragment should not be shorter than 20 cm.
- If necessary, you can use a block and a mallet to join two rows.
- It is necessary to continue collecting the coating, constantly monitoring the correct installation.
- Before you start laying the panels of the last row, they can be trimmed a little lengthwise. Naturally, this must be done very carefully, although the cut will be hidden under the baseboard.
As you can see, laying laminate flooring on a wooden floor with your own hands is done quite quickly. But this is only possible if the installation technology is followed. If you are not confident in your abilities, it is better to contact specialists.
From the author: Hello, dear reader. Do you have a wooden floor and have you decided to install laminated boards on it? Is it possible to do this? Of course you can. And even necessary. Wood is an ideal base for laying such flooring. But everything has its own nuances. If you don't follow certain rules, your floors may soon need to be replaced again. So, today we will talk about what it means to lay laminate flooring on a wooden floor, and how to do it correctly.
Why a wooden base?
Everything is simple here. Wood, for all its advantages (strength, environmental friendliness, etc.), has another important property. Under the influence of changes in the percentage of humidity and temperature, it can either increase or contract. Of course, this cannot be seen with the naked eye, but when working with the material it is necessary to take this into account.
Since laminated boards are a “floating” type of floor covering (i.e., not secured by anything - there is no need to secure it!), it does not prevent the floor boards from changing their size. And since the laminate also contains wood, it is also sensitive to changes in temperature and humidity percentage. A wooden floor will also not prevent the coating from changing sizes. It turns out to be a complete idyll.
For residential premises there are usually 31–32 classes labeled AC3 and AC4 respectively. In the kitchen or hallway, that is, in those places where moisture can get on the surface, it is recommended to lay a material made using HDF. Some types of such covering can even be laid in the bathroom.

After you have bought the boards and returned home inspired with your purchase, you should not rush to install it. Allow the material to acclimatize - “get used” to the temperature and humidity in the room. To do this, leave it there for about two days. Only then start styling.
Preparing the base for installation
Everyone knows that any flooring should be laid only on a flat surface. Therefore, if you are thinking about how to install boards on an uneven wooden floor, you will have to forget about it. Only a flat base will do. According to the standard, differences should not be more than 2 mm per 2 m². In this case, the slope should be distributed over 2 m, at least, and be no more than 4 mm.
If these indicators are exceeded, be prepared for the fact that the new flooring will become unusable within a couple of years. The laminated boards themselves are quite durable, but if the operating rules are violated, they quickly become unusable. This must be taken into account.
Here is another important fact about the strength of laminated boards: the strength of the base determines the class (31, 32, maybe even 33). And the AC indicator speaks about wear resistance. Not all consumers know about this, so some “enterprising” manufacturers take advantage of it. Especially from China.
 Source: http://masterskayapola.ru
For example, on the packaging they can write: “Class 33,” but the AC indicator will be the same as that of class 32 or 31, i.e. AC3–AC4. In other words, it's effectively a 31 or 32 grade, but with a slightly stronger base. Be sure to pay attention to the presence of the AC indicator when purchasing.
Let's prepare the base. At first glance, it may seem that everything is fine with the floor. But this is deceptive. The rule “trust, but verify” has not been canceled. Therefore, it is necessary to carefully inspect the floor and underground space.
And for this it would be good, neither more nor less, to disassemble it and check the logs, and at the same time each of the boards. In general, you can check the floorboards simply by tapping them with a hammer. If you hear a dull sound, then most likely it is rotten. If the heads of the nails that secure it are rusty, the same thing. You need to get rid of such boards without regret.

If the work is carried out in a city apartment, then there will be an old one under the floor. You may find cracks on it that need to be repaired. In particularly advanced cases, a new screed is generally poured.
You can, of course, do something more radical. For example, completely removing a wooden structure and pouring a solid concrete floor. But this is a slightly different area, because now we are talking about the reconstruction of a wooden floor.
If renovations are being carried out in a private home, most likely you have a high underground. This is cool! You don't have to disassemble the entire floor, but check it from underneath. In this case, carefully inspect the logs. Take a long-pointed awl and pierce it along its entire length to identify rotten areas. If one is found, it must be cut out and replaced with a new piece. By the way, it must be treated with an antiseptic.
All floorboards must be securely fixed. Usually they are simply nailed, but for more reliable fixation you need to use self-tapping screws. In this case, their caps should be “recessed” into the wood by a couple of millimeters. Old boards that are in good condition are best turned face down and fixed in this position. At the same time, do not forget to use a building level at all stages of work.

Now you can eliminate minor unevenness using a sanding machine. The gaps between the boards can (and even should) be filled with polyurethane foam or covered with wood glue mixed with wood shavings in a one-to-one ratio. Keep in mind that before laying laminated boards on a wooden base, you need to make sure that it is level and strong enough. No floorboard should squeak or sag.
Sometimes the optimal solution is to level the surface using OSB. This is a fairly durable and environmentally friendly material - something between chipboard and plywood. If you decide to use it, be sure to leave a distance of approximately 3 mm between the plates and ±12 mm from the walls.
But you need to take into account that in this case the floor level will rise, therefore, the ceiling will become lower. Therefore, in rooms with low ceilings it is worth considering whether OSB should be used.

In addition to using OSB, there is another solution. You can lay new boards of the same thickness on top of the old boards. They must be laid “in a cross”, that is, perpendicular to the old floorboards. But it will likely take even more away from the ceiling height than OSB. Although this will reliably “strengthen” your floor.
Now I will tell you how to lay flooring correctly. Do not forget to thoroughly clean the surface of small debris before installation. To do this, use a vacuum cleaner.
Laying process

When laying, do not forget about the backing. It cannot be laid under linoleum, but it must be laid under laminated boards. Here are some of the functions that the substrate performs:
- sound insulation;
- thermal insulation;
- leveling minor surface imperfections.

In addition, it helps preserve the flooring itself. You can't skimp on the substrate. Forget about cheap roll backing, which is usually sold by the meter. Over the course of several years of use, laminate boards will simply be destroyed, after which they themselves will become unusable.
: , polystyrene foam, coniferous. Please note that it is not required to be fixed to the walls or floor. However, like the coating itself. You can only grab it at the joints with masking tape. And then, this is not necessary.
First, let's install the spacers, since the coating can be installed correctly only by maintaining the expansion gap. What it is? We have already said that as humidity and temperature change, wood can expand and contract. So, this is, roughly speaking, a gap between the wall and the floor covering, which is needed so that the material has somewhere to “grow”. Otherwise, the joints may acquire an Λ-shape, which is extremely undesirable.

In the rather extensive list of floor coverings, there are not too many options that are compatible with a wood base. True, if you follow special rules, you can lay almost anything. But a laminated floor, constructed using the floating principle, is ideal for furnishing a house built over a structure made of beams, joists, and boards. However, compatibility does not save independent craftsmen from studying the nuances according to which laminate flooring is laid on a wooden floor, and from the need to remember the specifics of ever-moving wood.
Can laminate flooring be installed on wood floors?
Laminated panels are bonded only to each other; there is no need to attach them to static building structures, that is, to the floor or walls. Built using a floating design, the floor rests freely on the sub-base, allowing it to expand and contract. And it, in turn, does not prevent the laminate from changing its geometric parameters following temperature changes and humidity fluctuations.
The design specificity of laminated boards makes it possible to do without adhesives that hermetically seal the butt seams. Although adhesive technology exists, it is used extremely rarely due to labor intensity, significant consumption of glue and the inability to disassemble and reassemble permanently joined panels in another place. Glueless, the most popular fastening method, pleases both the wooden base and the owners of country property with excellent spontaneous aeration necessary for ventilation of the components of the wooden structure. An excellently ventilated floor covered with laminate through the seams lasts longer and does not rot.
Despite the artificial origin of the laminated coating, its behavior during operation is not much different from the behavior of lumber. After all, its main element is made of MDF panels, chipboard, HDF and similar boards created by pressing wood products. The base of a laminate floor is an important characteristic that determines the scope of use of the material. In theory, laminate flooring is not recommended for installation in rooms where wet cleaning must be carried out regularly. It is allowed to arrange bedrooms, children's rooms, offices, and living rooms. However, flooring made with HDF is considered moisture resistant and can be laid on floors in hallways and even kitchens.
Note. For flooring in rooms with typical wet conditions, a laminated floor of class 33 on the wear resistance scale is suitable, but its cost rarely suits the owners of country houses.

Rules for preparing a wooden base for installation
There are general requirements for the characteristics of the surface being developed. According to the instructions of SNiP with the number 3.04.01-87 assigned to the normative collection, for laying laminated coverings:
- a leveled surface is required, the differences in relief of which do not exceed 2 mm within an area of 2 m²;
- allow a maximum slope of 4mm, evenly distributed over 2m in any direction.
You should not deviate from the instructions regulated by technical regulations, since failure to comply will damage the sensitive locking system. The grooves will become loose, the fragile thin ridges will break, the floor will not last long and will have to be re-laid.

You can, of course, partially change the elements if only a few boards are damaged, but the repair procedure will require a lot of effort. In such situations, the laminated panels are dismantled to the restoration site, then the broken elements are replaced and laid again in the reverse order. If the laminated planks are damaged multiple times, partial replacement is out of the question. At best, a few boards will be preserved, which can be used to arrange storage rooms, closets, and compact covered verandas.
Before laying laminate panels on a wooden subfloor, it is mandatory to inspect the base. The scope of work is determined, as a result of which the base, brought into full order, will be ready to install the covering on its reinforced “shoulders”.
Preparation actions depend on the degree of wear of the wooden structure:
- Old plank floor will have to be disassembled down to the support beam, because over the years of its long-term operation, sensitive natural organic matter could suffer from excess moisture or become infected with fungus. It is impossible to find out through the floorboards what the real condition is if the wooden floor is not the ceiling of a spacious basement. Those with a high underground are lucky. It will provide an opportunity to examine and repair ceiling parts without tedious dismantling. We carefully examine the entire list of structural elements. We cut out doubtful sections of beams and joists and replace them with new timber. The boards removed from the floor with a low subfloor, which inspire confidence in their reliability, are turned over with the unworn inside out, laid again, and the cracks filled with foam or repair compound. We replace old, worn-out boards without regret. We will “go through” the floorboards secured in the bottom using a scraping machine. All structural components of a long-established wooden floor must be carefully treated with antiseptic impregnation and fire retardant. Nowadays it is easy to buy a mastic that performs both functions that are significant for wood.
- New plank floor There is also no need to scrupulously diagnose it, since it was built not so long ago and is probably covered with compounds that protect against putrefactive bacteria and fire. Therefore, preparing to lay laminate flooring on a newly constructed wooden floor will not take much time and labor effort from the contractor. We check the fasteners, change or repair loose fasteners, “sink” nails or screws a couple of mm into the floorboards. We foam or fill the cracks with wood glue, mixed in half with sawdust, and scrape if necessary.
- Floor with structural defects needs to be improved. It is very difficult to determine in advance the range of actions in such cases, because the situation can have a lot of different reasons. For example, if the floorboards sag, the joist system will need to be strengthened by additionally installing timber or replacing the boards with thicker material. It is often more profitable and easier to lay another row of boards of similar thickness on top, laid “cross” to the previous layer. The latter measure is acceptable if the additional subfloor, together with the laminate and underlay, does not take away too many cm, which are very necessary for a limited space, from the ceiling height.

You can level the rough wood base with plywood, GVLV, OSB sheets or by placing pieces of roofing felt under the joists, as well as glassine rolled into several layers. You can purchase a “constructor set” from Knauf with a full set of fasteners, supports and plywood sheets. The method is chosen based on economic considerations and ease of implementation.
Laying technology for laminated boards
We invite you to watch the thematic video:
It is impossible to cover the wooden rough base with vapor or waterproofing, it will interfere with ventilation. Condensation harmful to wood will accumulate under the insulation. But if nothing can break the burning desire to isolate, it is better to use a diffusion membrane.
Before laying, you will only need to lay the underlay; it is advisable to choose a natural material for this. For the sake of the safety of the wooden structure, it is worth forgetting about the high prices for cork and the bitumen-cork or bitumen-rubber pressed options created with its use. The thickness of this layer is selected based on the same parameter of the laminated panel. Typically, strips of 3mm underlay without overlaps are placed under an 8mm laminate. No permanent fastenings to the walls or to the base are needed, only gluing with tape in periodic dots or solid lines.

Note. The choice of direction for laying out laminated boards is influenced not so much by the preferences of the owners as by the direction of the existing floorboards. Laminate panels should lie across the boards. This means that the strips of substrate located under the coating need to be laid lengthwise.
Let’s assume that it has already been decided how we will lay the laminate panels, an elementary plan has been drawn out by hand in advance and a rational scheme has been selected. There is plenty of information about methods, rules and layout options on the website. Here are a couple of articles on the topic:
You can join the boards by gradually increasing the coverage of each piece separately or by joining pre-assembled rows. The preferred method is usually specified by the material manufacturer, and we examine the individual algorithm.

Actions of the installer when assembling a laminate floor piece by piece:
- Let's position ourselves in the starting corner, usually the corner farthest from the doorway, taking 4 panels with us. For two of them (1st and 3rd), planned for installation against the wall, you must first cut off the ridge. We do not touch the groove; it is always directed towards the stacker.
- Let us first outline the distance by which we will move the panels in adjacent rows in order to avoid cross intersections and thereby increase the reliability of the connections. The recommended offset for the offset is no less than 30 cm. We will shorten the second board by this amount.
- Using the method specified by the manufacturer, depending on the type of Click or Lock locking system, we join the 1st and 3rd panels, then attach a piece of the 2nd board to them, then the 4th uncut board.
- We move the assembled floor segment to the designated location, installing spacers approximately 1 cm thick between it and the adjacent walls. They will provide the clearance required for the laminate to move during thermal expansion.
- We extend the first row with the 5th board with a cut ridge, then extend the second strip of covering with the 6th.
- By analogy, we follow until the successful completion of laying the first two rows, not forgetting to cut off the ridge facing the wall. We cut the boards that complete both strips according to precisely measured distances. To snap the last ones into the rows of elements, we use a special mounting bracket.
- Next, we follow the course we have learned, only there is no need to trim the ridges anymore.
- We measure the panels of the last row at the place of installation and cut them taking into account the temperature indentation, attach them and snap them into place using a clamp.

Methods of bypassing pipes, methods of laying under radiators and arranging doorways correspond to standard rules for covering laminate floors.
Important point. In a large room, the temperature gap should be left not only along the walls. It is formed every 10 m, measured in width, and 8 m in length. The expansion joint is left in the opening along the axis of the closed door leaf. The gap after installation is closed with a profile made of plastic or aluminum.

Absolutely simple rules that explain how to economically lay a laminated flooring with your own hands will help you perfectly decorate your countryside and city property. And for those who did not intend to do the construction themselves, knowledge of the technology will help them competently monitor the actions of builders who are not always diligent.
