The wire connection is better. Methods of connecting wires: from twisting to soldering. What to do if there are several wires
All electrical engineering, since the time of Faraday, uses wires. And for as many years as wires have been used, electricians have been faced with the problem of connecting them. This article explains what methods there are for connecting conductors, and the advantages and disadvantages of these methods.
Twist connection
The easiest way to connect wires is twisting. Previously, this was the most common method, especially when wiring in a residential building. Now, according to the PUE, connecting wires in this way is prohibited. The twist must be soldered, welded or crimped. However, these methods of connecting wires begin with twisting.
In order to perform high-quality twisting, the connected wires must be cleared of insulation to the required length. It ranges from 5 mm when connecting wires for headphones to 50 mm if it is necessary to connect wires with a cross-section of 2.5 mm². Thicker wires are usually not twisted together due to their high rigidity.
The wires are stripped with a sharp knife, insulation stripping pliers (ISR) or, after heating with a soldering iron or lighter, the insulation is easily removed with pliers or side cutters. For better contact, bare areas are cleaned with sandpaper. If the twist is supposed to be soldered, then it is better to tin the wires. Wires are tinned only with rosin and similar fluxes. This cannot be done with acid - it corrodes the wire and it begins to break at the soldering site. Even washing the soldering area in a soda solution doesn’t help. Acid vapors penetrate under the insulation and destroy the metal.
The stripped ends are folded parallel into one bundle. The ends are aligned together, the isolated part is held firmly with your hand, and the entire bundle is twisted with pliers. After this, the twist is soldered or welded.
If there is a need to connect the wires to increase the total length, then they are folded opposite each other. The cleaned areas are placed crosswise on top of each other, twisted together by hand and tightened tightly with two pliers.
You can only twist wire made of the same metal (copper with copper, and aluminum with aluminum) and of the same cross-section. Twisting wires of different sections will turn out uneven and will not provide good contact and mechanical strength. Even if it is soldered or crimped, these types of wire connections will not ensure good contact.

How to connect electrical wires by soldering
Connecting electrical wires by soldering is very reliable. You can solder untwisted wires, but such soldering will be fragile due to the fact that the solder is a very soft metal. In addition, it is very difficult to lay two conductors parallel to each other, especially when suspended. And if you solder on some kind of base, the rosin will stick the soldering area to it.
A layer of rosin is applied to the pre-tinned and twisted conductors with a soldering iron. If another flux is used, it is applied in the appropriate manner. The power of the soldering iron is selected based on the cross-section of the wire - from 15 W when soldering headphones to 100 W when soldering twisted wires with a cross-section of 2.5 mm². After applying the flux, tin is applied to the twist with a soldering iron and heated until the solder completely melts and flows into the twist.
After the soldering has cooled, it is insulated with electrical tape or a piece of heat-shrinkable tubing is put on it and heated with a hairdryer, lighter or soldering iron. When using a lighter or soldering iron, be careful not to overheat the heat shrink.
This method reliably connects wires, but is only suitable for thin wires, no more than 0.5 mm², or flexible ones up to 2.5 mm².


How to connect headphone wires
Sometimes the cable near the plug breaks off in working headphones, but there is a plug from faulty headphones. There are also other situations in which it is necessary to connect the wires in the headphones.
To do this you need:
- cut off a broken plug or an unevenly torn cable;
- strip the external insulation by 15–20 mm;
- determine which of the internal wires is common and check the integrity of all conductors;
- cut the internal wiring according to the principle: leave one alone, common by 5 mm and the second by 10 mm. This is done to reduce the thickness of the connection. There can be two common conductors - each earphone has its own. In this case they are twisted together. Sometimes a screen is used as a common conductor;
- strip the ends of the wires. If varnish is used as insulation, it will burn off during the tinning process;
- tin the ends to a length of 5 mm;
- put a piece of heat-shrink tubing on the wire 30 mm longer than the expected length of the connection;
- put pieces of thinner heat-shrinkable tube 10 mm long on the long ends, do not put on the middle (general) ends;
- twist the wires (long with short, and middle with middle);
- solder the twists;
- bend the soldered twists outward to the unprotected edges, slide pieces of thin heat-shrinkable tubing onto them and heat it with a hairdryer or lighter;
- Slide a larger diameter heat-shrinkable tube onto the joint and warm it up.
If everything was done carefully and the color of the tube was matched to the color of the cable, then the connection will be invisible and the headphones will work no worse than new ones.
How to brew twist
For good contact, the twist can be welded with a graphite electrode or a gas torch. Torch welding has not become widespread due to the complexity and the need to use gas and oxygen cylinders, so this article only talks about electric welding.
Electric welding is performed using a graphite or carbon electrode. Graphite electrode is preferable. It is cheaper and provides better welding quality. Instead of a purchased electrode, you can use a rod from a battery or a brush from an electric motor. It is better not to use copper electrodes. They often get stuck.
For welding, you first need to make a twist 100 mm long, so that the finished one turns out to be about 50. The protruding wires need to be trimmed. For welding, it is best to use an inverter welding machine with adjustable current. If this is not the case, then you can take a regular transformer with a power of at least 600 W and a voltage of 12–24 V.
Near the insulation, “ground” or “minus” is connected using a thick copper clamp. If you simply wrap a wire around a twist, the twist will overheat and melt the insulation.
Before starting welding, it is necessary to select the current. The required current varies depending on the number and thickness of the wire that makes up the twist. The welding duration should be no more than 2 seconds. If necessary, welding can be repeated. If everything was done correctly, then a neat ball will appear at the end of the twist, soldered to all the wires.


How to connect wires by crimping
Another way to connect wires is crimping. This is a method in which a copper or aluminum sleeve is placed on the wires or cables to be connected, and then crimped with a special crimper. For thin sleeves, a manual crimper is used, and for thick ones, a hydraulic one is used. This method can even connect copper and aluminum wires, which is unacceptable with a bolted connection.
To connect using this method, the cable is stripped to a length greater than the length of the sleeve, so that after putting on the sleeve, the wire sticks out 10–15 mm. If thin conductors are connected by crimping, then twisting can be done first. If the cable has a large cross-section, then, on the contrary, in the stripped areas it is necessary to align the wire, fold all the cables together and give them a round shape. Depending on local conditions, the cables can be folded with the ends in one direction or in the opposite direction. This does not affect the reliability of the connection.
A sleeve is tightly placed on the prepared cables or, when laid in opposite directions, the wires are inserted into the sleeve from both sides. If there is still free space in the sleeve, it is filled with pieces of copper or aluminum wire. And if the cables do not fit in the sleeve, then a few wires (5–7%) can be cut off with side cutters. If you do not have a sleeve of the required size, you can take a cable lug by sawing off a flat part from it.
The sleeve is pressed 2–3 times along its length. The crimping points should not be located at the edges of the sleeve. It is necessary to retreat 7–10 mm from them so as not to crush the wire during crimping.
The advantage of this method is that it allows you to connect wires of different sections and from different materials, which is difficult with other connection methods.


A fairly common connection method is a bolted connection. For this type you need a bolt, at least two washers and a nut. The diameter of the bolt depends on the thickness of the wire. It should be such that a ring can be made from the wire. If wires of different sections are connected, then the bolt is selected according to the largest one.
To make a bolted connection, the end is cleared of insulation. The length of the stripped part should be such as to make a ring that fits onto the bolt using round pliers. If the wire is stranded (flexible), then the length should allow, after making the ring, to wrap the free end around the wire near the insulation.
In this way, you can connect only two identical wires. If there are more of them, or they are different in cross-section, rigidity and materials (copper and aluminum), then it is necessary to install conductive, usually steel washers. If you take a bolt of sufficient length, you can connect any number of wires.

Terminal block connection
A development of the bolted connection is the terminal connection. Terminal blocks come in two types - with a rectangular pressure washer and with a round one. When using a terminal block with a pressure washer, the insulation is removed to a length equal to half the width of the terminal block. The bolt is released, the wire is slipped under the washer and the bolt is clamped again. On one side, you can connect only two wires, preferably of the same cross-section and only flexible or only single-core.
Connecting to a terminal block with a round washer is no different from using a bolted connection.
The connection of the wires is reliable, but cumbersome. When connecting wires with a cross-section of more than 16 mm², the connection is unreliable or the use of lugs is necessary.

Self-clamping terminal blocks WAGO
In addition to terminal blocks with bolts, there are also terminal blocks with clamps. They are more expensive than usual, but they allow the connection to be made much faster, especially in connection with the new requirements of the PUE and the ban on twisting.
The most famous manufacturer of such terminal blocks is WAGO. Each terminal is a separate device with several holes for connecting wires, each of which is inserted into a separate wire. Depending on the version, it connects from 2 to 8 conductors. Some types are filled inside with conductive paste for better contact.
They are available for both detachable and permanent connections.
The stripped wire is simply inserted into the terminals for a permanent connection and spring tendrils fix the wire inside. Only hard (single-core) wire can be used.
In plug-in terminals, the wire is clamped using a folding lever and a spring clamp, making it easy to connect and disconnect wires.
Since the wires do not touch each other, the terminals allow you to connect wires of different sections, single-core to stranded, copper to aluminum.
This method of connecting conductors has proven to work best at low currents and is most widespread in lighting networks. These terminals are small in size and easily fit into adapter boxes.

How to connect electrical wires with lugs
Another way is to use tips. The tip looks like a piece of tube, cut and turned flat on one side. A hole for a bolt is drilled in the flat part. The lugs allow you to connect cables of any diameter in any combination. If it is necessary to connect a copper cable to an aluminum cable, special lugs are used, in which one part is copper and the other is aluminum. It is also possible to place a washer, brass or tinned copper, between the tips.
The ferrule is pressed onto the cable using a crimper, similar to how wires are connected using crimping.


Soldering tips
Another way to use the tip is to solder it. To do this you need:
- stripped copper cable;
- tip designed for soldering. It is distinguished by a hole near the flat part and a thinner wall;
- bath of molten tin;
- a jar of phosphoric acid;
- a jar of soda solution.
Carefully! Wear protective glasses and gloves!
In order to solder the tip, the cable is cleared of insulation along the length of the tubular part and inserted into the tip. Then the tip is successively immersed in orthophosphoric acid, in molten tin for a time sufficient for the acid to boil away and the solder to flow into the tip. This is checked by periodically briefly removing it from the solder. After impregnating the tip and cable with solder, the tip is dipped in a soda solution. This is done to neutralize acid residues. The cooled tip is washed with clean water and is ready for further work. Such a tip can be connected to aluminum busbars and lugs without the use of adapter washers.
Connectors for cables and wires
Cables can also be connected using special connectors. These are sections of pipe in which threads are cut and bolts are screwed in. There are detachable connectors, in which the bolts are unscrewed, and permanent ones. In permanent connectors, the bolt heads break off after clamping. There are also connectors designed to connect wires and cables of different sections. The cables are inserted end-to-end into the connectors, facing each other.
Connectors used on overhead power lines consist of two halves connected by bolts. The wires are laid in special grooves towards each other, parallel to each other, after which both halves are clamped with bolts.


Connecting wires and cables using couplings
If the cable to be connected is in the ground, water or rain, then conventional methods of isolating the connection are not suitable. Even if you apply a layer of silicone sealant to the cable and compress it with heat-shrink tubing, this will not guarantee tightness. Therefore, it is necessary to use special couplings.
Couplings are available in plastic and metal casings, poured and heat-shrinkable, high-voltage and low-voltage, regular and small-sized. The choice of coupling depends on the specific operating conditions and the presence or absence of mechanical loads.


Connecting wires and cables is one of the most important points in electrical installation. Therefore, all methods of connecting electrical wires must ensure good contact. Poor contact or poor insulation may result in short circuit and fire.
Video on the topic
Power terminal
Soldering wires in headphones
Electricity is not an area where you need to save. It is advisable to do everything carefully, select high-quality materials, and take a balanced approach to the choice of sizes/diameters/values. Let's start with the fact that even the conductors must be connected correctly. And choosing ways to connect wires is not as easy as it seems.
There are about a dozen ways to connect wires. In general, they can be divided into two groups: those that require special equipment or specific skills and those that can be successfully used by any home craftsman - they do not require any special skills.
The first group includes:
- Soldering. When connecting wires of small diameter in the amount of 2-3 pieces, this is a very reliable method. True, it requires a soldering iron and some skills in using it.
- Welding. You need a welding machine and special electrodes. But the contact is reliable - the conductors are fused into a monolith.
- Crimping with sleeves. You need sleeves and special pliers. The sleeves are selected according to certain rules that you need to know. The connection is reliable, but it will have to be cut to re-seal.
All these methods of connecting wires are performed mainly by specialists. If you have skills in handling a soldering iron or welding machine, after practicing on unnecessary scraps, you can make them yourself.

Some methods of connecting wires are more popular, others less so.
Methods of connecting wires that do not require any specific skills are becoming increasingly popular. Their advantage is quick installation and reliable connection. Disadvantage - you need “connectors” - terminal blocks, clamps, bolts. Some of them cost quite a lot of money (Wago terminal blocks, for example), although there are also inexpensive options - screw terminal blocks.
So here are ways to connect wires that are easy to implement:

There are two opposing opinions among professionals. Some believe that new methods of connecting wires - clamps - are the best solution, as they speed up installation without compromising the quality of the connection. Others say that the springs will eventually weaken and contact will deteriorate. In this matter, the choice is yours.
Technical nuances of different types of wire connections
All types of wire connections described above are used when laying electrical wiring, but the specific type is selected based on several characteristics:

Let's consider each connection method, the technology for its implementation and the advisability of use in various situations.
Soldering electrical wires
One of the oldest and most widespread types of connection. To work you will need rosin, solder and a soldering iron. The soldering process is as follows:

Actually, this completes the soldering of electrical wires. Not the most difficult process but it requires certain skills. The main thing is to heat the joint enough so that the solder flows between all the wires. In this case, you must not overheat, otherwise the insulation will melt. This is where the art lies - not to burn the insulation, but to ensure reliable contact.
When can soldering be used? This method of connecting wires works well in low-current electrical applications. When connecting wires in a junction box, it is no longer very convenient. Especially if there are a lot of wires and/or they are of large diameter. Soldering such a twist is not a task for beginners. In addition, when trying to make a connection in a junction box, the soldering begins to break down. To the point where some wires fall off. In general, the method is good for connecting conductors of small diameters.
Welding conductors in electrical connections
One of the most reliable methods of connecting wires is welding. During this process, the metal of individual conductors is brought to the melting point, mixed, and after cooling it forms a monolith. This method works very well with large diameters or with a large number of connected conductors. It is distinguished by not just excellent contact, which does not weaken or change its characteristics over time. It is also mechanically very strong - the fused part does not allow the connection to fall apart even under heavy loads.

A drop at the end of the twist is molten aluminum
There are also disadvantages. The first is that the conductors are fused, that is, the connection is absolutely permanent. If you need to re-seal it, you have to remove the fused part and start all over again. To be able to do this, you must always leave a small gap along the length of the wires. The second drawback is that you need a welding machine, skills in handling it, and special electrodes for welding aluminum or copper. The main task in this case is not to burn the insulation, but to melt the conductors. To make this possible, they are stripped of about 10 cm of insulation, tightly twisted into a bundle, and then welded at the very end.
Another disadvantage of welding wires is that it is a labor-intensive process, which also requires pinpoint precision in handling the welding machine. Due to the combination of these qualities, many professional electricians do not like this method. If you do the wiring “for yourself” and know how to handle the equipment, you can spend some time. Just practice first on scraps, select the current strength and welding time. Only after you get everything perfect several times can you start welding wires “in real life”.
Crimping
Another method that requires special equipment is crimping wires with sleeves. There are copper and aluminum sleeves of different diameters. The material is selected depending on the material of the conductor, and the size is selected according to the diameter and number of wires in a particular connection. They should fill almost the entire space inside the sleeve, but there should still be free space. The quality of contact depends on the correct choice of sleeve size. This is the main difficulty with this method of connecting wires: the sleeve should not be too large or too small.

The technology of work is as follows:
- The conductors are stripped of insulation (the length of the stripped section is slightly longer than the length of the sleeve).
- Each conductor is stripped to bare metal (we remove oxides with fine-grain sandpaper).
- The wires are twisted and inserted into the sleeve.
- They are crimped with special pliers.
It seems to be simple, but it is in the selection of the sleeve and the presence of pliers that the whole difficulty lies. You can, of course, try to crimp it with pliers or pliers. But it is impossible to guarantee normal contact in this case.
Twist
In the first section of the article, we deliberately omitted twisting the wires. According to the current standard, it cannot be used, since it does not provide proper contact and reliability of the connection. This method can replace any other methods of connecting wires.
Yes, wiring was done on twists 20-30 years ago and everything worked perfectly. But what were the loads on the networks then, and what are they now... Today, the amount of equipment in an ordinary apartment or private house has increased significantly, and most of the equipment is demanding on power supply. Some types simply will not work at reduced voltage.

Why is twisting so bad? Wires twisted into a bundle do not make good enough contact. At first, everything is fine, but over time the metal becomes covered with an oxide film, which significantly worsens the contact. If there is insufficient contact, the joint begins to heat up; an increase in temperature causes more active formation of an oxide film, which further worsens the contact. At some point, the twist becomes very hot, which can lead to a fire. It is for this reason that it is better to choose any other method. There are some that can be done even faster and easier, but which are more reliable.
Connection insulation
All the methods of connecting wires described above - welding, soldering, crimping with a sleeve - provide for their insulation, since the exposed conductors must be protected. For these purposes, electrical tape or heat-shrinkable tubes are used.
Everyone probably knows how to use electrical tape, but we’ll tell you a little about heat-shrinkable tubes. This is a hollow polymer tube, which, with increasing temperature, significantly reduces its diameter (2-6 times, depending on the type). The size is selected so that the pre-shrink volume is larger than the diameter of the insulated wires, and the post-shrink volume is smaller. In this case, a tight fit of the polymer is ensured, which guarantees a good degree of insulation.

Heat-shrinkable tubes for insulating conductors can be of different diameters and colors
In addition to size, heat shrink tubes are selected according to special characteristics. They are:
- heat resistant;
- light-stabilized (for outdoor use);
- oil-gasoline resistant;
- resistant to chemicals.
The cost of heat-shrinkable tubes is not very high - from $0.5 to $0.75 per 1 meter. Their length should be slightly longer than the length of the bare conductors - so that one edge of the tube stretches over the insulation of the conductors by about 0.5 cm, and the other sticks out by 0.5-1 cm. After the tube is stretched, take a heat source (you can use a lighter) and heat the tube. The heating temperature can be different - from 60°C to +120°C. After the joint is tightened, the heating stops, after which the polymer quickly cools.

Insulating wires with heat-shrinkable tubing takes little time—seconds count—and the quality of the insulation is high. Sometimes, for greater reliability, two tubes can be used - a slightly smaller and a slightly larger diameter. In this case, first one tube is put on and warmed up, then the second. Such connections can be used even in water.
Terminal blocks
This method is also preferred by electricians, but can be easily used by a person who can hold a regular screwdriver. This is one of the first ways to connect electrical wires without soldering. Today, on almost every electrical appliance you can see a version of this connection - this is the output block to which the power cord is connected.
Terminal blocks are a contact plate that is sealed in a plastic (polymer) or carbolite housing. They cost very little and are available in almost any store that sells electrical goods.

Terminal blocks are convenient, inexpensive, allow you to connect copper and aluminum wires, conductors of different diameters, single- and multi-core
The connection occurs literally in seconds. The insulation is removed from the conductor (approximately 0.5-0.7 cm), and the oxide film is removed. Two conductors are inserted into the socket - one opposite the other - and secured with bolts. These bolts press the metal against the contact plate, making the connection.
The advantage of this connection method: you can connect wires of different sections, single-core to multi-core. The disadvantage is that only a pair of wires are connected. To connect three or more, jumpers must be installed.
PPE caps
Another way to connect wires that does not require special skills is to install PPE caps. They are a plastic cone-shaped body with a spring sealed inside. They come in different sizes - from 0 to 5. You can connect wires of different diameters - on each package the minimum and maximum and minimum total cross-section of the wires to be connected is written. In addition, there are cases simply in the form of a cone, and some with stops “ears” that make their installation easier. When choosing, pay attention to the quality of the plastic - it should not bend.
Connecting wires using PPE is very simple: strip the insulation, collect the wires into a bundle, insert them inside the cap and start twisting. A spring inside the cap grips the conductors, helping to twist them. The result is a twist, which is wrapped around the outside with spring wire. That is, the contact turns out to be very high quality and good. This method of connecting wires with PPE caps has been used for a long time in Europe and America; it came to us about 10 years ago.

If you need ways to connect wires without welding, consider PPE
There is another way: first the wires are twisted, then caps are put on them. This method was invented by the Russian company that produces these wire connectors - KZT. But this technique requires more time, and the quality of the connection is no different.
There is one more point: how long to strip the insulation from the wires. Manufacturers give clear instructions on this matter - each size has its own length of exposed conductors. It is designed so that all conductors without insulation are inside the housing. If you do this, the connection does not require additional insulation, which greatly speeds up the process. In addition, the expanded lower part does not interfere with heat dissipation and such a connection heats up less.
Practicing electricians advise stripping the wires by 5-10 cm, and insulating the twist that remains without insulation. This is argued by the fact that the contact area with this option is larger. It is true, but this option heats up more. And the standard solution is reliable. There are no problems with contact (if the quality of PPE is normal).
Wago Clamps
The heated debates flared up specifically about Vago. Some people absolutely love this product, while others don’t. Moreover, no less categorically. Opponents of using the Wago don't like the fact that the contact is based on a spring. They say that it may weaken. This will lead to poor contact and overheating. And they show a photo with melted clamps. Proponents of this method conduct tests and comparisons and say that a properly selected branded clamp lasts for many years without signs of contact deterioration. And manufacturers say that, if the technology is followed, Wago terminal blocks can be used for 25-35 years. It is important to choose the right type and parameters and not buy a fake (there are a lot of them).

There are two types of Vago clamps. The first series is slightly less expensive, called Wago. These clamps are suitable for connecting single-core and stranded wires with a cross-section of 0.5-4 mm2. For conductors of smaller or larger cross-sections there is another series - Cage Clamp. It has a very wide range of use - 0.08-35 mm2, but also high cost. In any case, contact is ensured by a contact plate made of good copper. The special shape of the plate allows for reliable contact.
Detachable
In addition, Vago spring-loaded clamps are detachable (222 series) and permanent (773 and 273 series). Detachable ones are convenient to install in places where changes to the network configuration are possible. For example, in junction boxes. They have levers with which the wires are clamped or released. Wago detachable terminal blocks can connect from 2 to 5 conductors. Moreover, they can be of different sections and types (single-core and multi-core). The order of connecting the wires is as follows:

We repeat the same operation with the other wire(s). All this takes a matter of seconds. Very fast and convenient. It's not surprising that many professional electricians have forgotten other ways to connect wires.
One-piece
One-piece series differ in structure: there is a clamp body and a cap. The cap can be made of transparent polymer (773 series) or opaque plastic (223). The housing has holes into which wires stripped of insulation are inserted.

To ensure normal contact, you just need to remove the insulation correctly - exactly 12-13 mm. These are the requirements set by the manufacturer. After the conductor is inserted, its bare part should be in the terminal block, and the insulation should rest against the housing. Under such conditions, contact will be reliable.
Bolted connection
Another type of connection of electrical wires with solid experience is bolted. It is called so because a bolt, nut and several washers are used to connect the wires. Contact through the use of washers is quite good, but the entire structure takes up a lot of space and is inconvenient to install. It is mainly used if it is necessary to connect conductors made of different metals - aluminum and copper.

The order of assembling the connection is as follows:
- We strip the wires of insulation.
- From the stripped part we form a loop, the diameter of which is equal to the diameter of the bolt.
- We put it on the bolt in this order
- washer (it rests on the bolt head);
- one of the conductors;
- another washer;
- second conductor;
- third washer;
- We tighten everything with a nut.
This way you can connect not only two, but also three or more wires. Please note that you must not only tighten the nut by hand. You have to use wrenches and put in a lot of effort.
The best ways to connect wires for different occasions
Since different wires can be connected and they can be used in different conditions, the optimal method must be chosen taking into account all these nuances. Here are the most common situations:

These are the most common options for non-standard connections.
When installing an additional outlet, connecting a new chandelier, or troubleshooting a fault in the electrical wiring, you will have to deal with electrical work. Without practical experience, it is difficult to ensure reliable contact between conductors made of different materials, having different cross-sections or even different numbers of cores.
The article we have proposed describes in detail all the methods of connecting electrical wires that are used in the construction of electrical wiring. We analyzed the technical and technological features of each option. With our advice, you can successfully repair or upgrade your electrical network.
Any electrical installation work should be carried out competently. It is important to remember that the safety and life of all people and animals living in a house, apartment or country house depends on the correctness of their implementation. A mistake is unacceptable - at best there will be no good contact. And these are non-working electrical points.
In the worst case scenario, a visiting family member, friend or acquaintance could be electrocuted by an improperly insulated connection. Or the wiring will catch fire, which could lead to a fire.
For high-quality and correct execution of electrical wire connections, you need:
- knowledge of the basic types and principles of connections;
- availability of special tools for electrical installation work;
- availability of all consumables that will be useful when performing a specific type of connection;
- preliminary training on individual sections of wires.
When everything you need is available, you should carefully prepare your future place of work. To do this, you need to de-energize all the wires that you have to deal with. This is a very important step that cannot be ignored!
Without knowledge of electrical installation, it is better to entrust the replacement of electrical wiring to a professional electrician
To avoid getting an electric shock, it is better to make sure once again that the apartment or house is actually de-energized. In this case, it is convenient to use an indicator screwdriver - this is an inexpensive tool that can even be purchased in an online store.

It’s convenient when, in addition to the desire to do everything yourself, you also have the necessary tool - with it, performing electrical work is much easier and faster
In a situation where there are serious concerns about the advisability of carrying out electrical installation work yourself, it is better to contact an electrician. Moreover, you should invite only an experienced craftsman who has not only experience in carrying out such work, but also special education.
Electrician services will be especially relevant if you are planning to build a house. You can’t save on this - in the end you can pay double or triple the price, or even pay with your property.
Overview of popular connection types
The main types of connections used in household needs have about 10 options. Among them, there are both simple ones that can be performed without many years of experience, and more complex methods that require not only experience, but also special tools and skills to work with them.
Complex connection options
The connection of two or more wires is carried out in order to obtain high-quality contact. It is he who will ensure the operability of all electrical points in a particular house or apartment.
You can establish reliable contact between conductors on your own or invite a specialist. It all depends on the type of connection chosen, the availability of tools and skills in carrying out such work.
Complex types of connections include:
- soldering;
- welding;
- crimping.
These options will be quite difficult for a beginner to deal with. The fact is that to solder an assembly of two or more conductors you will need a special tool, the skills to work with it are one awkward movement and instead of reliable contact you can get the opposite result.

For soldering, you need to take solder from a tin-lead alloy, rosin and a brush for applying it, a soldering iron and sandpaper for stripping the core
The essence of this method is to remove the insulation from the conductors of the connected conductors and sand them to a shine. Then you need to apply rosin to each vein with a brush and heat it thoroughly with a soldering iron - the stripped metal should be covered on all sides with an even layer of rosin.
When all the conductor strands are prepared, all that remains is to twist them well and heat the solder with a soldering iron, and also heat the resulting twist until the rosin boils. Now you need to apply solder with a soldering iron to the heated assembly of conductors and ensure that it flows evenly between the individual wires.

When using welding, soldering and pressing pliers, a strong and incredibly reliable connection is obtained. In such nodes, contact will not be lost even after 30 years
Once it has been possible to obtain a complete distribution of liquid solder over the entire surface to be soldered, soldering can be completed. Now all that remains is to wait until the resulting assembly cools down naturally.
Welding is an even more complex type of connection. To complete it you will need:
- welding machine;
- carbon electrode;
- flux, which will protect the melt from exposure to oxygen;
- protective mask for the face and special heat-resistant gloves for the hands.
And the most important thing when working with welding is the ability to use the device. In the hands of an amateur, instead of a reliable contact that can last 30-50 years, a melted conductor and damaged insulation will come out from under the welding machine.
Before starting welding, you need to twist it, just like before soldering, until it shines. The essence of welding is to obtain a monolithic metal joint. To do this, you need to pour flux into the recess of the carbon electrode, turn on the welding machine and lower the end of the twist into the same recess.

The ball at the ends of the cores of the connected conductors will ensure reliable contact. Moreover, this method is excellent for multi-core wires
As a result of welding, the ends will melt and a metal ball will form on them. You need to wait for it to cool, clean it of flux and varnish it.
For crimping, you will also need special equipment - press pliers, also called a crimper, and a metal sleeve made of copper, aluminum, a combined alloy or insulation.
To obtain high-quality contact using this method, you need to prepare the conductor cores in the same way as before soldering. For stripping, it is better to use side cutters as a last resort. Then take the sleeve and place the prepared conductors of one conductor into it on one side, and the second conductor on the other.

The distance to which you need to strip the insulation from the conductor cores depends on the chosen connection method
Now you have to use press pliers to compress the connection on both sides. It is important that the sleeve or other type has a diameter suitable for the cross-section of the wires being connected - the cores must fit freely inside.
After compression with a crimper, you should check the quality of the crimping - you need to tug one and the other wire. If they are tightly clamped and do not fall out of the sleeve, then the contact is successful.
All connections obtained as a result of soldering, welding or crimping must be insulated. To do this, use electrical tape or heat shrink tubing.
The second option is more convenient and is now used by both professional electricians and home craftsmen. Moreover, when creating a contact using crimping, the heat-shrinkable tube must be put on before inserting the cores into the sleeve.
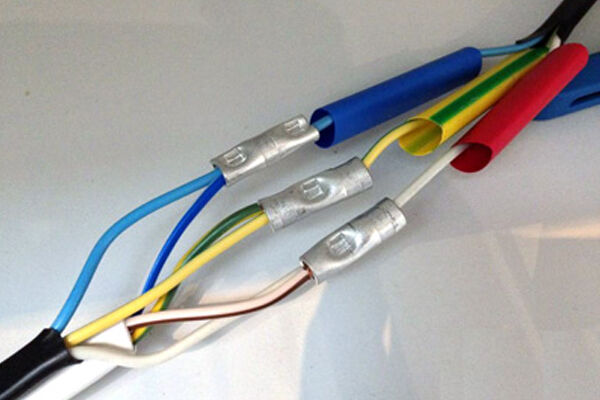
Image gallery
Select a liner with the correct material and inner diameter
Select a heat shrink tube of the required diameter. It is important to put it on the wire before crimping with a crimper.
Using press pliers, press the connection on one and the other side, trying to create reliable contact
Place a heat-shrink tube on top of the resulting assembly and heat it with a hair dryer or lighter so that it tightly grips and insulates the contact
Step 1: Select the sleeve of the required diameter
Step 2: Select heat shrink tubing
Step 3: Crimp the connection using a press pliers.
Step 4: Place the tube on top
Easy ways to create contacts
In addition to labor-intensive and complex options for creating a contact, which require skill and special tools, there are simpler ones that can be easily mastered with your own hands. Such methods are acceptable for connecting two or more wires with different cross-sections or the same. And the material of the cores can be different - copper, aluminum or steel.
Simple methods most often used at home include the following compounds:
- twist;
- bolted;
- screw;
- self-clamping.
There are two options for twisting, which can be done at home. The first is to simply twist the wires, stripped to a shine, and wrap electrical tape or heat-shrink tubing on top. The second option is to screw a PPE cap over the twist.
Using insulating tape is extremely inconvenient, especially in hard-to-reach places. It is better to buy heat-shrinkable tubing of the required diameter. Moreover, its price is quite affordable
The first option is a relic of the past. Such connections are unreliable, they can fall apart and contact is lost. In the second case, reliability is countered by the high price for one cap. It is not worth buying cheaper products - they cannot withstand the inclusion of a powerful heater in the network or other electrical appliances.
For a bolted connection, you need to prepare a bolt, washers one more than the number of conductors to be connected, and a nut. When creating a contact, the conductors are prepared in the same way as before welding or soldering. One condition is that the length of the stripped core should be enough to wrap around the bolt 3-4 times.
First, a washer is put on, then the conductor core is wound, then the washer again, again the core of the second conductor, the washer again, etc. When the cores of all conductors are wound, the last washer is put on and the whole thing is secured with a nut. The key must be used to tighten the connection well to ensure good contact. The resulting node must be isolated.
Another simple and inexpensive method is screw connections. They are made using terminal blocks. Moreover, the length of the area that needs to be cleaned from insulation to a shine depends on the model of the device and the cross-section of the conductor.
Image gallery
The PPE cap is easy to put on, as if screwed on top of a twist of wire. It is important to buy an original analogue, not to be tempted by a cheap fake
A bolted connection allows you to create contact between conductors made of different materials, and the diameter does not make a fundamental difference here
Screw terminal blocks are inexpensive and can be cut into the required number of cells, but they are not suitable for stranded conductors
The PPE cap is easy to put on
Bolted connection
Screw terminal blocks are inexpensive
Terminal block with clamping plate
The simplest option is self-clamping devices or. They create a reliable contact and are easy to use. Another advantage is the possibility of reusable use. Even a person very far from electrical installation can remove and reinstall WAGO.
Which option should you prefer?
To choose the right method of implementation, you should take into account the characteristics of your situation, assess the volume of future work and your skills. If we are talking about replacing a chandelier, then there is no point in learning the intricacies of welding and buying a welding machine. Here you can spend money on buying original German WAGO terminal blocks.
When there is a full-scale renovation of an apartment or house with replacement of wiring, it is more advisable to use the welding method. If you don’t have the skills to work with this equipment, then you can practice doing high-quality crimping and create all the contacts yourself.
Junction boxes often use screw or. But there is one caveat - they should be tightened periodically. Therefore, it is necessary to arrange the boxes in such a way as to ensure easy access to them for inspection.
One-piece, disposable clamps. If you need to break the connection and create a new one, you will have to cut off the old contact node
Using regular twisting and, as before, wrapping electrical tape on top is extremely dangerous. Moreover, this option is prohibited by electrical installation rules.
Technical nuances of the main types of connections
Each of the popular types of contact creation has its own characteristics. Thus, only single-core conductors of the same material can be connected by twisting.
If you need to create a contact with multi-core wires, then you need to use special tips - they compress the bundle of small wires. After installing the lug, the conductor can be connected to the terminal clamp without a clamping strip.
To make a reliable connection, stranded wires must be compressed with a special tip
When connecting wires of different diameters in series, the maximum load current will be determined by the cross-section of the wire with a smaller diameter. For example, a connection was made between copper wires with a diameter of 1.6 mm and 2 mm. In this case, the maximum load current on the electrical wiring, which is determined from the table, will be 10 A, and not 16 A, as for a wire with a diameter of 2 mm.
Connecting electrical wires by twisting
Until recently, twisting was the most common method of connecting wires when doing electrical wiring; due to its accessibility, all it took was a knife and pliers. But, according to statistics, twisting is an unreliable way to connect conductors.
According to the electrical installation rules (PUE), twisted connections when installing electrical wiring are prohibited. But, despite the noted disadvantages, the twisting method is currently widely used. Connecting conductors of low-current circuits by twisting, subject to certain rules, is quite justified.
The photo on the left shows how twisting is unacceptable. If one conductor is twisted around another, the mechanical strength of such a connection will be insufficient. When twisting wires, you must make at least three turns of wires around each other. In the middle photo, the twisting is done correctly, but a copper conductor is twisted with an aluminum one, which is not permissible, since when copper comes into contact with aluminum, an emf of more than 0.6 mV occurs.
In the photo on the right, the twisting of copper and aluminum wires is done correctly, since the copper wire is tinned with solder before twisting. You can twist several wires together at once; in a junction box, sometimes up to 6 conductors are twisted, wires of different diameters and from different metals, a stranded wire with a single-core wire. Only the stranded wire needs to be made single-core by first soldering it with solder.
Connecting electrical wires by soldering
The connection of copper wires with high-quality soldering is the most reliable and is practically not inferior to a solid wire. All of the above examples of twisted wires, except for aluminum and tinsel, when tinning the conductors before twisting and then soldering them with solder, will be reliable on a par with solid wires. The only drawback is the extra labor involved, but it's worth it.
If you need to connect a pair of wires and the twisted conductors must be directed in different directions, then a slightly different type of twist is used.
By splicing two pairs of double wires in the manner described below, it is possible to obtain a compact and beautiful connection by twisting both single-core and multi-core pairs of conductors. This twisting method can be successfully used, for example, when splicing broken wires in a wall, extending a wire when moving a socket or switch from one place on the wall to another, when repairing or extending the length of a carrying cable.
To obtain a reliable and beautiful connection, it is necessary to adjust the lengths of the ends of the conductors with a shift of 2-3 cm.


Twist the conductors in pairs. With this type of twisting, two turns are enough for a single-core wire, and five for a multi-core wire.

If you plan to hide the twists under plaster or in another inaccessible place, then the twists must be soldered. After soldering, you need to go over the solder with sandpaper to remove any sharp solder icicles that could pierce the insulation and stick out from it. You can do without soldering if the connection is accessible and the currents flowing through the conductors are not large, but the durability of the connection without soldering will be much lower.

Due to the shift of the twisting points, there is no need to insulate each of the connections separately. We attach a strip of insulating tape on both sides along the conductors. Finally, you need to wind three more layers of insulating tape. According to the requirements of the Electrical Safety Rules, there must be at least three layers.

Wires spliced and soldered in the manner described above can be safely laid in the wall and plastered on top. Before installation, it is advisable to protect the connection with a vinyl chloride tube placed in advance on one of the pairs of wires. I have done this many times, and the reliability has been confirmed by time.
Connecting wires in junction boxes
When I moved into an apartment built in 1958 and began doing renovations, I was immediately confronted with the blinking of the lighting bulbs in rhythm with the hammer blows on the walls. The primary task of repair arose, carrying out an audit of distribution boxes. Opening them revealed the presence of poor contact in the twisted copper wires. To restore contact, it was necessary to disconnect the twists, clean the ends of the wires with sandpaper and twist them again.
When trying to disconnect, I encountered a seemingly insurmountable obstacle. The ends of the wires broke off even without any effort. Over time, copper lost its elasticity and became brittle. When stripping the wire, the insulation was apparently cut in a circle with a knife blade and notches were made. It was in these places that the wire broke off. The copper became hardened due to temperature fluctuations.
You can restore the elasticity of copper, unlike ferrous metals, by heating it to red and quickly cooling it. But for this case, such a technique is unacceptable. The ends of the wires no longer than 4 cm remained. There was no choice for connection. Just solder.
I exposed the wires with a soldering iron, melted the insulation, tinned them with solder, tied them in groups with tinned copper wire and filled them with solder using a 60-watt soldering iron. The question immediately arises: how to solder the wires in the junction box if the electrical wiring is de-energized? The answer is simple, using a soldering iron powered by a battery.

So I updated the connections in all junction boxes, spending no more than 1 hour on each. I am completely confident in the reliability of the connections made, and this has been confirmed by the 18 years that have passed since then. Here's a photo of one of my boxes.

When leveling the walls with Rotband in the hallway and installing a stretch ceiling, the distribution boxes became a hindrance. I had to open them all, and the reliability of the solder connection was confirmed; they were in perfect condition. That's why I boldly hid all the boxes in the wall.
Connections currently practiced using a Wago flat-spring terminal block greatly reduce the time spent on installation work, but are much inferior in reliability to soldered connections. And if there are no spring-loaded contacts in the block, they make connections in high-current circuits completely unreliable.
Mechanical connection of wires
Soldering is the most reliable type of connecting wires and contacts. But it has disadvantages - the inseparability of the resulting connections and the high complexity of the work. Therefore, the most common type of connection of wires to electrical contacts of devices is threaded, screws or nuts. To ensure the reliability of this type of connection, it is necessary to perform it correctly.
Linear expansion due to temperature changes is different for metals. Aluminum changes its linear dimensions especially strongly, then, in descending order, brass, copper, and iron. Therefore, over time, a gap forms between the contact of the connected metals, increasing the contact resistance. As a result, the screws must be tightened periodically to ensure reliable connections.
In order to forget about maintenance, additional slotted washers, called split washers or Grover washers, are installed under the screws. The Grover selects the gaps that arise and thereby ensures high contact reliability.

Often electricians are lazy and do not twist the end of the wire into a ring. In this option, the contact area of the wire with the contact pad of the electrical device will be many times smaller, which reduces the reliability of the contact.
If the formed ring of wire is slightly flattened with a hammer on an anvil, the contact area will increase several times. This is especially true when forming a ring of stranded wire soldered with solder. Instead of a hammer, you can add flatness with a file, grinding off the ring a little at the points of contact with the contacts.

This is how it should be done ideal threaded connection of wires to contact pads of electrical appliances.
Sometimes it is necessary to connect copper and aluminum conductors with each other, or with a diameter of more than 3 mm. In this case, the most accessible is a threaded connection.

The insulation is removed from the wires to a length equal to four screw diameters. If the veins are covered with oxide, then it is removed with sandpaper and rings are formed. A spring washer, a simple washer, a ring of one conductor, a simple washer, a ring of another conductor, a washer and, finally, a nut are put on the screw, screwing the screw into which the entire package is tightened until the spring washer is straightened.
For conductors with a core diameter of up to 2 mm, an M4 screw is sufficient. The connection is ready. If the conductors are made of the same metal or when connecting an aluminum wire to a copper wire whose end is tinned, then there is no need to place a washer between the rings of the conductors. If the copper wire is stranded, then it must first be tinned with solder.
Connecting wires with a terminal block
Connecting wires with low current load can be done using terminal blocks. Structurally, all terminal blocks are constructed identically. Thick-walled brass tubes with two threaded holes on the sides of each are inserted into the housing combs made of plastic or carbolite. The wires to be connected are inserted into the opposite ends of the tube and secured.
The tubes come in different diameters and are selected depending on the diameters of the conductors being connected. You can insert as many wires into one tube as its internal diameter allows.

Although the reliability of connecting wires in terminal blocks is lower than when connecting by soldering, much less time is spent on electrical installation. An undeniable advantage of terminal blocks is the ability to connect copper and aluminum wires in electrical wiring, since brass tubes are coated with chromium or nickel.
When choosing a terminal block, you need to take into account the current that will flow through the switched electrical wiring wires and the required number of terminals in the comb. Long combs can be cut into several short ones.
Connecting wires using a terminal block
with Wago flat spring clamp
Terminal blocks with flat spring clamps Wago (Wago) from a German manufacturer are widely used. Wago terminal blocks come in two designs. Disposable, when the wire is inserted without the possibility of removal, and with a lever that makes it easy to both insert and remove wires.

The photo shows a Wago disposable terminal block. It is designed for connecting any types of single-core wires, including copper and aluminum with a cross-section from 1.5 to 2.5 mm 2. According to the manufacturer, the block is designed to connect electrical wiring in junction and distribution boxes with a current of up to 24 A, but I doubt it. I think it’s not worth loading the Wago terminals with a current of more than 10 A.
Wago spring terminal blocks are very convenient for connecting chandeliers and connecting wires in junction boxes. It is enough just to forcefully insert the wire into the hole of the block, and it will be securely fixed. In order to remove the wire from the block, considerable force will be required. After removing the wires, deformation of the spring contact may occur and a reliable connection of the wires when reconnected is not guaranteed. This is a big disadvantage of a disposable terminal block.
A more convenient Wago terminal block is reusable and has an orange lever. Such terminal blocks allow you to connect and, if necessary, disconnect any electrical wires, single-core, multi-core, aluminum in any combination with a cross-section from 0.08 to 4.0 mm 2. Rated for current up to 34 A.

It is enough to remove 10 mm of insulation from the wire, lift the orange lever up, insert the wire into the terminal and return the lever to its original position. The wire will be securely fixed in the terminal block.
The Wago terminal block is a modern tool-free way to connect wires quickly and reliably, but is more expensive than traditional connection methods.
Permanent connection of wires
In some cases, when it is not intended to connect the wires in the future, they can be connected in a permanent way. This type of connection is highly reliable and is advisable in hard-to-reach places, for example, connecting the ends of a nichrome spiral with copper current-carrying conductors in a soldering iron.
Connecting thin wires by crimping
A simple and reliable way to connect wire cores is crimping. Wire strands are inserted into a piece of copper or aluminum tube, depending on the metal of the wires being connected, and the tube is pressed in the middle with a tool called a press pliers.

Crimping can be used to connect both single-core and stranded wires in any combination. The diameter of the tube must be selected depending on the total cross-section of the conductors. It is desirable that the conductors fit tightly. Then the connection reliability will be high. If in a stranded wire the conductors are twisted together, then it is necessary to develop and straighten them. There is no need to twist the wire strands together. The prepared conductors are inserted into the tube and crimped with press pliers. The connection is ready. All that remains is to insulate the connection.
Crimping tips are available for sale, already equipped with an insulating cap. Crimping is performed by compressing the tube together with the cap. The connection is immediately isolated. Since the cap is made of polyethylene, during crimping it is deformed and held securely, ensuring reliable insulation of the connection.

The disadvantage of joining by crimping is the need for special press jaws. You can make your own pliers using pliers with side cutters. You need to round the side cutter blades and make a groove in the middle. After such modification of the pliers, the edges of the side cutters will become blunt and will no longer be able to bite, but only squeeze.
Connecting wires of larger cross-sections by crimping
To connect electrical wires with a larger cross-section, for example, in power panels of houses, special lugs are used, which are crimped using universal press pliers, for example, type PK, PKG, PMK and PKG.

To crimp each standard size of tip or sleeve, it requires its own matrix and punch, a set of which is usually included in the set of pliers.

To crimp a tip onto a wire, the insulation is first removed from the wire, the wire is tucked into the hole in the tip and inserted between the matrix and the punch. The long handles of the press pliers are used to squeeze. The tip is deformed, crimping the wire.

In order to correctly select the matrix and punch for the wire, they are usually marked and branded press pliers on the matrix have an engraving for crimping what cross-section of wire the matrix is intended for. The number 95 embossed on the tip means that this matrix is designed for crimping into the tip of a wire with a cross-section of 95 mm 2.
Connecting wires with a rivet
It is made using screw connection technology, only a rivet is used instead of a screw. Disadvantages include the impossibility of disassembly and the need for special tools.

The photo shows an example for connecting copper and aluminum conductors. More details about connecting copper and aluminum conductors are described in the website article “Connection of aluminum wires”. In order to connect the conductors with a rivet, you need to first put an aluminum conductor on the rivet, then a spring washer, then a copper one and a flat washer. Insert a steel rod into the rivet gun and squeeze its handles until it clicks (this cuts off the excess steel rod).
When connecting conductors from the same metal, there is no need to place a split washer (grower) between them, but put the groover on the rivet first or second to last; the last one must be an ordinary washer.
Connecting broken wires in the wall
Repairs should begin with very careful removal of the plaster in the area of damaged wires. This work is done with a chisel and hammer. As a chisel when laying electrical wiring in the wall, I usually use the rod from a broken screwdriver with a sharpened end of the blade.
Connecting copper wires broken in the wall
Take a piece of copper wire with a cross-section no less than the cross-section of the broken wire. This piece of wire is also covered with a layer of solder. The length of this insert must ensure an overlap of at least 10 mm over the connected ends of the wires.

The insert is soldered to the connecting ends. Solder should not be skimped. Next, the insulating tube is moved so as to completely cover the joint. If a sealed, moisture-resistant connection is required, then before putting on the tube, the soldered joint must be coated with silicone.
Connecting aluminum wires broken in the wall
A prerequisite for obtaining a reliable mechanical connection of aluminum wires is the use of a Grover-type washer. The connection is assembled as follows. A groover is put on the M4 screw, then an ordinary flat washer, rings of connected wires, then a simple washer and a nut.

Step-by-step instructions for connecting broken wires in a wall are outlined in the article “Connecting broken wires in a wall”
Connecting wires with slip-on terminals
Widely used in household appliances and cars is the detachable connection of conductors using slip-on terminals, which are placed on contacts 0.8 mm thick and 6.5 mm wide. Reliability of fixation of the terminal is ensured by the presence of a hole in the center of the contact and a protrusion in the terminal.

Sometimes the conductors break off, and more often the terminal itself burns due to poor contact and then it becomes necessary to replace it. Typically, the terminals are pressed onto the ends of the conductors using special pliers. Crimping can also be done with pliers, but you don’t always have a new replacement terminal on hand. You can successfully use a used one by installing the terminal using the following technology.
First you need to prepare the old terminal for reinstallation. To do this, holding the terminal with pliers at the press-in point, you need to use an awl or a screwdriver with a thin tip to move the tendrils that compress the insulation apart. Next, the wire is bent many times until it breaks off at the point where it exits the press fit. To speed things up, you can trim this area with a knife.

When the wire is separated from the terminal, a needle file prepares a place for soldering it. You can completely grind it off until the remaining wire is free, but this is not necessary. It turns out to be a flat platform.

The resulting area is broken through with solder. The conductor is also stripped and tinned with solder using a soldering iron.

All that remains is to attach the conductor to the prepared terminal area and heat it with a soldering iron. The antennae that fix the wire are bent after soldering the wire to the terminal, since if they are crimped before soldering, the antennae will melt the insulation.

All that remains is to pull on the insulating cap, put the terminal on the desired contact and check the reliability of the fixation by tugging on the wire. If the terminal has come off, then it is necessary to tighten its contacts. A home-made terminal attached to a wire by soldering is much more reliable than one obtained by crimping. Sometimes the cap is put on so tightly that it cannot be removed. Then it needs to be cut and after installing the terminal, cover it with insulating tape. You can also stretch a piece of vinyl chloride or heat-shrinkable tube.
By the way, if you hold a vinyl chloride tube in acetone for about five minutes, it increases in size by one and a half times and becomes plastic, like rubber. After the acetone evaporates from its pores, the tube returns to its original size. About 30 years ago I insulated the bases of light bulbs in a Christmas tree garland in this way. The insulation is still in excellent condition. I still hang this garland of 120 6.3 V light bulbs on the Christmas tree every year.
Splicing stranded wires without twisting
Stranded wires can be spliced in the same way as single-core wires. But there is a more advanced method, in which the connection is more accurate. First you need to adjust the lengths of the wires with a shift of a couple of centimeters and strip the ends to a length of 5-8 mm.

Fluff the slightly cleaned areas of the pair to be joined and insert the resulting “panicles” into each other. In order for the conductors to take a neat shape, they need to be tied together with a thin wire before soldering. Then lubricate with soldering varnish and solder with solder.

All conductors are soldered. We clean the soldering areas with sandpaper and insulate them. We attach one strip of electrical tape on both sides along the conductors and wind a couple more layers.

This is what the connection looks like after covering it with insulating tape. You can further improve the appearance if you use a file to sharpen the solder joints on the insulation side of adjacent conductors.

The strength of connected stranded wires without twisting by soldering is very high, as the video clearly demonstrates. As you can see, the connection can withstand the weight of the monitor 15 kg without deformation.
Connecting wires with a diameter of less than 1 mm by twisting
Let's consider twisting thin conductors using the example of splicing twisted pair cables for computer networks. For twisting, thin conductors are stripped of insulation for a length of thirty diameters with a shift relative to adjacent conductors and then twisted in the same way as thick ones. The conductors must wrap each other at least 5 times. Then the twists are bent in half with tweezers. This technique increases mechanical strength and reduces the physical size of the twist.

As you can see, all eight conductors are connected by twisting with a shift, which makes it possible to do without isolating each of them separately.

All that remains is to tuck the conductors into the cable sheath. Before refueling, to make it more convenient, you can tighten the conductors with a roll of insulating tape.

All that remains is to secure the cable sheath with insulating tape and the twist connection is complete.

Connecting copper wires in any combination by soldering
When connecting and repairing electrical appliances, you have to lengthen and connect wires with different cross-sections in almost any combination. Let's consider the case of connecting two stranded conductors with different cross-sections and number of cores. One wire has 6 conductors with a diameter of 0.1 mm, and the second has 12 conductors with a diameter of 0.3 mm. Such thin wires cannot be reliably connected with simple twisting.
With the shift, you need to remove the insulation from the conductors. The wires are tinned with solder, and then the smaller gauge wire is wound around the larger gauge wire. It is enough to wind a few turns. The twisting area is soldered with solder. If a direct connection of wires is required, the thinner wire is bent and then the connection is insulated.
Using the same technology, a thin stranded wire is connected to a single-core wire with a larger cross-section.

As is obvious, using the technology described above, you can connect any copper wires of any electrical circuits. At the same time, we must not forget that the permissible current strength will be determined by the cross-section of the thinnest wire.
TV coaxial cable connection
There are three ways to extend or splice a coaxial television cable:
– TV extension cable, commercially available from 2 to 20 meters
– using an adapter TV F socket - F socket;
- soldering with a soldering iron.

Tinsel wire connection
twisted with single-core or stranded conductor
If it is necessary to give the cord very high flexibility and at the same time greater durability, the wires are made using a special technology. Its essence lies in winding very thin copper ribbons onto a cotton thread. This kind of wire is called tinsel.
The name is borrowed from tailors. Gold tinsel is used to embroider the ceremonial uniforms of high-ranking military officers, coats of arms and much more. Copper tinsel wires are currently used in the production of high-quality products - headphones, landline phones, that is, when the cord is subjected to intense bending during use of the product.

In a cord of tinsel conductors, as a rule, there are several and they are twisted together. It is almost impossible to solder such a conductor. To attach tinsel to the contacts of products, the ends of the conductors are crimped into the terminals with a special tool. To make a reliable and mechanically strong twist connection without tools, you can use the following technology.
The insulation is removed from the 10-15 mm tinsel conductors and the conductors with which it is necessary to connect the tinsel to a length of 20-25 mm with a shift using a knife in the manner described in the site article “Preparing wires for installation”. The tinsel thread is not removed.
Then the wires and the cord are applied to each other, the tinsel is bent along the conductor and the wire core is tightly wound onto the tinsel pressed against the insulation. It is enough to make three to five revolutions. Next, the second conductor is twisted. You will get a fairly strong twist with a shift. Several turns of insulating tape are wound and the twisted connection of the tinsel to a single-core wire is ready. Thanks to shear twisting technology, the connections do not need to be separately insulated. If you have a heat-shrinkable or polyvinyl chloride tube of a suitable diameter, you can put on a piece of it instead of insulating tape.
If you want to get a straight connection, you need to rotate the single-core wire 180° before insulating it. The mechanical strength of the twist will be greater. The connection of two cords with tinsel-type conductors to each other is carried out using the technology described above, only for wrapping, a piece of copper wire with a diameter of about 0.3-0.5 mm is taken and at least 8 turns must be made.
Junction boxes perform a very important function. They ensure the distribution of electrical wires between points of consumption, i.e. switches, lighting fixtures and sockets.
Have you decided to install the devices listed above yourself? Then you need to thoroughly understand the features and order of connecting cables, as well as the basic methods of connecting them.
For a better understanding of the process, this event will be considered in several stages: from preparing the necessary materials to connecting electrical appliances using the example of an outlet, a two-key switch and light bulbs. First, you will learn about the basic methods of connecting cables and wiring features
Wire connection methods
There are several methods for connecting electrical wires. You can choose the most convenient and suitable option for your case.
Prices for cables and wires for construction and repair
Cables and wires for construction and repair

The first stage - getting ready for work

First of all, we prepare everything that is needed to connect electrical appliances to the box. Set includes:
- cables 3x2.5, VVG;
- cables 2x2.5, AVVG;
- switch with 2 keys;
- fastenings;
- lighting;
- socket;
- round nose pliers;
- roulette;
- wire cutters;
- pliers;
- flat screwdriver;
- hammer.
Second stage - make the markings

At this stage, we mark the installation locations of electrical appliances and the routes for wires. This way we can calculate the required amount of materials for installing the system.
The third stage - we begin installation

First turn off the electricity supply.
We connect the wires to the junction box. As a rule, cables are laid in grooves. Small nails or special plastic staples are used to secure the cables. If the work is carried out in a wooden house, the wires will be supplied through special mounting boxes.
Important note! You should try to lay the wiring so that the cables do not intersect. If intersections are unavoidable, such places must be isolated especially carefully.
The fourth stage - we connect electrical appliances and connect the wires

We insert approximately 10 cm of wire into a distribution box pre-built into the wall or fixed to the base (depending on the model). We remove the general sheath from the cables. Then we remove approximately 0.5 cm of insulation from each core. At this point, we focus on the situation - we remove enough insulation so that the cores can be connected in the chosen way.
The diagram shows an example of connecting electrical wires using terminal blocks.
In the example under consideration, the connection is made using a two-wire wire, in which one wire is a zero, the second is a phase. We connect the socket to zero and. We connect the phase supply wire to the socket and one core of the switch cable.
In our example, the switch is two-key. Each key is responsible for controlling a separate group of lighting fixtures. We connect the second wire of the switch cable to the first button, the third wire is connected to the second button.
The distribution box contains the neutral wires from the socket and light bulb sockets. The power cable is connected: zero is marked in blue, phase is marked in red. Wires are connected to connect each switch button to the light sockets.


Fifth stage - checking the functionality of the system
We turn on the power supply and check the operation of our outlet and. Everything works fine. We did a great job.

Now you know the order of connecting the wires in the junction box and the connection features of each main electrical appliance. Using the information received, you will be able to independently cope with all planned events.
Good luck!
Video - Connecting wires in a junction box
