Lining the roof with clapboard. Is it possible to properly hem the roof eaves with corrugated sheeting? Installation of corrugated sheeting
Lining the roof eaves with your own hands allows you to protect the roofing pie from external influences and give the roof an attractive appearance. Currently, there are many cladding options. We will focus on the most popular ones in this article.
Features of the binder
It is recommended to carry out work on covering the roof overhang after installing the rafter structure, but before installing the sheathing for laying the roof covering. Before filing the eaves, the roof waterproofing should be laid and it is advisable to insulate the roof from the attic side. In addition, it should be taken into account that it is preferable to sew up the roof overhang before the external insulation of the walls of the house begins, so as not to damage the wall covering while working with the cornice.
At the first stage of work, the protruding parts of the rafters should be sawed off along one line, which should be parallel to the adjacent wall of the building. 
The overhangs of the pitched roof are sewn up in such a way that gutters can be installed and ventilation of the roofing pie can be ensured. For these purposes, various materials and installation technologies can be used.
Selection of materials
Traditionally, roof eaves sheathing is done using edged and planed boards. To make the roof look aesthetically pleasing, you should use boards that are the same in thickness and width. In addition to boards, various materials are widely used today, which should:
- provide reliable protection of the eaves of the roof from moisture, frost, and precipitation;
- provide the necessary roof ventilation;
- be resistant to external influences and durable;
- have aesthetic appeal.
Popular materials for arranging eaves overhang include:
- lining (wooden and PVC);
- soffit (vinyl and aluminum);
- corrugated sheeting
Edged and planed boards 1.5-2 cm thick are a practical material for installing sheathing, which makes it possible to ensure high-quality and uniform roof ventilation. To do this, the elements should be stuffed with a gap of 1-1.5 cm.

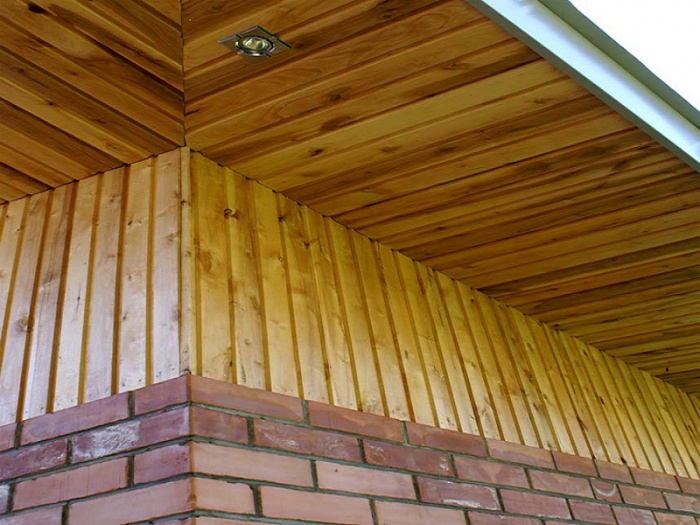
Wooden lining. This material should be selected with special care: the roof eaves lining is used outdoors, therefore, the lining must be made of high-quality wood of medium humidity and have a sufficiently large thickness - this will avoid warping.
 It is recommended to use wooden paneling that has been stored outdoors for at least a month, since its humidity corresponds to the humidity of the environment.
PVC lining. This is an inexpensive and easy-to-install material. Moisture-resistant lining is designed for a long service life. To install this material, you should immediately purchase U-shaped plastic strips for covering the edges and special corners for fastening the joints.
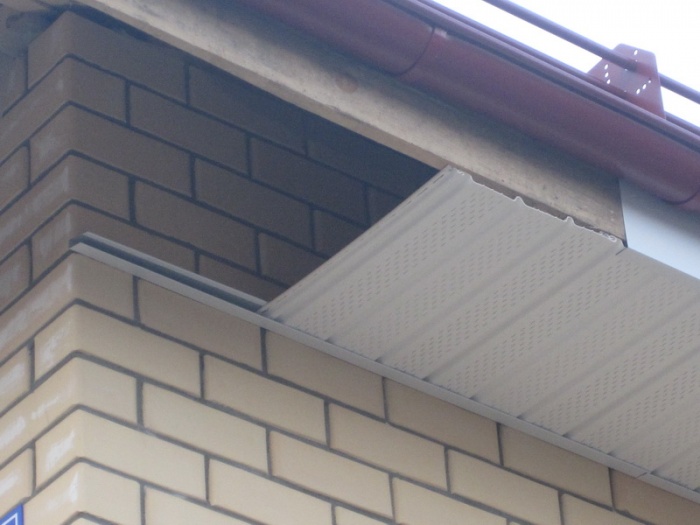
Soffit. This is a special aluminum or plastic panel with which the roof eaves are hemmed. Externally, the soffit resembles siding, but it is made of thicker plastic and is equipped with perforations, which allows you to create the necessary air ventilation under the roof. The advantages of aluminum and plastic soffit include high weather resistance and durability. UV stabilizers are added to plastic for making spotlights.
 The soffit panels are cut to the length of the eaves overhang and installed perpendicular to the wall.
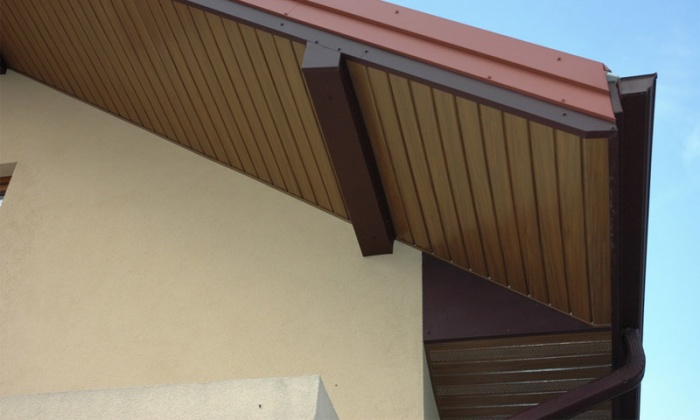
Corrugated sheet. Profiled sheets of galvanized steel with colored polymer coating are usually used for lining roofs made of the same material. The corrugated sheet has a fairly high rigidity and is resistant to external influences and extreme temperatures. Corrugated panels are cut according to the size of the eaves overhang. The ventilation gap of such a filing is equal to the wave height of the corrugated sheet.

Cornice sheathing frame
Hemming the roof eaves is done after installing the roof frame and adjusting the protruding edges of the rafters to size. After sawing off the rafter legs, the first sheathing board is installed along the line, which then serves as a guide for work in the next stages. Next, you should cover the overhangs, choosing the appropriate type of structure:

Do-it-yourself roof eaves lining involves creating a roof eaves box. In both versions of the sheathing device, it is performed in the same way: a board is placed on the sheathing along the pediment, and it is required to measure the distance, which should correspond to the width of the overhang. The board is then nailed parallel to the gable wall.
Installation of the binder
Sheathing the eaves of the roof with soffit requires the use of a J-shaped strip, which is secured with screws along the eaves and along the wall. The soffit sheets are mounted between the slats. The length of each panel should be equal to the distance between the mounted strips minus 6 mm for thermal expansion of the material. If the roof overhang exceeds 900 mm, 12 mm should be deducted. The frontal plate is closed with a special frontal strip. The use of soffit and special elements allows you to create a durable, functional and attractive roof overhang.

Before sheathing the roof eaves with edged boards or wooden clapboards, the material cut to size should be impregnated with antiseptic, fire-resistant and water-repellent compounds. This allows you to extend the life of the binder.
The width of the edged board is adjusted depending on the size of the overhang. The elements should be mounted in 10 mm increments, creating ventilation gaps. If the eaves overhang is covered with clapboard, the planks are laid with a tongue-and-groove connection, and special ventilation grilles should be installed every 1.5 meters.
To cover roof overhangs with corrugated sheets, you need to screw pre-cut sheets to the frame parallel to the wall and along the eaves. Self-tapping screws are used as fasteners. The junction of the wall and the sheet material is closed with an internal corner and a front strip. The inner corner should be attached to the profiled sheet, the front strip to the front board. The outer corner is fastened along the external joints of the profiled sheet.
Along the pediment, corrugated sheeting is mounted along the wall, along the outer edge of the roof overhang. Then the corners and end strip are installed. To ensure air access for roof ventilation, the width of the corrugated sheet should be 2 cm less than the width of the overhang. It is important to consider that the lining, made of metal sheets, is prone to corrosion in places where moisture accumulates and its service life is inferior to other options for finishing the eaves overhang.
Do-it-yourself roof eaves, how and with what material to cover it
Do-it-yourself roof eaves lining using popular materials. How to cover the roof eaves with soffits and pvc clapboard. Using corrugated sheets and wood to hem the cornice.
Hemming of roof eaves: options and their features
One of the stages in the construction of any roof, which gives it a finished look, is the filing of its overhangs or cornices, which provide protection to the walls of the building. It can be done in various ways and using various materials, which have their own advantages and disadvantages. Therefore, in this article we will look at what roof eaves lining can be like: options and materials used.
When to trim roof overhangs
There are two possible ways to file the roof eaves: before laying the roofing material and after it.
It is best and most correct to hem the roof overhangs before installing the roofing material, immediately after constructing the wooden base of the roof (rafters, sheathing) and laying the waterproofing material. This is especially true when using modern roofing materials. At this stage, the drainage system brackets are also often attached and the roof ventilation is installed.
Previously, the filing of overhangs was done after the installation of the roofing material and this was the final stage of roof construction. And even now this often happens, especially if the roofing material is asbestos-cement corrugated sheets or, simply put, slate. Sometimes this method is also used when roofing with other, more modern materials, such as metal tiles or corrugated sheets, in cases where there is no means to do both eaves and roofing at the same time, or for other reasons. Sometimes the hemming is carried out after the external insulation of the facade, after applying the reinforcing layer, but before finishing.
Everyone decides which option to choose at their own discretion, depending on the roof design, type of roofing material, circumstances and availability of funds.
Options for lining roof eaves
Currently, there are quite a few options for lining the eaves (overhangs) of the roof, both in terms of the type of material used and the method of its fastening. The following materials can be used for such filing:
Each of these materials has individual properties that determine their advantages and disadvantages when used for lining roof overhangs. In order to choose the best option, let's consider their features in more detail.
Planed board
For filing overhangs, dry planed boards, 10-25 mm thick, treated with an antiseptic are suitable. At the same time, the boards can be laid and secured both along the surface of the walls and perpendicular to them. The first option is most often used. It is convenient to fasten the boards to the sheathing with self-tapping screws using a screwdriver. It's better to work together. To ensure ventilation of the under-roof space, ventilation holes or slots are made in such a lining every 1-1.5 m.


Advantages of hemming boards:
- Relatively low cost, especially in regions rich in wood;
- Environmentally friendly material;
- Simplicity and speed of work on hemming the overhang, which allows you to do it yourself.
- Not very presentable appearance;
- Boards have more weight than other materials and place a greater load on the sheathing to which they are attached;
- Wood, even treated and painted on the outside, can absorb moisture;
- Over time, boards can become deformed and twisted;
- Wood must be periodically processed and painted.
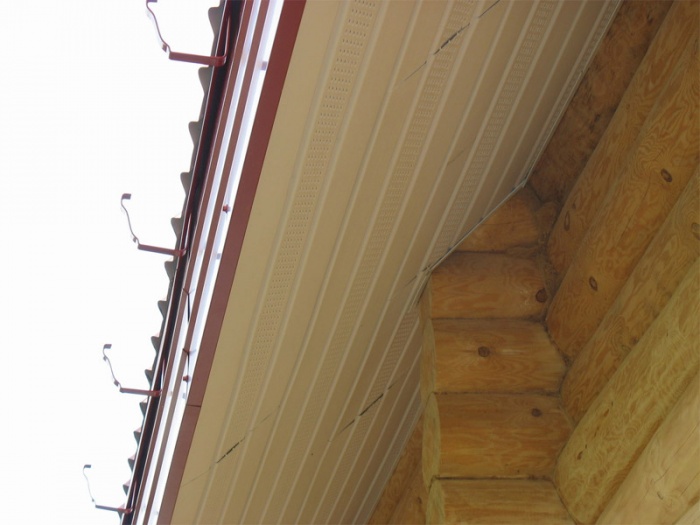
Lining the roof eaves with wooden clapboard
Wooden lining differs from boards in its smaller thickness and the presence of a longitudinal groove for connecting to each other. For overhangs, it is necessary to use dry lining and treated with an antiseptic. To ensure ventilation of the under-roof space, ventilation grilles are installed in it every 1.5 m. The lining can be mounted parallel or perpendicular to the wall. In the first case, the lining is attached to the sheathing every meter. In the second case, the elements are attached at the edges, and with a wide overhang (more than 0.5 m) also in the middle. Fastening is done using nails or self-tapping screws.


The advantages and disadvantages of wooden lining are almost the same as those of planed boards. But the lining has less thickness and weight. In addition, it has the best appearance and goes well with almost any type of roofing and facades. But it is also more expensive than a board. The cost of high-quality wooden lining is from $4 per 1m2.
Plywood or particleboard
Another option for lining the roof eaves can be moisture-resistant plywood or OSB chipboards. Strips of the required sizes are cut out of sheets of such plywood or particle boards and attached to the prepared sheathing using self-tapping screws.

Hemming with these materials is simple and quick. But on the other hand, moisture-resistant plywood is not such a cheap material: the average market price is from $5, OSB boards are from $3.5. In addition, both plywood and OSB will have to be painted after filing.


Plastic lining
This is another fairly popular budget option for lining the roof eaves.


PVC lining is cut into pieces along the width of the overhang and attached perpendicular to the wall. It has insufficient rigidity, so it is not advisable to lay it along the wall. In addition to the lining itself, for filing the overhang you will need shaped elements - fillets: U-shaped starting, H-shaped connecting, as well as external and internal corners. The fillets are attached to a wooden frame or sheathing using staples (staplers), clamps or small nails. The plastic lining is cut into pieces that are 4-5 mm smaller than the width of the overhang and inserted into the grooves of the fillets. Depending on the width of the overhang, the lining is additionally attached to the wooden frame with staples or clamps in 1-4 places. Since PVC lining does not have perforations, to ventilate the under-roof space, plastic ventilation grilles are installed in it every 1.5 m of the lining. The average cost of plastic lining is small - from $3.5 per 1 m2. Among the disadvantages are the low strength of the material and the tendency to burn out under the influence of UV radiation.
Lining the roof eaves with metal profiles (corrugated sheeting)
Corrugated sheeting or metal profile is a fairly durable material, as it is a specially curved (profiled) steel sheet covered with a protective layer. The latter can be galvanized or with an additional polymer coating. Most often, polymer-coated corrugated sheeting is used, as it not only looks better and can be of almost any color, but is also more durable. The average cost of 1 m2 of this material is from $7.


The advantage of corrugated sheeting (metal profile), in addition to strength, is that it is laid in large planes (up to 1.2 m), it is light and easy to install. But working with it requires care so as not to damage its protective layer.
Corrugated sheeting for lining the roof eaves can have different ridge heights (from 8 to 20 mm) and sheet thickness - 0.4-0.5 mm. To hem the overhang, in addition to the corrugated sheeting itself, you will also need shaped elements: profiles, strips, corners. The installation of corrugated sheet strips is carried out in them with gaps of 0.5-1.0 cm, taking into account the thermal expansion of the metal. If these gaps are not enough to ensure reliable ventilation of the roof, then special ventilation grilles are installed for this purpose.
Lining roof eaves with soffit
Soffits are essentially siding panels specifically designed for lining roof overhangs. They differ from conventional siding in their greater thickness and resistance to ultraviolet radiation. They can be vinyl or aluminum, unperforated, fully or partially perforated to provide ventilation.


Soffits are much stronger than plastic lining. Their use does not require the installation of ventilation grilles - it is enough to use panels with perforations. They are durable and do not fade in the sun. The disadvantages include the following:
- Soffit panels are smaller in size than corrugated sheets;
- Relatively high cost - on average from $9 per 1 m
You can even install the soffits yourself, especially if you need to hem the overhang of a simple roof. Due to their rigidity and strength, soffits do not require a special frame for installation. The only exception is complex roofs with curved or multi-level elements.
Additional elements are used to install spotlights:
- On the wall side - a U-shaped profile, which is attached directly to the wall, or a J-shaped one, which is attached to a horizontal rail;
- From the end of the rafters or wind board - an L-shaped wind strip, which is attached so that its groove is in the same plane with the groove of the J- or U-shaped profile;
- To connect the soffits at the corners - an H-shaped connecting profile, which is attached to the supporting rail. Corner joints can be diagonal or at right angles.
Soffit panels should have a length 5-6 mm less than the distance between the grooves into which they will be inserted. In this case, it will be easier to insert them and thus prevent their deformation due to thermal expansion. The hemming elements are fastened with galvanized self-tapping screws and press washers. The panels are connected to each other using locking connections.
Sheet metal filing
This is another option for inexpensive lining of roof eaves. For this, strips of sheet steel with a thickness of 0.5-0.8 mm can be used - galvanized or polymer-coated. Aluminum or copper sheets can also be used, but this is quite expensive.

Strips of metal are attached from below to a wooden frame or sheathing. To ventilate the roof, perforations are made in the metal or ventilation grilles are installed. The places where steel sheets are cut and perforated must be treated with special paint or an anti-corrosion compound. The average price of steel sheet metal is from $4
Hemming of roof eaves: options and their features
What kind of roof eaves lining can there be: options and materials. Features of lining the roof overhang with soffit, corrugated sheets and lining.
How to hem a roof eaves
After installing the roof, it is necessary to carry out work on its cladding. The binder will perform three functions at once:
- it will give the house a finished look;
- will provide roof ventilation;
- will protect the facade.
How to hem a roof eaves
Today we will talk about how to hem a roof eaves and what needs to be used for this.
Types of overhangs
Front overhang
The main function of the front overhang is to protect the facade. Essentially, these are the side edges of the roof slopes; therefore, a hip roof, which has 4 slopes, does not have such edges.
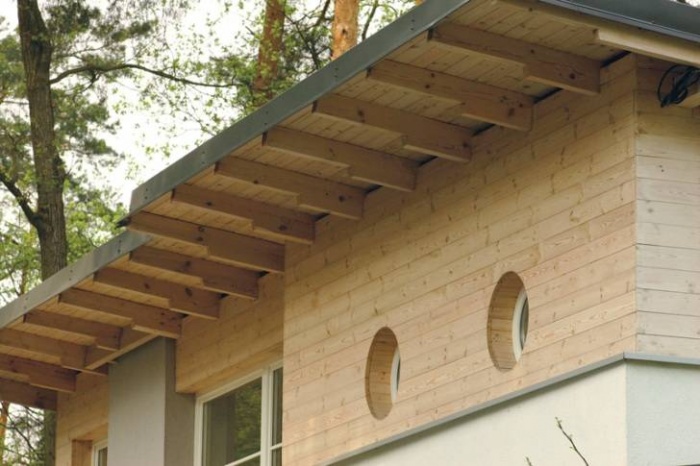
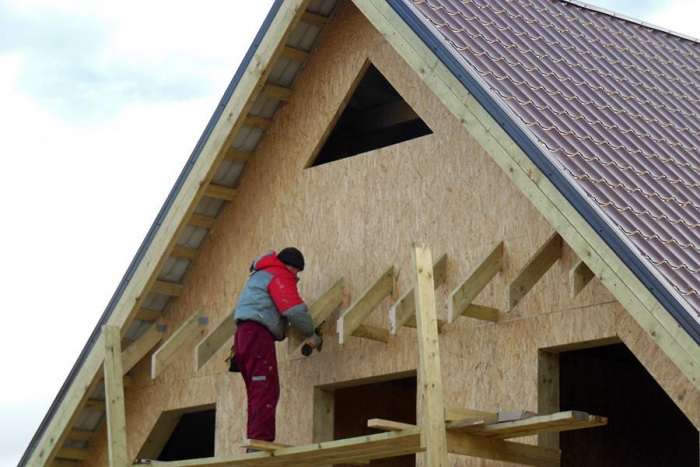
If we are talking about a gable roof (and in most houses this is exactly what it is), then the supporting beams installed on the rafters extend outward. You can also often see an overhang of sheathing boards laid under the roof on top of a vapor barrier. The main cornice board is attached to them, which is subsequently sheathed (more on this later).
Side overhang
Every sloping type roof has such an overhang. It is created by rafters extending beyond the walls of the building. The length of the projection depends on the blind area and the height of the building, but in most cases it ranges from 60 to 70 cm.
Despite the norms, sometimes narrower cornices are found. This can be fixed in two ways:
- reliably protect the wall from the wind, since in slanting rain it will get very wet;
- installing fillies to increase the length of the rafters is a more labor-intensive procedure that few people want to perform (after all, you will have to open the roof that has already been made).
Therefore, the required length of the cornice should be considered at the design stage.
Along the entire cornice, the rafters are fastened with boards - in the future they need to be covered with facing material.
How to ventilate a roof through a sheathing
How to ventilate a roof through a sheathing
As already mentioned, eaves protect the roof and facade of the structure from precipitation. But at the same time, they should not become an obstacle to the natural ventilation of the space under the roof. And this applies not only to attics, but also to ordinary “cold” roofs.
The heated air, rising from below, must freely overcome the eaves, pass between the roof and the vapor barrier and exit through the ridge. That is why during installation of the overhang you cannot use foam or sealant, otherwise condensation will occur and, as a result, the insulation will get wet.
Note! Only the side cornices should be ventilated, while the front ones must be sealed tightly.
About the choice of materials for the overhang
Today there are quite a lot of materials for cornices, each with its own pros and cons. Nevertheless, they all very effectively provide ventilation and protect the roof from moisture. When choosing one or another of the materials, pay attention not only to its appearance, but also to its service life.
Corrugated sheeting
This material is galvanized steel coated with polymer spraying. Corrugated sheeting is resistant to heavy loads, temperature changes, and has suitable rigidity. Between the layer of corrugated sheeting and the surface of the wall, you need to leave a gap that would be equal to the height of the waves of the material.
Soffit lining
A more popular material used in the construction of roof eaves, which is nothing more than siding, but with ventilation holes. Another difference between the material is the use in production of special ultraviolet stabilizers that protect the cornice from the harmful effects of sunlight.
Soffits are divided into several types depending on the material used in manufacturing.
- A characteristic feature of copper soffits is durability and presentability, but at the same time high cost. Such soffits are very durable and non-flammable.
A characteristic feature of copper soffits is durability and presentability
Metal soffit is a sheet of high-quality galvanized steel coated with a polymer coating.
Lining made of lining
No matter what new materials appear, even today it is quite common to find overhangs made of real wood. In this case, you need to select the material very carefully, because the cornice will be located on the street and, therefore, exposed to aggressive environmental influences. There is no need to save money and buy thinner lining - try to keep the thickness of the material at least 2 centimeters. The humidity of the lining should be at an average level.
Lining made of lining
Note! A lining that is too wet is absolutely not suitable, because it will definitely “lead”.
The boards need to be nailed two centimeters from the wall to ensure good ventilation.
Methods for filing cornices
You can hem the overhang using one of two available methods:
Methods for filing cornices
An overhang along the rafters is only advisable for roofs with a slight slope. This method is complicated in that as a result the edges of the rafters must form a flat plane. This is not always possible, so the only solution may be small planks, length from the edge of the canopy to the wall, attached to the rafters. To nail them evenly, you first need to pull the twine and align it. For fastening, use iron corners or screws.
A cornice on a wooden frame is perfect for roofs with a significant slope. To construct this box, you need to take a 40 mm thick board and secure it between the rafters and the wall surface. If one edge of the board is attached to the rafter leg, then additional installation of a second board, vertical, will be required.
The box is finished, now you can start attaching the sheathing.
Note! The sheathing should be secured with screws, but not nails - this will provide the necessary rigidity.
Soffit lining technology
Soffit lining technology
The installation procedure consists of the following steps.
First stage. It is necessary to equip the soffits with a pair of special strips in the form of the Latin letters F and L. The first needs to be secured on the side of the cornice, the second - on a special strip attached to the wall. All fastenings are made using self-tapping screws. It is advisable to pre-mark everything so that the planks lie evenly.
Second phase. Then you need to measure the cornice and subtract 6 millimeters from the resulting figure - this will allow you to create a gap to compensate for thermal expansion. Next, you need to cut the soffits into strips of the required length.
Third stage. The soffits need to be slightly bent and inserted into the installed profiles. Self-tapping screws are also used to secure them.
What you need to know when installing soffits
- It is undesirable to carry out work at temperatures below 15°C, even though manufacturers insist on the possibility of installation even in winter.
- Soffits need to be installed only at an angle of 90°C.
- Soffits should be stored only on a flat surface, in stacks of 15-20 pieces.
- You should always leave the gap mentioned above.
- To cut soffits, you need to use a “circular saw” with reverse teeth (you can also use special metal scissors).
- The length of the screws must be at least 3 millimeters.
- The step between the fasteners should be a maximum of 40 centimeters.
Corrugated sheeting technology
First stage. First, a block should be nailed to the wall in a horizontal position, strictly at the level of the overhang. In parallel, a second block is attached at the same level, this time along the rafters.
Second phase. Then you need to cut strips of corrugated board (not forgetting about the same thermal expansion) and attach them with self-tapping screws to the bars.
Third stage. The joints are decorated with strips of the outer and inner corners.
Actually, the installation of corrugated board is completed.
Clapboard hemming technology
Scheme of filing an overhang with clapboard
It is advisable to carry out this procedure from below, using a stepladder or scaffolding.
Note! The cornice can be hemmed only after completion of external insulation, installation of moisture insulation and cladding.
First you need to check if all the rafters are the same length and if they are installed parallel to the wall. Then you need to attach the wind boards to them and only then proceed with installation.
First stage. Screw the board to the wall in a vertical position. The bottom edge of the board should be flush with the rafters.
Second phase. Secure the next board between the previous one and the rafters, aligning along the bottom edge. The result will be a base - and you need to install the sheathing on it.
Third stage. The frame is covered with boards. Traditionally, a slight gap should be left between them and the surface. The boards should be smooth, approximately 20 millimeters thick.
Note! To ensure ventilation, it is advisable to install special grilles every one and a half meters.
Although it is worth noting: few builders do this, relying on the fact that wood has the ability to “breathe”.
Conclusion
As a result, I would like to note that upon completion of installation, the installed material must be treated with an antiseptic agent - it will provide additional protection for it. If you follow all the selection and installation instructions given here, the cornice will last a long time and look great.
How to hem a roof eaves with your own hands - step by step guide!
Learn how to hem your roof eaves! Selection of materials for the cornice, methods of hemming, instructions, photos + video.
Sheathing roof overhangs: sheathing options and execution techniques
Protecting your home's roof and making it look attractive are issues that require careful consideration. One of the possible solutions is a neat finishing of the overhangs, which will reliably protect the rafter elements from atmospheric influences and ensure the aesthetics of the roof.
The eaves overhang of the roof of a house is usually called its lower part, protruding beyond the boundaries of the walls. It is designed to protect the walls and foundation area from getting wet during rain.

According to the requirements of SNiP, filing roof overhangs is not considered a mandatory operation. Nevertheless, many experts recommend not to neglect the filing of roof eaves. It will allow us to solve a number of important issues, for example,
- when there is a strong wind, rising air currents arise, which, having penetrated under the overhang, tend to tear off the roof, and the roof overhang lining will become an obstacle in their path and will not allow slanting jets of rain to get into the under-roof space;
- lining the roof overhang will hide the rafter elements, the releases of the layers of the roofing cake and the roof covering from the attic side, and more.
Finishing the roof eaves is the final stage in its construction, so hemming the roof overhangs is done after
- her devices;
- insulation and finishing of external walls;
- installation of drains.
Types of overhangs
- Cornice or side. These are horizontal overhangs that are formed by the lower part of the slope. Ventilation of the space under the roof also passes through them. Having passed through the overhang, the air moves towards the ridge, drying the layers of the roofing cake along the way. Hence the conclusion that it is impossible to close them completely. But it is also extremely undesirable not to sheathe the structure. This means that you need to find a reasonable option on how to hem the roof overhangs so as not to block the access of air under the roof, but yes to birds, insects or rodents.
- Pedimental. They are formed by the inclined edges of roof slopes and do not take part in under-roof ventilation. Therefore, the need to finish the roof eaves for gable overhangs is due to other reasons, namely the inclined plane of the structure. It is highly susceptible to the destructive effects of moisture, which is blown by the wind. This is especially dangerous for an attic roof, since the edges of the insulation are unprotected from getting wet. Gable cornices must be completely sheathed. Thus, the lining of the gable roof overhangs will become impenetrable.
How to trim the edges of an overhang

Both gable and eave overhangs have uncovered elements: the ends of the rafter elements and the end part of the sheathing release, respectively, which must be finished before hemming the roof eaves.
The choice of material for finishing the edge of the cornice or its end part depends on the main material of the roof covering. Quite often, manufacturers supply ready-made kits for finishing edges along with the roofing material. The sheathing process itself is performed according to one of the following algorithms.
- All protruding rafter elements or fillies are cut in one straight line strictly parallel to the wall, that is, vertically. Then the ends of the rafter legs are connected with a strapping board. A frontal roof board is attached to it, the dimensions of which should allow the ends to be covered: completely or partially with minimal shortfall. It is on this that the drainage gutters will be installed in the future.
The frontal board is made of metal or wood. For roofs made of known types of tiles, such a board is included in the roofing material kit. The front board is attached to the ends of the rafter elements using galvanized nails or self-tapping screws.
- Elements of the sheathing that protrude beyond its limits are cut parallel to the wall at the same level. An end board is nailed to them and tied to the end of the roofing beam. If you attach the board in a standard way only to each element of the sheathing, then you will not be able to achieve a sufficient degree of rigidity, so it is recommended to use a T-shaped connection.
To do this, additional elements are hemmed from boards or bars, placing them between the front board and two adjacent battens, starting from the second, in increments of one interval, that is, every second and third are selected.
Binding options
In principle, roof overhangs can be hemmed using any convenient method. But upon closer examination, all of them can be combined into two techniques.

One of the options for filing is directly along the rafter elements. The main requirement in this case is the location of the open ends of the rafter legs in a single plane.
- This method is suitable for roofs with a slope of no more than 30˚, the overhang of which does not exceed 0.4–0.5 m.
- Hemming strips are stuffed onto the base of wooden parts nailed to the rafters.
- You can sheathe the base both lengthwise and crosswise.
- Installation begins with the installation and fastening of the initial and last trim strips.
- Then a construction thread is pulled between them and, keeping the correct level, the rest are set.
- When hemming the corner of two slopes, the planks must be secured to the corner rafter on both sides.

Horizontal roof overhangs are used on steep slopes. Installation of the roof eaves is fairly quick.
- A box is knocked down from wooden beams, which is attached to the adjacent wall and the base of the roof, and the wall beam must be positioned 1 cm higher than the beam attached to the lower section of the rafter legs. In this way, the slope necessary for the drainage of water that gets inside the eaves due to the wind is maintained.
- To ensure the rigidity of the box structure, fastening the bars with screws is duplicated with additional fasteners on metal plates and corners. Then they begin to file it with some convenient material.
Various materials made of metal, plastic or lumber are suitable for lining the roof eaves.

- The most common is considered to be lining the roof overhangs with boards 15–20 mm thick. The width of the material depends on the overhang of the cornice and ranges from 5–25 cm. The aesthetic appearance of the cladding depends on the exact observance of the constant width of the boards.
The undoubted advantage of boards for lining roof overhangs is its ability to provide high-quality ventilation of the under-roof space, since air in this case flows there evenly along the entire perimeter of the roof. The gap between the boards is 1–1.5 cm.
- If the boards used for hemming are of sufficient length, they are screwed at several points to prevent deformation.
- The boards are joined in a checkerboard order. In this case, it is necessary to leave sufficient distance between the two joints.
- The only exception is the corners of hip roofs, where the wooden planks are sawn down when joining, dividing the right angle in half.
- All elements are treated twice with antiseptics and fire retardants: before installation and after.

- Another popular material is wooden lining. Considering the susceptibility of wood to all sorts of weather vagaries, special requirements are placed on its quality:
- the planks should not be thin;
- humidity level. The natural humidity of the lining, which has been stored outdoors for at least a month, is considered optimal.
The lining strips are laid tightly, leaving no gaps between them, as in the case of boards. Holes for ventilation are cut out on the finished cladding in 150 cm increments and covered with gratings.

- Lining the roof eaves with corrugated sheeting coated with polymers is carried out according to a simple algorithm.
- When sheathing cornices with corrugated sheets, sheets of the required size are first prepared. They are screwed to the finished frame parallel to the wall. Special screws are used for fastening.
- The joint formed by the wall plane and the corrugated sheet is closed by installing additional elements: a front strip and an internal corner. The corner is attached to the profiled sheet, and the strip, accordingly, to the board. To close the external joints of the corrugated sheet, external corners are used.
- The roof gables (photo above) are hemmed along the walls. The planks are attached to the outer edge of the cornice and hidden under the end strip and corners. The sheathing strips should be approximately 2 cm narrower than the width of the overhang. Thus, air intake will occur due to the height of the profile wave.
- When installing the roof eaves, the finishing with corrugated sheets can be done in color, choosing the appropriate one from a variety of options.

- PVC siding is a fairly affordable and effective option for lining roof eaves. This material often goes on sale in a special package. The plastic panels are supplemented with U-shaped strips necessary for the design of edges, corners, and ventilation grilles. The sheathing is fastened parallel to the edge.
Plastic strips are attached to a wooden frame at two to four points.

- Special plastic panels called soffits are produced for lining roof eaves. These panels are thicker than siding and are usually equipped with special perforations through which ventilation of the under-roof space passes. In addition, UV stabilizers have been added to the plastic for spotlights, which provide the material with high resistance to ultraviolet radiation. The soffits for filing are cut along the length of the cornice and installed at right angles to the wall.
Sheathing roof overhangs: sheathing options and execution techniques
To give the house structure completeness, it is necessary to trim the roof overhangs. Suitable materials for this process are lining, board, siding,
The work on constructing the roof structure with my own hands is almost completed, and the last stage awaits me - lining the overhangs of the roof of my house. Why is cladding needed? What materials are used for roofing? How to do this work yourself? I will try to answer these and other questions.
Roof overhang trim
Why do eaves overhangs need to be hemmed?
Eaves overhangs are those parts of the roof that protrude beyond the wall of the house. Their main function is to protect the walls and foundation of the house from the destructive effects of snow and rain. The dimensions of the cornice are selected individually for each house and range from 40 to 130 centimeters. The size of the eaves overhang is influenced by: the height of the walls of the house and the presence or absence of a drainage system. When building some houses (for example, Alpine-style houses, which often have wooden walls), large eaves overhangs are installed to protect the walls.
Many people think that cornices are sheathed only to give the house an attractive appearance, but this is not entirely true. Roof lining is not only a decorative design for the eaves overhang, but also protects the elements of the roof of the house from the aggressive influence of the external environment.
Advice. According to the construction rules, roof lining is not mandatory, but its presence will significantly extend the life of the roof of the house, so I strongly recommend lining the roof overhangs.
These works are not particularly difficult and can be done with your own hands, but first I have to decide on the material that I will use.

Roof eaves
House roof ventilation
Before choosing a material, you need to touch upon the topic of eaves overhang ventilation, since methods for ensuring it will be considered for each material used in roofing separately. So why do you need roof ventilation? It provides the air circulation necessary to prevent damage to the wooden elements of the supporting roof structure. Everyone knows that warm air always rises. If you do not ensure its unhindered circulation under the roof of the house, condensation will form, which, flowing onto the insulation, will render it unusable.

Attic roof ventilation diagram
Advice. To prevent condensation from forming under the roof, the sheathing must have ventilation holes to allow fresh air to enter. It is also necessary to provide special vents on the ridge through which air will leave the under-roof space. It is for this reason that in the process of lining the roof with your own hands, I strongly recommend not using sealants to treat the eaves of the house.
Selecting material for roofing
For these purposes, various materials are used, each of which has its own pros and cons. You need to familiarize yourself with them, and then make your choice and start lining the roof with your own hands.

Lining the roof with clapboard
Materials used:
- Corrugated sheets are sheets of galvanized steel that have a special polymer coating. This coating not only additionally protects the metal, but also gives it the desired color. I would like to note that corrugated sheeting is distinguished by its variety of colors. Low weight and high rigidity allow it to be used for complex projects. Ventilation is provided by a gap during installation. Corrugated sheeting is distinguished by its durability. Despite these advantages, I still do not recommend using it for roofing with your own hands, since this material is difficult to install, and special equipment is required to cut it.
- Planed boards or wooden lining are in most cases used to cover the eaves of the roof of houses with wooden walls. A wood-clad cornice light goes well with a wood wall. The undoubted advantages of this solution are its beautiful appearance and excellent ventilation, which is achieved due to the gaps (6 - 13 mm) between the boards. Before installation, the wood must be treated with a special solution and allowed to rest outside. If you install a dry board from a room with your own hands, then perhaps over time it will move, which will affect the entire structure. Wood requires special care: it needs to be treated every three years. I recommend sheathing the roof overhang with wood only in houses that have wooden walls.

Roofing with corrugated sheets
- Plastic lining is distinguished by its low cost. It is easy to install, which is especially important if you do all the work yourself. But a significant disadvantage of plastic lining is its tightness. To ensure ventilation, special holes are cut, which spoil the appearance of the cladding. I would only use clapboard if the budget is very limited.
- Soffits are profiled panels that were specially designed for roofing. They are made from polyvinyl chloride with the addition of UV stabilizers, which provides them with additional resistance to ultraviolet radiation. The soffit has a wave profile. On one of the waves (on the middle wave), a ventilation grill is made in the factory. I preferred the soffit. This material suits me completely. Below I will tell you how to do soffit sheathing with your own hands.

Roof overhang lining with perforated soffit
To cover the eaves of the house with my own hands, I will need:
- soffit and its fastening elements;
- wooden beam for the frame;
- screws and nails;
- tools.

Roofing with soffits
I will tell you the principle of calculating the amount of material using the example of the cladding of my house. The dimensions of the house are 8 by 10 m, the eaves are 60 cm. It turns out that the perimeter of the house is 36 meters. To get the required soffit area, I need to multiply the perimeter by the size of the cornice:
36 m * 0.6 m = 21.6 m2.
But to this value you need to add four more pieces measuring 0.6 m by 0.6 m, which are located at the corners of the house. The total area of these pieces:
4 * 0.6 * 0.6 = 1.44 m2.
Final soffit area:
21.6 m2 + 1.44 m2 = 23.04 m2.
To cover the eaves overhang with my own hands, I used panels manufactured by Asko, which have dimensions of 0.305 m by 3.5 m. I calculate the area of the panel:
0.305 m * 3.5 m = 1.0675 m2.
Knowing the final area of the soffit and the area of one panel, I get the number of panels required to cover my house:
23.04 m2: 1.0675 m2 = 21.5831 pieces.
I round up to 22 pieces and take a couple more to spare. As a result, I buy 24 soffit panels for cladding.

Installation of siding and soffits
I also need to calculate the length of wooden slats required for the frame. To prevent the hem from sagging, I provided an additional rail in the frame, running in the middle. It turns out that the lath will be laid in three rows: the first row will roll along the wall itself, the third will run along the edge of the cornice at a distance of 60 cm from the wall, and the second – at a distance of 30 cm from the wall (in the middle). I calculate the length of the slats:
2 * (10 m + 8 m) = 36 m– 1 row from the wall;
2 * (10 m + 2 * 0.3 m + 8 m + 2 * 0.3 m) = 38.4 m– 2nd row from the wall;
2 * (10 m + 2 * 0.6 m + 8 m + 2 * 0.6 m) = 40.8 m– 3rd row from the wall;
36 m + 38.4 m + 40.8 m = 115.3– total length of slats.
Advice. If the width of the cornice is 60 cm or more, then lay a third row of slats to stabilize the sheathing.
I attach only the outer row directly to the rafters. To fix the remaining two rows, I make a sheathing. It took me another 40 meters to lay the lathing. I also provided a small reserve and bought 170 meters of slats with a cross section of 30 by 60 mm.

Installation of spotlights
Tools you will need:
- metal file (with small teeth) for cutting soffit panels;
- screwdriver, self-tapping screws and wood saw for constructing the frame;
- a hammer and aluminum nails with a large head (at least 20 mm in diameter) for fixing the sheathing;
- building level to control the horizontal position of the frame;
- scaffolding to facilitate the installation process and prevent damage to the wall (if the walls of the house are made of brick, then you can use a regular ladder).

Do-it-yourself roofing
The process of filing a roof with your own hands is as follows:
- I attach special J-slats to the first and third rows of frame slats with nails in increments of 40–50 centimeters.
- I bend the pre-cut pieces of the panel slightly and insert them into the grooves of the J-rails, after which I nail them to the wooden slats of the frame.
Advice. Make the size of the soffit panel the same as the size of the cornice, but be sure to provide a small thermal gap of 5 mm (the size of the soffit is 5 mm smaller than the size of the cornice). Drive the nail into the middle of the longitudinal hole in the panel. Do not fill it in completely, but leave a small gap.
As you can see, lining the roof overhangs is not particularly complicated. Now you can do it yourself. The main thing is not to be afraid or rush. Experiment and make your home more beautiful and comfortable!
The gable and eaves overhang of a corrugated roof are the projections of the roof beyond the walls of the house. The projections on the side of the slopes are called cornice, and the projections on the side of the pediment, respectively, are called pediment.
Lining the roof eaves with wood-look corrugated sheets
The overhangs are sewn up last - it is also important that the under-roof space is ventilated with a strong air flow in case of unexpected rain or the insulation gets wet due to a large amount of condensation caused by a strong temperature difference. At the same time, for such roofs from metal profiles, as a rule, the eaves are made from corrugated sheets, rather than being hemmed with standard soffits.
Why is this solution better than the standard one? Why do you need to cover the eaves overhang from below? The answers to these questions, as well as detailed instructions on how to hem the roof eaves with corrugated sheets with your own hands, are in the main part of the article.
Why do you need cornice hemming?
Both eaves and gable overhangs of corrugated roofing must be sewn up from below. Despite the seeming insignificance of this stage of construction, it is undesirable to leave the roof without covering for a long time, especially in late autumn or winter. Otherwise, due to the constant wetting of the ends of the rafters, even wood treated with protective compounds can be affected by rot, fungus or mold.
So after finishing on the slopes, you need to sheathe the cornice with corrugated sheeting as quickly as possible. Stitching performs four important functions.
Firstly, protects the roof from moisture. Although this happens infrequently, in a strong wind, raindrops can fly through the projections of the slopes into the under-roof space, so lining the eaves with a corrugated sheet protects the rafters, sheathing and insulation from getting wet.
![]()
Secondly, reduces heat loss through the roof. The roof is ventilated, among other things, through a cornice made of corrugated sheets, but this air flow is weak because it passes through very small gaps and holes. If metal sheathing sheets do not interfere with its passage, then an excessively strong air flow will blow through the under-roof space, significantly increasing heat loss through the roof.
Third, protects the under-roof space from insects, bats, birds. It's no secret that the roof is a favorite nesting place for birds. They make their nests out of insulation and stain the attic with feathers and droppings - and this is not only unpleasant to look at, but also dangerous, because birds carry dozens of serious diseases. Lining the overhangs with corrugated sheets greatly complicates the penetration of birds into the roof.
Finally, fourthly, improves the appearance of the roof. Protruding rafters with other “insides” of the roof, exposed to everyone, are not the most aesthetically pleasing sight. Sewn overhangs made of corrugated sheets acquire a regular rectangular shape and make the entire roof a complete architectural ensemble.

Lining the roof overhangs with corrugated sheeting gives the roof of the house a complete and neat look
The eaves overhang of corrugated sheeting is not sheathed only in small outbuildings. In addition, unlined slopes are found in houses with, but rarely - even if the house is designed with a non-residential attic, the rafter system still needs to be protected from moisture, and the attic itself from birds and other unwanted residents.
How to hem the roof eaves: soffit or corrugated sheeting?
Typically, cornice and gable overhangs are covered with soffits - panels that resemble perforations. But instead of spotlights, you can use other materials: wooden blocks, vinyl panels,. Of course, soffits are easier to install and the under-roof space is better ventilated through them, but other materials, especially corrugated sheets, have their advantages:
- Longer service life. The thickness of the metal and the anti-corrosion quality of the profiled sheet, with the exception of ultra-budget material, are higher. Therefore the service life is longer.
- Profiled sheet is cheaper. Soffits, as specialized ones, cost more than regular profiled sheets. And if you are sheathing a roof overhang made of corrugated sheets with a metal profile, then the sheathing will generally be free for you - it will be used for the scraps remaining after installing the roofing.
- Perfect color match. Even if the soffit manufacturer uses the same color as the profiled sheet manufacturer, the actual shades may differ significantly. If you buy material from the same company, then this is excluded.
- Great strength. Although there is no special load on the eaves overhang of the corrugated sheet, the greater strength of the metal profile is important: this material is much more difficult to damage during transportation or installation.
- Diversity. Soffits are available in 2-3 forms, while the number of possible corrugated sheet profiles is in the tens, if not hundreds. The same goes for flowers.
For these reasons, it is better to hem the roof eaves made of corrugated sheets with a profiled sheet. With the exception of roofs with a very slight slope - in this case, due to the practically absent height difference between the ridge and the lower part of the slope, the draft is minimal, therefore, for good ventilation of the under-roof space, it is important that the lining material has perforations.
How to hem a cornice with corrugated sheeting: design of an overhang, list of materials, instructions
As a rule, covering the cornice with corrugated sheeting is done using a special box, onto which sheets of metal profiles with additional elements are then attached. But a simpler design is possible, when the corrugated sheet is fixed on the back side of the rafters, which is why it is not located horizontally to the ground, but at the same angle as the roof slope. This kind of hemming of roof overhangs with corrugated sheets is called diagonal and is only suitable for roofs with a slight slope.
Dimensions of roof overhang made of corrugated sheets
Regardless of the type of lining, the minimum overhang of a corrugated roof is 500 mm, but it is usually made wider - up to 700 mm.
Horizontal filing of roof eaves with corrugated sheeting is suitable for roofs with any slope, so we will describe the procedure for its installation.
First, prepare the cornice assembly itself. To do this you need:
- Level the overhang by cutting off the protruding parts of the rafters or building them up with wooden blocks (fillies) to the required width of the eaves overhang.
- Install the front board so that its outer corner is in a straight line that continues the line of the rafters.
- Place a drip.
- Install waterproofing.
- Make a counter-lattice.
- Secure the ventilation tape to the ends of the sheathing bars.
- Install drain hooks.
- Attach.
- Lay the roof covering.
For more information on how to design a roof overhang made of corrugated sheets, read this article.
Only after this the roof eaves are finished with corrugated sheeting.
What tools and materials will you need:
- Front plate with a fold bent in the shape of the letter “L”.
- A wooden block or edged board with a width of 40 mm.
- J-profile.
- Profiled sheet.
- Scissors for metal or any other.
- Self-tapping screws for metal with rubber washers.
- A hammer drill if the house is made of brick, foam block and other similar materials.
- Screwdriver.
- Dowels or wood screws.
- Building level.
- Ruler.
- Pencil or marker.
How to sheathe a cornice with corrugated sheeting: step-by-step instructions
Lining the roof eaves with corrugated sheets, as well as laying sheets on the roof, is carried out at an air temperature no higher than +30 °C. This limitation is due to the thermal expansion of the metal. At negative temperatures, it is also undesirable to install a profiled sheet, but if there is such a need, then this can only be done when the thermometer is above the -15 ° C mark.
Attach the corrugated sheet correctly
To secure the metal profile cornice, use roofing screws with a self-sealing rubber washer. This reduces the rate of development of corrosion processes at the attachment point.
Begin hemming the cornice with a corrugated sheet by installing a support bar on the wall of the house. It is placed so that its lower edge is exactly at the level of the lower edge of the front board. To do this, use a building level and a marker to mark the fastening line. Then the beam or board is temporarily attached to the wall either with several screws if the house is wooden, or with dowels in pre-drilled holes if the walls are made of brick, stone or other similar materials. After this, the horizontality is checked again with a building level and, if everything is in order, the beam is finally secured every 300-400 mm.
This completes the covering of the roof eaves with corrugated sheeting.
Not everywhere you can buy a front plate. Instead, you can use a standard external corner strip.
What's the result?
Sheathing the eaves with corrugated sheets is an important final stage of roof installation. It protects the elements of the roofing pie from getting wet, dirty, excessive ventilation, and infestation by birds and insects. In addition, it gives the roof a finished look.
Unlike standard soffits, lining roof overhangs with corrugated sheets costs less, will last longer, and better matches the color of the roofing. Therefore, the profiled sheet should not only be laid on the roof, but also used to decorate the eaves assembly.
The filing of overhangs with corrugated sheeting is carried out after the cornice assembly is almost completely ready: the front board, the cornice strip, and the roofing itself must be installed. At the same time, the process itself is simple - it is complicated only by working at height. Therefore, you can easily make a cornice from corrugated sheets with your own hands. And if it is not possible to buy all the necessary additional elements, feel free to replace them with standard external and internal corner strips.
The installation of a pitched roof is always accompanied by a process such as finishing the roof eaves. These works may not seem so significant, but the further operation of the roof depends on how correctly they are performed.
Typically, corrugated sheeting, lining or panels specially designed for this are used as materials for covering cornices.
What are roof overhangs and why are they needed?
The roof overhang is the surface at the bottom of the roof, which is distinguished by its protrusion beyond the walls themselves. It is needed to protect the walls and foundation of the house from moisture getting on them during heavy rainfall. As a rule, the width of this part varies within one meter. Construction rules allow not to line this part of the roof.
But still, it is best if the overhangs are treated, since a strong wind entering through the holes in them can easily tear the roof off the building. In addition to the practical function, overhang sheathing also has a decorative function, since it is always better to remove the underside of the roof and aesthetically treat its edge.
Before making cornices under the roof, you need to complete the roofing work, finish the house and install the finishing material on the cornices last.
Types of overhangs
If you look at the roof, you can see overhangs on all sides. two of them are cornice, two are pediment.
Eaves overhang
This is the lower surface through which air enters the roof structure and ventilation occurs. On roofs with an attic, the air passes directly there, and on attic roofs into the roof structure itself, where the air cavity is located. After the air passes throughout the roof, it exits through the ridge.
If the overhang is boarded up, ventilation will not occur, but birds, mice and insects will be able to get into the roof structure. Thus, the overhangs are formed. But not close, but with a small gap for air to pass through.
Usually the issue of leaving a gap is resolved by similar actions:
- Leaving a gap between the sheathing and the wall of the house. For hemming made of corrugated sheets, the gap is left small, from half to one centimeter. When using lining, you need to leave from a centimeter to one and a half.
- If the overhangs are decorated with metal, then you need to install ready-made metal grilles that are mounted on the finish.
- If the sheathing is carried out using boards, then you need to leave gaps of up to 1 cm between them.
- If you decide to use soffits, then perforated material is used, which is created for ventilation purposes.
Important! The area of the ventilation hole should be larger or the same as one five hundredth of the area of the roof structure. For roofs covered with bitumen, such holes are made even larger.
Gable overhang
This is the side part of the roof slope, which is adjacent to the walls of the house. Ventilation is not important in this case; the main thing here is protection from environmental influences. If there is a strong wind with rain outside, then it is necessary that the gable-type overhang does not allow moisture to pass through with the wind, since there is a risk of moistening the roof insulation, which will cease to perform its main function. That is why tightness is in the foreground when designing this part.
Sheathing methods
Roof overhangs can be designed in various ways, for example, in perpendicular and parallel directions from the overhang. Various solid materials or their elements can also be used. Let's consider methods of fastening the material:
Hemming along the rafters
If the roof has a slope of no more than 30 degrees and a small part of the offset, approximately 50 cm or less, then this cladding method can be used. To begin with, a sheathing is formed, which is attached to the rafters; the material is already mounted on it parallel, perpendicularly or along the end of the rafters.
Horizontal type binder
This design method is very good with a strong roof slope. To carry out cladding work, you need to build a kind of box that is attached to the rafters and the wall. To quickly drain water that gets onto the overhang, it is necessary to mount the beam on the rafters a little lower than the one that is attached to the wall.
Important! If the overhang is more than 45 centimeters, another additional one is placed between the beams.
All beams are reinforced with boards that are nailed perpendicular to the wall.
Materials for covering cornices
When choosing a material for a roof eaves, you need to pay attention not only to its functional side, but also to its decorative side, since cladding that is inappropriate in style will look extremely unattractive.
Board finishing
Boards must be taken only from coniferous species and of certain dimensions. The width should be at least 5 cm and no more than 25, and the thickness should be about 2 cm. In order to prevent damage to the wood in the future, the boards need to lie under a canopy for about a month before installation. It is also necessary to carry out treatment with an antiseptic and decorative coating with varnish or paint as necessary.

When the boards are perpendicular, their fastening points are located on each side; in the case of a long overhang, additionally in the middle. If the board is attached parallel to the wall, then fasteners are installed every meter. Be sure to leave a gap of about a centimeter between the boards to allow natural ventilation of the roof.
Clapboard finishing
Unlike ordinary boards, lining is a material completely ready for installation and processed. Before installation, the lining must also be left under a canopy for one month. Installation is carried out in the same way as in the first case. The only exception is that there is no need to leave gaps between the elements. Special metal grilles for ventilation are then attached to the lining.
Important! The overhang is covered only with moisture-resistant lining.
PVC siding finishing
To finish the roof eaves with siding, only those panels that have a special moisture-resistant coating are used. Additionally, you will need to purchase all additional decorative elements - special finishing strips for finishing edges, corners for masking joints, grilles for ventilation. The panels are attached perpendicular to the wall using three or four fasteners. It is better not to fasten panels along the overhang, as they can break due to the fact that they are not highly rigid, for example, like wooden boards.

Finishing with corrugated sheets
This material can be laid in such a way that a large area is hidden at once. Be sure to leave small gaps of about a centimeter between the sheets of corrugated sheets so that the panels do not bend due to temperature changes. Ventilation is carried out by installing ventilation grilles over the entire finishing surface.

Sheet type metal trim
For cladding the eaves of a house, copper, aluminum or galvanized or polymer steel can be used. The length of the sheets used can be up to 6 meters, and the thickness from 0.6 to 0.8 cm. Ventilation can be carried out by installing additional grilles or by installing perforated sheets. Steel sheets must be treated at the cutting line with special means to prevent metal corrosion.
Plywood finishing
Such material for overhangs can be used, but only on condition that it is water-repellent. Plywood has rigid sheets, so it is easy to attach; the result is a reliable coating, but it must be painted, since without treatment it does not look particularly attractive. Ventilation is carried out using special grilles.

Soffit finishing
Soffits are strips made of various materials that are made for processing roof eaves. Thanks to a wide range of colors and materials, you can choose those soffit panels that will fit into the overall design of the exterior in appearance.
In addition, the kits contain a variety of additional parts that speed up and simplify the cladding of the cornice with your own hands. There is no particular difficulty in installation; you just need to cut the planks to size and secure them according to the existing grooves.

Additional finishing of the cornice edge
Any type of overhang has parts of the structure that are not covered. For a cornice overhang, such elements are the ends of the rafters, and for a pediment overhang, these elements are the ends of the sheathing. They, just like the overhang made, need to be decorated, while protecting them from atmospheric influences.
Important! Eaves overhangs must be decorated with gutters.
These elements can also be decorated with different materials, depending on what type of material was used. Usually, along with a kit for processing the overhang itself, material for finishing the edge is also offered.
Before decorating the eaves overhang, all rafters must be cut vertically at the same level. The ends are then joined together using a strapping board onto which the front is attached. A gutter will subsequently be installed on the latter.

A gable-type overhang is processed by initially cutting off the ends of the sheathing that extend beyond the walls so that they are parallel to the wall. An end board is nailed to these ends. It is covered with roofing material.
