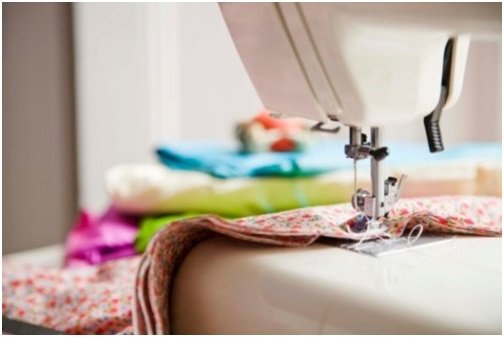
Rules for operating a manual sewing machine. Manual sewing machine instructions, video on use, operation, handy How to use a manual mini sewing machine step by step
This article provides only a description of the device and the main characteristics of the Merrylock cover maker, model 009.
Brief sewing machine instructions type Chaika, Podolsk 142, performing a zigzag stitch. An abbreviated manual for the design of the Chaika sewing machine and basic recommendations for its operation are presented in a simplified form that is understandable to everyone. A diagram of the machine's structure and a description of the main components, parts and controls are clearly given. Recommendations are given on the purpose and use of various paws. The operation of the machines requires periodic lubrication of the components and mechanisms of the sewing machine. Our instructions give recommendations on how often you need to lubricate and clean the machine, what kind of oil you need to use, etc.
Detailed instructions for the Podolsk sewing machine. This machine operating manual is suitable for any machine of this class. Hand sewing machines Singer, Tikka, almost all old PMZ models, including those with a foot drive, have the same device. The instructions are set out almost in full on the basis of the manufacturer's manual as amended in 1952. There are many visual drawings and a detailed description of the device and recommendations for the operation and care of the sewing machine, as well as a section on the design of the foot drive.
It is almost impossible to find an instruction manual for used Japanese-made sewing machines. At one time they were brought to our country from Japan, and if there are instructions for such a sewing machine, then it is in Japanese, less often in English. To make it easier for you to understand the main characteristics of such sewing machines, we give a brief description of one of the Brother sewing machine models. It details the capabilities of such machines and their use. The main feature of the operation of Japanese-made sewing machines brought to our country from Japan is that they are designed for a mains voltage of 100 volts. Therefore, it is imperative to have a step-down transformer.
This model of sewing machine belongs to machines whose operation is designed only for sewing light fabrics. The compact and small machine has a number of restrictions on use. One of them is that you cannot sew too thick fabrics on it. This is one of the reasons leading to its breakdown. If you do not have the operating instructions for this machine, you can use a brief summary of the device and a description of the purpose of the sewing machine controls. Numerous illustrations clearly show how to use this sewing machine.
The household 4-thread overlocker VOMZ 151-4D (Vologda) can have several modifications. One of them is presented in this brief instruction. This overlocker model performs a four-thread overlock stitch. The last number and letter in the name of the overlocker in the instructions are deciphered as an overlocker that performs a four-thread stitch (number 4), and the letter (D) means that the overlocker has a differential slatting device. In other words, this particular overlocker model can be used for processing knitted fabrics. The instructions provide a diagram and parameters for adjusting the overlock loopers. You may need them if gaps appear in the stitch.
Textima 8032 is an industrial machine produced back in Soviet times in the GDR. A good, silent and fast machine that has the ability to perform a non-seating seam, or vice versa, to perform a landing (when sewing in a sleeve), thanks to the presence of a moving foot. Instructions Such industrial sewing machines have not survived, but the machines are still used in many ateliers and small sewing shops. We offer you a very brief instruction manual for this sewing machine, containing basic recommendations on the design and purpose of the mechanisms, as well as recommendations on the operation and care of the Tekstima sewing machine.
Detailed instructions for the Chaika sewing machine. In an accessible and understandable form for a beginning seamstress, basic ideas about the controls of the Chaika sewing machine and how to perform some operations are given. This instruction can be used for all Chaika, Malva, Podolsk models that perform zigzag stitching and other operations based on it. Brief recommendations are given on how to lubricate and care for the sewing machine, how to use the main feet and accessories.
This model of industrial iron is used in many studios, despite its age and the availability of good industrial irons on sale. This is explained simply. The iron is very heavy and this feature makes it indispensable when ironing heavy, drapey fabrics. In addition, these irons can withstand many years of use without requiring repairs. But, if you still need to repair the iron, we offer a brief description of its structure and operational characteristics, some technical parameters and an electrical diagram.
The master's opinion about which sewing machine is the best. Learn more about a used Rubin sewing machine and other old Veritas models.
If you are going to buy an Astralux sewing machine, then this article will help you learn more about Astralux machines.
This article describes one of the most inexpensive models of Brother sewing machines, the Brother LS-2125 sewing machine, produced in China.
What is different about a computerized sewing machine? The structure and basic operations and types of stitches.
How an inexpensive Janome sewing machine works and how to repair a Janome with your own hands.
If you are going to buy a sewing machine, then read this article about the features of an electronic sewing machine.
In this article, the master will share his opinion about the models of Singer sewing machines produced in the early 90s.
The household overlocker Prima, depending on the model, performs a three- or four-thread seam. Device, instructions for the Prima overlocker, care and repair.
How to thread a Chinese or any other model of three-thread overlock. Threading a modern knitted four-thread overlocker.
This article provides a description of the Chinese sewing machine Dragonfly 218. These instructions are suitable for other models of Chinese machines of this class.
Installation and repair of a manual sewing machine Podolsk. Each photo of the components and mechanisms of the sewing machine is commented by the master.
You will need a step-down transformer from 220 to 110 volts when purchasing a Japanese-made sewing machine.
We offer a detailed overview of the capabilities of the Juki 510 sewing machine. This machine model was produced in the 90s in Japan.
How to disassemble a sewing machine. What mechanisms in it can be regulated independently. Installation and repair of the Juki 510 sewing machine.
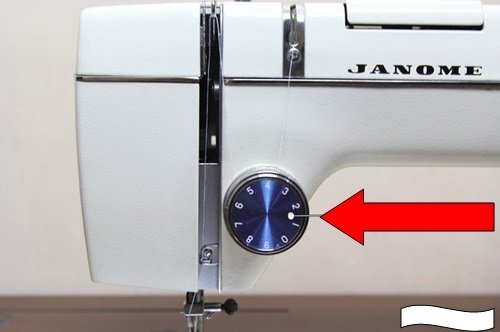
Let's move on to the tension regulator, which is a small wheel with a set of numbers. Thanks to this device, you can control the tension of the thread during operation. If the tension is strong, the needle will deviate slightly to the side. If the tension is insufficient, the thread will gather and tangle on the reverse side of the fabric being processed.
Let's start looking for the needle holder screw that securely holds the needle during operation. Usually it is located under the sleeve of the machine.
Next, you should find a foot that looks like small skis. Thanks to the foot, the fabric is securely attached to the machine and moves in a given direction.  Using a special lever located behind or to the right of the needle, you can raise and lower the presser foot onto the fabric.
At the bottom of the sewing machine there is a small bobbin that feeds the second thread to the needle. You can find it under the metal plate under the needle. The bobbin is released using a lever or button. It is needed to thread the second thread.

So we figured out the simple structure of a sewing machine. Now you need to learn in detail how to properly use a sewing machine.
Setting up the sewing machine before starting work
The machine must be placed on a flat, stable surface so that the needle is on your left side. First, you'll need to check a few basic settings. No network connection required yet.
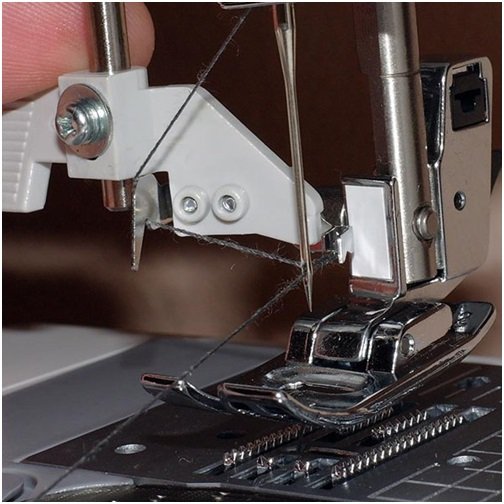
- Insert the needle into the machine: The flat side of the needle should face backwards and has a groove on the front to hold the thread while sewing. Insert the needle into the machine and tighten the special screw to hold it in place.
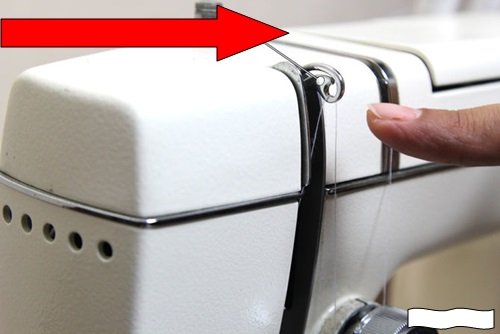
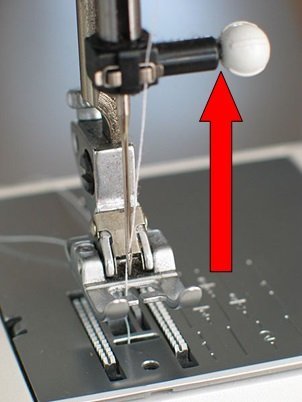
- Installing the coil. All machines use upper and lower thread. The threads in the spool must be placed on the upper spool seat, then the thread passes through the thread guide to the foot and is finally inserted into the needle. The lower thread must be placed inside the bobbin at the bottom of the machine: the thread is wound from the main spool using a thread take-up onto the bobbin. To wind the thread, you need to start the winding mechanism; when the process is completed, it will automatically turn off. The bobbin, ready for use, should be placed in the space under the needle, and the tip of the thread should be left outside.


- Connect the pedal and place it in a location convenient for you.
- Now you can turn on the device and try to make a few lines.
Learning to sew on a sewing machine
Before you start sewing on a new machine for the first time, you need to adjust the speed and learn how to start and stop the device.
- First you need to put the electric machine to idle.
- Try to set the device in motion by lightly pressing the ballast pedal with your foot.
- Increase the sewing speed by pressing the pedal harder.
- If you remove your foot from the pedal, the machine will stop working.
It is best to repeat the above steps 2-3 more times.
Now you can start working directly.
- We prepare the fabric: fold it in half, stitch it on our hands, and then use chalk to draw various broken and curved lines.
- We put the machine in the workplace and refuel it.
- Sew the fabric along the marked lines.
If you succeeded, congratulations! Now you can try to sew something more serious.
In order for equipment to serve properly for many years, it needs to be looked after and used correctly. Here are the basic rules for caring for an electric sewing machine:
- The machine should be stored in a cool, dry place. Dampness spoils the mechanism.
- Hide the device from dust, which causes the oil to harden and run poorly.
- If the machine has not been used for a long time, it must be thoroughly cleaned of dust and dirt, and then the rubbing parts must be treated with oil.
- After a long period of “downtime”, you must definitely change the needle with a new one, as it may become rusty and begin to tear the thread.
Video instruction
Using the machine is easy if you follow the instructions and our recommendations. To more accurately understand the threading process, watch the video instructions.
What you will learn from the video:
- Removing the bobbin case from under the bottom panel of the machine for threading.
- Winding thread onto a bobbin.
- Installing the bobbin into the bobbin case.
- Installing the bobbin case into the bottom of the sewing machine.
- Threading the upper thread through the first thread guide, thread tensioner, second thread guide to the needle.
- Pulling out the lower thread and preparing for work.
In contact with
The old mechanical sewing machine broke down, and I wanted to replace it with a new, electric one from China. And without knowing it, I took “the one from the TV store on the sofa” for review.
Read the review to see what came of it.
At first I wanted to take the most sophisticated one with 7 types of stitches, but the manager replied that it was not available and offered the simplest one. Following the proverb “from a thin sheep there is at least a tuft of wool” - he agreed.
I bragged to my brother about my upcoming purchase, and then for the first time I heard about an advertisement for a car from the Telemagazine. This sounded quite alarming to me.
Sent quite quickly. After 20 days I received the parcel by Dutch post.
The box is quite ordinary. A little wrinkled on the way.
Dimensions 23x21x13.5 cm. 

The kit includes: a spare needle, a needle threader, two empty bobbins and two with thread - black and white. 
The machine also comes with extensive instructions in English. 


It is possible to control it using a foot pedal.
The pedal itself is quite small, length 88 mm, width 57 mm.
The cable length is 150 cm, the plug is very similar to an ordinary 3.5 mm minijack.

Powered by either four AA batteries or mains power.
Power adapter with European plug.
Cable length 110 cm.

Declared characteristics.

Both adapters are connected to the corresponding ports on the rear of the machine.

The photo above immediately shows my first disappointment. We take the cars out of the box and it’s immediately clear that they are cheap. Flimsy plastic. Gaps between parts, etc.
The length of the machine is approximately 19 cm, the height is also 19 cm. It weighs only 640 g without batteries.


Width 97 mm.


At the bottom there is a compartment for batteries.


Now let's get acquainted with the controls of the machine.
Power button.

To the left of it is the operating speed switch, Low-High, respectively.

The flywheel is located on top of the rear part.

In the middle there is a peg for winding thread onto a bobbin.
The pin is put on the pin, and the reel is put on this retractable rod.


Then, having thrown the thread through your finger or pencil, you need to run the machine idle and you can wind the thread.
There is a bobbin holder on the front.

From it the thread goes to the upper thread tension regulator.

On the back of the machine there is a lever for the presser foot lifting mechanism. Made of plastic and quite thin, there are serious doubts about its reliability.

At the top of the front of the machine there is a small light bulb.

And also a small blade for cutting thread.

The hole in the needle plate is small, oval in shape.

The bottom bobbin is hidden under the semi-transparent cover.

It is held in the recess by a weak magnet.

I was unable to disassemble the machine, since the screws are located at the bottom of deep “wells” and I needed a long screwdriver.
After receiving and inspecting the machine, I decided to read the instructions, but I didn’t want to translate it from English.
I started searching for information on the Internet.
I couldn't find any instructions in Russian. But I discovered that this machine is sold under many different names - Tailor, Sinbo, Irit, Fanghua FHSM-203, etc. And almost all reviews from users were negative.
Then I went to Youtube in search of instructions. The program “Smashing a sewing machine from a TV store - Advice from Everything will be good - Issue 407” left no stone unturned in hopes for high-quality sewing. And the last nail in the coffin is the video “ROSTOV. The whole truth about Mini Sewing Machines” from a repairman for these products.
The information that everything inside is plastic and cannot be repaired was frankly not encouraging.
But still, the opinion of strangers is one thing, and your own is another.
Let's check the machine in action.
I don’t see the point of inserting batteries inside, so I connected it to the network. Used to control the pedal. It’s quite normal, but it’s too small – I literally had to press with my big toe.
The backlight is not very good.

Let's start with a simple thin fabric. I found an old sleeve from a cotton shirt.

Seems not bad. Only the seam pulls the fabric, you need to adjust the thread tension.
Front side.

Reverse

Stitched fine.

I tried stitching the cuff. The machine stopped and the thread flew out of the needle.
Now a piece of knitted T-shirt. Look at the lighting at the same time.

On the front side there is just a loose seam. Please note that the fabric does not stretch.

But the reverse is a complete failure.


It is necessary to adjust the tension of the lower thread, but the device does not have such an option. Absent.
And finally - a control shot. Two layers of thick denim.

The front seam is small and looks good.

But on the reverse side the thread is simply straight, it cannot even be called a seam.

Thus, the machine can sew, but it needs adjustment, and this is not possible. Thin fabric pulls. When sewing on thick fabric, there are problems with the bottom thread, and sometimes the machine just stops and cannot sew.
As they called it in the program - a machine for handkerchiefs.
It could be recommended for very undemanding users, if not for the price. For this money, the machine will not be suitable either for handkerchiefs or for pampering a child.
Once again, goods from TV stores have shown their unsuitability for use. Avoid them.
That's all.
Thank you for your attention.
Update. It turned out that my top pin and thread were installed the other way around.
I turned it over and tried to adjust the thread tension. It only got worse. Now the thread keeps flying out of the needle. The machine doesn't sew.
The product was provided for writing a review by the store. The review was published in accordance with clause 18 of the Site Rules.
I'm planning to buy +9 Add to favorites I liked the review +67 +99Sewing machine PMZ class 1-A, manufactured in 1952. This instruction is suitable for all lockstitch machines PMZ plant named after. Kalinina with manual and foot drive, up to the latest models with electric drive. The text of the instructions was left almost unchanged, in the original edition of the PMZ plant.

Sewing machine PMZ:
1. Screw for adjusting presser foot pressure. 2. Thread take-up lever. 3. Bandage securing the front cover. 4. Front cover. 5. Nut for adjusting the tension of the upper thread. 6. Thread take-up spring regulator. 7. Thread attraction spring. 8. Tension washer. 9. Thread guide. 10. Thread cutter. 11. Presser foot rod. 12. Presser foot screw. 13. Sliding part of the needle plate. 14. Fabric drive (rack). 15. Needle plate. 16. Platform. 17. Reel core of the winder. 18. Winder tension regulator. 19. Needle bar rod. 20. Needle holder. 21. Needle holder fastening screw. 22. Needle bar thread guide. 23. Sewing machine foot. 24. Sewing machine sleeve. 25. Sleeve spool pin. 26. Winder latch. 27. Flywheel. 28. Winder pulley. 29. Winder spindle. 30. Friction screw. 31. Stitch regulator cover. 32. Forward and reverse stitch control lever. 33. Stitch adjuster screw.
Purpose of the PMZ sewing machine
1. The machine has a central bobbin shuttle device.
2. The highest number of revolutions per minute is 1200.
3. The largest stitch pitch is 4 mm.
4. Material feeding in forward and reverse direction.
5. Flat platform measuring 371 x 178 mm. 6. Weight of the machine head (without manual drive) - 11.5 kg.
2. Sewing machine PMZ. General operating rules
1. According to the instructions, the flywheel of the machine should rotate only in one direction - towards the working person. Do not rotate the machine in the opposite direction (away from you), as this may cause the threads to become tangled in the shuttle.
2. When the machine is not running, the presser foot should be raised.
3. Do not start the machine without putting fabric under the presser foot, so that the teeth of the fabric motor (rack) do not become dull and the lower surface of the presser foot does not deteriorate.
4. Do not pull or push the material with your hands while sewing. The needle may be bent or broken. The necessary advancement of the fabric is carried out by the machine itself.
5. When sewing, the front slide plate above the hook must be closed tightly.
3. Bobbin case and bobbin of the PMZ sewing machine

In order to replace the bobbin in the bobbin case, you must first move the front sliding plate covering the shuttle device, then grab the latch “A” with two fingers of your left hand and pull the bobbin case out. When the latch is open, the bobbin cannot fall out of the bobbin case, since it is held in place by the hook of the latch. To remove the bobbin, you need to release the latch into place, turn the bobbin case open side down, and the bobbin will fall out.
4. Bobbin winding
To wind the bobbin, use a special winder attached to the back of the machine arm near the flywheel. The winder works in conjunction with the lower thread tension device located on the right corner of the platform. When winding the bobbin, the machine mechanism should not operate. Therefore, before you start winding, you must first turn off the flywheel so that it rotates completely freely, without causing movement of the machine mechanism. To do this, you just need to turn the round knurled head of the large friction screw, located in the center of the flywheel, towards you. The bobbin is installed on the end of the winder spindle so that the spindle stop pin fits into the bobbin slot. Place the spool of thread on the spool pin. The thread from the spool is pulled down under the tensioner washer. Then up onto the bobbin through the hole on the left side.

The winder frame, in which the spindle with the bobbin is attached, rotates, is pressed down by hand so that the rubber rim of the pulley comes into contact with the surface of the flywheel. The free end of the thread on the bobbin must be held by hand for some time until a sufficient number of turns are wound onto the bobbin to secure the end of the thread, after which this end is cut off. Once the bobbin is completely wound, the winder frame turns off automatically, moving the bobbin away from the handwheel. If the rubber rim does not contact the handwheel when winding the bobbin, the bobbin winder frame needs to be adjusted. To do this, you need to unscrew the screw in the slot of the winder adjustment plate, press the winder frame down towards the flywheel and, holding it in this position, secure the screw with a screwdriver in a new position on the plate. When the thread is wound correctly onto the bobbin, the turns are laid evenly and tightly to each other. If the winding turns out to be uneven or irregular in shape, you need to adjust the position of the lower tension device on the platform, and slightly move the tensioner bracket along the platform slot in the desired direction. To do this, use a screwdriver to first release the screw securing it.
5. Threading the bobbin case of a PMZ sewing machine

You need to take the wound bobbin with two fingers of your right hand, making sure that the free end of the thread runs off the bobbin from right to left. The bobbin case is held with the left hand in such a position that the oblique thread slot on the edge of the cap is on top, and the bobbin is inserted into the cap.
Pull the thread with your right hand through the slot on the edge of the cap to the left under the tension spring, then into a small slot at the end of the spring. The free end of the thread should hang to the left of the cap mounting pin.
6. Inserting the bobbin case into the sewing machine

The threaded bobbin case must be placed in the machine. To do this, take the bobbin case by the latch with two fingers of the left hand, put it on the central rod “H” of the hook so that the finger “K” of the bobbin case fits into the slot of the overlay plate on the stroke body. Release the latch and press the bobbin case inward until it locks onto the central rod of the hook. Leave the free end of the thread hanging and close the shuttle device, pushing in the front plate.
7. Installing a needle on a PMZ sewing machine. Kalinina

The needle must be inserted at the highest position of the needle bar, which is achieved by turning the handwheel. The flat side of the bulb on the needle should be facing to the left, i.e. outward, and the long groove on the needle blade is to the right, i.e. inward to the base of the sleeve.
Pay special attention to the correct installation of the needle, since if the needle is installed incorrectly, the PMZ sewing machine will not create a loop and gaps will appear. In the indicated position, the needle is inserted into the needle holder “E” and moved up until it stops, and then firmly secured with screw “1”.

Before threading, turn the machine's flywheel toward you by hand so that the thread take-up lever with the thread eyelet comes to the top position. Place a spool of thread on the spool pin on top of the sleeve and pull the thread from the spool in the following sequence:
1.Forward left through the rear left thread cutout “1” on the front board and down to the tension regulator.
2. Between the washers “2” of the tension regulator and up behind the tongue “3”.
3.In the eye of the thread take-up spring "4".
4.Up through the eye of the thread take-up lever “5”.
5.Down into thread guide “6” on the front board.
6.Down into thread guide “7” on the needle bar.
7. From right to left through the eye of the needle “8”. Pay special attention to threading the needle. You only need to refuel from right to left, i.e. out.
9. Preparing the PMZ sewing machine for sewing products

Before you start sewing, you need to pull the bottom thread out. To do this, take the end of the needle thread with your left hand without pulling it. Then they turn the machine’s flywheel towards themselves so that the needle first lowers into the hole of the needle plate, grabs the lower shuttle thread and then rises again to its upper position. After this, you need to pull the end of the needle thread and pull the bottom thread up through the hole in the needle plate. Then the ends of both threads, upper and lower, are pulled back and placed under the foot. The presser foot lowers onto the underlying material, and the machine is ready to sew.

The manual drive is installed and secured on the rear protrusion of the sleeve, located under the flywheel of the machine. The manual drive consists of a housing “1” with two toothed gears (large and small), a drive lever with a leash “2” - for clutching the machine’s flywheel, and a folding handle “3” - for rotation by hand.
After removing the wooden body of the machine, the manual drive handle - “3” is usually folded down to the non-working position, and the leash - “2” is disengaged from the flywheel.
To bring the drive into the operating position, handle “3” must be turned and inserted into the lug socket “A” on the large gear, having first pulled out the round head of the latch, without which the handle cannot be brought to the proper position. Having installed the handle, release the latch, which locks. The leash “2” must be turned so that the leather spacer fits between the flywheel matches. A special latch holds the leash in working position.
Having secured the flywheel of the machine for the working stroke, using a friction screw and lowering the foot onto the placed fabric, begin with your right hand to evenly rotate the manual drive handle, always in only one direction - away from you. The flywheel of the machine will rotate towards the working person.
11. Working on a PMZ foot sewing machine
The foot machine is set in motion by alternately pressing either the toes or the heels on the foot of the machine. When working correctly, both legs should rest with their entire feet on the footrest, and the left leg should be located slightly behind the right. The machine foot should be rocked as evenly as possible.
The drive wheel should only rotate in one direction - towards the seamstress. Beware of turning in the wrong direction as this may cause the threads to become tangled in the bobbin hook. The machine is put into operation using a friction screw in the same way as for a manual machine.
12. PMZ instructions. Finishing sewing

Stop the machine in a position where the thread take-up lever is at the top and the needle comes out of the material. Then, raising the lever “P”, raise the foot, move the fabric away from you with your left hand and cut the threads at the end of the stitch on the edge of the thread cutter located above the presser foot. For further sewing, leave the ends of the threads 8-10 cm long. The thread tension in the PMZ sewing machine is of great importance for the quality of sewing. The interlacing of the top and bottom threads should occur in the middle of the material being sewn. The stitching on the front and bottom sides should have the same appearance. If the tension of the upper thread is too strong or, conversely, the thread tension is too weak, then the interlacing of the threads occurs on the upper side of the material. The car winds its way from above. The result is a weak and unsightly seam. To eliminate this phenomenon, you need to loosen the tension of the upper thread or increase the tension of the lower thread.
If the tension of the upper thread is too weak or, conversely, the tension of the lower thread is too high, then the interlacing of threads will occur on the underside of the material - the machine loops from below. The seam turns out to be fragile. In this case, you need to increase the tension of the upper thread or loosen the tension of the lower thread.

Adjusting the tension of the upper thread must be done with the presser foot lowered. The amount of tension increases when turning nut “K” to the right and, on the contrary, weakens when turning counterclockwise. By noting the appropriate position of the pointer, you can quickly navigate to the correct tension setting. The tension of the bobbin thread is adjusted by screw “A” on the bobbin case tension spring (see figure above). When turning the screw (with a small screwdriver) to the right, i.e. clockwise, the bobbin thread tension increases. When turning the screw to the left, i.e. counterclockwise, the tension decreases. If the bobbin thread tension has been set correctly, it rarely needs to be changed; In most cases, a good stitch can be achieved by simply adjusting the top thread. Too much tension may cause thread breakage.
In addition to the correctly selected tension, the quality of the stitch also depends on the correspondence of the needle number to the thickness of the material being sewn. For the sewing machine, needles No. 70, 80, 90, 100 and 110 are used.
The thicker and coarser the material, the higher the needle number should be and the lower the number of threads used, i.e. the needle and threads should be thicker. On the contrary, the thinner the material, the lower the needle number and the higher the thread number, i.e. the needle and threads should be thinner.

The stitch length, i.e. the distance between needle pricks, for ordinary materials is provided within the range of 1.5 - 2 mm. For thin materials, the stitching should be more frequent, for thick materials - less often. The longest stitch length that can be achieved on the machine is 4mm. The required stitch length is set by the “B” regulator according to the scale numbers, which are printed on the regulator cover and show the approximate stitch length in millimeters. When the regulator lever is set to the highest division of the scale, which runs in the middle of the lid and does not have numbers, then there will be no fabric feed at all.
When operating the machine, lever "B" must be lowered down. The lower the regulator lever is lowered, the thinner the stitching will be, i.e. the longer the stitch length. On the contrary, the higher the regulator lever is set, i.e., the closer to the upper division of the scale, the more frequent the stitching or the shorter the stitch length.
When the regulator lever is lifted up from the middle line, the machine will change the direction of material supply to the opposite, i.e., when the machine is operating, the material will move towards the worker.
In order to change the stitch length, you need to move the regulator lever to a new scale division corresponding to the desired stitch length.
The regulator lever is moved to a new division as follows.
Let the lever of the regulator “B” stand on some division of the scale and it needs to be moved down to a larger stitch pitch. An internal limit plate located under the regulator cover and clamped by the left head screw prevents the regulator lever from moving down. "A" in the left arc slot of the cover. In order to be able to lower the lever lower, you must first release the indicated screw “A” and move it along the slot to the lowest position. After this, set the regulator lever to the required scale division, move the left screw “D” up along the arc slot until it stops and secure screw “A”. To obtain a more frequent stitch, the lever of the regulator “B” is moved up to the corresponding division of the scale, after which the screw “A” is released, moved up until it stops, and then secured again.
14. Reverse direction of material supply
The PMZ sewing machine can sew in both forward and reverse directions. When the feeding direction is reversed, the material will move towards the worker during sewing. In order to switch the machine to reverse, you only need to move the regulator lever “B”, which is in the lower position at a certain scale division, up to a stop. The stitch length remains unchanged. The machine can be switched to reverse feed without even stopping sewing or removing fabric.
15. Adjusting the presser foot pressure of the material
The amount of pressure the foot presses on the material rarely needs to be changed. But when sewing silk or light fabrics, it may be necessary to slightly reduce the pressure force, for which the screw is turned two to three turns to the left, i.e. counterclockwise. When sewing thicker materials that require stronger pressure, screw “K” is turned two to three turns to the right, i.e. clockwise. The pressure of the foot on the material should be sufficient to ensure uniform feeding of the material and to prevent the material from lifting along with the needle. Too much pressure only makes it difficult for the machine to move and spoils the material.

To ensure easy running of the machine and prevent wear of rubbing parts, all places of the machine indicated by arrows should be lubricated daily with a few drops of oil in each place if the machine operates continuously. To lubricate hard-to-reach parts, the machine has lubrication holes. In order to lubricate the needle bar hinge, you must first remove the front cover, loosening the screw securing it. The direction for the shuttle in the stroke body is lubricated with one drop of oil. The area indicated by the letter "A" must be lubricated when the needle is in the lowest position.
Installation and repair of a manual sewing machine Podolsk. Each photo of the components and mechanisms of the sewing machine is commented by the master.
The PMZ sewing machine is a fairly reliable and “hardy” machine, but over the years it has developed “plays” in many components that need to be eliminated. It is necessary to adjust the needle bar, check the gap at the nose of the hook when meeting the needle, etc. On our website you will find many materials on how to perform repairs yourself, including for PMZ sewing machines.
The most used machine. Probably everyone at home or in the country has such a sewing machine. The Podolsk machine got its name from the city in which the PMZ plant is located. The first letter in this abbreviation means Podolsk. Read about how to repair PMZ sewing machines yourself in this article.
PMZ lockstitch sewing machines have one unique property. They practically do not skip stitches. Even with a gap between the nose of the shuttle and the needle blade of almost 1 mm. they stitch reliably. But, nevertheless, it is with this kind of “breakdown” that people most often turn to a specialist. It takes exactly a minute to eliminate it, since you just need to place the needle correctly.
Does your machine break needles? You may simply be using a needle that is too fine when sewing thick fabrics. But there are a number of other reasons.
The first PMZ models have foot and manual drives. To learn how to repair a foot drive used for any brand of machine, read this article.
Sewing machines PMZ equipped with a manual drive, which very often requires repair. The handle wobbles, the drive rattles and rotates slowly. This article provides recommendations on how to independently repair the manual drive for a PMZ sewing machine.
The bobbin plays an important role for any machine, especially for old PMZs. The fact is that over the years of use, notches appear on metal bobbins from needle blows, and the lower thread, clinging to them, often breaks and loops.
Before you start working on the sewing machine, you need to carefully inspect and check the serviceability of its parts. In this case, special attention must be paid to
1) serviceability of the needle and coil;
2) the quality of the threads, the correctness of their threading and the uniformity of tension;
3) the condition of the bobbin and the winding of threads on it;
4) installation of the hook and bobbin case (check for excessive swing);
5) installation and fastening of the needle and foot;
6) installation of stitch regulator;
7) lubricating the machine.
When sewing on the machine, do not pull the fabric with your hands or push it under the presser foot.
Seams and thickened areas must be sewn carefully so as not to break the needles.
After finishing work, the machine must not be left with the presser foot raised. You need to place a piece of fabric under the foot and secure it with a lowered needle.
The machine should not be rotated with the presser foot down, when the threads are threaded and the fabric is not placed.
It is necessary to insert the bobbin case correctly and carefully check its installation. If the machine begins to knock, it must be thoroughly cleaned and lubricated.
At the end of work, the machine must be wiped with a rag and covered with a cover or cap.
