How to make a gas burner using cans yourself. Do-it-yourself gas torch for soldering. Video: DIY mini-horn at home
To carry out repairs and other roofing work that involves melting mastics and laying roofing materials, you will need a special gas burner. The device is primarily used to perform the following tasks:
— heating and drying of roofing materials;
— cutting and soldering of metal;
- firing a layer of old paint.
Approximate structure of a gas burner
The gas burner has a fairly simple design. It is a glass made of metal and equipped with a nozzle and a handle, which is attached to the body . Heat-resistant plastic or wood can be used to make the handle. Gas enters the housing passing through the gas pipeline. In most cases, propane under pressure is used to operate the burner.
The burner glass should have a shape that protects the flame from being blown out by the wind.
There is a valve on the burner body that allows you to adjust the flame length and intensity of the supplied gas. It’s good if the burner has a reducer, which allows you to use gas economically.
Roof burner components
During the assembly process of the device, mechanical processing is practically not used. The burner is assembled from ready-made spare parts. To make it we will need:
- A steel valve that can be taken from a cylinder intended for storing liquefied gas.
- A plug used for transporting gas cylinders.
- A nozzle from a blowtorch with a nozzle diameter of 0.8 mm.
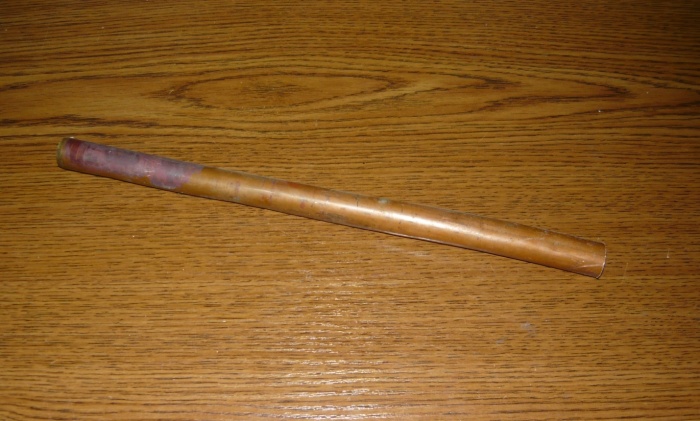
- A piece of pipe one meter long with an internal diameter of 10 mm. and steel thickness 2 mm.
- Wooden handle.
You can use the handle from a burnt-out soldering iron as a handle.
Step-by-step burner manufacturing process
The process of manufacturing a gas burner begins with the fact that we insert the supply tube, for which we will use a steel pipe, into the handle and secure it with glue. The divider and body must be machined from a brass rod, the diameter of which should be 20 mm. In the finished body, two radial holes are drilled (each diameter is 5 mm) and four holes are drilled in the divider rod (each diameter is 1 mm).
When assembling, it is necessary to press the divider into the body with a slight tension. At the same time, the flange must be installed inside the housing with a gap, that is, the internal diameter of the manufactured housing must be 0.6 mm larger. diameter machined The resulting gap is responsible for braking the gas flow, which is supplied to the drilled holes in the igniter.
 Such nozzles are found in purchased models
 To make a thin hole in our nozzle, you need to take a drill with a diameter of 2 mm. and use it to make a blind hole, which is 1.5 mm. doesn't reach the exit. Drill with a diameter of 0.4 mm. used for jumper. The resulting hole must be completely caulked with gentle hammer blows. Then you need to sharpen the end. To do this, take sanding paper and sharpen it until the desired cross-section of the outlet hole is found, that is, until the nozzle can be placed on the tip of the threaded burner tube.
A supply hose made of fabric-rubber material must be attached to the end of the gas supply tube. Secure the hose to the tube with a clamp. We set the working pressure, after which we supply gas. Wait until all the air is forced out of the hose, and only then insert the nozzle into the flame of the gas burner.
What is a gas burner? Many people are interested in the exact answer to this question. In short, this is a homemade propane device that has a huge number of advantages over its analogues. In this article we will try to understand exactly everything related to a homemade gas burner, and also answer the question “How to make a gas burner with your own hands?”
Firstly, I would like to note Key Features of this design. These include:
- extremely easy to use;
- no unpleasant or harmful odors, traces of soot, etc.;
- compactness, allowing the gas burner to be used almost anywhere.
The device of a homemade gas burner includes:
- metal case;
- gearbox;
- nozzle;
- fuel supply regulator;
- head;
- a unit for securing a gas cylinder.
The metal case includes a special glass, with the help of which the mechanism eliminates the possibility of blowing out the flame. This also includes a metal or other handle that does not exceed 100 centimeters. A wooden holder and a gas hose are installed on top of the handle. Using a reducer and a tube with a valve, the gas supply level and its length are adjusted accordingly. The nozzle is used to ignite the fuel, in this case the latter is propane.
Type of fuel the burner runs on
As mentioned earlier, a gas burner is also called a propane burner. From this it is easy to conclude that, as a rule, propane or a mixture of propane and butane is used as fuel.
With this fuel a special cylinder is filled, which is attached to the burner.
Do-it-yourself gas burner production
 As you can understand from the list of elements of the entire design of the device, it is extremely simple and does not have any complex parts that require a lot of time.
In order to make the unit with your own hands, it will take a little time and effort. And if you correctly study the material presented in this article, as well as approach the process with all seriousness and accuracy (since the work is carried out with flammable substances), then it will definitely be completed.
As practice and many living examples show, on average, a person who has never created homemade gas burners, 40-45 minutes after reading the instructions, could already boast of a homemade burner.
How to make a gas burner with your own hands
Here we come to the most interesting process. To make a burner. Below we will describe in detail the entire process of creating this unit, taking into account all the nuances and tips.
So, you should start with the simplest, but no less interesting. From the manufacture of the burner handle. In principle, any material can be used. By the way, it would be more reasonable to simply use a ready-made handle from some old and unnecessary soldering iron. The supply tube is made exclusively of steel.
Do not forget to pay great attention to the dimensions of all parts. For example, the diameter of the burner supply tube should not exceed one centimeter, and its thickness should fluctuate around 2 - 2.5 mm. This tube is inserted into the handle and fixed with glue or other quality material suitable for the purpose.
Frame
 The burner body, oddly enough, is also made of steel. It is best to use a brass rod, the width of which should be approximately 2 centimeters. The divider can also be made from it.
Next, several holes are made in order to create circulation of oxygen in the unit. After all, as anyone knows: fire cannot exist without oxygen. The total number of such holes should be four: each with a diameter of about 1 millimeter. They are made in the very core of the burner divider.
The next step is to forcefully press the divider, which was worked with a little earlier, into the body of the gas device. The inner flange must be installed with some clearance of about half a centimeter. With the help of this gap in the future, a huge flow of gas approaching the igniter will be slowed down.
Nozzle
 As mentioned earlier, the nozzle is used to supply fuel, namely propane, from its cylinder to the outside. To make it you should use special metal rod. Here you will need a 2mm drill to make a blind hole in the nozzle. For the jumper we will need a 4mm drill. The holes made are caulked with a hammer, and then sharpened using everyone’s favorite sandpaper.
After this, a hose from the gearbox is mounted on the end of the tube, which must be made of special rubber and fabric material. Fastening occurs with a regular clamp using a standard screwdriver.
After the mechanism, in your opinion, is correctly secured, you need to set optimal pressure in the cylinder and supply gas from it. The air from the hose should then be completely displaced. The length of the fire, with the correct location and operation of all parts, should be about 40-50 mm.
In general, as mentioned earlier, a homemade gas burner is a rather unique tool that will come to the aid of any owner in any unpleasant everyday situations. And the maximum ease of its manufacture can only further attract all priorities to itself.
In just two decades, construction technologies have been updated, new building materials and tools have appeared. For example, the old faithful roofing felt has given way to new fused roofing materials, which are better in all respects. No one will argue with this anymore. And accordingly, the bucket with hot bitumen and a brush for coating has gone into oblivion, instead of which builders today use a gas burner for roofing work.
What is a gas burner
This is a hand tool connected to a gas cylinder. It includes:
- An injector, inside of which a nozzle with a through hole of small diameter is installed. Through it, gas in the form of a flame is supplied to the place of surfacing or drying.
- Cup. This is a device within which flammable gas is mixed with air (oxygen). The glass has many holes through which air is sucked into the flame zone. In addition, this device protects the fire flame from the effects of wind.
- A valve that opens the gas supply and regulates its pressure, and accordingly the length of the torch.
- The main pipe that separates the torch from the handle that the welder holds.
- Handle made of plastic or wood.
Of course, to operate a gas burner, you need a hose connected to the cylinder and a reducer that reduces the gas pressure in the line. The gas pressure at the burner outlet is 0.1-0.15 MPa. A propane gas burner for roofing weighs a little, in the range of 1.0-1.5 kg. So it is convenient and easy to work with it.
How to make a burner with your own hands
In principle, the design of a propane gas burner is simple. The main thing is to assemble the nozzle and glass. The remaining elements and parts are ready-made units and parts that are sold in any hardware store. Therefore, it will not be difficult to make it yourself.

So, what is required to assemble a burner with your own hands?

Gas burner assembly
First of all, you need to cut an internal thread at one end of the copper tube using a tap of the appropriate diameter. Copper is not a very hard metal, so it will not be difficult to carry out this operation with your own hands. It will also be easy to screw in the jet.
With a glass everything is more complicated. To do this, you will have to cut one side of the pipe into several longitudinal petals (6-8 pieces), and then bend them towards the center. You will get a cone, but there is no need to bring the petals to the end; you need to leave room for the main tube, onto which the glass is placed. After which the petals are pressed against the tube, where they are sealed. There are slots between the petals that will serve as air supply inside the nozzle. The length of the petals is approximately one third of the entire length of the glass.
Important! The jet should be located at a distance equal to the length of the petals. That is, a flame of propane and oxygen should form at the level of the slots.
The gas burner for roofing work, or rather, its front part in the form of a nozzle is ready. All that remains is to assemble the back part. To do this, you will need two M25 bends made from a pipe with a diameter of 25 mm with threaded threads. In a one-way bend, in a place where the thread is not cut, a cone is formed into which the rear part of the main tube is inserted. This can be done by heating the squeegee with an oxygen torch and tapping it on all sides.
A gas control valve is screwed into it. The second connection, it is double-sided, is screwed into the valve on the other side. Be sure to wrap it on a sealing material. For example, on fum tape. An adapter from a threaded connection to a hose connection is screwed onto the rear end of the second bend. There is no point in making it yourself, because it is sold in any hardware store and is very cheap.
Now all that remains is to make the handle and install it on the prepared device. There are a huge number of handle options. The main thing here is to hold the entire homemade device comfortably. For example, it can be cut from a wooden board 5 mm thick, you can buy an ax handle and adjust it to the size and shape. It is better to attach the handle to the brackets, because this is the strongest section in the entire structure. Optimally, this is a rear drive, because the control valve should be located slightly in front for ease of use.
There are different ways to attach a piece of wood to a metal tube.
- Make a recess along the entire width to fit the diameter of the pipe of the squeegee, place the squeegee in it and secure it with two clamps made of metal tape.
- Install the squeegee on the side of the handle and also secure with clamps.
So, you have made a gas burner for roofing work yourself, you can connect it to a gas cylinder and carry out testing. To do this, the hose is connected to the cylinder through a reducer, where it is secured with a clamp. Its second end is threaded into the adapter, where it is also secured with a clamp.

The cylinder opens, the supply of propane through the gas reducer opens. And the last thing to open is the control valve on the injector. Gas should flow through the nozzle with a characteristic sound. You must wait until the air inside the device is completely released. After which the gas flow is ignited. The valve near the handle regulates the length and power of the torch.
Attention! A homemade gas burner for roofing work is a high-risk device. Therefore, all operations performed must be approached with special care. This is especially true for the connections of all elements with each other. Complete tightness must be maintained.

Fire safety measures
Regardless of whether a factory gas burner is used or a homemade one, fire safety requirements must be strictly observed.
- Keep a fire extinguisher on the roof when performing roofing work.
- All work is carried out only during daylight hours.
- When laying a soft roof using a gas burner, only one propane cylinder can be placed on the roof.
A gas torch for soldering is known to many home craftsmen who often deal with pipeline systems. The main purpose of such a tool is to adjust the mixing of oxygen and flammable gas. Thanks to this device, you can provide a stable flame of the required power. Gas burners can be special-purpose or universal.
To perform surfacing, welding and other types of processing of metal products using the gas-flame joining method, use appropriate units. The gas burner has many positive qualities, among which it is necessary to mention the stability of the flame, which is maintained even in strong wind conditions. This creates comfortable conditions for working outdoors.
Basic device
In the design of a gas burner for soldering copper pipes, certain elements can be distinguished:
- a unit that serves as a location for gas cylinders;
- nozzle;
- device head;
- gas supply regulator;
- gearbox
There are separate burner models for soldering copper pipes, which may be equipped with special additional elements. For example, such devices can be equipped with automatic piezo ignition, adapters designed for propane cylinders of various shapes, wind protection, a transport cover, etc. Thanks to such equipment, the process of soldering copper pipes is greatly simplified.
Gas torches for soldering copper pipes may differ from each other in such characteristics as the thickness and shape of the metal used to work with such a device. There are also special gas burners for soldering copper pipes, designed for a specific type of gas.
How to use a gas torch for soldering
Even before you start using this device for soldering copper pipes, you should make sure that the tool is in working order. Preparatory activities are limited to examining detachable joints, soldered joints and hose joints to identify leaks.
After you can make sure that there are no problem areas, you can select the operating gas pressure based on the task at hand. After this, the valve must be opened half a turn, then the hot mixture is ignited, and then, using the valve or reducer of the mini-gas burner, they begin to adjust the intensity of the flame. Having completed the above operations, the main tool for welding copper pipes or other metal products will be ready for use.
Homemade torch for soldering copper pipes
It's time to get acquainted in more detail with the design of a gas apparatus for ejection-type soldering, designed to work with metals in high temperature conditions. The source of operation for a manual gas burner is a cylinder containing liquefied gas. This device is highly economical, since it is possible to adjust the gas supply intensity.
How does a copper pipe soldering torch work?
A manual gas burner has a fairly simple design, which fully applies to the principle of its operation. The gas supply is provided by a ventilated tap located on the cylinder or a reducer hose. As it moves, it enters the supply tube located at the base of the burner. Once there, the gas flows into the vertical channel of the stand, from where it enters the central hole of the nozzle.
Next, the gas begins to enter the nozzle at an accelerated rate, and then, without losing momentum, exits the hole. After this, it is directed through the radiator channel to the diffuser. This process is accompanied air suction from the spool, without which it is impossible to ensure the combustion process. Once in the diffuser, the mixture begins to separate into two streams: auxiliary and main.
The ejector is equipped with a rotating spool sleeve, which has radial holes, making it possible to adjust the amount of incoming air.
What does a homemade soldering torch consist of?
In the design of a gas unit for soldering, one can distinguish the following main components:

How to make a burner with your own hands?
With the exception of the handle, the manufacturing process of the torch elements intended for soldering carried out on a lathe. Moreover, it is best to create elements based on brass or bronze. Copper would not be a suitable option for this. The choice in favor of these metals is due to the fact that they have high thermal conductivity characteristics, as well as non-susceptibility to corrosion processes and high strength.
When making the nozzle body, the nozzle itself and the cover for it, it is advisable to use steel. To create an adjustment needle, it is recommended to use a steel knitting needle. For the gland used to seal the thread, it is recommended to use fluoroplastic. Thus, if you have the indicated materials, it is quite possible to make a homemade torch for soldering products, including pipes, with your own hands.
It should be noted that if you have a drawing creating a gas burner is not that difficult. But this work will require a lot of time, first of all this concerns the jet. You can create an outlet hole measuring 0.1 mm by drilling a through hole, the diameter of which should be 0.4 mm. Next, you need to take a small ball, and with its help, doing everything extremely carefully, caulk the created hole, bringing it to the required size.
The assembly procedure itself provides for the following stages:

Thus, it should turn out reliable portable burner, with which you can weld metal products, including pipes, from various metals.
Conclusion
A large selection of various devices for soldering metals and workpieces from it allows you to choose the most suitable option. A gas burner can effectively cope with this task. Moreover, you don’t have to go to the store to get it. If you prepare all the necessary materials and tools and thoroughly study the manufacturing technology, then such devices can be assembled with your own hands, thereby saving on assembly.
Before you start creating a gas burner, it would be useful to familiarize yourself with its operating principle and design. Such knowledge will be useful for the reason that it will help simplify the procedure for its manufacture, given that the master will have an idea of what elements the burner consists of and what role each of them plays in the work.
Many home craftsmen know what a gas burner is. Thanks to it, you can weld, surfacing and other types of processing of metal products, heat them and connect them. The principle of operation of such a device is to mix flammable gas and oxygen. As a result, you can get a stable flame with a huge temperature, which is difficult to extinguish. Such burners can be universal or designed for specific jobs. The fact that the flame is stable allows this unit to be used outdoors even in windy conditions. You can either buy it or make it at home. If you are not one of those who are looking for easy ways, we suggest you figure out how to properly make a gas torch for soldering with your own hands.
Materials and tools for work
To make a regular burner, you will need the following parts and tools:
- Bulgarian;
- hammer;
- sandpaper;
- brass blanks for nozzle and divider;
- thin brass tube Ø15 mm;
- wooden bars;
- vice;
- FUM tape or silicone seal;
- connecting hoses;
- control valve.
Making a handle and nozzle

Take a brass tube and attach a handle to it. If you have a handle from an old burner, you can use it - it will be much more convenient. If you don’t have one, you can take a wooden block. To make the handle fit comfortably in your hand, it can be processed. You need to drill a hole in it for the brass tube. Their diameters must match. After which the tube is inserted into the beam and secured there with silicone or epoxy resin.
For ease of work, the brass tube must be bent above the handle at an angle of 45˚.

The next stage is the manufacture of the nozzle. This is a labor-intensive and long process. It needs to be approached with greater responsibility. The desired nozzle opening size is 0.1 mm. It is clear that it will be very difficult to achieve this size on your own without special equipment, so you need to drill the hole a little wider and adjust the edges to the desired size. Everything must be done carefully so that the hole is even and does not direct the flame in different directions. After making the hole, secure the workpiece in a vice. Then carefully strike the future nozzle with a hammer. This must be done vertically, with a “pull” towards the center of the workpiece. Gradually, the part must be scrolled, ensuring an ideal hole without slope.
After embossing the part, you need to sand the nozzle head with fine-grained sandpaper. Threads should be applied to the back of the part to connect it to the tube. A simpler connection method is to solder the nozzle to the pipe. But it should be noted that in this case it will be very difficult to repair any parts.
In principle, that’s all, now you can connect a gas cylinder to the tube, light it, and the unit is ready to work. But now certain difficulties arise that interfere with normal work and cause inconvenience. It turns out that you can regulate the gas flow only by opening and closing the tap on the gas cylinder. In this case, it will be very difficult to achieve the required flame power. What to do?
Work to improve flame control

To ensure normal operation of our burner, it is necessary to equip it with a divider and a tap. A suitable place to mount the tap is near the handle, 2–4 cm higher. But it can also be installed on the supply pipe. A faucet from a burner from an old autogenous engine or its other analogue will do. It is permanently fixed to the tube with a threaded connection. To seal the connection, use FUM tape.
The divider will be installed on the pipe with the nozzle. It also needs to be made of brass Ø 15 mm. The best option is a cylindrical part with a hole for a tube with a nozzle. If there is none, do the following:
- Take a brass pipe Ø 35 mm and cut a piece of 100–150 mm.
- Stepping back from the end, use a marker to mark 3-5 points exactly apart from each other.
- Drill 8–10 mm holes in it with a drill and use a grinder to make even cuts to them.
- Now you can bend everything to the center and weld it to the burner tube.

To properly secure the divider, it must be placed so that the nozzle protrudes 2-3 mm from the connection point. Thanks to this device, two goals can be achieved: to protect the flame from strong winds and to provide it with a flow of oxygen, which is necessary for a more stable and strong flame.
All welding points can be smoothed using a grinder. Then your homemade burner will look more solid. That's all. Now all that remains is to supply gas and use the burner for its intended purpose.
Making a mini burner

If you need to work with small parts or circuit boards, then such a large torch will not suit you at all. In this case, you can make a small burner from improvised materials that will produce temperatures up to 1000ºC. You will need:
- Regular dropper – 2 pcs.
- Needle for inflating balls.
- Needle for a medical syringe.
- Soldering iron.
- File.
- Copper wire.
- Pliers.
- Grinding stone.
- Flux for soldering.
- Thermal gun.

Armed with all the tools, you can get to work. For convenience, we divide the process into the following stages:

Gas will flow through the thick tube, and compressed air through the thin (medical) tube. You can change the pressure of gas and compressed air thanks to the dropper regulators. This small burner will be useful for use at home.
A gas burner is a useful tool in capable hands. In order to have it, you don’t have to go to the store and spend money to buy it. You can do everything yourself. The main thing is to prepare all the materials and tools, as well as research the technology for manufacturing the burner. Before starting work, we recommend that you familiarize yourself with the structure of the tool and the principle of its operation. Then it will be much easier for you to do everything yourself.
Video
Watch a video on how to make a burner from scrap materials:
Video about making a miniature gas burner:
