Country house with cellar. How to build a cellar on the street: we build a cellar with our own hands. How to properly lay out a brick cellar
The cellar is an important building on the territory of the dacha; it is important for storing fruits, canned food and vegetables. That is why you need to understand the principle of arranging such a room. It is important to study the step-by-step instructions for building a cellar with your own hands, with the help of which you can get a reliable and durable storage space.
Basement or cellar
Most often, a basement refers to storage, which is located under the first floor. That is, it is built from below, at ground level, has its own dimensions, and utility units can be placed in it without fear. The basement can also additionally contain a storage room, a boiler room, a swimming pool, and a laundry room, but for such rooms a thermal insulation system is important.
Having decided to rebuild a cellar with your own hands, you need to remember that many products can be stored in such a room - from the harvest harvested in the fall to preservation. The cellar can be placed not only in the basement of the house, but also in a separate area.
Main types of storage
 You don’t need to think that a cellar and a basement are two identical things. Construction of a cellar in a country house may involve digging a simple hole and minimally finishing it. The choice of type of construction will directly depend on many factors, for example, the intended purpose, the climatic characteristics of the region, as well as the finances available in the family budget. Also, when determining the type of room and the material that will be used in construction, you need to take into account the location of such a building.
It is much easier to create a separate cellar at your dacha with your own hands than, for example, to rebuild a structure under the house, but this option will require the owner to spend a lot of money on materials. Creating a cellar in a private house with your own hands is much cheaper, but such a building will be very limited in area.
The most common type is the ice cellar. It helps the owner to store food for a long time even in the hot season, as well as in the southern regions. It will be quite difficult to rebuild such a cellar under a private house with your own hands, but the resulting result will be distinguished by high performance parameters, strength and durability.
 Another popular type of construction would be a storage facility with two separate sections. Most often, this type is used when it is necessary to prevent the mixing of odors of fruits and vegetables that are simultaneously stored in the cellar. To construct such a storage facility, much less material will be required than in the case of a glacier.
The wine cellar is a separate structure. It is used for storing wine products; it has its own special structure and differences that must be taken into account in order to properly build the cellar. Most often, various preserves are also stored in such a storage facility along with wine.
Types of cellars by depth parameter:
- underground buildings must be located in dry places;
- semi-underground structures can be built in damp places with an average level of groundwater;
- above-ground cellars are created when groundwater is too close.
It is necessary to pay special attention to the fact that if the humidity level is too high, you need to create a special cushion from a sand-gravel mixture. It will help separate the building from the underlying groundwater.
The construction of a cellar will not require special permits from any regulatory authorities, but the developer must in any case understand exactly where to locate the cellar, taking into account all possible options. It is best to use an area that is as dry as possible and away from trees.
Construction at equal level
This type of work will be quite labor-intensive, but if there is no opportunity to buy a ready-made building, and there are no characteristic hills on the residential site, then this option will be the only suitable one in this case.
 When using this tuning method, you need to take into account total height of groundwater in this area, as well as in the adjacent area where the pit will be dug. If the soil on the site is not dry, then groundwater can negatively affect the entire building or, appearing in the future, lead all products to poor condition.
You can determine the level of soil water by looking into the nearest well in the spring, when large masses of snow melt. In the summer season, in areas where soil water flows too high, moisture-loving grass, for example, horsetail, sedge, horse sorrel and other varieties, can grow.
If you want to accurately determine the flow of water, you can seek help from a specialist who will help you accurately calculate the best area for digging a pit and its total depth.
When constructing a cellar using this method, the pit must be placed at a depth of at least 2-2.5 meters. The first thing the work will begin with is the process of digging a pit.
Preliminary preparation of the pit
 The area chosen for the construction should be as better clean, eliminating the turfy fertile layer, thereby creating a platform for digging. The work is carried out manually, since any other technique can lead to damage to the edges of the pit, which is undesirable for such a cellar arrangement. To make digging much easier, you need to remove the soil, loosening each layer of it and carefully level the edges of the hole as much as possible.
If the soil on a residential plot is of a loose type, then the pit is dug with a certain slope - in this case, the earth will crumble much less. The upper part of the pit is marked 30-50 centimeters wider in each direction than the bottom.
If the groundwater level is high, the pit also needs to be made wider and deeper by 40-50 centimeters; this space needs to be filled with waterproofing material, which will help protect the walls from dampness. To waterproof the walls and floor in such a room, you can use clay extracted from the pit; it is poured into the bottom of the hole after digging is completed and near the already constructed walls.
Top fertile layer soil is well suited for transferring to the beds of a vegetable garden or front garden, and other soil can be used, for example, to fill the lower layers of an alpine hill.
Tuning material
For the construction of cellar walls, it is best to use natural materials that will not emit harmful fumes. There is only one explanation for this - in such an area not only closed canned foods will be stored, but also fruits and vegetables in boxes. They are susceptible to the perception and absorption of negative odors and various substances harmful to the body.
Open metal should not be used when building a cellar, as it will become a conductor of cold, thereby violating the optimal temperature needed for storing food.
To arrange the room you need:

Laying the main foundation
To make the cellar dry and strong, it is better to make the floor of the foundation concrete, but before pouring it, it is imperative to provide good waterproofing under it.

It should also be noted that in some cases half of the cellar is left earthen. This can be tolerated if the groundwater is located quite deep. An earthen floor will help maintain natural ventilation inside the cellar and an optimal temperature at depth. In this case, to build a wall, the bottom of the pit is filled with a special strip foundation over the area.
Load-bearing wall structures
To fully rebuild the cellar, you need to build walls, arrange ventilation and waterproofing. To do this, there are the following instructions:

It is important to note that in cases where groundwater comes too close to the foundation, it is best to create a drainage layer around the brick walls. It is most often filled with broken brick or crushed stone. It will drain excess moisture from the cellar into a special pit or container.
Covering the room
Covering the cellar can be done using different methods. The easiest thing in this case will be to lay concrete slabs on top of it, which should, in addition to the walls, also rest on the ground near the cellar by 400-500 millimeters. But not every site can be visited by equipment that would lift the slab and lay it on the desired site, so very often you have to carry out the overlap yourself.
In addition to ready-made concrete slabs, you can install a homemade wooden, combined or metal floor. The second is convenient because it is easy to lay insulation between wooden beams inside the cellar itself, and also to attach ceiling boards. When creating such an entrance, the staircase will be of a simple design.
Building a basement in a private house with your own hands is not a problem. In the past, people usually used these floors as a cellar. But now some are considering them as residential space. Nowadays even a basement can be made warm and cozy thanks to the availability of a variety of building materials.
What is a basement for?
Before you build a cellar under the house with your own hands, you need to figure out why it is needed. If previously only various canned foods, vegetables and some equipment were stored there, now many people prefer to make basements residential in order to expand the usable area.

The cellar can be used for various purposes. But in any case, it is unlikely that the space under the building will be empty. Depending on the purpose, the following types of basements are distinguished:
- For storing various fruits, vegetables, canned foods. Almost all people who live in private houses and have their own gardens have such a cellar in their house. This is how the harvest is stored throughout the year.
- Workshop. Furniture for special work is placed there. They make shelves on which tools and equipment are stored.
- As a spare room. Some people prefer to make a place for relaxation under the house. This can be a kind of living room, games room, bar. You can also make a bedroom here - it depends on people’s preferences.
- Garage. If there is little space around the house, then a wise decision would be to locate the garage under the house. Not only will a personal vehicle be parked there, but also spare parts will be stored.
- As a boiler room or other communication.
First of all, you need to figure out what purpose the room will have. The underground floor can be made as follows:
- Basement. In this case, it will be buried in the ground by half or a little less. This option is the most suitable for those cases where a living room is planned. Windows can also be installed.
- Heated basement. In this case, the floor will be more than 50% buried in the ground. At the same time, you will need to think about heating in the room. All this must be taken into account during the design of the entire building.
- Unheated basement. In this case, it will be buried more than 50% in the ground. There is no heating in it. This option is the easiest. The arrangement technology has a shorter version of actions compared to previous options. Typically, such a basement is used for storing various vegetables, fruits, preparations, and tools. Here you can also place thermal, water metering units and an electrical panel
Before you think about how to properly build a basement yourself, you need to decide on its purpose.
How to arrange a basement in a private house
It’s not difficult to build a cellar at your dacha with your own hands. If you plan to build a basement that will be located under the house, then you need to think through and calculate everything in advance. You should definitely make a drawing. It is best to start from the depth of freezing of the soil. You should also take into account the level of influence of groundwater. They are capable of gradually destroying the cellar.

In general, the construction of a basement in a private house involves the following algorithm of actions:
- Clear the space, remove the trash.
- Make a marking of how the building will be located.
- Dig a pit.
- Compact the soil at the bottom.
- Place a sand cushion under the foundation. Its thickness should be approximately 30-50 cm.
- Make formwork from wooden panels. Another option is to use permanent formwork made of polystyrene foam.
- Reinforcement works. A strip foundation must be reinforced with special frames. The diameter of the rods that will be positioned longitudinally is at least 1.2 cm. For horizontal and connecting parts, the diameter should be from 0.8 cm.
- The completed frame is filled with concrete.
- Now you need to wait until the foundation hardens and becomes strong. The duration of this period depends on climatic and weather conditions. Usually it takes 2 weeks. Maximum strength will be achieved in a month.
- Carry out waterproofing and insulation work.
- Backfill the sinuses near the walls. Use coarse or medium-fraction sand.
It is necessary to begin the construction of the foundation by digging a ditch. Its depth should be approximately 1.5-2 m. It is best to compact the walls, especially the bottom. It is best to use not only sand, but also crushed stone as a pillow.
Be sure to remember about the waterproofing layer. It will prevent groundwater from seeping into the room. The waterproofing cushion includes a layer of crushed stone 10 cm thick. If groundwater is located close to the soil surface, then it is recommended to additionally sprinkle crushed stone on top with clay. After this, the entire layer must be filled with hot bitumen. For 1 m² you will need approximately 5 kg of substance. Thanks to such a high-quality cushion, groundwater will not be able to spoil the basement.
Construction of walls and floors in the basement
The construction of a cellar must begin with the walls. After the foundation is completely done, you can begin to build brick walls. Their thickness should be equal to 1 brick.
Then it is necessary to carry out plastering using a cement composition, then treat it with bitumen mastic and glue it with roofing felt (about 3 layers).

The outside walls and cavities are covered with clay. You can fill everything with sand at once without using clay, but in this case the sand will allow water to pass through to the brick walls, and because of this the building will deteriorate.
Not only the foundation, but also the walls need to be protected from moisture. The simplest methods in this case are the use of waterproofing layers. They can be glued to walls and the walls can be painted.
As for waterproofing, which is applied like painting, it is necessary to prepare a primer in advance. It is a mixture of gasoline and bitumen, and both components must be welded. Such waterproofing material can easily be purchased in specialized stores, so you don’t have to prepare it yourself. It is enough to apply it to the front side of the wall from the bottom to the blind area. Apply when chilled.

There are two ways to apply the primer:
- A primer is applied to the front side of ready-made brick blocks using a spray bottle. This method is the simplest, but at the same time the most effective. If you only have a brush, then the walls will have to be treated twice.
- The primer is applied before the walls are installed in the chosen location. They are pre-treated with the substance and then lowered into the ditch using a crane. The blocks will then be connected using concrete mortar, which is prepared from 1 part cement and 4 parts sand. The grooves between the blocks should be aligned and wait until they dry. Then coat with primer.
The last technique is considered the easiest, since processing blocks in a dug hole is not very convenient.
The lower brick layer, which is located directly on the foundation, must also be protected from moisture. To do this, roofing material should be laid under the first row of bricks. It is best to make 2 such layers.
The blocks are fixed to the insulating coating of the foundation using cement mortar. The area between the platform and the brickwork should also be treated with primer.
Instead of painting waterproofing, you can use adhesive waterproofing. It's very easy to use. Roofing material, aquaizol and brizol are considered protective materials. Simple cement plaster will also work.

When the walls in the basement are completely erected, you can begin arranging the floor. It is necessary to fill the air cushion of concrete. You don't need formwork for this. First you need to check the soil and the depth of the pit. If it is insufficient, then it is necessary to remove 1 more layer of soil.
After this, you should waterproof the floor to prevent moisture from entering the room. The easiest way is to use durable thick film. It can be purchased at any hardware store. The properties of this material will not deteriorate over time.
In any private home, it is necessary to carry out floor insulation work. Expanded polystyrene, extruded polystyrene and other options are used as thermal insulation. Plates made from these materials are immediately laid out on film. The thickness of the thermal insulation layer must be at least 50 mm, then heat will be retained in the room much better.
After this, the layer should be covered with waterproofing material. Then a frame of reinforcement is laid out. The thickness of the mesh should be no more than 0.3 cm. In the end, all that remains is to fill everything with concrete. The height of the level should be approximately 10 mm. When the floor has hardened, you can begin finishing work. Special boards and ceramic tiles are usually used for floor finishing.
Ventilation and insulation of the cellar
To build a cellar, you should definitely consider ventilation. The room must be ventilated. For this purpose, a ventilation system is made. You can’t do without it at all, especially in cases where the basement is used as a bathhouse or garage. For example, odors of petroleum products that can penetrate into living rooms need to be removed from the garage. As for a sauna, bathhouse or swimming pool in the basement, in this case it is necessary to dry the room.

The simplest method is to use supply and exhaust ventilation. This will help create a natural air flow. In order for ventilation to function correctly, it must always include a pipe through which air will pass into the room from the outside, as well as an exhaust hood, thanks to which the air from the room will escape.
First, you need to install an exhaust pipe in the basement. It is fixed to the ceiling, and then taken out through the roof. If there is a chimney from the fireplace below, then the hood can be installed next to it. It is best to install the hood higher than all other buildings on the site.
As for the supply pipe, it is mounted on the side of the room where the wall is located opposite the hood. It should be done 50 cm from the floor. The supply pipe should also be moved up to the roof.
It is clear that the basement is the coldest room in the house. Many people use it to store crops, canned goods and tools, which is quite convenient. But if you set up, for example, a garage in the basement, then you will definitely get tired of warming up the car every time. In this case, additional insulation of the ceiling and floor is carried out. Thermal insulation will keep you cool in the summer, which is also convenient for storing food (they will not rot or become moldy on hot days).

You need to put foam sheets on the floor when the mastic has dried. They are glued using hard bitumen. Then you need to lay asbestos-cement slabs. As for the ceiling, sheets of polystyrene foam are fixed to it using glue or liquid nails. Instead of polystyrene foam, you can also use mineral wool and fix it to the sheathing of metal profiles.
Conclusion
Before you start building a house with a planned basement, you need to figure out how to make a cellar. In general, this is not a difficult process, but you need to follow the instructions. You should definitely choose high-quality materials and take your time, then the basement will be done correctly, and it can be used for various needs.
Video - How to arrange a basement in a house
A cellar is a place where you can store almost any food. The main advantage of this building, when compared with a regular pantry, is obvious - in it you can keep salted or fresh vegetables and fruits, and a variety of preserves. All year round, the temperature in the cellar does not exceed 7°C, which is almost the temperature of a refrigerator.
There are several types of cellars. The simplest one is earthen. You can also build a cellar in the garage. There are also such cellars as above-ground, with a cellar, blocked cellar, etc.
To do this you will need: water, clay and chopped straw. Mix the solution until it becomes plastic and viscous.
Apply the solution in several layers, each time waiting for the previous layer to dry completely. After this, you can cover the walls with slab boards.
You can also lay out the walls from old bricks, or simply fill them with concrete.
For better storage of vegetables and various products, the earthen floor of the cellar contributes. The base of the pit is well-compacted crushed stone, filled with bitumen on top. Next on top is an adobe floor. A good option is a cement screed. 
For a more convenient cellar, you will have to build steps. Initially, it is necessary to dig the future staircase and compact the earth well in place of the steps. Next you need to make formwork from plywood on the side surfaces of the steps above the horizontal plane. Next, fill the step slabs with cement mortar. The steps must be lined with bricks, and the treads of the slabs must be made of stone.
Roof and cellar door design
 Self-construction of a cellar involves protecting its upper part. You can build a standard one over the cellar, larger in size than the cellar itself by 50 cm on each side.
Such measures will help prevent water from flowing into the cellar during rain. Be sure to insulate the door with several layers of foam rubber, and then cover it with dermantine on top.
This is quite an important process. All waterproofing materials can be divided into two types: non-pressure and counter-pressure. The second type of materials is used if groundwater reaches the floor level on the water pressure side. The first type of materials is used if the groundwater level does not reach the floor.
For better protection against water, use a drainage layer during construction., as a rule, are connected to a special well located next to the cellar. The drainage is alternated in layers with soil, and when laying the layers, it must be compacted.
To reduce groundwater, build – i.e. a special container with a certain slope for water drainage.
If the cellar is protected from groundwater, then waterproofing can be done with heated bitumen. Before covering the walls with bitumen, be sure to treat them with cement mortar. Waterproofing with bitumen is usually applied in two layers. While the bitumen is drying, the walls are usually sprinkled with sand.
 Correct storage is the key to successful food storage. In the cellar, the hood can be of two types.
The first option is natural ventilation. It is performed using two pipes: exhaust and supply. This hood is based on the temperature difference between the room and the street, because of this, continuous air circulation occurs.
Usually the exhaust pipe is mounted near the ceiling, and its end is located half a meter above the cellar level. That. heated air goes out. And at the bottom of the cellar, a supply pipe is installed 10 cm above the floor line. It must be protected with a metal mesh from pests and insects.
The second type of ventilation is forced. It is created using special fans. The device is the same as in the first case. This ventilation is necessary in the summer, because... There is no air exchange due to the increase in outside temperature.
By observing all technological conditions, you will build a high-quality and reliable cellar that will delight you for many decades.
- Date: 05/22/2014
- Views: 1096
- Comments:
- Rating: 21
DIY cellar under the house
Advantages and disadvantages of a cellar under the house
A cellar is used to store vegetables, pickles and other products in private homes. Often the cellar is located in the basement. There are a number of advantages that allow you to choose this type of cellar. For example, you don’t need to go outside to buy vegetables; they are always at hand.
If your house is heated all year round, there is no need to make insulated walls and ceilings in the storage, since the temperature in the basement will almost always be above zero.
The disadvantage is the increase in humidity in the basement. But this can be easily solved. To combat humidity, it is recommended to use supply and exhaust ventilation.
This can be done at different stages of construction. It is easier to do it at the stage of laying the foundation, having full access to the basement for excavation work. When building such a cellar in a finished house with laid floors and ceilings, you will have to manually dig a pit and remove the soil from the room.
Return to contents
Cellar interior
First, you need to build a pit under the house. The dimensions of such a pit should be 60 cm larger than the dimensions of the finished cellar on each side. Such measures are necessary for the convenience of performing stone, concrete and waterproofing work. Construction of a pit larger than the specified dimensions may lead to an unjustified increase in the volume of excavated soil and complicate the filling of cavities. It is recommended to manually tear off the pit at the boundaries and level its walls. It is undesirable to unnecessarily destroy the soil.
It is very important to prevent water from entering the cellar. For these purposes, it is necessary to make a waterproofing cushion. To do this, pour a layer of crushed stone onto the bottom of the pit (layer thickness - 10 cm). Then compact the crushed stone. If groundwater is located close to the surface, it is recommended to lay a thick layer of clay on top of the crushed stone. Fill with hot bitumen at the rate of 5 kg per 1 m². This will help eliminate capillary permeability of the crushed stone bed.
The foundation is formed from monolithic concrete. To create it, formwork made of boards is used. After the base has hardened, cover it with several layers of roofing material. Use bitumen mastic for this. Leave about 10 cm of material near the walls for allowance. When building a cellar under a house in a dry area, it is enough to make the walls half a brick thick.
In conditions of high humidity, the recommended wall thickness should be one brick. When building a cellar under the house with your own hands, plaster the inside of its walls with cement and stick up to 4 layers of roofing material on them using bitumen mastic, leaving allowances in the places where the walls connect with each other, as well as in the places where the walls connect with the ceiling and floor. Build another red brick wall and cover it with a thick layer of clay.
If you are building a cellar on clay soil, you need to seal the gaps between the walls and the pit with the same soil. It is not recommended to use sand for these purposes, as it allows water to pass through well, which should not penetrate into the storage.
Return to contents
List of tools
The list of tools may vary depending on what material the cellar will be made of.
The following tools are used to make wooden cellar walls:
- axe;
- saw;
- chisel or brace.
When building brick and stone walls, the list of tools is as follows:
- spatula or trowel;
- furnace hammer;
- sledgehammer;
- an ordinary bayonet shovel for preparing a solution, etc.
To compact soil, mortar and concrete, a tamper (a piece of log or block with attached handles) is used. If the cellar has reinforced concrete walls, a tool is used to tie the frame. You may also need a level or spirit level.
Return to contents
Determination of groundwater level
One of the requirements under the house is a depth of 1.5-1.8 m. At a shallower depth it will exceed +8°C, which will have a bad effect on the storage of vegetables. To deepen the cellar, it is necessary to determine the groundwater level in your area. If you are building a storage facility at the stage of building the foundation, then the task is simplified, since a geodetic survey of the site is usually carried out before construction. If the cellar is planned under a house built a long time ago, you will have to determine the maximum groundwater level yourself.
To determine the groundwater level, you can drill a well at least 2.5 m deep. Leave it for a few days and see if water appears there. Or try to find out how high it stands in the nearest wells.
You need to find out the groundwater level during prolonged autumn rains or active snow melting in the spring. It is at this time that it will be maximum. In this case, it will be possible to reliably determine whether water will appear at the required height.
If the groundwater level is closer than 1 m to the surface of the floor of the house, you will have to abandon the construction of a cellar under the house. If the water level fluctuates from 1 to 1.5 m, it is possible to reduce it by installing a drainage system around the perimeter of the house deeper than the expected level of the floor of your cellar. In this case, it is necessary to properly waterproof the walls of the storage facility.
Return to contents
Cellar construction
Before going under the house, carefully consider the structure of this structure. It is necessary to build a staircase for ease of descent into the cellar. The slope of the stairs should be 45°. The steps of the stairs must be made wide enough (approximately 20 cm).
Under the house depends on your individual preferences. Place the shelves near the walls, ensuring they are stationary. The number and size of shelves depend on the volume of products that you plan to store in the cellar.
Make partitions between the compartments in the cellar. You can store root vegetables in the compartments, separating them with partitions made of boards or galvanized metal mesh. The recommended height of the partition is 50 cm. In this case, it is quite convenient to store root vegetables and then remove them as needed. Choose the compartment width at your discretion.
The floor covering in the cellar can be made of bricks, tiles or boards, laying them on a pre-formed concrete screed.
The floor in the cellar can be left earthen, and the walls can be sheathed using boards, wickerwork or slabs. Sheathing is necessary to increase the service life of the cellar. In a lined cellar, more favorable conditions are created that allow root crops to be preserved in good condition.
Return to contents
Ventilation device in the cellar
In the cellar under the house, high-quality supply and exhaust ventilation is necessary to maintain optimal temperature and humidity conditions for storing food. A more advanced design is a ventilation system consisting of two pipes, one of which provides air flow from the outside, and the other is exhaust.
For optimal air exchange, place these pipes at different levels. It is recommended to place them at different ends of the room. Place the exhaust pipe under the ceiling, and place the supply pipe below (at a height of approximately 50-60 cm from the floor of your cellar).


It is difficult to imagine a modern house or garden plot without a cellar. This structure allows you to preserve the harvest and preserve it until spring. A typical cellar design involves its exterior design. This free-standing building creates a unique atmosphere of a rural house and adds coziness to the site.
The following two concepts are distinguished:
- cellar;
- basement.
The basement is located under the floor in the house and can serve as either a storage room or any other room. The cellar has a very specific purpose - to be a storage facility for agricultural products and preservation.
To ensure reliable food safety, the cellar must meet the following requirements:
- Maintain optimal temperature conditions at any time of the year.
- Create a microclimate, preventing drying out and waterlogging of products.
- Constant supply of fresh air to remove gas odors.
- Reliability and spaciousness of racks and shelves.
- Prevent rodents and insects from entering the premises.
- Reliable waterproofing system.
- Free access to provisions, easy accessibility.
The following requirements also apply to materials and design:
- structural strength;
- durability of materials;
- weather resistance;
- good waterproofing;
- reliable supply ventilation system.


Types of cellars
The method can be divided into three types:
- recessed;
- semi-recessed;
- ground.
Based on their location relative to the house:
- underground;
- wall;
- separate cellar.
A free-standing structure is usually built into a natural hill. If the personal plot is located on a plain, the cellar is partially or completely dug into the ground, artificially creating a mound above it.


The building must be equipped with a vestibule. This requirement is due to the fact that cold air can damage the safety of provisions. Protection from drafts is also necessary. In the cellar, supplies are arranged in accordance with storage temperature, according to the principle: the lower the shelf, the colder.
Important! A good location for a home cellar would be shaded areas. It is recommended to place the entrance door facing the north or northeast side. This technique will help avoid overheating of the room from the scorching sun in summer.
For a standard family of four, 7 square meters of storage will be sufficient. The cellar can be larger. It all depends on the needs and financial capabilities of the owner.

Deep cellar
Buried structures include structures that are completely below the surface of the earth.

If a buried structure is built under the floor of a house, it is a basement. A typical project includes:
- waterproofed walls and floor;
- shelves and racks;
- ventilation vents;
- stairs;
The interfloor ceiling of the basement must have increased strength, therefore, most often, it is concreted. The entrance to the storage can be arranged both from inside the house and from outside. In the second case, a recessed platform with a staircase is additionally equipped. The walls are made of brick, cinder block or wood. But monolithic poured structures are quite acceptable. This arrangement method is the most common.


A free-standing deep cellar is built as a separate building. The design scheme is quite simple. A pit is being prepared on the site, about two meters deep. Then the floor is drained and the walls covered with waterproofing are installed. The ceiling is made of fairly light materials: beams covered with a mixture of clay and straw. The thickness of such a shelter is 40-50 cm. The floor is protected by a layer of clay up to 15 cm high. A drainage system 50 cm thick must be installed along the perimeter of the cellar. The design of a cellar with a cellar is the most complex design. This structure consists of underground and above-ground parts. The recessed part is used directly as storage for products. The above-ground part (house) can be used to store household equipment. A cellar equipped in this way very well protects the basement from precipitation and temperature changes.


Semi-buried cellar
The semi-buried cellar design can be built on both flat and hilly terrain. The basement part is deepened into the ground by 75-150 cm. The walls are laid from brick, cinder block or concrete. The ceiling is covered with beams and filled with clay coating, on top of which a waterproofing layer of roofing felt is laid. The surface of the semi-buried structure is covered with earth. This allows you to maintain approximately the same temperature in the cellar both in winter and summer.
Above ground cellar
An above-ground food storage structure is erected in cases of high groundwater. The entire structure must be above the ground surface, or with a slight depression of up to 50 cm.


The most important task when constructing this type of structure is to achieve the effect of a thermos. Most often, a layer of earth up to 1 meter high is poured on top of the cellar. The height of a cellar built above the ground is usually 2 meters.
Important! The facade of the above-ground cellar is carefully insulated so that the temperature inside the storage always remains the same.
An interesting type of ground basement is a glacier. A special feature of its construction is that it is 40-50 cm deep into the ground for storing ice. Hence the name. It is very important to provide high-quality ventilation in the glacier.


Wine cellar
A wine cellar is usually built in the basement of a house. The area of such storage can be 7-10 square meters. A very important condition is compliance with temperature and humidity conditions. The temperature in the wine cellar should be between 12-16 degrees. Humidity should be maintained at 70%.
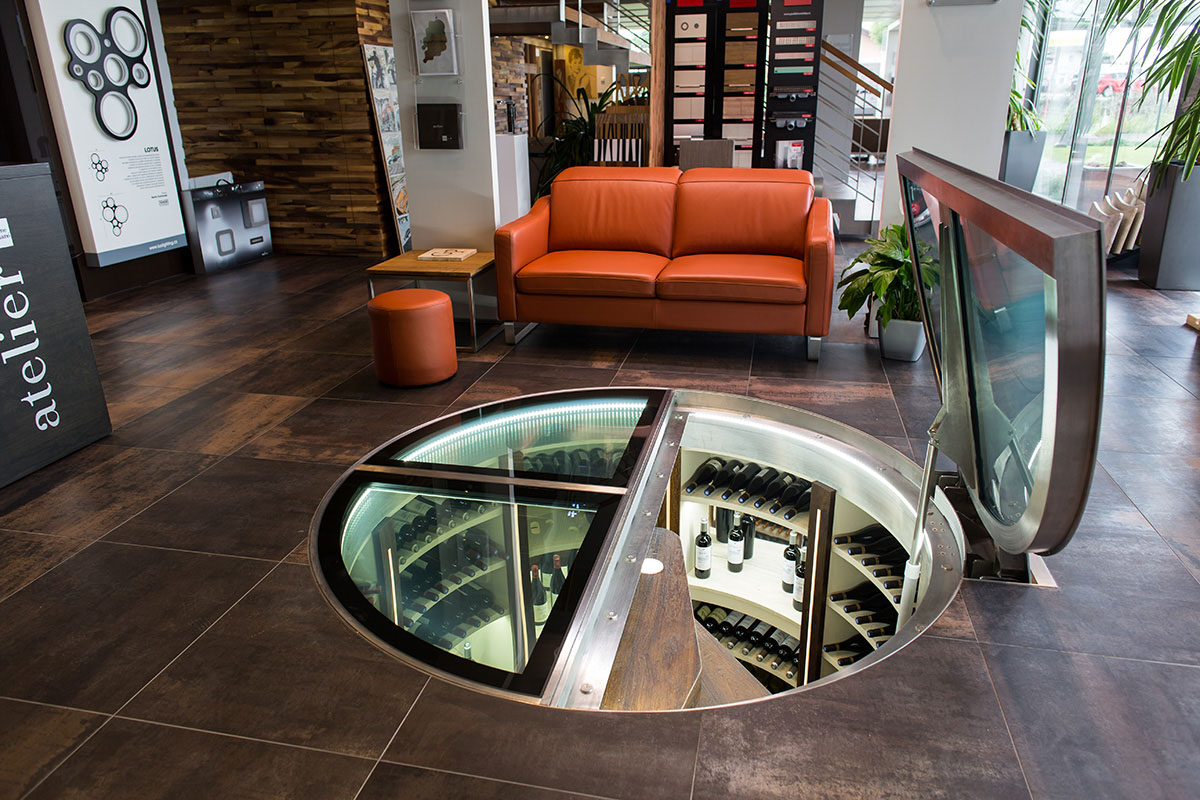

Such a cellar should be located away from workshops and garages to avoid exposure to vibration. An equally important condition is the cladding. All materials must be safe and environmentally friendly, and must not emit odors. The walls must be carefully covered with thermal insulation materials. The space is equipped with shelves with cutouts for bottles or kegs. The best material for building walls is brick, and for filling the floor - sand.

Construction of a cellar
Before proceeding directly to the construction of the storage facility, it is necessary to select a location for the construction of the cellar. The location for the construction of a food storage may well be an area with a hill where atmospheric moisture cannot enter and accumulate. If groundwater is high, it is necessary to build an above-ground cellar.


Advice!It is recommended to equip a semi-buried building with a groundwater height of 1.5 m.

The construction of the cellar is carried out in stages:
- Preparing the pit.
- Laying a drainage cushion made of gravel, expanded clay, crushed stone, sand.
- Laying a waterproofing layer.
- Reinforcement and concreting of the floor.
- Preparation of formwork for the construction of walls.
- Installation of fittings.
- Concreting walls.
- Vibrator compaction.
- External waterproofing.
- Internal waterproofing.
- Plastering ceilings and walls, cladding.
- Arrangement of space with racks and shelves.
- Ventilation equipment.
- Ceiling arrangement.
Basic principles when laying a cellar
Laying the foundation
- The size of the pit around the perimeter must be increased by 30-40 cm from the actual dimensions.
- The minimum foundation depth is 30cm.
- The perimeter is strengthened with formwork to prevent the soil from collapsing.
- Posts 10 cm high are installed in the corners.
After installing the foundation, they proceed to waterproofing and pouring the floor with concrete. Waterproofing is achieved using a layer of crushed stone, gravel or construction waste. For greater effect, dry mixtures are poured with heated bitumen. Sheets of roofing material are laid on top. On top of the waterproofing layer, the basement cellar floor is covered with sand.


Walling
If the site has wet soil, the cellar walls are mounted from reinforced concrete grade 350. The most suitable replacement for concrete is brickwork or stone. But the use of these building materials is recommended on dry soils. Basement wall installation steps:
- Installation of formwork.
- Installation of reinforcing mesh.
- Layer-by-layer pouring of concrete with careful compaction.
- The top of the reinforcement sheet is attached to the ceiling.
- After thorough and lengthy drying, the formwork can be disassembled. Dismantling should be done after 4 weeks.

Arrangement of the vestibule
In front of the storage room there is a vestibule with two doors. The air that accumulates in the vestibule acts as thermal insulation. Thanks to it, the necessary microclimate is created in the storage facility. When creating a cellar layout, you need to carefully consider the number of steps in the staircase. The width of each tread is at least 200mm. A well-designed space will provide access and accessibility to any shelf and storage rack.


Ceiling
The basement ceiling is made using permanent formwork. Concrete grade 250 is used as the main material. Stages of installation of the ceiling:
- A transverse frame is made from wooden beams.
- A reinforcing mesh with 20cm cells is laid on top of the frame.
- The wall fittings are connected to the ceiling fittings using tying wire.
- The formwork is being constructed.
- Pouring concrete occurs in several stages. Each layer must be thoroughly compacted and allowed to dry.
Complete hardening of the ceiling fill occurs after 3 weeks.
Waterproofing
The basement requires careful waterproofing. The installation of a moisture-protective layer in the cellar is carried out using mastic and bitumen liquid mixtures.

Sheets of roofing material are fused over the walls, which are carefully connected to the floor covering, additionally coating the seams with mastic. External walls and ceilings are protected with polystyrene foam boards. The ceiling is insulated with a double layer of roofing felt. A layer of crushed stone and sand is poured on top. Then, geotextiles are laid. The final covering is a land rampart. Soil is a natural thermal insulator. To strengthen the earthen embankment, it is necessary to plant ground cover plants with a developed root system.
In the garage
Cellar ventilation
Without constant air exchange, products will not be stored indoors. Therefore, a very important step in arranging a cellar is the installation of a ventilation system. Principle of ventilation arrangement:
- The exhaust pipe is fixed. It must be fixed in the highest place under the ceiling.
- The supply pipe must be placed slightly higher than the floor covering.
- The ends of the pipes are brought out.
- The resulting vents in the walls between the pipes must be insulated with polyurethane foam.
- Moisture canopies and a rodent and insect net are hung on the outer ends of the pipes.
Ventilation vents can be made of concrete. Using formwork, mount the pipe and insulate it with mastic and roofing felt.

Facade decoration
The facade of the external cellar must meet increased requirements for the durability of the material. In addition, the door must fit tightly to prevent drafts.


A cozy cellar mound fits perfectly into the landscape of any personal plot. By laying out a beautiful path to the basement and lining the façade of the vault with natural stone, an ordinary cellar will turn into the most beautiful part of the site.
