How to make a bicycle out of cardboard. A DIY bicycle is a treasure trove of master classes using various materials. Step-by-step manufacturing process
MASTER CLASS “BICYCLE POSH POTS FOR A BOUQUET OF CANDY”
Pogorelova Valentina.
Look what beauty Valentina made! The master class is very detailed, we will learn!

.
Bike dimensions:
- height 18 cm
- length (from rear wheels to front wheel) 33 cm
- width (between rear wheels) 18 cm
To make a bicycle we will need:
- wire 2-3 mm
- white tape
- 4 white buttons
- “Moment” glue (or heat gun)
For this bike I used 1mm floral wire, 40cm long.

If possible, it is better to take 2-3 mm wire in coils.
I had to wind two or three wires together to achieve the desired thickness.

1. We start by making the front large wheel.
To do this, bend the wire in a circle.
(It’s better to do this on some kind of base in the form of a jar, so that the circle turns out smoother)
From a wire 40 cm long (this is the maximum length in my case) a wheel with a diameter of about 14 cm is obtained.

2. Wrap the circle with tape

3. Let's start making the two rear wheels.
To do this, we take a wire 25 cm long. The wheels are about 8 cm in diameter.
We do everything the same as for the front wheel.
(To make these circles even, I used a cream jar for the base)
As a result, we have 3 parts.

4. We make “spokes” for the wheels. True, we will have them in the form of curls.
For a large wheel you need 6 pieces of wire 14 cm long, for two small wheels - 6 pieces of 10 cm each.
We wrap these pieces with tape. And we bend


5. Let's start making the bicycle frame. It turns out to be “double”.
For frames we take 2 pieces of wire 40 cm each (for the frames themselves) and 2 pieces of wire 20 cm each (for curls on the frames)

6. We wrap these pieces with tape and bend the small parts in the same way as for the wheels.
We attach the curl to the 40-centimeter base, retreating 10 centimeters from the edge of the base.


7. The edge of the frame, from which we retreated 10 cm, is also twisted and we get such blanks for the frames.

8. Back to the wheels.
We make an axle for the rear wheels from wire 13 cm long. We wrap it with tape.
9.Prepare white buttons that will hide the mounting points for the wheels and axles from the outside.
To do this, we “comb” the legs of the buttons, making them as flat as possible.
(If possible, you can find white furniture “plugs” that cover fastenings on furniture)
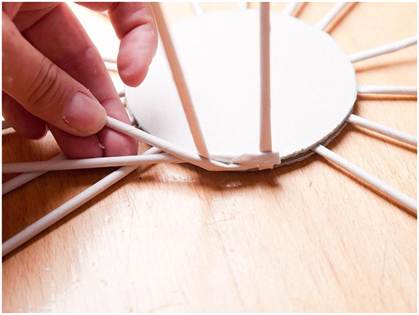
10. We do a “fitting” and attach the curlicue spokes to the wheels

8.

11.We make a steering wheel from 40 cm wire


12. Connect the rear wheels to each other with an axle.
This is the most difficult moment in the whole process.
(I did this using “Moment” glue. To do this, I had to hold the parts for a long time while the glue “set.”
The glue from the heat gun just came off the parts when I touched it)


13. Then we attach the steering wheel to the front wheel.
To do this, we bend the wheel and secure the joint with glue.
Then we will “close” this place with buttons.


14. When the wheels are well dry, we begin attaching the frames and steering wheel to each other.

15. Slightly bend the frames and bend the free end of the frames so that they (the frames) can be put on the axle of the rear wheels.
Let's do a fitting


16. Carefully connect the frame to the axle with tape

17. We finish the bike itself by making “handles” on the steering wheel.
To do this, wrap them with tape.
18. Let's start with the bicycle basket.
For the basket we will need two circles.
The bottom of the basket is about 8 cm in diameter. For this you need a wire 25 cm long.
The top of the basket is about 14 cm in diameter. For this you need a wire 40 cm long.
We do the same as with the wheels.
19. We make “twigs” for the basket by wrapping 4 pieces of wire 40 cm each with tape.
We twist them with tape in the middle together like this

20. We attach a circle of smaller diameter to the finished “spider” with tape.
First, it is better to do a “fitting” and mark with a pencil the places where the rods are attached to the circle.
21. Carefully bend the twigs, lifting them up.
22. Having done the “fitting”, we attach a circle of larger diameter to the twigs with heat tape.

24. To prevent the basket from looking “naked,” I suggest making curlicue decorations and attaching them between the twigs of the basket.
The length of the wire for such curls is 8 cm. In our case, such curls are needed 8 pieces.

23. At the top we bend the twigs in the form of curls.
.

25. Our basket-planter for a bicycle is ready

26. Attach the basket to the frames and axle of the bicycle using tape.


27. All that remains is to make a bouquet and “plant” it in a basket.
My bouquet is held on polystyrene foam and can be pulled out of the basket.
Thus, if the bouquet is eaten, the flowerpot-bicycle will serve as new bouquets

I would like to introduce you to the craftswoman Sjusen and her wonderful works. The planter well and bicycle are made of cocktail tubes and twine. As the author writes, she did the work out of hopelessness (there was no wire), from laziness (I was too lazy to go to the garage to get the wire) and from impatience (the author was not going to wait for someone else to do similar work). Here is a clear example of how “bad habits”))) allow you to create masterpieces with your own hands) Many thanks to the author for the pleasure of watching and for the accessible master classes!


Let's start with the well. The well is functional, you can turn the wheel and raise and lower the bucket.
We will need: twine, cocktail straws, coffee beans, hot glue, scraps of cardboard or ceiling tiles:

From cardboard we cut out a strip the length of an A4 sheet, 6 cm wide and connect it with a stapler or glue into a ring:

We cut the cocktail tubes into 6 cm pieces, wrap each with twine, 36-38 pieces in total:

Cover the ring with tubes:

We cut out parts from ceiling tiles or thick cardboard: a circle with a diameter of 11 cm (2 parts), a circle with a smaller diameter (1 part), a rectangle 6X12 cm (2 parts), a “peg” 10 cm high, 2.5 cm wide and with a hole in the middle (2 details):

We wrap all the parts with twine:

Decorate with grains:

Glue the bottom into the cone (a smaller circle, according to the diameter of the cone):

We glue the wrapped circles to the cone, one from below, the other from above, to hide the protruding “tails”, we glue a braid of twine around the circle. everything turns out neatly:

We glue the “pegs” onto the base of the cone:

We wrap a tube about 15 cm long with twine, but only the very beginning:

We decorate the tip and insert it into the holes of the “pegs”:

We wrap the rest of the tube with twine, up to and after the 2nd peg. So the tube will spin and the well will do its job (raise and lower the bucket):

We model a bucket, a handle made of wire, a bucket made of cardboard (can be made from a lid of a suitable size):


We fix one end of the twine rope with glue on the handle of the bucket, and we wind the other end on the crossbar of the well and also fix it with glue:

We check that the wheel should spin and raise (lower) the bucket:


We glue and decorate the roof parts. We fix the roof:

POTS BICYCLE


All we need is twine, cocktail straws, coffee beans for decoration, hot glue and scraps of ceiling tiles or cardboard:

From the scraps of ceiling tiles we cut out 3 blanks for wheels (you can circle a reel of large tape and then use this wheel size as a guide; you can glue 2 blanks for each wheel to make them more stable - then there are 6 blanks in total):

Wrap with twine:

From 4 cocktail tubes we make these blanks (about 2 cm before and after the bend) and wrap them with twine


Glue with hot glue like this:

We insert it into the circle, the wheel is ready (we make 3 such wheels). I got one wheel with a diameter of 11 cm:

We take another tube, bend it and stretch it a little in the fold (it stretches well):

We insert one piece remaining from the blanks for the wheels into this bent tube - to do this, cut the bent tube a little and insert a straight line with a drop of glue into it. We make two blanks and wrap them with twine


For the steering wheel, cut 2 blanks (2 cm before the bend and 3 after) and connect them


And one more blank - a straight tube about 11 cm long (if you are afraid that the bicycle will be unstable, you can insert skewers of a suitable size and diameter inside)

We wrap it with twine and decorate it with coffee beans “pots” (various jars of processed cheese, sour cream, jelly, ice cream, etc.):

We decorate the 2 rear wheels with grains on one side:

We decorate the side parts of the straight workpiece and the “steering wheel” with grains so that everything is neat:

Let's start assembly. We insert a straight tube into the rear wheels and secure it with glue:

In the front wheel, still without decoration, we insert 2 double blanks like this (I tried it differently - it’s ugly), fix it with glue (you can strengthen the axles with skewers by inserting them inside the tubes)

We insert a piece of tube (1.5-2 cm) between the upper tubes and glue it in:

Wrap with twine:

We glue the lower axles to the rear wheels:

Glue the steering wheel and flowerpots


Well, what do you think of the idea of using cocktail straws and twine? They can make excellent crafts for interior decoration; you can give them as a gift or sell them for the upcoming holidays. Some people make good money from manual work, and there are people who earn money on the Internet) You can find out how to make money in online casinos on the website http://onlinecasinogid.com/blackjack. Modern online casinos provide an opportunity not only to enjoy your favorite game, but also offer favorable bonuses and conditions for beginners. You can find out more about the history and development of the most popular games on the website.
This article contains several master classes on making a bicycle quickly and easily with your own hands from scrap materials with step-by-step photos and videos. This product will serve as an excellent element of home decor and will be the subject of surprise and admiration for all guests.
Making the “Flower Bicycle” composition with your own hands
To create this decorative composition we need:
- A decorative bicycle, which you can purchase in a specialized store, or you can make it yourself, following master classes from the Internet;
- Corrugated paper;
- Styrofoam;
- Toothpicks, glue, glue gun, thread or wire for attaching flowers;
- Decorative elements: tulle, bows, beads, ribbons, homemade beaded flowers, sisal;
First you need to make a small bouquet of flowers from corrugated paper. To do this, you need to cut out a rectangle measuring five by seven centimeters, fold it in half, round one edge and carefully stretch it.
Now you can start making the petals. You need to cut a strip of paper measuring ten by five centimeters and fold it in half twice. Then you need to cut out a petal of the same shape as shown in the photo below, and tuck it a little using an ordinary pen. Next, these petals need to be attached to the bud and secured with wire.
Flowers can be made of any shape and size, and when you have a sufficient number of them, you can begin creating the composition itself. The bottom of the wicker bicycle basket needs to be filled with a piece of foam plastic and flowers made of paper and beads must be secured to it using toothpicks. You can also add green sisal and various elements in the form of decorative bugs and butterflies. Our flower beauty is ready!
Making a bicycle from cocktail straws quickly and easily
To make such a beauty you will need some scrap material and a few hours of free time.
Tools and materials to create this product:
- Straws for cocktails;
- Disposable plastic cup;
- Scissors, toothpicks, cotton swabs, tape;
- Threads, bandage.
For greater clarity, this master class is presented in video photo instructions.
In this master class we will show you how to make an original flower pot with your own hands.
A flowerpot in the shape of a bicycle will be a very unusual decoration for your home or a gift for family and friends.
To create such a beauty with your own hands we will need:
- Wire two to three millimeters wide;
- White tape;
- Four white buttons;
- Moment glue or glue gun.
First, you need to make three circles of different sizes from wire and wrap them with tape. Now you can add curls to them and secure them well.
The same curls should be used to decorate the entire bicycle.
The next step will be to create a basket for our bicycle. It is made using the same technology as the bicycle itself and secured with glue.
All that remains is to make flowers from candies and decorate the product with them.
We create a very cute decorative bicycle with our own hands

To create such a miracle we will need:
- Several cardboard blanks;
- Small wooden stick;
- A piece of thread, toothpick;
- Scissors, glue.
First you need to make a cardboard basket. To do this, you need to glue cardboard strips to the bottom of the product, as shown in the photo below.
And then weave them into a basket.

Using the same method, only without weaving, you need to make three wheels.
Next you need to take a small wooden stick, two strips of cardboard and a thread and use them to make a fork for the future bicycle.
The parts that came out at the end need to be glued together.
The bicycle handlebar is made of cardboard and thread, and is also decorated with some decorative element.
This is what the output should look like:

Let's make a decorative flowerpot-bicycle from twine and aromatic coffee beans

For work we will need:
- Cardboard;
- Straws for cocktails;
- Leg-split;
- Coffee beans;
- Polymer glue;
- Scissors.
Using a compass, you need to draw circles on cardboard, as shown in the photo below, and cut them out using scissors.
Then these blanks must be wrapped with twine.
In the cocktail tube, you need to trim off the excess, leaving about two centimeters from the bend on both sides. You need four of these blanks to make one bicycle wheel. Next, each tube needs to be tightly wrapped with twine.
Now you can assemble the wheels, as shown in the photo below.

Then you need to take two tubes, stretch one, and cut off the top of the other and connect them as in the photo below. Two such blanks need to be wrapped with twine.
The steering wheel must be created by cutting off the upper part of the tube, leaving two centimeters before the bend and three after it. Wrap them with twine.
The next blank for the steering wheel is an eleven-centimeter long tube wrapped with twine.

The wheel should be decorated with coffee beans. It is necessary to insert two blanks into the front wheel and secure them with polymer glue.
You need to insert a straight tube between the rear wheels and secure it with glue.
A piece of tube must be inserted between the upper ones. And wrap the place where they are attached with twine.
The role of a flowerpot here will be played by an empty jar. You can decorate according to your taste.
Video on the topic of the article
At the end of this article there is a selection of thematic videos on how to make a topiary with a bicycle, make a cute cradle for this type of transport, or design your own composition in the steampunk style.
Nadezhda Ignatova (Voloshchuk)
Hello my dear friends, a long time ago I had to see on the Internet twine bike, a lot of time has passed since then, but the desire remains. Today is our holiday “Russia Day”, on which I congratulate you all, which means that all kindergarten workers have a day off, and I decided to do twine bike so that the day off is not wasted.
Now I will tell you how I did it. To make it we will be needed:leg-split, titanium glue or hot glue, cocktail tubes, cardboard, anything for decoration (coffee beans, beads, rhinestones, sequins) I used sequins (I store sequins and beads from under jars of gouache, it’s very convenient and nothing gets lost).

So, let's begin.
We cut out three blanks for wheels from hard cardboard. (you can circle a roll of tape, a mug, a glass) I have a rear wheel size of 8 cm, a front wheel of 10 cm. cm:

wrap all the blanks twine:

We make these blanks from 4 cocktail tubes (about 2 cm before and after the fold):

try it on:

wrap it around twine:

glue crosswise:

Glue the crosses into the blanks for the necklace With:

decorate the wheels (front on both sides, rear on one side):

take the tube, bend it and stretch it a little and insert a piece into it (in order for the tube to fit into the tube, you need to cut it a little and insert it with a drop of glue):

the blank is ready, we will need such blanks 2 :

wrap two blanks twine:

make a steering wheel, cut off 2 blanks (2 cm before the fold and 3 after):

connect them:

wrap it around twine:

another blank - a straight tube 11 long cm:

wrap the workpiece twine:

Let's start assembling. We insert a straight tube into the rear wheels and secure it with glue. We insert the blank into the front wheel and insert a piece of the tube between the upper tubes (1.5-2 cm) And paste it in:

wrap up the scrap twine:

We insert another blank into the front wheel (on the side, here So:

We place the front wheel with two glued blanks on the beam of the rear wheels and glue it:

glue the steering wheel:


put it on bicycle wrapped in twine and a flowerpot decorated with beads (for flowerpots you can use boxes of processed cheese, ice cream, sour cream, etc.):

decorate bike with flowers:

flowers for bicycle My 7 year old daughter made these - these are daffodils.
My daughter likes it. I already have 2 crafts from twine:

Thanks to everyone who watched to the end.
Craftswomen always want to decorate their home in some way. Embroidery, knitted items, various decorative details. We invite you to familiarize yourself with ways to make a bicycle with your own hands, which can serve as the highlight of your home.
From twine
We will need:
- leg-split;
- cardboard;
- pencil;
- cocktail straws;
- a container for the future pot (from yogurt, for example);
- glue “Titan” or “Moment”;
- coffee beans;
- scissors.
We cut out the bases for the wheels from cardboard using a compass or other round objects. It is necessary to make 6 such blanks, two for each wheel.

Having glued the pieces together in pairs, we wrap them with twine.

We make spokes for wheels from tubes. To do this, measure two centimeters from the fold in both directions. There are four of these parts for each wheel. We wrap them with twine and glue them together with Moment or Titan glue.


Now we place the spokes in the wheels and fasten them with glue.

We decorate the rear wheels with coffee beans, as shown in the photo below.

We take the next tube and cut off 2 centimeters from the fold in one direction and 3 cm in the other. We make another such part. We connect them to each other with the long sides. This will be our steering wheel. We also wrap it with twine.


Cut off a part of the tube without a bend, 11 centimeters long. Wrap it in twine. This blank will connect the rear wheels of the bicycle.

Now we cover the ends of it and the steering wheel with coffee beans, which we set on glue.

We take a new tube, fold it and stretch it. We make a cut on the side of the short part, put a drop of glue and insert it into the segment that remains from previous work.


We need two such blanks. We also wrap them with twine.

We insert these long blanks into the front wheel, as shown below, and decorate the wheel with coffee beans on both sides.

Between the ends that will be at the top, we lay a piece of tube 2 centimeters long, and close this place with twine.


We connect the rear wheels with a jumper.

Now we take the container that we have chosen for the future flowerpot and cover it with twine. We decorate the top edge with coffee beans.

Glue the steering wheel to the top bar and place the planter between the rear wheels.

You can leave the flower pots for all sorts of little things, but with flowers the bike will still look more harmonious.

Instead of a flowerpot, you can make a bicycle with a cradle and place flowers there.

From wire
We will need:
- wire with a diameter of 2-3 mm;
- white tape;
- buttons of the same shade - 4 pieces;
- glue, you can use Moment-Crystal or a heat gun.
We roll three identical circles from the wire, fold them together and wrap them with tape. It turns out to be a wheel. We need to make three wheels, one of which is large, and the other two are the same size.


Using the same principle, we make three curls in each wheel.


We make the frame and steering wheel in the same way.

Our bicycle will come with a basket, so we’ll assemble that too.

We attach the basket between the rear wheels. And now our bike is ready. If we place a composition with candy flowers in it, it will be a wonderful gift. You can see how to make such flowers in the video below.

From a three-core cable

Prepare the following materials and tools:
- three-core cable, always soft - 1.5 meters;
- wooden skewers;
- small blocks of wood;
- cotton wool;
- brown and white paint;
- coffee beans;
- threads;
- newspapers or office paper;
- cardboard;
- drill;
- silicone hot glue;
- screws;
- small flowerpot made of plastic or ceramic;
- satin ribbons and decor as desired.
We cut three sections from a three-core cable: one larger for the front wheel, two smaller for the rear. Pull out the blue wire from the middle. And using a piece from it and glue, we connect each piece of cable into a ring.


Using a drill, make a hole in a wooden block and wheel. Connect using a skewer.

Such holes must be made according to the number of spokes. The result is a design like this.

We connect two wheels. We bend the wooden block in the middle with another piece of cable and secure it with a screw.

We decorate the flowerpot and attach it to the frame of the front wheel with a screw.

We make a steering wheel from the blue middle wire.

All parts must be painted white, and the cable joints must be covered with satin ribbon.

We glue a piece of cable to both rear wheels.

We tie a bow made of ribbon 0.5 cm wide onto the steering wheel.

For the basket, cut out a circle from cardboard and place it between two wheels.

We cut out two more similar circles and attach newspaper tubes to one, these will be our stands. How to make them, see the video below.

Cover with the second circle and lift the racks up. Let's start weaving our basket. When it is ready, we attach it to the prepared platform. You can use glue or screw it on.

Now let's start making our topiary. We attach a ball of crumpled newspaper to the blue wire, folded in half. We cover the newspaper with cotton wool, then tie it with thread and paint it with brown paint.


Cover the ball with coffee beans. We install polystyrene foam or pour plaster into the basket and install our coffee tree. The trunk can be previously covered with tape or thread.

So that the inside of the basket is not visible, we fill it with artificial plants and twigs for decoration.

We also decorate the pot on the steering wheel as desired.
These beautiful compositions can become a decoration for your home or part of a gift. Such bicycles can be decorated in any way you like, for example, in Provence, steampunk style, decorated with beads, rhinestones, ribbons, etc.
Video on the topic of the article
