Simple homemade piercing and cutting weapons made of stone, wood and bone for survival in extreme conditions, knife, spear, spear, axe, sling, brawler. What and how to make a knife in the wild Knife from a file
When surviving in extreme conditions, you can make simple homemade piercing and cutting weapons from stone, wood and bone yourself, but to do this you need to have at least a little experience in making them and at least some skills.
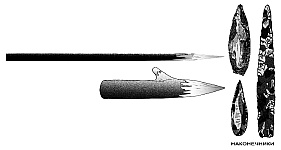
Homemade knife made of stone.
Stone can serve as a material for a homemade knife.
— Obsidian is an igneous rock consisting of volcanic glass.
— Quartz is a widespread, hard, rock-forming mineral. Has many varieties.
— Flint — painted in different colors, with smooth transitions between them. An excellent material for making a knife, axe, spearhead, and arrowheads.
— Shales are rocks. Easily split into separate, thin and sharp plates.
Making a homemade knife from stone.
Rinse the stone (layered rock) selected according to its shape with water. Then determine the presence of natural cracks in it and their general direction. Along these directions, the stone will easily split into plates. Hit the stone with another stone so that the impact energy passes along the layer or crack. It is impossible to process the stone in other directions, that is, across cracks and layers.
The broken plate must be given the desired knife shape using another stone. If the size of the plate allows, then make a handle. Handle size according to palm size. Wrap the handle with fabric, leather strip, etc. If the stone handle does not work out, then you need to cut it from a tree branch. Split the end of the branch. Insert the blade into the split and securely secure it there, wrapping the handle with wire, rope, strips of fabric, bandage, leather belt, vine.
Homemade spear.
A spear is a piercing or piercing-cutting, throwing, polearm bladed weapon. A spear is the same knife, only with a long, straight handle. The simplest spear is a straight stick made of hard wood, sharpened at the thicker end. For hardness, the tip of the spear should be on the fire. For defense against a predator at close range, a short, strong, sharpened branch can be useful. For greater efficiency, the spear must be equipped with a tip made of stone, bone, or metal.
Homemade slingshot.
Rogatina is a Slavic heavy spear for hunting large animals. A simple spear is a thick, pointed, long stake. The rod has no resemblance to a pitchfork; it is called so because, in ancient times, the tip of it was a horn from cattle. Or a spear is a wide, double-edged knife on a long shaft. Designed to repel the attack of an attacking animal (bear, aurochs, wild boar). The thickness is equal to the grip of the palm of the hand. Length about two meters. Below the tip you need to attach a crosspiece to keep the animal at a safe distance. When attacking an animal, you must quickly rest the blunt end of the spear on the ground, step on it with your foot and point the tip towards the animal. When striking, the spear must be held with both hands.
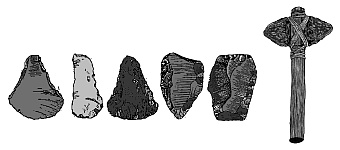
Homemade stone axe.
The material used is the same as for the blade of a stone knife: flint, obsidian, etc. A simple way to make an ax is to beat a stone until it is given the desired shape and forms a sharp blade. Then the finished stone must be attached to a handle made of durable wood.
Homemade sling, harpoon.
Sling – this weapon is a long harpoon for underwater hunting. On one side it has a tip for hitting fish. On the other, a rubber or spring rod. The striking distance is limited by the length of the harpoon.

Homemade brawler.

Drach is designed for fishing at depth from the shore or from a boat. Fishing procedure: throw the draach to the bottom of the reservoir further from the shore, or better yet, into a hole. Wait a little, then with a sharp tug on the rope, pull the tackle towards you. If the fish was not hooked, repeat. Operating principle: due to a sharp jerk, the drach chaotically breaks off from the bottom and hooks fish in its path.
Based on materials from the book “Survival beyond the threshold of civilization.”
Nagorsky S.V.
Chapter from the book, Basics of Survival."
Why did the “Stone Age” of Humanity last so long? Yes, because having mastered the most primitive methods of making products from stone (flint), any person could provide himself, anytime and anywhere, with the most necessary tools: a knife, arrowheads and spearheads, axes, scrapers, hand axes, etc. The list of products is small, but for a man of those distant times this was quite enough for life. Products made from flint quickly broke, but it was just as quickly possible to make new products on our own to replace the lost ones. For modern man, such possibilities of his prehistoric ancestor are already in the category of fantasy. The production of the simplest metal products requires, if not the presence of a machine park, then special tools and fairly high qualifications in metalworking. The metal itself also needs to be obtained somehow.
I have a feeling that someone will ask: “Why does a person of the twenty-first century need Stone Age technologies? Why does modern man need some kind of stone tips for arrows and spears?” These fans of specific questions already know the answers to all their questions in advance. For example, in their opinion, televisions are needed only for broadcasting and viewing porn, printed publications are needed for the dissemination of extremist views and dirty lust. They can also tell in detail about the main purpose of table forks, corkscrews, meat grinders, electric kettles, irons and freezers. How many people have already died unable to withstand torture with these tools? And here the author offers technologies for the production of alternative weapons.
Well what can I say? Some people, trying to understand the world around them, seek adventures in wild lands, in the middle of nowhere. Other people have adventures in their own homes. In both cases there is sometimes a need to arm oneself at least at the Stone Age level. Because with the acquisition of modern firearms, even more hassle appears. Let's remember how airplanes fly today. No sooner had I entered the storage room after registration than the command immediately sounded: “Take off your shoes, pull out the belts from your trousers, take out all metal objects, unbutton your pants and bras, put your hands behind your head, face the wall or the back of another passenger’s head!” And just like that, under the watchful and attentive gaze of well-trained flight attendants and, most likely, at the gunpoint of invisible snipers, a chain of passengers boards the plane. Well, it’s clear that on the plane some idiots suddenly have something going on and they start pumping up their license, remembering that they themselves were people too, twice as many times and demanding justice. Other passengers who are so violent immediately begin to calm them down by saying that they dreamed about it and that a modern citizen always has bare feet, his fly and bra are unbuttoned, he is never right, especially without having a license!
And you want to say that in such conditions an extreme tourist can carry a legal barrel with cartridges, gunpowder and other ammunition to the middle of nowhere? You may be able to take it there, but don’t forget that your registered weapon still needs to be taken back. And there the local official will take an eye on your gun and tell you what is not allowed. In his own words, he will explain that you can write a complaint to him and about him, but in green ink, with a red seal and in triplicate, otherwise he will not even consider your accusations... The owners of the trunks and the house may have problems. Without a gun in the safe, the owner could sleep peacefully, but then in the middle of the night or early in the morning there is a sudden check. The policeman said: “I don’t drink this and I don’t snack on this, but you can try this. I won’t look at the safe today, I’m writing that the storage is satisfactory,” maybe it won’t stay in your apartment for long. What if he also has to appear before his superiors in the morning.
I hope it’s now clear why an ordinary citizen would need to know, just in case, the technology for making a stone ax and a wooden fork?
While studying ancient flint processing technologies in theory and practice, I encountered a paradoxical situation. Judging by scientific sources, in the Old World and in Russia in particular, it is believed that the technology for making ancient flint products is an unusually complex and lengthy problem. Moreover, it is poorly studied and controversial, accessible only to a narrow circle of especially dedicated specialists from experimental archeology. There were even reasonable assumptions, for example, that in ancient times the grandfather began to create a stone ax, and the grandson finished it. The most that European scientists have achieved in experimental archeology is to create replicas of the crude axes of the times of Pithecanthropus. At the same time, in North America, making products from flint and using ancient technologies is common practice for making antique souvenirs by local artisans. I want to say that scientists from archeology from different continents apparently have no connection with each other and each has their own, purely personal opinion about the World History of Humanity.
The level of skill of an ordinary craftsman in flint processing from the North American states or Canada has reached such unprecedented heights that the ancient ancestors of today’s Humanity could not even dream of it. And this goes without saying without the use of modern special equipment (laser, vibration or ultrasonic machines...). Everything is done according to ancient technology, where the craftsman’s main tools include a cobblestone and a piece of deer antler for finishing the product. At most, a particularly advanced master can afford to replace ancient materials with modern ones on his instruments. Instead of a cobblestone there is a copper striker, instead of a finely sharpened deer antler squeezer there is something like a tiny screwdriver on a comfortable handle. And everything else is like the ancient masters.
Now a little more about flints. What is it and where can I get it? Flint is one of the most common minerals on Earth. The sand underfoot is mostly finely ground flint. Although it seems that this sand is eternal, it is not. Under the influence of the external environment, sand can dissolve, sinter and flow like a liquid, flowing into random, natural cavities to form flint nodules. For greater clarity, let’s take ordinary window glass. If you measure the thickness of old glass with a regular caliper, you can find a significant difference in size. The glass will be thicker at the bottom. Glass is also made of quartz, only because of the additives it is less hard and less refractory. It also flows, but we don’t have time to notice it with the naked eye in such a short time as our life..
Flint nodules can be the size of a tiny pea to the size of a small peasant hut. The deposition of flint on the walls of cavities lasts for thousands and even millions of years, and quartz crystals often form inside the nodules from the amorphous form of layered flint. Silicon stone is tiny crystals of quartz framed by amorphous flint, and in a purely crystalline form is called quartz. Depending on the impurities, quartz crystals can be called by all sorts of names, but most often they are colorless rock crystal druses. The silicon itself in the nodules can also contain impurities and have different colors and slightly different properties. Another option for the formation of flint nodules from melt in volcanoes. There, the nodules are mainly composed of a crystalline form of quartz. Inside volcanic nodules there may also be cavities with individual crystals. Ordinary flint has a glassy sheen when fractured and thin plates can be seen through. Quartz can be translucent or transparent, depending on the type, color and other advantages, it can belong to the group of semi-precious stones. There are also precious forms of quartz.
The nodules are destroyed over time, the fragments are rolled around by water flows and again acquire a rounded shape. Unlike rounded fragments, nodules are usually covered with a rather weak and loose, so-called jacket. If the hardness of the flint itself (and quartz) on the Mohs scale is 7, it scratches glass and hardened steel, then the shirt has a hardness of 3-4 or less. When processing flint, it is necessary to get rid of the jacket and take into account the natural layering.
Flints have one more feature. There is always water present in flints. On stones that have lain in the open air for a long time, moisture evaporates and at the same time tears the integrity of the stone, covering the entire volume of flint with small cracks. Processing such flint is difficult, or rather impossible, since the overdried stone chips not in layers, but along internal cracks and in any direction. Therefore, it is necessary to store flints for subsequent processing in moist soil or water. Sometimes raw (fresh) flints are specially heated in the ashes of fires so that the stones are stratified into long and thin plates. It is clear that fragments of small flint nodules will be stratified into many curved plates, while fragments of large flint nodules may turn out to be almost straight.
When making stone products for practical purposes, we must not forget that these products are mostly disposable and will not last long. Therefore, it is simply not wise to be especially diligent and waste time on production. Any (stone) product must be made quickly, with sufficient accuracy, but nothing more. Other types of stones, crystalline sandstones, hard varieties of slates, obsidian volcanic glass, as well as display, window and bottle glass can be used to make practical products.
The photo shows replicas of antique products. And if we speak in Russian, then antique flint products created by modern craftsmen.
Continued in
Let’s just say that a knife is an extremely necessary thing, and if it so happens that you find yourself alone with nature, you don’t have a knife, but there’s nowhere to go without it! Take advantage of the experience of our ancestors and try to make a knife from stone.
In theory, everything is quite simple, you need to find a suitable stone and process it so that it has a cutting surface.
To do this, the stone needs to be split into plates and sharpened if necessary. As tools for making and sharpening, you can use another stone, bone, animal horn, and anything else that can be used to give our knife the desired shape and sharpness; in this sense, it would be a good idea to practice in advance.
For manufacturing, it is best to use stones of the following types:

Slates- various rocks with a parallel (layered) arrangement of intergrowths of low- or medium-temperature minerals. Shales are characterized by foliation - the ability to easily split into separate plates. They belong to terrigenous or metamorphic rocks.

Flint- a mineral formation consisting of crystalline and amorphous silica (SiO 2) in sedimentary rocks. Often colored with oxides of iron and manganese in different colors, with smooth transitions between them.
In ancient times, flint fragments were used to strike fire, make weapons and household items (arrowheads, flint knives, etc.) In the Middle Ages, flint was widely used to create fire by striking sparks onto tinder using two pieces of flint, or one flint and a piece of other material (flint-pyrite, flint-steel). Later it was used in weaponry in wheel and percussion flintlocks.

Quartz- one of the most common minerals in the earth's crust, the rock-forming mineral of most igneous and metamorphic rocks.

Obsidian- igneous rock consisting of volcanic glass with a water content of no more than 1%, homogeneous volcanic glass that has passed through the rapid cooling of molten rocks. Volcanic glasses richer in water, which swell when heated, are classified as perlites.
You can make your knife a wooden handle (by tying the blade to the wood with string) or use it as such. The undoubted advantage of a stone knife is its sharpness; it is also not susceptible to corrosion, but in terms of strength it is not very strong; it can break from a fall or blow.
© SURVIVE.RU
Post Views: 3,773
It was enough for Mowgli to acquire an “iron tooth”, and half of his problems were solved, which as a result brought him to the throne of the wolf pack. And this is not a joke: having a knife in a survival situation immediately increases the chances of success by at least 50%. But even if such a product is not among your things, you can make a knife yourself, and not only from metals.
The ability to build a knife depends on the available resources and the conditions of the area in which the person finds himself. Almost everywhere you can find natural material for making blades of various types.
You should pay attention to the rocks. Obsidian (volcanic glass), quartz, flint, and slate (layered material) are suitable for making a knife. The stone is split against the rock by hitting it at a 90-degree angle, resulting in a sharp edge that can be processed further or left as is. Such a product will allow you to cut a rope, finish off game, build an ax, etc.


In forests, flakes from hard wood (such as oak or conifers) are used to create a cutting edge. Such wood is characterized by good strength, which increases with the sharpness of the “blade” after firing. A wooden knife can be wrapped in a rag or other material to create a handle. The application is almost similar to the stone one - it is suitable for cutting a carcass and cutting a rope. It is better to have several of these products with you.
If you are near a river or other body of water, shells such as toothless shells can help. Half of such a shell has a good cutting edge.
In the sands, saxaul can play the role of a knife. It is also worth paying attention to the shells of turtles. This chitinous "body armor" consists of slate-like plates that can be adapted as a knife.
If you are a successful hunter and you come across a medium-sized animal, you can make a knife from ribs by sharpening one of the edges on a stone. Fibula bones are also suitable for this. In addition, sometimes other natural materials can play the role of a knife. For example, a sedge leaf will allow you to quickly peel a mushroom for boiling.
Now a few words about metal. Many people get into accidents without a knife, but with a sufficient amount of other materials. To make a blade in this case, it is necessary to select a pliable (soft) metal and process it with a heavy object resembling a hammer (for example, a large nut with an ax inserted into the hole, etc.). Processing is carried out on a flat surface (for example, on a flat stone), where the product is given the required shape and the cutting edge is brought out. The handle is made of wood. Of course, this is not a steel knife, but it will perform the household functions tolerably.
Any piece of metal or other material can be used as a knife. For example, a bent lid of a tin can, half of which is wrapped in cloth, or a long piece of glass, for which a rope or rag “handle” is also made. The main thing is not to get confused and show your imagination and ingenuity.
Let’s imagine that you find yourself “in the shoes” of Robinson in a deserted forest region: you have almost nothing with you, and the nearest settlement is several days away. In such a situation, a knife is needed, but it is lost or bad people took it away. Without panicking, you immediately begin to think about the problem - how to make a knife yourself in the complete absence of tools.
How to make a camping knife from a piece of iron
First of all, you look around, hoping to find material for the blade. The blade can be made from stone, flint, glass fragments, bone. But the best material would be metal. Question: where can I get metal? It must be looked for near places associated with human activity. These could be high-voltage poles, railway tracks, abandoned villages, old barns, landfills. You need to take a closer look at doors and gates: iron hinges and awnings will be good material for cutting tools.
But here we will tell you, using a real example, how to make a knife from a less convenient piece of iron.
In one of the extreme situations, after a short search, this piece of iron and a couple of pieces of iron wire were found.

To forge a knife from this material, you needed a forge, an anvil and hammers. Bricks served as anvils and hammers. It took much longer to collect fuel and find the required number of bricks.
When everything necessary was collected, we began to build something like a forge. We dug a hole with a stick and even with our hands, taking into account the size of our iron workpiece. Crushed stone was poured into the bottom of the pit (pellets, pebbles, or any small stones could be used). The walls of the pit were reinforced with large stones: firstly, they did not allow the earth to crumble, and secondly, they retained heat when the workpiece was heated.
According to the rules, it would be necessary to dig two holes connected by a trench - one for the forge, and the second for air flow. However, this option has its own difficulties, so we limited ourselves to one pit.

It took about 10 minutes to build the forge (excluding time spent searching for materials). When it was ready, they lit a fire and began to burn the coals. Large branches were burned, but small ones were not thrown into the fire, since they do not produce coals, and excess ash would impair the flow of air to the burning wood.
While the firewood was burning, an anvil brick and a couple of hammer bricks were moved as close to the pit as possible. Naturally, we didn’t have pliers for manipulating the hot workpiece. Instead we had a hook made of wire. This hook was used to hook the workpiece.
When the coals were ready, we immersed the workpiece in them and waited until it heated to the desired temperature. The temperature was determined by color by eye, remembering that forging can be done in the temperature range from cherry red (770-800 0 C) to light red (830-900 0 C).

Having waited until the workpiece had finally reached its standard, they quickly removed it with a wire hook and began forging. First, we straightened out the curl that was supposed to turn into a blade. The workpiece was gradually forged on both sides until it was given a flat appearance. Only after this were the blades forged. To perform these operations we needed more than one heating. During the process, our workpiece looked like this:

When we forged the edges of the blade and brought the shape of the entire knife to acceptable parameters in our opinion, we began heat treatment of the product.
Heat treatment began with annealing. The workpiece was heated to the hardening temperature (light red color), then left to cool slowly in air. Annealing was needed to relieve internal stresses in the metal after forging and bring the metal structure to an equilibrium state.
After this we started hardening. First, we decided on the quenching medium: we had a fairly large container of water. But you can also harden it on soft wet ground or wet sand (of course, everyone knows how to wet the ground in the absence of water). Having prepared the quenching medium, heated the blade to a light red color, kept it at this temperature for some time and quickly dipped it into the quenching medium (we used water).
Then we took a vacation. To do this, one side of the slopes was cleaned from scale on the brick (to a shine) in order to control the temperature by the color of the tarnish on the slope. We placed our blade with the cleaned edge up on the remaining coals and observed the colors of the tarnish.
At first, the surface of the descent was painted a light straw color, which, as it warmed up, turned yellow, then yellow-orange. We settled on yellow-orange color: this color exactly corresponds to the temperature of 240-250 0 C - the tempering temperature. Having grabbed the workpiece with a wire hook, they dipped it into the same quenching medium.
This completed the important heat treatment procedure, and we moved on to the mechanical processing of the knife. We straightened the slopes and sharpened the blade on a brick. To ensure efficient sharpening, the brick was moistened with water and sand was poured onto it as an abrasive. And this is how the knife turned out:

Inspired by the success, we thought: what kind of knife is this that doesn’t have a sheath?! And we immediately started making these sheaths, because we already had the necessary tool. We found a piece of wood of a suitable size and planed it with our knife to the required length. Then, using a knife and a large stone, they split it in half lengthwise.
On one of the halves, a pencil (or charcoal) was used to outline the outline of the blade, leaving an allowance sufficient to freely remove the blade from the sheath. Then we applied our woodcarving skills, simultaneously testing the quality of the blade’s hardening and the comfort of its handle. The result is a blade bed like this:

We combined the two halves of wood and got a finished scabbard. They cut off a piece from the laces on the shoes and tied the two halves of the sheath together with them.

Such a sheath is convenient to wear obliquely behind a belt or by a belt loop. Thanks to the bend of the sheath and its sufficient thickness, you don’t have to worry about losing it.
In conclusion, we present the figures that accompanied us in the process of making the knife.
Knife specifications:
– knife blade length 135 mm;
– the entire length of the knife is 245 mm;
– butt width 4 mm.
Spent time:
– construction of something like a forge 10 min;
– burning coals for 20 minutes;
– blade forging operations with bricks on stone, hardening, tempering 30 minutes;
– operations of editing the blade slopes and sharpening 15 minutes;
– making a sheath 25 min.
As a result, in less than 2 hours we were able to make a knife without tools, using only materials that we could actually find. At the same time, the knife turned out to be not disposable, but suitable for performing various tasks.
Now, if you find yourself in extreme field conditions, you will not be confused by the question “How to make a knife yourself?”
Useful hiking tips:
In this video you will learn how to make a homemade sheath:
