Dragon age relic of the legion of the dead. Orzammar. Side missions. High Dragon Sets
As in any self-respecting modern RPG, in dragon age A: Inquisition is also available for crafting armor and weapons. Unlike the first part, crafting here is not limited to inserting runes - now we are given the opportunity to create a thing from scratch by choosing appearance, type, material that gives the necessary bonuses and improvements. Although the runes also remained, where would we be without them? In general, in my humble opinion, craft is made dull and not interesting, like everything in this sad game, there are many opportunities, but running around collecting all this junk is not very fun.
Sketches of weapons and armor
At the very beginning, to create items, improvements or runes, sketches of these same items, improvements and runes will be required. Where to get them? In chests, merchants, headquarters missions, sometimes even bosses. Sketches are displayed in the list of items available for crafting, they can be used as much as you like and, what is good, they do not take up space in your inventory.
There are only 3 levels of sketches in the game. The higher it is, the more cells there will be in the item, the better and with more bonuses it will be possible to create an item. Sketches of the 1st level suggest the presence of 2 cells, 2nd level - 3 cells, sketches of the 3rd level - 4 cells.
The crafting system here is logical - on heavy armor you will need a large amount of metal, a little less skin and rarely when you need fabric, but for a mage's attire, the opposite is true. For swords and weapon hilts, a base is needed, as well as leather or fabric braid and the like.
There are 4 types of cells in total: the main one, which determines the basic parameters, and three additional ones, the set of which may be different depending on the sketch. Namely:
Damage- the main cell for weapons, determines the damage per second depending on the material, as well as the type of elemental attack of the staff.
Attack- An additional slot for weapons and weapon upgrades. Depending on the material, it adds bonuses to attack types or the chance of inflicting status effects on the enemy.
armor- the main cell for armor, determines the level of armor depending on the material and protection against physical damage in melee.
Protection- An additional slot for armor and armor upgrades. Depending on the material, adds resistance bonuses from elemental, ranged and magic attacks, as well as the chance of retaliatory bleeding or additional health.
Support- an additional cell for all types of items. Depending on the material, it adds attribute points (dexterity, magic, etc.).
Only two additional slots are always available for upgrades of any level, with the help of upgrades you can only add bonuses and / or stat points, but not damage or armor level (the exception is Bianca).
Types of improvements and crafting
Armor
3 types of armor are available for crafting (light, medium and heavy), as well as helmets of each of the three types. Almost all types of armor have two upgrade slots available: bracers and greaves (with the exception of special armor like the elven robe of the Guardian or the armor of the Legion of the Dead). Improvements are created separately, but according to a similar principle.
Sometimes ready-made improvements can be found in chests or received as a reward for completing a mission at a rate. Improvements can also be removed from dropped items and placed on others.
Weapon
In Dragon Age: Inquisition, there are even more types of weapons than armor, and with improvements they are not so simple.
|
Weapon type |
Slots |
Name |
|
One-Handed - Swords |
Long sword handle |
|
|
One-Handed - Maces, Hammers, Axes |
One-handed handle (shaft) |
|
|
Two-Handed - Greatswords |
Big sword hiltLarge sword pommel |
|
|
Two-handed - large axes and hammers |
Two-handed handle (shaft) |
|
|
Magic staves |
Staff tipStaff hilt |
|
|
Daggers/Dual daggers |
Dagger hilt/Dual blade hilts |
|
|
bow hilt |
Separately, it is worth mentioning Bianca, since the weapon is unique. You can increase DPS and characteristics only with the help of improvements. Bianca has as many as 3 upgrade slots available - Shoulders, Scope, Handle. The main cell is available for the shoulders, which increases the UVS, for the handle there is also one support cell, for the sight - one attack cell. Although when I went through the game already somewhere in the middle, Bianca was many times worse than mediocre bows ...
Crafting materials
To create weapons and armor in the game, there are 3 types of materials: metal, leather and cloth, in turn, they are also divided into 3 levels. The higher the level of the material, the greater the level of armor or bonus indicator. The type of armor also varies depending on the material.
Metal
Metal is found using the search button (or a keen eye) in caves and on mountain slopes in the form of small clusters of several types of each in one location. V emerald graves in the Argon Shack you can buy Perfect Chandeliers, Obsidian and Pyrophyte, and Stained Glass from Cero is sold in Skyhold from a merchant from Orlais.
Level 1 Metals
Tier 2 metals

Level 3 Metals

Leather
Leather is obtained from slaughtered animals of a certain type. At the merchant's inland lands(Crossroads) you can buy almost all types of level 1 leather, in the Dalish camp in the Sacred Plains you can buy needleback skin, phoenix scales and sheep skin.
Leather level 1

Skin level 2

Skin level 3

fabrics
Cloths drop from slain enemies. Silk, semi-velvet and cotton can be bought in Val Royeaux.
Tier 1 fabrics

Tier 2 fabrics
Excellent things
You will have the opportunity to create excellent things in Skyhold after inviting the enchantress (mission at headquarters). When creating an item, a separate cell for an excellent item appears, right above the main one. Ordinary materials will not work here. For an excellent item, you need metals, leathers or fabrics touched by the Shadow, which come across randomly when collecting, as well as special finds like a dragon's tooth or iron bark. Only one unit of such material can be inserted in a cell, but its filling is optional.
Special materials grant a short-term ability like Walking Fortress, Indomitable, or Shadow Cloak, a chance to gain a bonus to Focus, or heal up to 15% of health on a fatal blow. The possible bonuses are randomly generated and there are many of them.
Dragon Age: Inquisition - crafting armor and weapons was last modified: May 5th, 2015 by admin
In this article, I would like to note the very existence and location of unique sets of armor in the game.
Kits
Ancient elven armor (+5 defense per set)
armor- in the ruins in Bressilian Forest. The armor itself is in the sarcophagus.
Helmet- in the Brescilian East Forest. In order to get it, you need to exchange it with a hermit. If the hermit is killed before that, you can forget about the helmet.
Gloves- in the ruined temple, according to the quest with the urn.


Boots- boots can be found in Lotheringi, but due to a bug, they, unfortunately, may not be.

Juggernaut Set (+3 Strength and Constitution per set)
The whole set is in the Bressilian forest - gloves, a helmet and boots in the graves (when the grave is activated, the undead crawl out of it). The armor is in ruins behind a closed door, which is opened through a ritual.
armor

Helmet

Gloves

Boots

Zeal Set (+5 Willpower per set)
armor- in the temple of Andraste, according to the quest with the urn. Found on the corpse of a knight in the right passage.

Gloves- in Orzammar, in the library of the Guardians, in a closed chest.

Boots- Bought in Redcliffe from a blacksmith after rescuing his daughter.

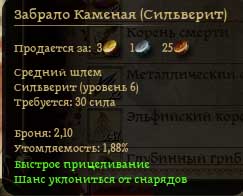
Legion of the Dead Set (+3 Damage and Constitution per set)
In the dead ditches on the deep paths. The helmet is on the pedestal, in the same place as the key. The remaining parts lie in sarcophagi throughout the location.
armor
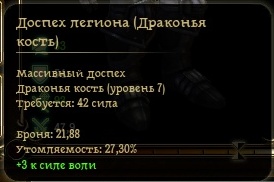
Helmet

Gloves
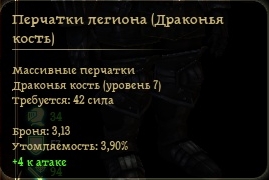
Boots

Effort Set (-10% fatigue per set)
armor- according to the quest in the Deep Roads, it is removed from the Womb.

Helmet- in order to find this helmet, you need to go to Taig Aedukan with the dog. After talking to her and sending her on a quest, she will bring back the "Crusader's Winged Helm".

Gloves— quest of free miners. Having collected all the stones, the location of their treasure will be marked on the map - in that chest there will be gloves.

Boots- Can be bought in Dust City.

High Dragon Sets
After killing the High Dragon and obtaining scales from its carcass, Wade can choose from three types of kits:
Medium (-25% fatigue, +5 defense per set)
armor

Gloves

Boots

Heavy (-20% fatigue, +5 defense per set)
armor

Gloves
Boots
Massive (-15% fatigue, +5 defense per set)
armor

Gloves

Boots

In addition, there is also a set of two parts, which does not give any bonus when worn at the same time. This:
Helmet of the Knight Commander- it can be found in as many as three copies: on the quest "Evil" in the Denerim Elfinage (in the last room of the shelter); in the Vault on the second floor of Redcliffe Castle; can be bought from Cesar after completing all the tasks of the Ravens.
Armor of the Knight Commander- Can be bought from the Marauder in front of Orzammar.

incomplete armor
Body
Templar Armor- Dropped by a bewitched templar in the Tower of the Circle of Mages.

Shadow of the Empire- From a merchant in the Commons Halls of Orzammar.

Armor of Divine Will- can be bought from Ruk in Ortan teige.

Villain's Garb- in Wade's shop (Denerim).

Mail of Avon the Great Same with Wade.

Hasind robe- given for the quest "Hasinda Way Sign". It can also be in the Dalish store.

Witch's Robe- Bought from Curiosities of Thedas (Denerim).
Robe of the First Enchanter- after completing the quests, Ravens can be bought from Cesar.

Robe of the Lord Magister Dropped by the Slaver Leader in the Denerim Elvenage.

Mantle of Possession- on the Morrigan quest.

Reaper Clothes- Curiosities of Thedas.

Head
Templar Helm- Dropped by an enchanted templar in the Tower of the Circle of Mages.

Thick Qunari Helmet- Dropped by Rogue Leader in Lothering.
Ginger Helmet- given for saving Radcliffe from the undead, if none of the militia died.

farsightedness- Dropped by High Dragon.

Very tight helmet- Sold by Varathorn.

Helmet for two-wire Dropped by Jarvia. Can also be found in Jammer's stash.

Corruption Dropped by the hurlock general during the siege of Denerim.

Flag Bearer's Helm- a chest in Fort Drakkon on the first floor during the siege of Denerim.
Visor Stone- Sold by Gorim in Denerim.
Rogue Scout's Helm- Dropped from Taoran in the last quest of the Blackstone Volunteers.

Griffin Helmet— the Gray Wardens' vault in Denerim.

Freedom Fighter Hood- a corpse on the 4th floor of the Tower of the Circle of Mages.

Hood with cameo- falls on the quest "Five pages - four magicians."

Sorcerer's Hood- in a chest on the lower level of the ruins (Bressilian Forest).
Assignment in Dragon game Age Origins"Dead Castle" is an impassable test for many players. Some do not know what to do during the adventure, others miss this mission, and still others suffer from a mistake. In this article you can find comprehensive information on this quest with a description of all the problems and mysteries.
How to take a task
First of all, it should be noted that the task in Dragon Age Origins "The Dead Castle" often passes by the players, because it can only be taken from a hidden location in the Deep Roads. This territory is called Dead ditches and is notable for the fact that it does not open immediately. The entrance to it becomes available to the player only after Ortan manages to find Branka's diary in the teig. This item can be considered the key to the task, because without it it will not be possible to even try to complete the mission. The reward for completing it will be the Legion of the Dead Full Armor with , which provides good protection. It can be worn on the main character or given to one of the associates.
Quest start
The mission in Dragon Age Origins "Dead Castle" is activated automatically after finding the diary. The player should prepare for the execution, because the hidden location is fraught with a huge number of opponents. To complete the task, the user will have to search for four pieces of Legion of the Dead armor, which will later become a reward. It should be noted that the reward is quite symbolic, because the soldiers of this squad are still fighting the creatures of darkness in the fortress of Bonammar. The first item to look for will be the boots. To obtain them, you will have to help the Legion in the battle with enemies at the entrance to the former stronghold of the dwarves. Then you should go through the tunnel from the gate. Immediately at the exit you can see a large sarcophagus, and inside it will be the first piece of armor. In the fortress, it is recommended to be extremely careful and do not forget to constantly use the save function. In the mission "Dead Castle" in Dragon Age Origins walkthrough holds some unpleasant surprises.

Continuation of the search
After obtaining the boots, the player will have to find three more items to complete the Dead Castle quest in Dragon Age Origins. The player can find gloves in the room where there is a statue of a gnome, but it is recommended to move carefully. The statue breathes fire if you step on the slab with the trap activated. The flame takes a lot of health, and therefore it is better to send the strongest ally first. The chest armor is also hidden in the sarcophagus, but in a different location. It is guarded by skeletons and commanded by a hurlock emissary. There should be no problems with clearing the location, because the player will encounter the creatures of darkness many times before this task. The last item will be a helmet, which is the easiest to find. The player just needs to go to the sanctuary of the Legion, go to the altar and pick up the right thing. Nobody guards her, but the difficulties on the assignment do not end there. Four items will open access to a new location, which will be indicated in the personal codex.

boss fight
Guide to the passage of the "Dead Castle" in Dragon Age Origins should prepare the user for the main test. All four parts of the armor were assembled in order to open the way to a closed location in the former dwarven fortress. It is enough for players to reach the center of the tunnel, which leads to the uterus - the main enemy in Bonammar, and then pick up the last piece of the Legion of the Dead armor. It is the Emblem of the caste, you can simply pick it up, deploy it and leave. If you want to test yourself for strength, then you can fight the boss, but first you need to go for the key. He unlocks the gate to the territory where the creature is located. The desired item is located in the southernmost room, not far from the legionnaire's altar. The fight shouldn't be too difficult if all of your comrades are used correctly. For the victory you can get good items and a small amount of gold, which in the game is never superfluous.

Completion of the task
A full set of Legion of the Dead armor in the Dead Castle quest in Dragon Age Origins is required to complete the quest. The player will have to go again already dressed in new things to the room where the user previously found the helmet. There will be a relic on the altar that can only be activated while wearing armor. The action will lead to the appearance of a mysterious shadow, which you will have to fight. There will be no prizes for winning, but the action is required to complete the task. A corresponding entry about the victory will appear in the codex. After that, you can go to the Diamond Halls. Previously, the player must not forget to give the Emblem of the dead caste to the Guardians. Further in the right wing of the Diamond Halls there will be a memory book that you need to click on. Only then will the task complete and be marked as completed in the log. The path will not be short, but the reward is worth it, plus a journey through the fortress of Bonammar will open new pages in the history of the dwarves.

Possible mistakes
The problem with the Dead Castle quest is far from new for players, many users have encountered it. The error lies in the fact that the last sarcophagus, where the Emblem of the caste of the dead is hidden, is not active after collecting four pieces of armor. If you do not collect the complete set, then you will not be able to pass the tasks. Unfortunately, there is no optimal solution to this problem. As mentioned above, it is better for players in the Dead Moats to save often. Reverting to older files may help in this situation. Initially, you should try to exit the location, save and close the game. The next time you enter, you can find that the error has evaporated, and you can interact with the sarcophagus. This method is the most effective, but if nothing happened, then you should not be upset. The full set of the Legion of the Dead can be obtained in the Awekening add-on.
This Dragon walkthrough Age: Origins does not contain information about backstories, since there are a lot of them, but at the same time they are not very difficult, and therefore you can easily go through them without our help. Our article begins after the arrival of the main character with Duncan in Ostagar.
Ostagar
You arrive at Ostagar with Duncan and greet the king. After that, Duncan leaves you so that you can get comfortable in the camp, we get an updated codex and the quest “Initiation into the Gray Wardens”. So, at the other end of the bridge, you can find out something from the first soldier you come across. Go west and talk to the kennel. The fact is that the dog must be cured, for which it is necessary to bring a flower that grows in the Wildlands. This is the quest “Mabari Wolfhound”.
The dog is your first ally. I recommend talking to your dog from time to time. Ask him if he sees anything interesting in the area and he will not return with empty pockets. Sometimes very interesting specimens come across. In battle, he will be useful only at the beginning, over time, replace him with more promising members of the squad.
Now it's time to meet Alistair.
Oh Alistair. One of the youngest Gray Wardens. A former templar, with all the consequences... The guy is not so simple as it might seem at first glance. It is especially interesting to watch their confrontation with the Morrigan. In battle, he behaves with dignity. Good with a sword and hit with a shield.
Then go south and talk to Duncan. We are entrusted with 2 tasks: to collect 3 bottles with the blood of the creatures of darkness and to find a cache with important ancient contracts. In addition, two new members of the squad are joining us - Daveth and Jory. Well, let's go to the Korcari Wildlands.
Wildlands of Korcari
For starters, a pack of wolves. And here are the creatures of darkness - these are the Harlocks, and Genlocks (archers) are standing on the hill, so rationally regroup the squad. After killing, do not forget to search their corpses (I remind you that to complete the task you need vials with their blood). We go south, on the way do not forget to break wild flower(the one that is needed to treat the dog, if you took such a quest). We continue to move and move north, to the ruins of the tower. Approaching the hiding place, we will have a conversation with Morrigan and her ... sorry ... mother. Upon completion of the assignment, we return to the camp, talk with Duncan and participate in the ritual of initiation into the Gray Wardens. Do not forget about the dog (take the flower, come back after a while). Then go to the general meeting.
Tower of Ishal
A well-thought-out strategy for the upcoming battle is the key to victory. At the meeting, King Cailan will ask you and Alistair to light a signal fire and thus let them know that the darkspawn horde has moved into battle. After that, Teirn Loghain's detachment will strike the horde from the flank. We head to the eastern part of Ostagar, towards the Tower of Ishal. Watch the video about the beginning of the battle. We continue our way to the tower, but on the way we are informed that the creatures of darkness have already made their way into the tower and killed all of our people there. We go inside the tower and clear floor by floor. And at the very top, between the signal fire and us, there is an Ogre, with whom we will have to fight.
After the battle, we light a signal fire. We watch a video in which both the king and Duncan die heroically, and Tair Loghain betrays the order and orders his squad to retreat. And we got in trouble...
Woke up in Morrigan's hut. As it turns out, Flemeth, Morrigan's mother, saved us. Further nice conversation and in a way. Morrigan is coming with us, and Alistair, as a former templar, does not like it.
Morrigan. “Forest witch? Lies and delusion. Are you not used to thinking with your mind?” Morrigan doesn't talk much about himself. She does not deny that she is a witch from the Wild Lands, but all other facts of her biography are shrouded in a veil of secrecy.
Lothering
After watching the video with Tair Loghain, we meet the same dog (who was treated under Ostagar) and a small detachment of creatures of darkness. On the way to the city, on the bridge we will meet local “tax collectors”, robbers who, as you understand, rip off the already unfortunate refugees like sticky. Morrigan offers to teach them a lesson. But if you are too lazy, you can pay them 10 silver coins. Personally, I dealt with them, and at the same time I learned that a reward was announced for our heads. Next to the robbers lies the corpse of a templar, something that is useful to one of the inhabitants of Lothering with him.

Life in Lothering follows the principle of those in power. The city is full of refugees, but some are trying to cash in on it. I'm talking about the scene of the priestess arguing with the merchant who jacked up the price of his goods.
Near the entrance to the church, you can break the announcement with the task “Robbers are everywhere”. Purpose of the task: to destroy 3 gangs of robbers that live in the northern outskirts of Lothering. Upon completion, go to Preacher Devons for a reward. After that, 2 more tasks will appear on the bulletin board, they are quite simple: “When the bears attack” and “The last gift”. Look inside the church and talk to Sir Donall. From the conversation it will become clear that Earl Eamon, on whose help Alistair so hopes, is mortally ill and the Knights of Redcliffe are looking for the Urn of the Sacred Ashes of Andraste. Also give him the medallion and the note that you picked up from the corpse of a soldier (well, remember, at the entrance to Lothering).
We go to the local tavern. There, one of Loghain's henchmen, Dane, is waiting for us and be prepared for a small conflict. Leliana will join us. Attention! If you kill Dane, you will forever lose the opportunity to take Leliana into your squad.
Leliana, a novice of the church, capable of knocking the spirit out of trained mercenaries, is worthy of attention in herself, and if she also claims that the Creator himself sent her to the battle with the creatures of darkness, this is ... to put it mildly, unusual.
Hey, there's some guy in a cage!
This guy's name is Stan, and the church put him in a cage for... a crime. We get the quest “Prisoner of the Qunari”. How to perform? It is necessary to talk with the Reverend Mother (negotiations with Leliana will be more successful). You will find the Reverend Mother in the church, in the room on the right. But I didn’t really care, and in the shoes of Leliana stupidly broke the lock of the cage.
Stan. A caged, masculine giant, no doubt the people of Lothering had seen nothing more terrifying until the Pestilence fell upon them.
This concludes our stay in Lothering, and the passage of Dragon Age: Origins is just beginning. At the exit from the city, we help the dwarf merchants from the occupation of the harlocks. From now on, they will always be located near your camp, so you will be provided with the necessary equipment and rune casting. Where to go next? Earl Eamon won't help us, so it's pointless to go to Radcliffe for now. It remains to enlist the support of the gnomes, elves and magicians.
Dwarf City
At the pass to frosty mountains we are already waiting for a gang of thugs led by a magician. Upon entering Orzammar, we see a scene where Thur Loghain's envoy Imrek is trying to enter the city of the dwarves, but the entrance to the kingdom is closed to everyone. But the treaties of the Gray Wardens turned out to be more good reason and they let us in anyway.

political affairs
The dwarves are ready to answer the call of the Gray Wardens without any problems and recognize the force of the agreement, but that's bad luck, in the dwarf kingdom there is a complete mess with the authorities.
If you are in need of funds, you can take a few side quests in the Commons of Orzammar. For example, Filda will ask you to look for her son in the Deep Roads. Brother Berkel wants you to help him open a church in Orzammar. And Dagna wants to learn magic. Why does a goat need a button accordion, and a dwarf needs magic? Well, come on, we'll talk to the First Mage when we're in the Circle Tower. Well, a couple of tasks can be taken from the keepers in the Diamond Hall.
We go to the Council Hall. All the venerable minds of Orzammar decide far more important matters for the dwarves, one of which is who will take the place on the throne. The throne cannot be divided in any way by 2 applicants: Belen and Harrowmont. Your task is to support one of the contenders, so that the newly elected king orders the army to be released to fight Mor. I supported the latter, as Harrowmont seemed to me more noble. True, the first task for Harrowmont is more difficult, it is necessary to win the trials, and at the same time find out the reason for Baizil and Gwiddon's refusal to represent Harrowmont.
Trials of Valor
We go to the location behind the Common Halls. You can order duels from the Challenge Gunsmith. For each victory you will receive some money, and if you go through all the fights, you will receive a ring of blood as a reward (requirement of a blood mage).
It is not easy to persuade Bayzil and Gwiddon to participate in the trials. I didn't manage to do that. Whatever it was, we are going to sign up for participation in the tests. And here we are in the arena. Our first opponent is Severin. Easy! Our next opponent is… erm… the opponents are the warrior-caste twins Lucian and Myaja. It's like two Severins, don't worry too much! The next enemy is already more serious - this is the Silent Sister Hanashan. Next is a pair test, you can take someone from the squad. I took Alistair. Be careful, our enemies Vodzhek and Velance are well protected by armor. And the last test... Piotin will come out to fight. God, this was a mess! The enemy is unrealistically strong and tenacious. This is very tough fight, I ran from corner to corner, drank everything that was, for courage, and still won, even if not the first time. After the battle, we receive congratulations and go to Dulin's in the tavern "At the Kabatchikov".
Halfway to the throne!
We helped Harrowmont by participating in trials. However, this is not enough. The next thing to do is deal with the local villainess Jarvia. We're heading to Dusty City. Dust City doesn't welcome us with open arms. Well, come on, after what I went through fighting Piotin, all these thugs are flowers. You can talk to Rogek. This I mean that you can earn extra money by smuggling lyrium, but you need to deposit 50 gold coins. I just killed Rogek and extracted 20 gold, that was enough for me. After talking with Nadezhda, we learn that members of the Jarvia Charter carry special keys with them, in the form of a knuckle. Next, talk about it with Alimar in his shop, and then go to the abandoned shack at the end of the city. Take the key from the dead thugs. Then open the “suspicious” door and you are there. Hmm… the Charter's hideout looks like a labyrinth and there is a lot of swag here. Along the way, you can open the cages with prisoners. And here she is, Jarvia! Oh, the fight with Jarvia and her minions will not be easy, but she is susceptible to magic, go for it! That's all, we search locations and corpses. And the key that we found from Jarvia leads us to a secret exit through Janara's shop.
Firestarter
Lord Harrowmont asks us to go to the Deep Roads, in search of a certain Perfect Branca. The word of the Perfect at the Council is worth its weight in gold! We leave for the Deep Roads, and on the way we talk with Oghren.

Oghren. “I can’t say that I would be a good match for a dance at the coronation ball, but in the Deep Roads I am exactly what you need.” The Oghren of House Kondrad was a promising member of the warrior caste. His house did not hold a particularly high position, but many of his representatives, including Oghren himself, won outstanding victories in the Trials and thus increased their position. Oghren likes to drink well, so give him appropriate gifts.
First, I went to the Aedukan thaig to hunt some darkspawn. Wandering through the labyrinths, I did not find anything interesting, except for the bags with the remains. Then I went to Caridina Crossing. So, you can go different ways, there is a passage on the left and on the right. Go into the passage on the left, stumble upon the Screamers, in the passage on the right - a squad of genlocks is waiting for you. At the end of the path, another portion of enemies, but with a manual bronto. And here he is, Taig Ortan. We go along the corridor and turn into the passage on the right, along the way we knead spiders and genlocks. We meet the gnome - Hand, the very one that Filda asked to find. And here are our new enemies - forgotten spirits, and with them a stone golem. In the same place there is a chest containing Ortan's notes (for the Lost Records quest). Next, we are waiting for another detachment of enemies and two golems (each “controls” the bridge). We go straight into the passage, we have to fight the queen of spiders, who constantly calls her own kind, and when she is in immediate danger, she dumps. After cleaning the location, we read Branca's diary. Now it becomes clear that Branca went to the Dead Moats. So what are we waiting for?
Dead Moats
To begin with, we will be shown a video with a dragon and an impressive number of creatures of darkness. Next, we help Cardol and his legionnaires. On the other side of the bridge, a detachment of archers and Ogre were waiting for us. We move to the left, deal with a bunch of hurlocks and bronto, open the door and again the enemies. In the large hall on the left, a horde of enemies awaits you, led by the genlock master of the anvil. On the opposite side, cross the bridge and into exactly the same room, but with skeleton-devourers. Next, a meeting with Gespit. Be ready. I have never seen a more terrible creature. It is this creature that turns gnomes into genlocks. The uterus is relatively harmless due to its immobility. First, cut off her tentacles. That's better. Oh-she-she, the tentacles of the industry again, and even genlocks with screamers appeared. But I know you can handle it. Next, another scripted replica of Hespit.
Anvil of the Nether
We are given the right to change the members of the squad. Don't remove Oghren. I took with me the Morrigan and Leliana. And here is Branca. We are locked! Congratulations! Branka is so obsessed with this anvil that she asks us to go through the numerous corridors and find this very place with the anvil. One good turn deserves another. We follow the marker for a long time and stubbornly, along the way we clean the area from the creatures of darkness. In a room with 4 golems, you need to fill up ... that's right, the golems (they will come to life one at a time). We go further, we pass into the corridor, where the golems will attack in pairs. We reach the place with the Apparatus of Spirits (this is such a mechanism in the form of four stone heads that calls on spirits). We kill the spirits and activate the highlighted anvil. And so on until ready. Everything is simple! We go into the passage on the left, we watch the splash screen. Now you have to choose who to help: Branca or Caridin. The motivation here is this: Branca wants to use the power of the anvil (an army of golems would be useful to us in the war with the Blight), and Karidin is tormented by remorse, because he created such a dangerous tool. Any of them can forge a crown, since both of them are Perfect. I helped Branca, I was of the opinion that in war all means are good. In any case, you will have to fight with a crowd of golems and one of the leaders. After a difficult battle, we speak with Branka. That's it, we have the crown. And, by the way, here you can remove the list of gnomes who have turned into golems (take it to the keepers). If you did the same as I did, then do not forget to steal the armor from the dead Karidin. And then the coronation of the elected king and ... all ... it's time for us to move on.
elf forest
At the entrance to the elven lands, we are met by a Dalish patrol. What, but how?.. After us, they still lead to the main thing. After a conversation with Elder Zathrian, it becomes clear that most of the elves have fallen from the curse of the Raging Fang and are about to turn into werewolves. And as you already understood, they are clearly not in a position to fight with Mor. To remove the curse and their speedy recovery, it is necessary to kill the source of this infection.

In the Dalish camp, you can take side quests, since they are not so difficult and there are not many of them. Elora, the chief cattle breeder, sits near the gall (such a horned animal) will ask you to examine the animal (use the survival skill). The young hunter Kammen cannot arrange his personal life in any way (persuade his chosen one Geina to score on the test and accept, even if not yet an experienced hunter). Atras wants to find out what happened to his wife Daniela. And the local craftsman Varathorn will make you a breastplate if you get an iron bark.
Ents, elves... Gandalf?
We are heading to the Brecilian Forest. It seems to me that there are a lot of wolves here (both ordinary and werewolves). Going deeper into the forest, we will meet the Runner. The conversation with him was not so long, and soon after the fight he ran away. We continue to explore the forest. Near a fallen tree (where you can get iron bark for a craftsman) I met a new enemy - Sylvan (analogue of the Ents from the Lord of the Rings), but don't worry too much, any piece of wood burns well. In the south side of western Brecilian, talk to the Great Oak, from which someone brazenly stole his charm ... sorry, acorn.
Then I went to the eastern part of the forest. Here he met a hermit who stole an acorn from an oak tree. He has a counter offer, which is to kill the oak tree. But no, I promised to help the oak, so I traded the acorn from the hermit for some book from the inventory, and returned the loss to the oak. And the oak, in gratitude, gave us a staff that will help us overcome the magical barrier and move on. At the fork to the left of the entrance to East Brecilian you will find the werewolf Daniela (wife of Atras if you took the quest in the camp). She will give you a message for your husband and a handkerchief. Daniela can't be saved anyway. Even if you refuse to kill her, she will take the "Ozverin" and attack you. Also, if you go north, you can take the quest “Mage's Treasure”. The purpose of the task is to find 3 gravestones, kill the dead and collect a set of Juggernaut armor (a very useful little thing, I put it on Alistair, and he is an enviable knight).
lair of the beast
After passing the magical barrier, we meet the Runner again, and then we pass to the ruins. In the ruins we go straight, and at the end of the corridor we turn left. We kill the dragon and into the passage to the lower level. In the first zone you will meet the ghost of a boy and there you can also find a description of a certain ritual. In the second zone there is a place for the ritual. Here's what you need to do: fill the jug with water -> move away from the source -> look at the altar -> put the jug there -> pray -> inspect the jug -> take a sip of water -> take the jug -> go to the source -> pour water into it. After that, the door will open, and after a showdown with the dead, you can pick up the juggernaut armor. In the next zone, you can learn the specialization of the battle mage, for this, put on the altar gem(falls on the floor). The fourth zone is simply littered with traps. Watch where you're stepping! Leliana was with me, it was she who turned them off. Then a few more skirmishes with enemies and that's all, we are in place.
The mistress of the forest is White Fang?
And here is our third meeting with Begun, but this time he was more inclined to negotiate. After talking with the Lady of the Forest, it will become clear that Zathrian himself is to blame for the curse, and it was he who gave birth to the White Fang. Let's ask him, he will be very close. We take him to the Mistress of the Forest and have a nice conversation. However, a nice conversation did not work out, Zathrian, because of his hatred, flatly refused to remove the curse. We had to use force... The fight will not be easy, but we are used to it. The first thing Zathrian did was paralyze the werewolves and summon allied sylvans. But we won, and Zathrian at the cost of his life dispelled the curse. All werewolves took on their true human form, and the wounded in the camp began to recover. We speak with the new elder of the Dalish. The deed is done, the elves will come to battle with the Blight.
On the way, Teirn Loghain's hired assassins, led by Zevran, were already waiting for us. However, he could not defeat us, and he had no choice but to join us. Zevran was a Raven that Loghain contracted to kill the surviving Gray Wardens. However, after an unsuccessful attempt, he ended up in the hands of his failed victims.
Circle Tower
We go to the pier of Calenhad Lake. In the Tower of the Circle we speak with Gregor. As it turns out, the Tower of the Circle is just teeming with possessed and demons of all stripes. You see, the most "intelligent" magicians of freedom wanted to, and they decided to resort to blood magic, and the most gifted ones, like Uldred, decided to release the inhabitants of the Shadow. Who got to fix the situation? Guess! But first, buy everything you need from the quartermaster, because as soon as we get inside, there will be no turning back until the very end. Note that the passage of Dragon Age: Origins in this location will require some ingenuity from you.

We meet the magician - Winn, who guarded one of the few surviving students with the help of a magical barrier. She brought us up to date and agreed to help clear the Tower.
Wynn. “I will not lie still in bed, pulling the covers up to my chin and waiting for the hour of death to strike.” Wynn has a particularly strong aptitude for healing magic. In the Circle Tower, she is one of the most respected.
So, let's start clearing our way, floor by floor. On the second floor in Irving's room, take the Black Grimoire book. Great gift for the Morrigan. On the fourth floor we meet the demon of desire and the templar bewitched by him, and in the central hall we will be met by the demon of Idleness, which enslaves our mind.
Shadow
Waking up in a place called Weishaunt, we get a new quest “Lost in Dreams”. Duncan is standing in front, by the way, what the hell, he died? Where are the rest of the team? An interesting situation. Don't believe me, these are dreams. “Duncan” is actually one of the demons, but the squad members are wandering somewhere in the Shadow, we need to find them!
Activate the shadow pedestal. Destination - "Primal Shadow". We speak with Niall, learn more about this place and how he tried to use the Litany, but did not have time, and also how we ended up here. Nearby we get the ability to turn into a mouse and go into machine holes, as well as be unnoticed by enemies. This is just one of four images to be used. As soon as you get all the images, go around the circle again, study everything you can, because in some locations you can increase one of the basic parameters. Next is the Burning Tower. Here you will get a form - a flaming man, which will make you completely immune to fire. In the Scattered Mages location, you will get the ability to transform into a golem, which has deadly physical attacks and the ability to kick down locked doors. In the place “Invasion of the creatures of darkness”, you will take on the form of a spirit, so it will become easier to go into inaccessible areas. After the massacre of all the main demons, we go to help out friends (elements along the edges). And when you're ready, head to the central element, to fight with the one who dragged us here, with the demon of Idleness. The demon will be in the guise of an Ogre, then what the hell, and so on until the bitter end. Combat tactics to your taste. The main thing is to use Wynn's mass healing. That's all.
From the body of the deceased Niall we extract the Litany of Andralla. We go around this floor and near the stairs to the upper tier of the Tower, we also speak to those imprisoned in the magic field - Cullen. And then according to the scenario... After not a long verbal battle, the battle with Uldred will begin. In places where magicians begin to turn into demons, use the Litany. After defeating the main crook, we speak with Irving. And everyone is fine... Don't forget to talk to him about Dagna (dwarf from Orzammar) if you took this quest. And our journey is not over, new achievements are ahead.
redcliffe
We get to a small village. On the bridge we meet a sentry who will take us to Bann Tegan, brother of Earl Eamon. The fact is that every night all dead things come out of the castle. Once recaptured, twice, ... but this time we will not recapture. This is how the locals feel. Well, can we help?

Right there in the temple you can take the quest “The Lost Child” (oddly enough, the child is sitting in the closet, in the house).
Survive this night
Talk to village chief Murdoch. So, it will soon get dark, there are practically no soldiers in the village (except for us and the knights of Sir Perth), so the peasants will have to fight mainly. The weapons and armor are in a terrible state, and the only blacksmith in the village refuses to help. The gift of persuasion by this point was already well pumped, so I simply promised to help him, to find his daughter Valena. Forcing Ohen by force will only go to the minus. A certain gnome merchant Dvin refuses to help the village. To raise the morale of the militias, you just need to call on such a warrior. A suspicious elf, a certain Berwick, sat in a local tavern, who, after questioning, confessed that he was spying for Teirn Loghain. He can also be persuaded to perform that night. Near the mill we speak with gray Perth. Ser Perth, in general, does not need anything, except for a divine blessing and some amulets. No problem.
It got dark ... So, the carrion will go down from the ominous fog. Once you've killed everyone, go straight ahead. We meet a knight who reports that the monsters are already in the village. Let's hurry! Near the fire will be the final battle. How to exterminate all the undead, victorious URAAAAA! After such a long standing ovation, we go to the castle.
Lock
We immediately speak with the blood magician Jovan imprisoned in the cell. It was he who poisoned the earl and taught his son magic, but he did not cause demons and other dead things. I did not draw hasty conclusions, so Jovan remained in the cage. So, let's get used to the castle a bit. In the northeastern part, on the first floor, Valena, the daughter of a blacksmith, hid. In the courtyard, activate the lever to open the gate and let Ser Perth and his knights in. After you scatter all the undead, talk to Perth and forward to the castle.
We see a strange picture: Bann Tegan dances like a jester, and Connor is possessed by a demon. A fight will begin, in which all the Possessed in this room will take part, led by Bann Tegan. But everyone got what they deserved. It became known that Connor wanted to save his father and began to study magic. Earl Eamon is still in our world, but Connor's mind is possessed by a demon.
Jovan suggests using blood magic, but this ritual will require someone's life. Volunteers were found, but I decided to go the other way and turned to the Circle Tower for help. Irving kindly agreed to help us and sent his magicians to Radcliffe, and then according to the script.
Shadow
So, we are in the Shadow. We go into the portal, we speak / fight with Connor, or rather with a demon. And so several times. On the fourth such call, a serious battle with the demon is ahead. That's all.
I advise you to wander around the castle a little more, gifts for your wards will not be superfluous. I had Leliana well pumped, so picking locks on doors and chests was fun. On the lower floor, in the earl's office, in the table is the amulet of Alistair's mother, a wonderful gift.
Looking for a relic
Earl Eamon is mortally ill. One legendary relic can help him - the urn of sacred ashes of Andraste. Of course, this may just be a legend, but it's still the only hope. We are staying in Denerim, to talk with a certain Genitivi, he may have useful information on this matter.
Denerim
And here we are in Denerim's shopping district. So, let's start with side quests, since there are a great many of them here. Sergeant Keelone will ask you to deal with the rowdy mercenaries in the "Pearl", and then with the same success to calm down the "noisy" visitors of the tavern. At the market, a certain Master Ignacio introduces the Antivan Ravens. Talk to him and after a while the messenger boy will hand you a letter. Head to the Bitten Nobleman tavern and find Ignacio in one of the rooms. Would you like to work as a hired killer? Our first victim is Pedan, a man who sets traps for everyone who is somehow connected with the Gray Wardens. I think killing this reptile is a matter of honor! Pedan is located in the brothel "Pearl", and you will find the secret password in the poster that hangs at the entrance to the elfinage. In the Pearl, you can persuade the local robber to teach us the Duelist specialization (useful if you or someone from the squad is a robber, Leliana, for example). To do this, you need to beat Isabella in card game(Leliana should help). So, after the “accident” with Pedan, we will inform Ignacio about this. Next to him, in the chest, you can take a couple more orders - “Hunt for mercenaries” and “Audience with the ambassador”. You can take three tasks from the innkeeper in the “Bitten Nobleman” tavern and several tasks traditionally hang on the preacher’s board near the temple.

Members of your party may have business in Denerim. Leliana has a conversation with her longtime "friend" who is trying to take her out. And Alistair has a meeting with his sister.
In search of a relic (continued)
In Genitivi's house, we do not find the one we need. Instead, we speak with his assistant Waylon. But he doesn’t finish something, so we decided to press him against the wall. Rummaging in the chest of one of the rooms, we were interested in the records of Genitivi's research. We leave for the village of the Refuge in the Frost Mountains.
Strange place, I tell you. It was not possible to talk properly in the temple, the sectarians, led by Eirik, took up arms. Search the bodies of the dead, and on the right side, behind the brick door, talk to Genitivi.
And here we are in the church. Genitivi has decided to stay in the great hall, while we need to keep looking for the urn. Everything is very clear here: we clean the locations from obsessed sectarians and simply obsessed, select the keys, open the doors. Next, caves and ... cave dragons will begin. As soon as you get to the appointed place, a conversation will begin with the leader of the sectarians Kolgrim. The guys, apparently, were completely mad ... Andraste was reborn, her ashes need to be defiled, and so on. But I did not agree and a fight ensued ... in general, we beat everyone. And they removed the horn, boots and a good hatchet from Kolgrim's body. By the way, if you use Kolgrim's horn on the top of the mountain, then you will meet with the highest dragon.
Trial
To get to the urn, you need to pass the test, which consists of several parts. We learn about this from the Guardian, who has been guarding the urn for many centuries.
First you need to solve eight riddles. But just in case, I’ll tell you the answers: Elisha is a melody, Brona is dreams, Lady Vasily is revenge, Thane Shartan is a house, a student of Havard is a home, General Maferat is jealousy, a student of Katair is hunger, Archon Hessarian is compassion.
Next, we talk with the ghost of the past (everyone probably has his own, but I spoke with Jovan), and then there will be a fight with ... our clones. The third stage of the test is a puzzle. You need to stand on the tiles in such a way as to recreate the bridge.
Well, the last condition is to take off your clothes and go through the fire. After the Guardian's remark, we are approaching the ashes of Andraste herself.
As expected, the ashes healed Earl Eamon, which means that the matter has taken a serious turn. And now, when the treaties are confirmed and the armies of dwarves, elves, magicians are ready to help in the war with Mort, and Earl Eamon has recovered, the time has come for the Assembly of the Lands. We again arrive in Denerim and settle down at the estate of Earl Eamon. But, before we had time to properly relax in luxurious apartments, as the maid of Queen Anora asks us for help. The fact is that Lord Howe keeps the queen a prisoner in his estate.
queen in captivity
On the way to Lord Howe, we met the Antivan Crows, led by Talesen. Taliesen tells Zevran that everything is in order, that everyone understands why he did this and offers to return to his duties as a hired killer. If you are at odds with Zevran, then he will accept the proposal of the Ravens, and so we calmly killed everyone.

So, you can't get through the front door, there's a crowd of some people. Erlina offers to enter from the back door, but there are 2 guards standing there. Wait for the maid to distract them or kill them and go inside.
To make the passage of the estate safer, change into guards. Bypassing the extra attention of the officers, we get to the place of imprisonment of Anora, but the door is blocked by a magical barrier. So you have to kill the one who created this barrier. The location has a treasure chest (coins and some inventory items), so have a good burglar with you (you can return here later with the keys). In the room, in one of the chests are documents that once belonged to the Gray Wardens.
And in one of the cells you will find Riordan, another surviving Gray Warden. But we have no time to linger, we go down into the dungeon.
Be careful, because in almost every room a dozen soldiers and fighting dogs are waiting for us. In the torture room, free Oswin, thereby unlocking the quest "The Nobleman Under Torture", then don't forget to talk to his father Bann Sieghard in "The Bitten Nobleman". This act will give you a voice in the Assembly of the Lands. In the place, free Rexel for the quest “Missing in action”, having previously taken the key from the dead guard.
And here is Earl Howe, who, in spite of everything, insisted on being right. And next to him was a battle mage, who created a magical barrier. Kill the bastards! After all the brawls, I found Vaughan, who provoked the elven uprising, and in the next cage sat the templar Irminrink drugged by lyrium (give the ring to his sister Bann Alfstanna, who is still sitting in the same tavern). That, perhaps, is all, we free the princess.
And here's a little annoyance. We are met by Catherine and her guards. We have 3 options left: kill everyone (it is incredibly difficult to fight experienced and well-armed soldiers), try to explain or surrender. In the last two cases, you will end up in Fort Drakkon.
Fort Drakkon
We are in prison. We have 2 ways to get out: wait for the help of friends or get out ourselves. There are many options for both methods. I chose the first option and waited for help from Leliana and Morrigan, who introduced themselves as ministers of the church. Morrigan in church attire, can you imagine? I thought the guards would look at the Morrigan and say, are you in the church? But Leliana's eloquence saved us here, too. Just do not communicate with the Monk Augustine, otherwise it will turn out that the church did not send anyone and you will be exposed. In the hall with ballistas, Sergeant Tanna blocks the way. You can try to convince her to leave the post or use ballistas. If you aim the very first right (from the entrance) ballista and shoot, then you can cause serious damage to Tanna, and then kill the rest. You may have a reasonable question: why did I take the girls, and not powerful warriors like Oghren and Stan? Leliana was cunning, had abilities like stealth and the ability to make traps. Well, Morrigan had the ability to "blizzard", using which, the soldier took off as if by magic. And here are our prisoners. After killing 2 guards, we get the keys to the cell, everything is simple! There are four of us again, so dealing with the remaining guards will be easier.
Place on the throne
Upon returning, you will have a conversation with Eamon. Who will take the throne? There are several options: Alistair, Anora, Alistair + Anora, GG + Anora (if you play as a human noble, you can try your luck). I managed to convince Alistair and Anora that marriage is the best thing for both parties.
There are a couple of days left before the Assembly of the Lands and some problems in the alienage need to be resolved.
Elfinage
And these problems were as follows: a crowd of elves argued with healers from Tevinter. The fact is that quarantine has been declared for the elfinage, and these “doctors” collect both healthy and sick elves in a shelter and ... nothing more is known about them. Having discussed this matter with Shianni, we decide to look inside the hospital. On the gates, kill the only guard and go inside. No sooner had we entered than we were attacked, which we later regretted. Take the note from the table, and then go outside and fight again. Talk to Shianni again. We go to another building on the gates. Inside we ask the elf who washed the floor. He told us where and how the elves are taken out and we went further. We leave through another door and “speak” with the Tevinterers. In the warehouse, you will learn that all this “treatment” comes down to a banal slave trade, and the main one here is Caladrius. An excellent opportunity to get dirt on Loghain, the council will be interested to know that the regent is not opposed to selling his people into slavery.

Caladrius was disposed towards a peaceful outcome. He offers us a letter with Loghain's seal. However, what prevents us from taking the letter from the dead slavers and putting an end to their activities forever? After Caladrius's health has come to naught, he offers us an even more generous offer, namely to raise my health level at the expense of slaves. Tempting, of course, but I politely refused ...
Ser Otto is a blind templar who senses evil. We get the quest "Evil", for which you need to look for unusual things in the elfinage. For example, tell Otto about a crazy girl, a pool of blood, and a rabid and dead dog. Next, you have to clean the shelter from evil spirits.
Assembly of the lands
After you do all your business, talk to Earl Eamon, and then we head to the palace to the Gathering of Lands. And again we communicate with an old friend of Catherine, but this time she is without her militia.
So, in order for the council to take our side, it is necessary: complete the quests with the prisoners in the Howe estate (Oswin and Irminrink). Don't tell Anora that you're going to kill her father Loghain, otherwise she might do something against you. Do not rush to talk about Alistair and the murdered king Caelan. Start the conversation by saying that your main goal is the war with the Blight. And then you can point out Loghain's crimes, like the alienage's slave trade. This will be enough.
At the meeting, we were unanimously supported, but the only thing left was a duel with Loghain. You can participate directly yourself, or you can send someone from your squad, Alistair, for example. After the duel, Riordan intervened, who made an unusual offer, namely, he offered Loghain to atone for his guilt by joining the Gray Wardens. It seems reasonable, and you know how such an initiation ends in most cases. If he is worthy, then he will pass, if not, then death still awaits him. Loghain will be initiated and take Alistair's place after he goes berserk and leaves the squad. But we have known Alistair longer and are in contact with him. friendly relations, so I gave him the opportunity to avenge Duncan and the others. After seeing her father's head being cut off, Anora terminated our marriage agreement with Alistair. Alistair ordered to lock her in the tower, and began to slowly master the role of the ruler.
The last fight
The history of Dragon Age is coming to its logical conclusion. The traitors of Ferelden have been punished, the treaties of the Gray Wardens have been confirmed by the allies, and all that remains is to defeat Pestilence and the Archdemon.
Earl Eamon went to Radcliffe to raise an army, and we followed him. And so we retreat to the allotted chambers, where we have to find out the most important secret of the Gray Wardens. Riordan explains to Alistair and me why only the Gray Warden can defeat the Archdemon. It turns out that after the death of the Archdemon, his soul moves to the nearest creature of darkness. Thus, immortality is achieved. Do you remember what the Gray Wardens are made of, what we drank at the initiation? Yes, there is filth in our blood, so the soul of Achidaemon will inhabit us. But the Gray Warden has his own soul, so at the moment of the last blow to the Archdemon, the Gray Warden dies. On another it is impossible. Riordan, as the oldest of us, decides that he will kill the Archdemon himself, but if he falls? We'll have to finish this business to our GG. However, Morrigan has an obscene offer, for which there is an opportunity to escape. What I took advantage of ... It's time to speak.
So, the battle will begin in a gloomy atmosphere at the city gates. Everybody is dancing! Sorry, all members of your squad participate in the battle, but you can only control the GG. You have to fight with hurlocks and genlocks, but they are easily taken out. After that, talk to Riordan. You have to deal with two enemy commanders, in the trading quarter and the elfinage. From now on, you can call on one of the allied armies, just keep in mind that for the last battle, and with the Archdemon, it is better to keep one of the armies intact. You know what a dragon is. Defeating him in close combat is almost impossible, so save the elven archers or magicians for last. Although you can try your luck with gnomes or golems. It is also important that you have a robber next to you, I have the best Leliana, she shoots a bow with good dexterity, which will help to defeat the dragon. The last parting words to the members of the detachment and ... forward!

The fight in the shopping district should not cause difficulties, I called on the magicians, which allowed me to bring down the ogres at a distance, they did not even have time to reach us. In the alienage, such a trick will not work, too small nooks and crannies in this area. I decided to do without support at all, since the enemy did not advance until they broke the gates and barricades. Well, while the gates were intact, a real riot of elements was going on behind them, since Morrigan and I are enviable magicians.
Next, you have to play for the remaining members of the squad and defend the city gates. I appointed Oghren as commander there. Well, the fight is not easy. I sent Oghren to the “yellow” enemies. While Stan and the dog dealt with simpler, but superior in number, opponents. And Wynn, traditionally used magic to heal the squad.
We switch to our main squad. The next scene of action is Fort Drakkon. Before that, we watch a video in which Riordan crashes without having time to finish the job. We'll have to deal with the archdemon. At the entrance to Fort Drakkon, many enemies will be waiting for us. The place is good for shelling, for example, it would be logical to call on elven archers. But archers will come in handy for the last battle, but for now you can call on Redcliffe soldiers, gnomes or golems.
We will be alone inside the fort. We clean the area, and at the entrance to the second floor, buy from Sandal. This is our last chance. Make the best use of your finances. Sell all that is superfluous and buy various lubricants (or extracts and what you need to make yourself). Make your way to the roof.
And here is the final battle. Archdemon in all its glory. The dragon spits the energy of the spirit, waves its tail, and when it is in immediate danger, changes its position. How to be? First, call on an allied unit. I chose the elves, as the archers seemed to me the only right decision. Leliana (with a bow), Morrigan and my GG took up the Archdemon directly. Alistair, in close combat, would not be effective, so he aimed the ballistae and fired at the dragon. As soon as genlocks and harlocks appeared, I switched it to them + one of the magicians. This is a great opportunity to replenish the supply of healing poultices. As soon as the ballistas broke down, in the shoes of Leliana we try to fix them. This is the most effective tactic in my opinion. Of course, you could call gnomes or golems, because these guys eat darkspawn for breakfast in their Orzammar. That's all!
The dragon is defeated, and we are watching the final video. The end will be different for everyone. It depends on who becomes the ruler of Ferelden, whether you agreed with the Morrigan and how you acted in a particular area (for example, when I helped Harrowmont in Orzammar, the dwarven kingdom became more and more distant from the outside world, etc.). That's all, the passage of Dragon Age: Origins is completed. Congratulations!
A child does not need a good father. He needs good teacher. And to a man - good friend. And a woman is a loved one. And in general, let's talk better about stitches-tracks.
Arkady and Boris Strugatsky, "Distant Rainbow"
The peace of Ferelden is threatened by more than just the Blight. Hundreds of scum of all stripes raised their heads, waiting for the end of the world. We can both join them and punish the scoundrels. To make sure you don't miss a single opportunity, we've put together a list of additional tasks which have not yet been dealt with on our pages.
Ostagar and the Wildlands - the beginning of the story Lothering - a living dead city Circle of Magi - magical secrets Redcliffe - universal summoning Sanctuary - classic easter egg Brecilian forest - traces of corruption Orzammar - thieves and their prey Denerim - Guild quest series - find everything Sheila - raw beauty
Let's start with the backstories of our heroes. In each case, we will be able to complete several additional tasks, but they are not difficult - training. You can even skip them and rush straight to Ostagar. However, painstaking exploration of the initial territories will bring you not only money, experience and some equipment. At the very beginning, when the hero is very young and inexperienced, you can learn a lot of interesting things about the world, which you won’t be able to figure out later. So we advise you to look into all corners, at least at first.
Each backstory will bring you something useful, make your path easier. noble man he will get a dog, a Dalish will get a good bow... in a word, to each his own. But there is one hero who will be much easier than the rest at the start. This is a noble dwarf - he leaves with Duncan, jingling more than twenty gold pieces in his pocket! Well, let's go after them.
Ostagar and the Wildlands
sick dog

Dwarven Politics
Talk to the kennel in the camp, and he will tell you about the sick mabari, who swallowed tainted blood. To cure him, you need a special flower that grows in wild lands Korcari. According to the plot, you still have to go there, so feel free to agree. Look in the ruins a couple of meters from the place where you will meet a wounded soldier. The cured dog will join you after the Ostagar battle if you haven't got a pet yet.
Hungry Prisoner
An unfortunate soldier hangs in a cage in the camp. He is not only not released, but also not fed. The poor man will ask you to get him some food. Before giving consent and food, ask the prisoner why he was imprisoned. At the end of the story, you can demand the key to the chest of magicians from the prisoner. Food can be obtained from the guard by convincing or bribing him. And the chest will be opened only after returning from the wild lands, when the pacified one leaves it.
Sword
You can trick the messenger Peak into getting a good sword. But first, the boy must be caught - find him with the ash warriors, and then run after him.
Missionary Chest
Not far from the border of the wildlands, you will find the body of the missionary Jogby. From it you can remove a letter with hints - where to find the treasure. Look for the chest in the south of the map.
Chasing tracks
In the west of the wildlands is an abandoned parking lot and a chest containing a magazine. Read it and follow the mark that appears. A chain of such traces will lead you to the treasure.
last will

The dog plays the role of a psychoanalyst

The professor is sleeping - the students are happy
In the middle of the wasteland, you will come across the corpse of Rigby. The will describes where his belongings are hidden: in an abandoned camp to the west of the body. Having dug out the chest, you can either open it or take it to the widow Jetta. She is waiting for you in the church of Radcliffe.
Ash Demon
On the corpse of a soldier, not far from the hurlock emissary, lies a bag of ashes and a sheet with a local legend. The legend is true, and by pouring the ashes onto a pile of rocks northwest of the bridge, you will summon Gazarath, the "orange" demon of wrath. Good trophies await the winners.
Lothering
Create three Poultices/Traps/Poison Bottles
The tasks are of the same type, they are taken from Miriam, Allison and Barlin, respectively. There is nothing complicated, only the appropriate skills and components are needed, which are bought from Barlin and collected on the map.
Deceased Templar
At the entrance to the location after the battle with the bandits, you will find the corpse of a templar. Things from it should be taken to Ser Donall in the church.
On a note: in the same church, you should tell Sir Brian that you gray guard and ask for help. He will give you the key to the poultice cabinet.
Preacher's board
If you complete all four tasks from the local preacher's board, you will receive a good sword as a reward.
Circle of Magi
call
On the first floor of the tower, in the library, you can perform several summoning exercises. To do this, find two halves of the book: in the library and next to the stairs on next floor. Perform all three rituals and the task will be completed. But that's not all. Repeat all three rituals in a row and activate the fourth summoning flame - it is in the room where the second half of the book was. A creature will appear and quickly disappear. It can be robbed by obtaining a note. But that's not all! On the preacher's board, you can later take a task that talks about disappearing travelers. It turns out that the demon we called decided to profit. We kill him, take away the trophies, inform the preacher and go to fill the pangs of conscience with ale.

The main character makes it clear with her whole appearance how she wants to be a gray guard and save the world

Apparently, this is the only way Oghren sees us all...
Guardian of the Limit
What dwelling of magicians does without secrets? We definitely have it in our tower. To unravel, you need to find several student notes: a couple in the student rooms, another one in the library, two are next to Owain and the blood magicians, and finally one will be in the main hall. Now activate the three statues in the large hall - a statue with a bowl, with a raised sword, a lowered sword - and a statue with a spear (it's in another room, in the center of the floor). Go down to the first floor, go to the place where you met Wynn, and try to get into the basement. Kill the guard and pick up a great sword that will help you, for example, defeat Flemeth.
Jenny's Casket
In the office of the main sorcerer, you will find not only Flemeth's grimoire, but also a chest. It can be delivered to a house in the market district of Denerim near the Curiosities of Thedas. Unless, of course, you picked up the note about Red Jenny after meeting Zevran. As a reward, you will receive money, but no information about this mysterious box.
Enchanted Templar
On the fourth floor, you will meet a templar possessed by a demon of desire. If you attack them, you will get some good trophies, but if you let them go, you will most likely not see them again, but there is a small chance to meet them on the map above the mountain of corpses: the demons will satisfy their insatiable hunger. Here they can not avoid reprisals!
redcliffe
Gathering troops
Bann Tegan gives us story mission(with which several additional ones are connected): prepare the village for a siege. To do this, you need to talk with Perth and Murdoch. The first will ask you to bring him amulets. We will receive them from mother in the local church. In addition, in the shop you can find a bunch of barrels of oil. Perth should also be told about them.
Murdoch will ask you to bring more soldiers and get weapons for them. The ranks of "volunteers" can be replenished by the dwarf Dwinn, if you persuade him well. Several recruits will bring us a local tavern. First of all, this is a suspicious elf at the table. Your robbers will help you discover his spy essence. The innkeeper himself, Lloyd, will go after the elf, he will have to threaten. But it's better to first ask the waitress Bella and the men in the tavern about their lives. You can promise to help the waitress, and for the defenders you can negotiate free ale from Lloyd. Weapons can be begged from the blacksmith, promising him to save his daughter.

Mor came to one noble noble family

Spectacular lighting makes Stan even more convincing
The blacksmith's daughter
You will find it in the castle, in a small storage room on the ground floor.
hidden boy
Caitlin is standing in the church, asking to find her missing brother. He hid in the closet at home. After asking the boy, we learn about the family sword, which can be both appropriated and returned.
Demon
If you play as a magician, you are able to independently enter the shadow to free the son of Eamon. The demon will offer a deal. You can get an extra spell point, blood mage specialization, "forbidden pleasure" with a demon... Please note - the choice will affect the ending of the story.
asylum
In the village itself, as well as in the temple, there are no additional tasks (except to consider the delivery of scrolls to the church of Denerim as such), but there is an amusing "easter egg", which can already be considered a classic of role-playing games. After the end of the story mission, return to the village and go to the local cemetery. Epitaphs you will surely like. Here are just a few of them:
Cheryl isn't here. She was cremated.
"I can do an ax too" - Jim, sword swallower.
Multiplayer with love.
Great-great-grandfather Gygax.
In order to play as Sheila, you need to download the separate Stone Guardian module. Let's get to know this dangerous girl better.
| Gifts to Sheila | |
| Present | Where to look |
| Magnificent Amethyst | Dusty City of Orzammar, Alimar Market |
| Magnificent Diamond | Orzammar Commons, Trader Garin |
| Magnificent Emerald | Orzammar Commons, Figora's Store |
| Magnificent sapphire | Orzammar Commons, Trader Legnar |
| Magnificent Malachite | Circle Tower, Quartermaster |
| Magnificent Pomegranate | Denerim Market District, Wonders of Thedas |
| Magnificent Ruby | Elfinage, Alarita shop |
| Magnificent Jade | The cellar of a house in Honnleath |
| Magnificent Topaz | Frost Mountains, Trader Faryn |
Sheila is a former gnome who became a golem. She manages to combine femininity (for example, she wants to sew red shoes) and feigned rudeness ("Let's go crush a couple of heads"). In general, jokes about the "hermaphroditism" of the golem are perhaps the most curious in the entire game. By the way, she hates all birds without exception, which she constantly reminds of (“I don’t believe in the Creator. After all, a rational being will never create birds! What was he thinking about ?!”).
In combat, Sheila is a true all-rounder. She can be a hit-boy, a shooter, a controller, and even support. In the last incarnation (a branch of racks), it is most effective. Destroying a group of a golem in a stance, a healer, a magician, and a warrior with a two-handed weapon is almost impossible. There is only one inconvenience: the movement of our talisman takes some time.
As you can see from the table, there are no special gifts for her, but you can easily please her by dressing her in crystals for the first time.
The personal quest is related to the restoration of memory. Sheila is curious to know who she was before she became a golem. The quest can be obtained after talking with Perfect Karidin, according to the story. To complete it, go to the Kadash teig that appeared on the map of the deep paths. Go through the teig up to the statue of the heroine.
Forest Brecilian
bitten wife
In the Dalish camp, talk to Atras. His wife was bitten by werewolves and everyone says she's dead, but he doesn't believe it. Danaila will be waiting for you near the northern entrance to the eastern forest. Save her, unfortunately, will not work.
iron bark
Weaponsmith Varathorn will ask you to bring him rare ironwood bark, which local craftsmen use to create magnificent equipment. The bark can be torn off from a fallen tree near the northern passage to the eastern forest. As a reward, the master can receive a bow, armor (or both, if you insist), or an amulet, if you give up everything.
Elf in love

Last family photo. Very soon, most of them will not be alive - traitors are worse than filth...

Apparently, not only female characters are copied from popular people ... And Eddie Murphy not only voiced the donkey from Shrek
sick gall
In the camp, the caretaker of the Gaul Elora had a misfortune: one of her wards is sick. You can, using survival, find out what is the reason, or you can convince the caretaker that the animal is incurable.
bitten elf
In the center of the western part of the forest, not far from the ogres, lies a wounded Deygan. It can be taken to the camp, cured, robbed, abandoned or killed. A wealth of choice - isn't that what we want from a good role-playing game?
On a note: if you first rob an elf, and then send him to the camp, then he can return things and restore relations.
death dream
To the south of the Great Oak lies an abandoned, but very cozy camp, in which one is drawn to rest... Waking up, one or more members of your squad will start a fight with a shadow that created the illusion. Defeat the demon and re-examine the "cozy" halt.
It is interesting: after finishing the story mission in the woods, go to the camp and talk to Leliana. She will play you a song from the main menu of the game.
Orzammar
Lost son

The story is over. The hero stands on the road and looks thoughtfully at the sunset... But it's too early for him to rest!

In the Common Halls we will come across Filda. Her son went to the deep paths and did not return. We will find the hand in the teig Ortan, it is connected with the plot - do not miss it.
Church
Burkel wants to open a church in Orzammar. You can help him with this by convincing the chronicler (in the hall of the keepers) to give permission. You will receive a meager reward, but this church will have a decisive influence on the fate of the world. And not the best...
Dwarf Mage
Dagna really wants to get into the circle of magicians. It is possible, by telling her father Jannar about her daughter's plans, to prevent her, or you can help by talking to the first sorcerer, if he, of course, is alive. As a reward, we will get a good rune or lyrium. In addition, Dagna will become an outstanding scientist.
Naga search
All his pets fled from the beater Bemora. Nagas must be searched for in the Common Halls, there are five of them in total. For each beast we get 25 silver coins. And if after that you talk with Leliana, then she admits that she really wants such an animal for herself. You can get it in Dust Town from an idle dwarf for a modest fee. Now this "hedgehog" will live with you in the camp.
Racket
After receiving the first task from any of the contenders for the throne and leaving the Diamond Halls, you will see how the local bandits threaten the merchant Figor. If you follow them into the shop, you can help the merchant. If you settle the matter peacefully, he will thank you and stay to trade, and if you kill the robbers, then ... he will scold you and run away.
Fights without rules
In the west of the Halls of Trials, in a small room, there is a gunsmith who will offer to take part in the battles. The reward for each battle is trifling, but the ring that you get after four victories is not bad for blood mages.
unwanted child
In Dusty City, you can find an unfortunate gnome who was kicked out of her family because she gave birth to a son from an untouchable. You can force her to get rid of her son, as her relatives want, or you can convince the latter that they are wrong and restore the family.
dragon in the throne room

This is how you need to put two characters in the throne room to summon a dragon

If the blanks are over, but you need to say something, it turns out like this
The architecture of the gnomes sometimes surprises. After studying the inscriptions on the throne, we will get a note in the codex. Now you need to correctly position the members of the detachment: one in the "dressing room" on the square in the center of the hall, and the other two in the throne room itself, in its southwestern part, on buttons that look like the end of an arrow. We click on the throne again with the last character and get acquainted with the local prisoner.
The thieves
Running past the king's treasury, you will come across a group of thieves who were trying to dig a tunnel. Deal with them and get a well-deserved reward from the guard who came running to the noise.
Poison
In one of the chambers for the nobility, you will meet the herbalist Vidron standing by the bed of a dying lady. He will tell you that she was poisoned and ask you to make an antidote. Then he will give you a recipe, which will be the main reward.
stolen book
The chronicler's assistant in the Halls of Keepers wants us to find a valuable book that was recently stolen. Trickster lives in Dust City. Negotiations with the thief will come to a standstill... But the note picked up from the corpse will lead us to the bandits, who are just carrying the tome to the fence in the Halls of Trials. After the battle, the book can be either sold to the same fence or returned to the keepers.
The missing pedigree
Dwarf Orta believes that she comes from a noble house Ortan, but that's bad luck: the family tree records disappeared in the teig of the same name. At least she didn't find them in the Halls of the Guardians, which meant there wasn't anywhere else. The records really lie in the center of the teig, not far from the Ruka cave.
List of golems
In the room with the Anvil of the Void, there is a table that lists all who have become golems. The names can be copied and taken to the chronicler.
Treasure of wanderers
Find four piles of stones in Caridin's Crossing:
At the western exit to the map.
Southwest of the bridge.
Not far from the intersection of three roads.
East of the Deep Hunter's Cave.


Our pet naga named Shmoplez. They seem to get along well with the dog.
After that, a mark with a vagabond's cache will appear on the map.
Legion Honor
Once we collect all the pieces of the armor dead legion, we will be given the quest "Dead Castle". Now we can get the emblem of the caste of the dead from the sarcophagus (in the room of the legion in the dead ditches) and take it to the chronicler. But before you leave the temple, equip someone in full armor and activate the legion relic.
Earthman Sword
In the deep paths you can get hold of one of the best one-handed swords - Grounder's Honor. First, find the tomb in Ortan teig (southeast corner). Now we are looking for pieces:
The pommel lies in the Ortan teig in a vase in Ruka Cave.
Hilt can be removed from the corpse of a genlock emissary at Caridina Crossing (the genlock is waiting for you in the tunnel that goes from west to south).
The blade is removed from the corpse of an ancient darkspawn in the Dead Ditch (on the bridge in the center of the map).
Once you find everything, return to the tomb.
Cache
In the charter shelter, we will get Jammer's diary, which talks about the treasure. We need to find three chests: Jammer himself, Kanky and Pique. From them we get a silver ring for a dress, an iron letter opener and a pomegranate decoration. You can't take anything else! It remains to find a cache near the tamed bronto and open it.
The life of the keeper
To receive the task, touch the wall of memories in the Halls of the Guardians. Now find three runestones:
Near the head of the miners in the Common Halls.
In the southeast caves of Caridin's Crossing.
In the western of the central rooms in the Dead ditches.
We return to the wall of memories for a reward.
Torn Demon
Gnomes are solid guys: if they already destroy the demon, then the pieces are carried over all the lands: what if they grow together? You can collect these pieces on the deep paths.
Limbs in the northwest of the Aedukani teig.
The torso and head are at Caridina Crossing, in the southeast and northeast respectively.
We take it to the altar in Ortan teig and revive the demon. We have another choice - to let him go for money or to kill him. This time it's final. What will you choose?
Denerim
Help the law
Near the house of the blacksmith Wade is Sergeant Keelone. He will complain to the authorities and ask for help to deal with crime. You can act both by force of conviction, and simply by force. If you want a high reward, listen to what the customer prefers.
Dark dealings

Trying to explain the fool
to the dwarf that it is impossible to "fall into the sky." Wynn and I are still trying to get through to consciousness, and Sheila offers ... basically the same thing, but in a much faster way.

Eamon has a great sense of beauty. In all his mansions can be found
real works of art
On the other side of the house, the forge stands the sly Couldry. Only robbers can meet him. He has two task lines: for thieves and for burglars. In both lines, stealth will be extremely useful to you.
It is important: do not forget to leave too noticeable companions in the camp for the duration of the mission.
Before the meeting of the lands, we will be able to perform three thefts and two break-ins. Another theft and two burglaries after. If your stealth is not at the master level, then money, persuasion and fists will help you in some tasks.
Sect
In one of the lanes (you will visit there when you destroy the bandits by order of the church) you will find the corpse of Ser Frieden, who died trying to destroy the sect of blood magicians. You can finish this noble deed - go to an abandoned house (a new location on the map of Denerim) and cut out the villains.
Evil
Evil has settled in the orphanage in the elfinage, which the templar Otto will tell you about. Gather some clues, including questioning the elf girl sitting on the doorstep. After cleaning the shelter, do not forget to return the amulet to the elf.
Prisoners of Howe
In the cellars of the estate of Earl Howe, you can find several prisoners at once.
Bann Sieghard's son hangs on a rack in the torture room, who will intercede for you at the meeting as a reward.
In prison, the templar Irminrik went mad. Take his ring to Banana Alfstanna.
Veteran Reksel also could not stand the imprisonment. It is necessary to tell the preacher Rosamund about it.
Guild Quests
The tasks of most guilds (preacher boards, Blackstone volunteers, assassins and "interested ones") are mostly completed without problems: the benefit of the targets is marked on the map, or at least their approximate location is described. But there are a few exceptions.
If in the final task volunteers you choose the side of the father, then in order to get to the son, you must not go to Lothering, which will be destroyed by this moment, but simply pass the town. Taoran will come across to you in a "random" encounter.
Love notes that one of interested(tasks are given by the innkeeper in Denerim's Bitten Nobleman), scattered literally all over the world. Finding them is not easy. Here are all the places:
In the Dalish camp, behind the merchant.
Near the entrance to the ruins in the Brecilian forest is a secret door on the left.
V royal palace Orzammar, in an inconspicuous room in the east of the palace.
In Orzammar's charter hideout, in the room to the right of the hall where Jarvia fell.
In another hideout, this time in a village, next to the entrance to a house with a bloody altar.
In the tavern "Spoiled Princess" near the tower of magicians.
In the tower itself, on the second floor, in the east room.
In the windmill of Redcliffe (where there is a secret passage to the castle).
In the basement of Redcliffe Castle, just before the entrance to the courtyard.
At Wade's forge in Denerim.
In the brothel "Pearl" (location in Denerim) in the southeast room.
In Eamon's manor in Denerim in the northwest room.
In addition to these same faces, they will make you run and mages from the community.
blood marks
We need to bleed four doors in Denerim: two in the Trade District and one each in Dirty and Dark Alleys.
Places of power
We need to activate four places of power.
A grave in western Brecilian.
Altar in the teig Ortan.
A tree in the Denerim alienage.
Stairs to the second floor of the tower of magicians.
Scrolls of Banastor
You need to find five scrolls at the following addresses.
The southeast ruined room on the second floor of the mage tower.
Northwest room on the third floor of the Mage Tower.
Southeast library in the abandoned temple with the ashes of Andraste.
Western barracks (entrance from the center) in an abandoned temple with the ashes of Andraste.
Southeast room in werewolf lair.
The rest of the tasks should not cause difficulties.
