Two-story houses made of facing bricks. How to cover a house made of foam blocks with bricks and finish the facade
Even at the stage of designing a future house, it is worth thinking about what its facade will look like. And if unattractive material is used to make the walls, then the facade is most often covered with facing brick. In some cases, such cladding not only has decorative functions, but also protects the walls of the house from moisture saturation. This, for example, happens in the case of building a house from foam blocks or aerated concrete. In our article we will tell you how to cover a house with facing bricks, as well as how to choose the right material suitable for these purposes, because there are many varieties of it, differing not only in color and texture, but also in important technical characteristics.
Material selection
When deciding how to decorate the facade, many owners country houses choose facing bricks. And this is not surprising, because this material has excellent specifications. However, the house can be lined with several types of this material:
- ceramic bricks;
- clinker products;
- silicate elements;
- finishing material made using hyperpressing technology.
Each of them has its own unique technical characteristics. When choosing elements, you should pay attention to the correctness of the shape, evenness and clarity of the edges, and uniform coloring. There should be no defects on the surface of the material. It is also important to take into account water absorption (the lower it is, the better), frost resistance (optimally within 25-50 freezing and thawing cycles), as well as compressive strength.
Ceramic brick
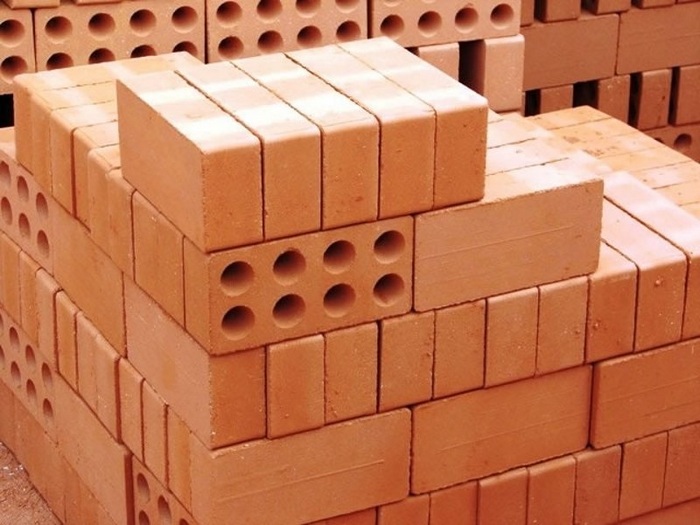
Clay is used as a filler in this product. After molding, the material is fired in a furnace at temperatures reaching up to 1000°C. A house lined with this material becomes warmer, its soundproofing qualities increase, and the structure will last longer. Therefore, it is much more profitable to build a brick-lined house from foam blocks than to build a wooden or frame structure.
Among the advantages of ceramic wall products, it is worth listing the following:
- Typically, water absorption is 6-14 percent, which allows the material to be used for cladding facades. For some varieties of such products, this figure may be higher, since a different clay is used for production.
- Frost resistance - the material can withstand 25-50 cycles.
- The thermal conductivity of ceramic products is small - 0.3-0.5.
- Impressive strength (1300-1460 kg/m³) allows the use of such material for the construction load-bearing structures Houses.
Among the disadvantages of ceramic products are the following:
- Small selection of colors and textures. You can find it on sale different shades red-brown and red brick, since the material contains red clay.
- If we compare ceramic elements with silicate ones, their price is higher.
Clinker products for wall cladding

Clinker bricks contain additives from refractory clays. The material is fired at very high temperatures, reaching up to 1200-1300°C. Thanks to this, the structure of the product is very dense, which reduces its water absorption. Also for this reason, the frost resistance of the material increases. If you decide to clad a building made of foam blocks with brick, then it is best to use clinker.
This material has many advantages:
- The products have increased frost resistance, which can reach up to 100 cycles.
- Low water absorption allows it to withstand any weather conditions, which is especially important for a house made of a material such as foam concrete.
- Impressive service life - more than 100 years.
- A wide range of colors, textures and shapes allows you to realize any ideas of architects.
- Clinker can be used to make columns, decorative parts of facades, fences, gazebos, cover fireplaces and stoves, and use it for interior decoration.
- Due to its high density (up to 2100 kg/m³), solid material can be used for the construction of load-bearing structures of a building, for example, foundations.
Clinker has few disadvantages, but they do exist:
- These products cost a lot of money. It is also worth adding installation costs to the costs, because it is necessary to install the face brick Only a specialist can.
- Due to the high density of the material, it has high thermal conductivity, so a house lined with such bricks needs additional insulation.
Important: only solid clinker has high thermal conductivity. As for hollow clinker bricks, its thermal insulation characteristics are higher.
Silicate wall materials
The filler here is quartz sand. Compared to ceramic bricks, silicate material is not as expensive, which makes it more acceptable for most citizens. However, the thermal conductivity of the material, its strength and frost resistance are lower than that of its ceramic counterpart.
Among the few advantages are:
- Water absorption is within 6-8%.
- High sound insulation characteristics.
The disadvantages include:
- Thermal conductivity is in the range of 0.39-0.8.
- Density from 1500 to 1950 kg/m³.
- Low frost resistance within 15-50 cycles.
- A small selection of colors, textures and shapes, which significantly reduces the decorative capabilities of the material.
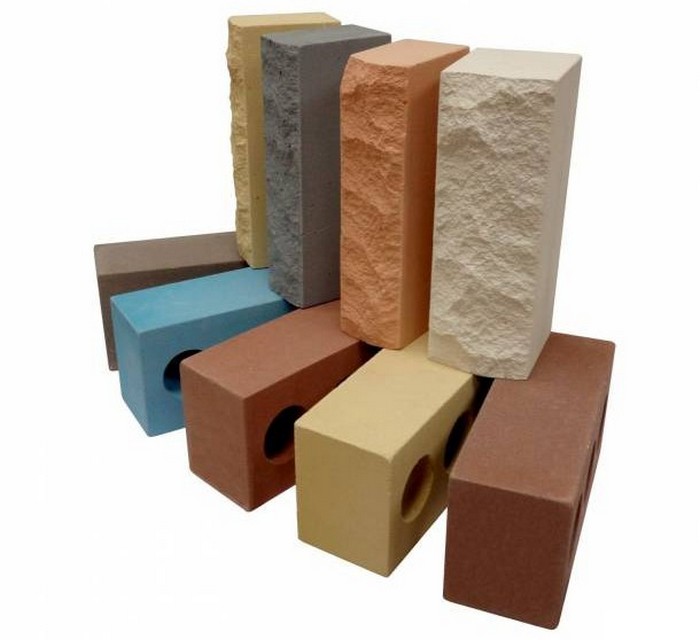
Products made by hyperpressing method
Using the semi-dry hyperpressing method makes it possible to obtain a fairly wide range of wall cladding products. A house made of foam blocks can be safely lined with such bricks, because its characteristics are not inferior to ceramic products. Depending on the filler used, hyperpressed products can differ significantly in their technical characteristics:
- Water absorption is 3-7%.
- Frost resistance can be within 30-300 cycles.
- Strength can also vary significantly and is in the region of 1000-4000 kg/m³.
Among the disadvantages of elements obtained by hyperpressing, the following can be mentioned:
- High thermal conductivity - from 0.43 to 0.9.
- Compared to ceramic bricks, the price of hyper-pressed products is higher.
Facing masonry methods
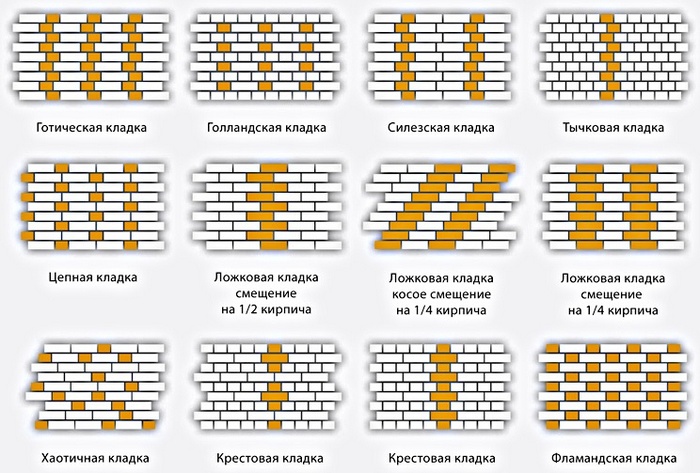
If you don’t know which masonry option to choose to cover your house with bricks, photos from the Internet will help you choose suitable option. can be done using one of the popular methods of laying wall material:
- Spoon and track laying are the most commonly used options. In this case, the material is laid with the long spoon side. In the next row, the vertical seam between the elements is shifted by half or a third of the element. This ensures constant overlap of the vertical seam.
- Block lining at home involves alternating spoon and butt rows.
- Cross masonry It is performed in the same way as a block one, you just need to make sure that the vertical seam falls exactly on the middle part of the end part of the brick in the top row.
- Gothic styling- this is the alternation in one row of products laid with a spoon and a poke. In the next row, the vertical seam of the spoon must be shifted by 1/3 of the length, and the butt by 1/2.
- Chain or Brandenburg masonry performed by alternating two spoons and one poke in one row. In the next row, the poke should fit exactly above the vertical seam of the two spoons.
- Chaotic masonry Most suitable for independent implementation, since it does not require any alternations.
House cladding technology

If you are going to do the cladding of a house from foam blocks or other material yourself, then it is very important to correctly calculate the number of bricks in order to purchase products from one batch. Material from different batches may differ in color or tone. To calculate the amount of material, the area of the facades without taking into account openings is multiplied by 51 - this is the number of bricks required to cover 1 m² of surface.
Wooden wall elements must undergo antiseptic treatment before laying. If the foundation design did not provide for expansion under the facing brick in advance, it is worth pouring additional tape nearby, which is connected to the old base using reinforcing pins.
When performing masonry, the following technology is used:
- Work can be carried out on a non-rainy day at an air temperature of at least 5 degrees so that the properties of the solution do not change.
- First, a test laying of the material without mortar is carried out in order to adjust the stones to size and select elements for decorating doors and windows.
- Before starting to lay the first row, the horizontality of the base is checked.
- It is forbidden to break stones with a hammer. They can be cut using a grinder.
- For installation, a solution is prepared from Portland cement, sand and water in a ratio of 1:3:1. The mixture should be thick enough so that the brick does not move.
- First, masonry is done in the corners of the house to a height of 4-6 rows. After this, the cord is pulled and the intermediate stones are laid.
- Before laying, the elements must be moistened with water so that they do not draw moisture from the solution.
Attention: all horizontal seams are made 1.2 cm high, and vertical seams - 1 cm.
- The cladding is installed at a distance of 3-4 cm from the walls of the house. This space is needed for ventilation. Also for this purpose in bottom row every three vertical seams a seam is made without mortar, filled with insulating material, and on top of the masonry one row does not reach the cornice.
- To connect the facing layer and walls, anchors, dowels with wire, clamps or long nails are used. The installation spacing of fasteners is at least 0.5 m.
- After the masonry is completed, the seams are embroidered with a wooden rod, simply pressing the mortar inward.
One of the common finishing options for all types of country houses is facing the house with brick. This type of finishing is attractive because it looks beautiful and stylish; externally brick houses look solid and solid, even if inside, under brickwork, hiding wooden frame or foam blocks; and it is, moreover, very durable: build it and forget it.
However, it must be kept in mind that bricks come in different forms. A good, high-quality brick really lasts a very long time. The quality of a brick is determined mainly by its frost resistance, which is measured in the number of freezing/thawing cycles. A good facing brick has 50 freeze/thaw cycles or more.
Brick cladding options
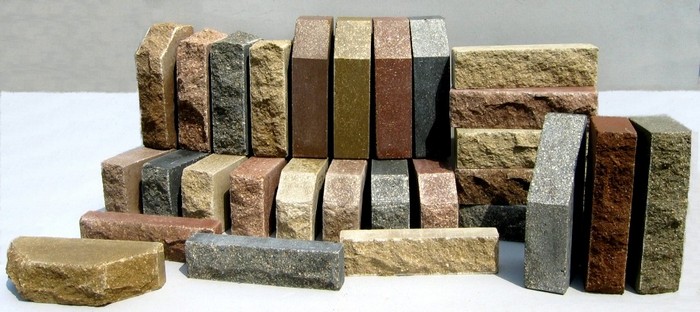
There are many varieties facing bricks, differing in color, texture, surface shape and production technology. Accordingly, you can select cladding options in different architectural styles.
In particular, cladding the façade of the house with dark-colored bricks with a pronounced relief texture gives the building the appearance of an ancient castle. Decorative elements of complex-shaped facades can be covered with figured (shaped) bricks. Clinker brick, which looks extremely decorative, also has the lowest water absorption and increased frost resistance. Glazed bricks of various shades are often used in the design of facades, say, in the Art Nouveau style.
 For example, the Terca company, part of the Wienerberger concern, offers four main color solutions: traditional terracotta, black, coffee and yellow (variegated colors are obtained through the use of a special firing technology), - plus seven options for the texture of the front surfaces: smooth, rough, grooved, antique, antique chipped, chipped and “St. John’s” from the “St. Holy Family”, which is produced by hand molding. (By the way, hand molding not only increases the price and gives an unusual appearance, but also doubles the durability.) Such diversity allows you to choose an adequate solution for almost any architectural style.
Decorative masonry with facing bricks can be carried out not with ordinary mortar, but with ready-made masonry mixtures of various colors - it turns out very beautifully. An example of such mixtures is Vetonit. Beauty masonry joints emphasizes the chamfer made on the edges of the bricks - a style also characteristic of the Terca company.
Features of the technology
Regardless of what the frame of the house is made of, a ventilation gap is left between the facing brick and the main wall.
If facing wooden house, then the ventilation gap protects wooden walls made of timber from mold and rot, and the insulation, if the house is insulated, from moisture.
The same can be said about: according to current thermal engineering standards, they need to be insulated, which means a ventilation gap is necessary.
Subsequent brick lining is also carried out leaving a ventilation gap: although such houses do not need additional insulation, due to the high vapor permeability of foam concrete and gas silicate at the border with the brickwork, in the absence of a ventilation gap, moisture would begin to condense, moistening the walls and causing dampness.
The vents in the lower part of the brick cladding, which are necessary so that street air can circulate freely in the ventilation gap, are left not in the first, but in the second row of bricks, so that they are not filled with mortar during the construction process. These vents look either like windows closed with bars or mesh, or like vertical seams not filled with mortar into which plastic segmented liners are inserted.
The facing masonry must be connected to the main walls of the house. The classic method is to use galvanized steel mesh. The disadvantage of this method is that, despite the galvanization, the mesh still rusts and breaks down over time.
Connections made of composite materials - carbon fiber or basalt - are not destroyed, but in this case the masonry joints in the main wall and the cladding must be the same in height.
Flexible stainless steel connections in the shape of strips are used - such connections can be used if the masonry seams do not match.
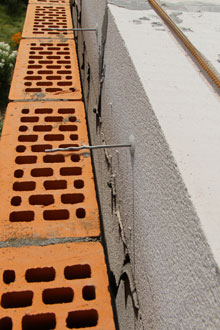 Stainless steel ties are also used, which are fastened with dowels if the main wall is made of foam blocks, or screwed into wooden wall like self-tapping screws. In the case of cladding insulated wooden houses similar connections, equipped with special “umbrellas,” press the insulation to the wall. When facing a house made of foam blocks with bricks, these connections can be installed anywhere and do not depend on the location of the masonry joints. Therefore, they can be used even if no connections were made at the stage of laying walls made of foam blocks.
At the design stage, it is important not to forget to take into account the thickness of the brick cladding with a ventilation gap, which will be added to the thickness of the main walls, so that a platform of the appropriate width is provided on the base strip.
Cost issues
Cladding a house with brick is a relatively expensive type exterior finishing. Cladding a wooden building with brick will, in fact, cost more than finishing it with decorative boards or, especially, vinyl siding.
However, compared to plaster, brick cladding of a stone house will not always cost significantly more. Of course, if compared with ordinary plaster, the difference will be quite significant. However, ordinary plaster, in principle, can only be used on uninsulated brick walls that do not meet modern requirements for heat conservation.
On walls made of gas silicate or foam concrete, as well as on insulated brick walls (“ wet facade"), it is necessary to use relatively expensive compounds with high vapor permeability, and the figures turn out to be quite comparable. In this case, brick cladding will not be much more expensive than other methods of exterior finishing.
In order to use facing bricks, the foam blocks from which the walls are made must be prepared. This problem is due to the fact that both materials that form the wall are classified as breathable. For this reason, when facing foam blocks with bricks, it is very difficult, and sometimes impossible, to bring both materials into full contact. However, this problem needs to be solved, since foam blocks are afraid of moisture. If you want your house to be not only beautiful, but also durable, you urgently need to line it with brick.
Facing foam blocks with brick helps solve the issue of waterproofing walls.
Features of foam block cladding
Houses made of foam concrete are built quickly, literally in a few weeks. This process can be carried out independently, without the involvement of outsiders. work force. However, if the process of erecting walls is delayed, you should not follow the usual tactics in these cases of sequential work according to the principle of “first the walls, and then the cladding.” While you are building the main elements of the house, the foam blocks will become saturated with moisture, become covered with dirt and take on an unpleasant appearance.
It is necessary to clad a house with foam blocks immediately as the walls are being erected, without waiting for their construction to be completed. Tiles, facade panels, stone, and brick are used as facing materials.
The most popular material is usually facing brick.
It is beautiful, reliable and prestigious. In addition, finishing a house with brick can combine maximum protection and the basis for a flight of designer imagination.
Typically, cladding is carried out in two ways - in parallel and after the fact. In the first case, it is produced simultaneously with construction. However, few people do this. Most often, facing work in parallel with the construction of walls is abandoned due to a lack of labor.
Post-mortem cladding is carried out immediately after the masonry of the walls is completed. However, it is very important to complete the work before the rains. This linking of work deadlines to weather conditions negates all the benefits of consistent work. The weather does not take into account your needs and the established rhythm of actions. If cyclones come and your walls are defenseless, there will be a lot of extra work.
Structure of wall formation with facing masonry
The main thing in the technology of wall cladding is the connection of the inner and outer layers with each other. In this case, you should not arrange a brick bond, as this will reduce the heat-insulating functions of the brick. Typically, metal structures, such as reinforcement, are used as a binder.
The optimal option for forming a wall is next diagram:
- facing layer;
- air gap between the brick and foam block layers;
- reinforcement layer;
- vapor barrier layer;
- anchors for securing insulation;
- insulation coating;
- foam blocks;
- plaster.
Such a sandwich will perform good insulating functions. Moreover, the insulation will be not only air (retention of heat or coolness), but also water (protection of foam blocks from moisture).
Cladding technology
In order to carry out a full-fledged cladding, you need a foundation reserve of at least 20 cm. Usually this gap is provided for in house designs. However, in reality it is different. If the time has come for cladding, but there is no required gap, then you will have to spend time building up the foundation.
To do this, you need to dig a trench along the entire length of the masonry, but so that there is a free space of 20 cm in front of the house. The depth of the trench must fully correspond to the depth of the foundation, and its width should be 40 cm.
A sand cushion should be placed at the bottom of the trench. The sand needs to settle within two days. There is no need to specially water it or compact it, so as not to accidentally damage the main foundation.
You need to make holes in the main foundation under the house using a hammer drill and a diamond drill. In this case, special care should be taken, as it can cause a crack to appear.
- the rods are laid out parallel to each other every 8 cm;
- perpendicular to them you need to put more iron rods, but at a distance of 20 cm from each other, welding is carried out at the places of these intersections;
- a rod 25 cm long is welded to each point of the fixed intersection, which is necessary for the junction with the main structure.
- this entire structure is installed in the desired location and welded to the main structure.
The surface of the foundation is cleaned of dirt, after which a primer is laid on it.
The formwork must be installed at a distance of 25 cm from the main structure. The solution is poured into it to the height of the foundation. After this, you will need to take a break from work for 3 weeks to allow the new foundation to dry completely.
At this time, the walls and foundation will have to be completely covered with polyethylene. If this is not done, the rain will saturate the walls with moisture. They will have to dry for two months.
After three weeks, the formwork is removed, and finishing of the house continues.
Before finishing you need to prepare cement mortar. To do this, 1 part of cement and 1.5 parts of clean sifted sand are poured into the container. Everything needs to be mixed thoroughly, preferably using a drill with an attachment. After this, 0.3 parts of slaked lime is added, and everything is mixed again. Now you need to pour in 0.6 parts of water and stir until homogeneous. During the kneading process, it is advisable to add a little plasticizer. The solution is ready, it's time to start lining.
How to cover a house? Very simple. First you need to make a measurement between the foam blocks and bricks at 35 mm, then stretch the thread along this mark. Next, the usual masonry algorithm begins. Cement mortar is laid, brick is laid on it, then it is punched from all sides with a rubber hammer. The space for squeezing the solution should be about 6-9 mm.
For each subsequent brick, the mortar is laid first on the side, then on the previous brick. The grinding of bricks is done by moving first horizontally to the adjacent one, then vertically to the underlying one. Each time, you need to remove excess mortar with a trowel, transferring it to an adjacent surface.
The difference between this facing masonry from conventional construction brick wall lies in the need to provide points of contact with the foam block wall.
The main thing is not to lay the bricks correctly, but to prevent the blocks from becoming saturated with water. If all conditions are met, you will have a beautiful and comfortable home.
