Insulate with foam between the block and the brick. Insulation of brick walls: types of thermal insulation materials, installation features. Brick house - pros and cons
We continue our traditional series of articles from Yuri Voedilo (professional builder and repairman). Yuri writes:
V recent times heating prices are growing enormously, so many people pay great attention to external wall insulation. Therefore, I decided to pay attention to this topic. This article will discuss the insulation of external walls. brick house facing brick. Next, we will talk about the tricks of laying the brick itself and the need for bulk insulation. Also, in the article we will give examples of laying out an arch.
The ventilated airspace allows the inside of the brick wall to dry, but the external vents can introduce a small amount of moisture - rainwater or moisture - into the assembly of the natural stack effect. Drying the wall assembly cleanly can reduce the likelihood of bricks reaching critical moisture levels that will initiate freeze-thaw damage.
The effectiveness of one or both approaches could be established; test results can indicate which approach is best based on the direction and environmental impact of each wall. 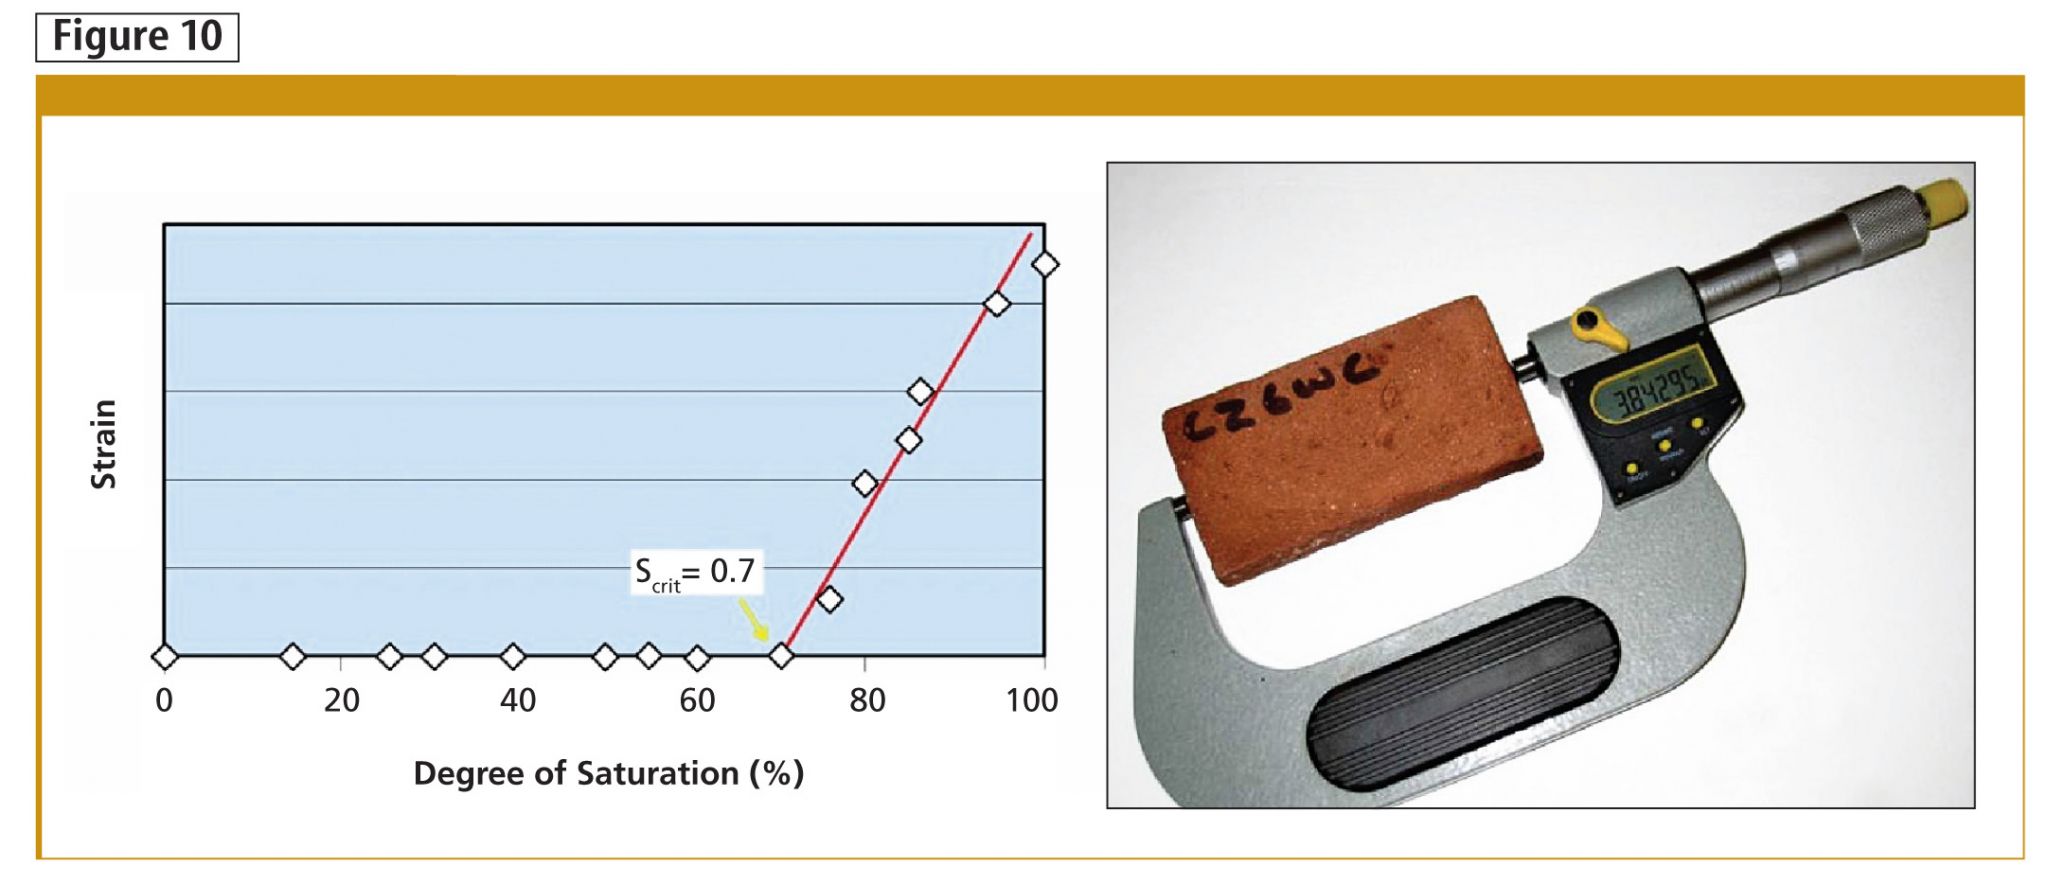

The heritage is preserved, the future is secured The existing stock of stone buildings is ripe for future use. However, if the heritage buildings of Canada are to be adapted, reused and expanded, their thermal performance must be improved to meet the tenant's comfort needs and the owners' energy expectations.
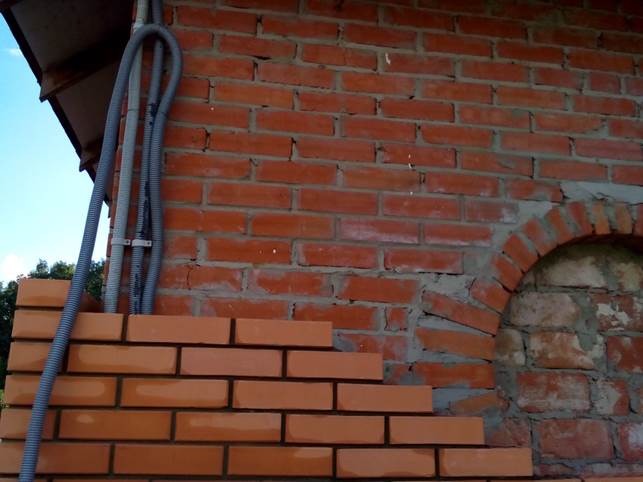
The house is lined with ceramic bricks and has a very nice and tidy look. But only under the condition that the brick is laid correctly, that is, the seams must be even and clean, and the brick itself is not stained with mortar and must not have cracks.
Stage 1. Mortar for facing bricks
To work we need the following tools:
One of the steps to reduce energy consumption in old masonry buildings is to insulate their exterior walls by applying interior insulation. With careful evaluation and testing, designers can detail insulation retrofit strategies to reduce energy waste without compromising durability.
Notes 1 The authors would like to thank those who contributed to the research and design work on this topic. These include Ekaterina Tsekova and Marianne Cutti, Paul Pasqualini of Engineering Link, and Dr. John Straube, Chris Schumacher and Randy Van Stratten of the University of Waterloo and the Building Sciences Corporation.
- Construction trowel;
- Building level;
- Thread or fishing line
- Rod 8-12 mm (square reinforcement);
- Grinder with a circle on concrete;
- Cement, sand;
- Foam plastic in bulk.
First, let's prepare a solution. All according to the standard scheme, one part of cement grade 400 and three parts of sand, preferably not river sand, since the solution on river sand settles very quickly. But if you don't have any other sand, then add a plasticizer to the solution, you can buy it at any hardware store. The density of the mortar should be such that it can be easily picked up with a trowel and applied to the brick. More and more often, they add different kind pigments (special dyes). Therefore, a little advice: before buying a brick, consider combining the color of the brick with the color of the seam itself. In our case, the client wanted a classic seam color, that is, gray.
He specializes in performance analysis, durability assessment and cladding design for new construction and building renovations. She specializes in the rehabilitation of heritage buildings, developing solutions that balance cultural considerations with the needs of modern residents. His research interests include the design and construction of low energy buildings. Slag blocks are used in construction because of their easy installation, durability and low cost.
but appearance the blocks provide is very simple and utilitarian. One fairly simple way to hide cinder blocks is by faking paint to make them look like a brick wall. Brick walls have a slightly warmer look than cinder block walls.
Stage 2. Laying of ceramic (facing) bricks
There is a lot of information on the Internet about how a brick is laid, so I think it's not worth writing about the basic principles. But there is not so much about the features of ceramic brick laying, tk. high-quality brick insulation of a house requires special attention.
Wash wash the walls and let them dry for about 24 hours. Start by cutting around the edges of the wall, applying a primer with a brush. When applying the primer, use smooth, even strokes. Cover most of the walls with paint. Cover an area that measures an area of about 3 feet before moving on to the next section. This usually takes 4 to 6 hours, but of course read the instructions on the bank.
Paint the wall with the color you use to represent the faux brick mortar. This is the color that will appear between the fake bricks. Use the same technique you used to apply the primer. Build a stamp to apply the brick pattern to the wall. Start by cutting synthetic sponges to brick sizes. Glue the sponges to the plywood.
The work will start by laying out the corners. Masonry from facing brick you need to lay down only on the waterproofing. To do this, use roofing material or thick plastic wrap. In our case, the waterproofing was laid in the foundation itself, so we began to lay the masonry directly on the foundation. Having retreated from the main wall 4-5 centimeters, we will make the masonry. We retreat these 4-5 cm for an air gap, later I will explain why. You need to lay the ceramics in the same way as ordinary brick, but only under a metal rod with a section of 8 by 8 or 10 by 10, 12 by 12 millimeters.
Apply the paint you want to use for the bricks onto the print using a roller. Start at the top corner and press the stamp firmly against the wall. Cover the entire wall using this technique and let the paint dry. Use a laser level to provide a guide when punching a brick pattern on the wall. It is a tool that you can buy or rent that projects a laser beam down the length of a wall to create a straight line.
Fill in the gaps left with a stamp by cutting the sponge to fit the spaces on the walls. Apply paint to the end of the sponge and press the sponge against the wall in the unprinted areas. For a person in the block for 70 years without warming, in place with old, leaking windows, indeed, every new tight window is energy-saving. The window must be tailored to the specific requirements of the customer. This should be the answer to the question of what we should expect from windows, what tasks they should perform.
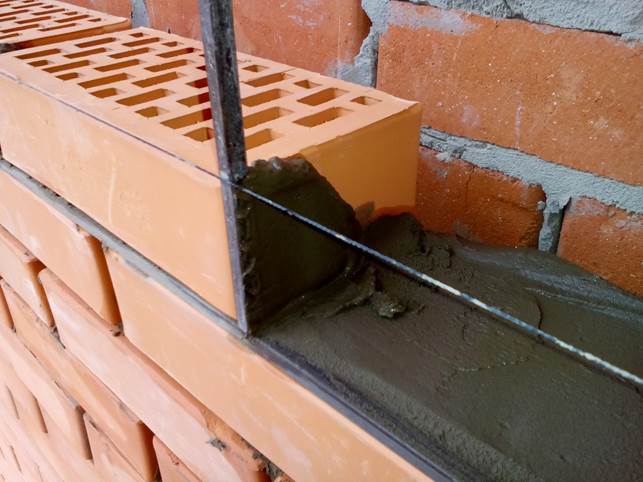
And the way it is done: the metal rod is placed directly on the masonry itself along the front edge of the brick, and a solution is applied near it. So that the thickness of the applied solution near the twig itself is not higher than the twig itself. And on the back side, the solution was ten millimeters higher. This effect is easy to achieve if the mortar is cut along the twig with a construction trowel, while the trowel is kept at an angle.
Energy saving with modern windows
Just because of the adaptation of windows to our needs, it is worth buying an offer from a company whose experienced consultants are able to choose the best solution for us. During the heating season, everyone is looking for heat savings. The corresponding values can be calculated by architects when designing a house, which in general should fulfill the task energy efficient home... In other cases, the best savings in heating costs after the heating season are compared to last year if the windows have not been replaced. It should be noted, however, that the improved parameters and quality of the windows, the greater the likelihood of low heating costs.

The vertical seam is applied in the same way, only the twig is placed vertically to the end side of the brick (butt). The twig itself will not stand, so you will have to hold it while applying the solution.
Remember, however, that expensive and energy efficient windows must also be treated appropriately. It is very important to regularly check the correct functioning of the window fittings. Report it and ask for a steer and best service from the company that built the window. Correct regulation and maintenance of windows prolongs the comfort of their use. It is also important to install the correct windows. Pay attention to their settling and isolation. If you opt for "energy efficient" windows, it is worth considering "hot plug" instead of the standard install.
Note: after about 2-3 hours of work, you need to wipe the seams with a small brush. At the same time, if there are holes or tears in the seams, then be sure to cover them! Otherwise, with temperature drops of +/- degrees, water will enter there and, when freezing, it will tear the seam, and after a while the brick itself. All drops of solution from the wall must also be wiped off with a rag, as it will be much harder to wipe after drying. By the way, after a while, white spots may appear on the wall. This is the salt that was in the sand. There is nothing terrible here, she easily wipes off with a rag, well, or you need to wait until the rain will wash her away.
It is based on the fact that the used window is additionally insulated with special strips: vapor-tight and vapor-permeable. Kaisergrub Queen Shihuang in Lintong, China Plateau rescue concept. The original stone scales are composed of approximately 600 limestone slabs and are connected to each other with cast bronze wires. The goal was to save the tank for research and exhibition purposes. Our concept has been implemented on two models. In our workshop, the development and the first execution took place on a small model, the second sample took place on a replica of a tank in Munich.
Facing brick laying is a painstaking process that requires accuracy. Therefore, be patient.
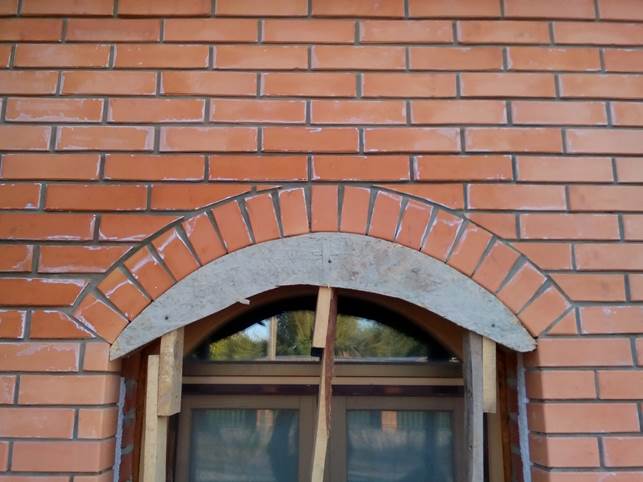
Stage 3. Making a frame for a brick arch
In order to lay out an arch from bricks, first we need to make a frame under it. We don't need beauty here. Superior strength and smooth bending. We take a USB sheet 10 mm thick and cut out two crescent strips with a width of at least 6 centimeters with a jigsaw. The length and bend of the crescents are individual for each window.
The concept has two main elements. Firstly, the possibility of carrying out large-scale rescue operations in one piece, and secondly, the possibility of very quickly dropping all the compounds necessary for the rescue. Saving work can be continued without hindrance.
The measure was very successful, even the sensitive bronze wires were not damaged. A detailed report will be published shortly by Sandra Bucher. Reversible lamination with controlled sublimation. Cyclododecane lamination has proven to be very effective in areas where fully reversible protection was required in a short time. However, the durability of the reversible protective coating over a longer period of time has been a problem. This is problematic for larger objects, especially in the wall and architectural areas.

Next, these crescents need to be twisted together, as shown in the photo below. We use old bars for this, their thickness can be different, but the width is the same from 10 to 12 centimeters. And the length is equal to the height of our windows.

In order to maintain the coarse color of about 100 m², a reversible lamination was necessary, which stabilizes the plaster during the entire fixing work on the wooden plasterboard and protects the paint layer from contamination. The backup takes about 6 months.
The painting is made of mortar on a lime mortar. The spikes are separated by spikes that are mounted on a wooden, bifurcated structure. This timber substructure is directly connected to the roof of the building. Roof damage and steel worm infestation weakened so much supporting structure what has become necessary work on the roof and right on back side paintings. The painting should be protected by the cyclododec lining on the front during this construction and supported by the jogging construction.
We insert the bars between the two crescents and twist them with self-tapping screws 45 mm long after which the frame is ready for use.
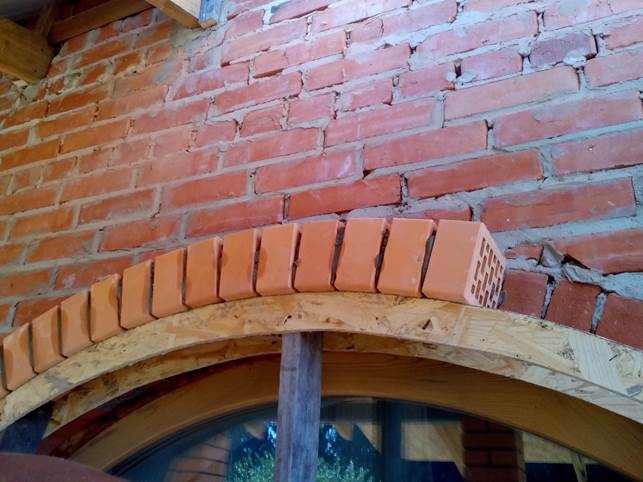
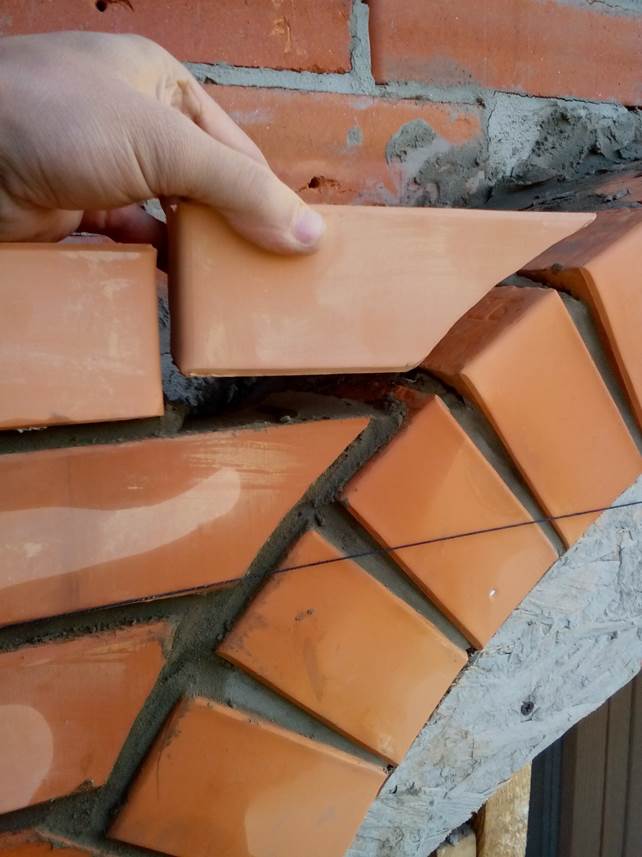
Stage 4. Making the arch
Having installed the frame in the place where the arched window will be, we begin to cover the frame with a brick on top.
It was predictable that renovation work on the roof structure and media, the images will take at least 6 months. The cover must be easily removed and without heavy mechanical stress. Lowers wall murals. Despite the material properties that were not provided for this purpose, we nevertheless decided that at this time the only known material that reliably adheres to cyclododecane without dissolving it and that does not solidify by evaporation of solvents.
Lamination design A dense layer of cyclododecane melt is applied directly to the paint layer. To this layer was added 10% boiling limiting gasoline. This very bottom layer serves as a release layer. Boiling point gasoline was added to facilitate handling of the cyclododecane melt. A layer of cyclododecane with a nonwoven reinforcement was then applied. Non-woven fabric is a thin polypropylene non-woven fabric. A cyclododecane melt was also used in this layer. It was added with a boiling point of 30%.
Only now we will lay the brick not horizontally, but vertically with the butt side on the face of the masonry. But since the length of the brick is 25 cm, and the width of our masonry is 17 cm (the width of the brick is 12.5 cm + the air gap is 4-5 cm), then the brick will have to be cut to length. For cutting bricks, we will use a grinder with a diamond wheel for concrete.
The relatively high proportion of gasoline causes the cyclododecane layer to be thin and the fleece to adhere only moderately to the substrate. This is necessary because the last layer must be removed together with the glued aluminum foil after the measurement is completed. Before the next step, it was necessary to maintain a waiting time of 10 hours so that the boiling point gasoline evaporates from the cyclododecane.
Aluminum foil should be glued as a top layer. The foam was applied thinly to the prepared pieces of aluminum foil using a spatula, after which the pieces of film were pressed with a roller for lamination. After finishing construction works the top two layers of the laminate can be detached.
The adjoining bricks of the main wall will also need to be cut at an angle. The arch should be in relation to the main wall on a plane at the same level or protrude outward by 2-4 cm, this is a matter of the client's taste. In a day, three frames of the arch can be safely disassembled. The arch is ready.
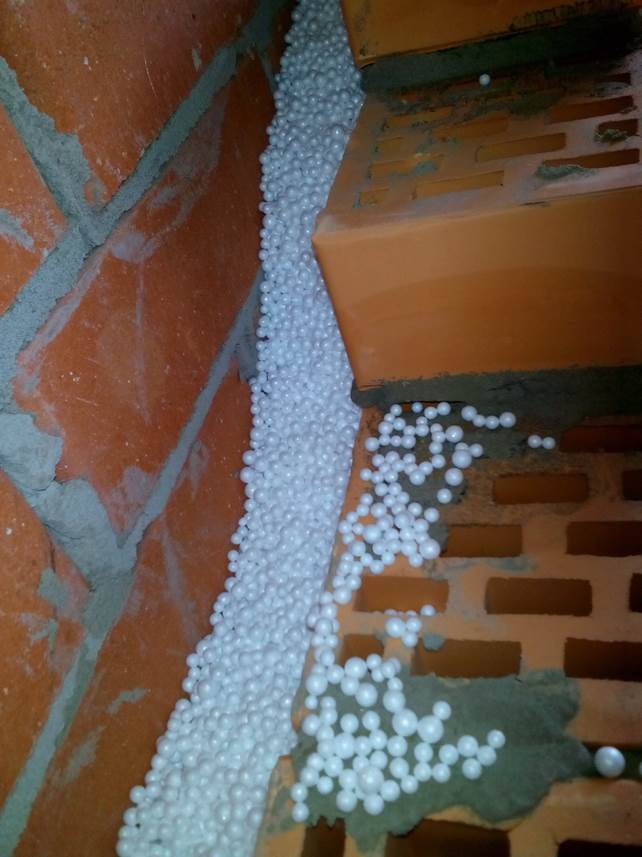
Stage 5. Insulation of brick walls of the house with foam outside
Difficulty with measure. The measure was generally successful and cyclododecane remained in the pattern throughout the measurement and completely sublimated after the layer was cleaned with foam and alufamia. However, the implementation is not without its problems. On the one hand, the foam reacts very quickly, so it can only be processed for a few minutes. The processing time can be increased by cooling the foam. We used ice water. On the other hand, it is necessary to spread the foam very thinly and evenly on the aluminum foil, as the parts with the thicker foam become very stiff and can lead to a loss of the paint layer when the lamination is removed.
We will fill the air gap that we left between the main wall and the ceramic brick. This is an integral part of the cladding of the house with facing bricks with insulation. The next question is: what should be the insulation between the brick wall and the facing brick? For this we decided to use free flowing foam, which is sold in bags. Why exactly him, and not sheet polystyrene?
Here's why. The first advantage: if the walls of the building for some reason were not even, then the free-flowing foam will not react in any way when backfilling. But with the sheet you will have to suffer. The second advantage: mice can start in the foam sheet and make themselves a lot of moves and holes. It is impossible to make a move in bulk foam, since mice do not have the ability to climb over it. Raking with their paws, they sharpen like a truck in the mud, staying in place.

Before pouring the foam into the wall, you need to close the gaps around the perimeter of windows and doors with mineral wool or foam sheets. Moreover, the latter is better, since when filling the slopes, it will be easier to apply the putty to the foam.
Note: in order to insulate the walls of a brick house outside in windy weather without incidents, I do not advise you to fill up foam plastic. All the foam will fly around your yard at best, and at worst, even sweep your neighbors.
Stage 6. Final work
Advice: few builders know such a secret, when all the work on insulating the house with bricks will be finished, take the money and buy a couple of canisters of liquid silicone at the construction supermarket. And all brickwork paint thoroughly, especially the seams, they can generally be poured. After drying, a barely noticeable transparent film will remain on the wall. Thanks to it, your home will look like new for 5-10 years longer. If there is not enough money for liquid silicone, then replace it with a deep penetration primer, just remember any streaks on the brick, otherwise after drying you will be in for a very unpleasant surprise. And so, all the work on laying facing bricks and insulating a brick house has been completed. Although such insulation is expensive, it will serve you for many years.
A good owner knows that it will be problematic to keep warm in the house without high-quality insulation. Moreover, today the issue of energy saving is more than acute.
It doesn't matter if you are going to build a house or you already have a finished structure - it needs to be properly insulated.
What can you do in order not to heat the air around the house? The answer is simple - figure out how and how you can insulate the brick walls of your house.
Brick house - pros and cons
The advantages of a brick house
Brick is the most common material used in low-rise construction.
The advantages of using it are as follows:
- no need for external finishing;
- there is no need for periodical renovation of the facade;
- ecological cleanliness. The construction material made from natural ingredients;
- high strength. External influences for a long period of time will not be able to harm the brickwork. True, provided that it is carried out in compliance with all norms;
- lack of efflorescence. Subject to the manufacturing technology;
- lack of limiting factors when planning indoors. Dowels are freely driven into the brick to hang a picture, cornice, etc. It is not difficult to carry out electrical wiring. It is not difficult to dismantle the wall, if necessary;
- regulation of humidity level. The brick provides free air circulation;
- strength;
Note. Strength is marked with the letter "M". For example, M50 means that the material can support up to 50 kg. 1 cm sq. area.
- frost resistance;
Note. This indicator is marked with the letter "F". For example, F50 means that this type of product can withstand up to 50 freeze-thaw cycles.
- Fire safety;
- resistance to the development of microorganisms.
Disadvantages of a brick house
However, such a house has its drawbacks. Among them are the following:
- hygroscopicity. Some types of bricks can absorb water;
- condensation due to temperature differences.
Brick
Views
- Depending on the manufacturing method:
- silicate - is a mixture of sand, lime and various additives;
- ceramic - made from clay. Then it is fired.
- Depending on the nature of the filling:
- corpulent;
- hollow;
- porous.
Note. The more voids, the less the weight of the material and its ability to withstand loads. However, the higher the ability to retain heat.
- Depending on the application:
- construction - for the construction of structures
- facing - for finishing. In turn, it is divided into textured and profile;
- stove or fireclay - for stoves. It is based on refractory clay.
- Depending on the size. The size is regulated by GOST 530-2007 " Ceramic brick and stone ”.
- standard. Size - 250x120x65 mm. Weight - 2.35 kg. Corresponds to the parameters of a human hand. Convenient to work;
- one and a half - 250x120x95. Weight - 3.5 kg.
- double - 50x120x140 mm. Weight - 4.7 kg.
- European - 0.7 standard size;
- modular brick - 1.3 standard size;
- incomplete - 1/2, 3/4 and 1/4 part of the standard.
What influences the choice
The choice is influenced by:
- design load on the structure (walls and foundation);
- operating conditions of the building;
- architectural and aesthetic preferences.
Heat insulating material
Views
Thermal insulation material or insulation is a structural element of a structure that is designed to help retain heat in a room.
Insulation of a brick wall can be performed using various materials.
Depending on the type of feedstock, three types of thermal insulation materials are distinguished:
- Organic. They are made from organic raw materials. These include:
- polymers - expanded polystyrene, polyethylene. They are based on styrene monomer;
- wood waste - chipboard, fiberboard, OSB;
- cellulose - ecowool;
- agricultural waste - straw, reeds.
It should be noted that the popularity of these heaters is limited by the scope (up to 100 o C), low water and bio-resistance, and susceptibility to decomposition.
However, they are quite popular in the event that there is a need for environmentally friendly materials.
Note. Brick walls with organic insulation reduce heat losses slightly compared to inorganic ones.
- Inorganic.
- Soft (fiberglass and mineral or basalt fiber).
- Solid ( cellular concrete (aerated concrete and gas silicate) and foam glass).
- Loose (perlite, vermiculite, aerated concrete gravel).
Used for floor insulation in bulk or for wall insulation - as insulation between brick and foam block or as part of plasters
- Inflatable ( foam spraying).
- Combined - mixtures based on asbestos:
- asbestos cardboard;
- asbestos paper;
- asbestos felt;
Note. The value of the coefficient of thermal conductivity of the insulation is inversely related to the quality of the insulation. The higher it is, the worse the insulation.
What influences the choice
The choice is influenced by:
- wall thickness;
- the type of brick used in construction;
- scope of application;
- the presence of ventilation;
- the presence of insulation from the inside, inside or outside the building;
- region of residence;
Note. Many manufacturers indicate the recommended thickness of insulation for brick walls, taking into account climatic conditions and the region of residence.
- humidity, temperature conditions and their differences;
- the presence, number, size of windows and the material from which they are made;
Note. If on wooden frames you can stuff the film, and thus keep warm. That, insulation plastic windows impossible. It should initially provide for the use of a high-quality profile, at least a two-chamber glass unit, a high-quality and dense rubber gasket. As well as high-quality work on the assembly of these components and the installation of the window unit.
Warming
Views
If you are going to insulate the brickwork at home, you should first decide on which side the insulation will be performed. After all, this has a direct impact on the choice of material.
There are three known ways of using thermal insulation:
- External insulation. In this case, all insulation work will be carried out from the outside of the building.
For outdoor work, it is advisable to use such thermal insulation as:
- mineral wool;
- polystyrene, expanded polystyrene;
- cellular concrete.
Note. Insulation of the chimney of a brick pipe is carried out only with the use of soft thermal insulation, such as glass wool or mineral wool. This makes the job easier. Also, consider the range of temperatures over which some type of soft insulation can be used.
As a rule, a wall sheathed with insulation needs decorative facade work. On the one hand, this will extend the life of the insulation. On the other hand, it will give the building a more aesthetic appearance.
The so-called sandwiches are widespread as materials for decoration - facade panels for brick with insulation. These are multi-layer structures that look like part of a finished brick wall with insulation. Their structure is shown in the photo.
Different materials are used as insulation. The price of the panels depends on the cost of the thermal insulation layer.
Sandwiches are convenient because it is easy to mount them with your own hands, even without having special knowledge in the field of construction and decoration.
Another popular material for exterior decoration is vinyl siding various colors and textures. However, brick siding with insulation is not available on the market, and therefore it needs to be mounted only on an insulated wall.
A video instruction on how to insulate a house with your own hands is presented in other articles on our website.
- Insulation between masonry. This method is used both in the construction of new houses and in the insulation of already built ones.
- Internal insulation.
The most popular materials are polystyrene, expanded polystyrene and cotton wool. And for non-residential buildings and warehouses - foam concrete and aerated concrete.
An example internal insulation there may be insulation of the loggia, which, in fact, is a continuation of the living space. It is important to achieve an optimal balance between the thickness of the thermal insulation and the usable area.
Installation specification
- Solid thermal insulation.
Installation features:
- the plate is attached to the adhesive solution;
- then fixed with a dowel;
- covered with another layer of solution;
- covered with a mesh for reinforcement or fiberglass;
- a layer of plaster is applied
- the surface is painted.
Note. If you do not plan to use plaster, then the amount of work will be reduced. First you need to "put" the sheet on glue, then fix it with a dowel, then proceed to the finishing.
The construction of a brick wall with this type of insulation is shown in the photo.
Output
From the information provided here, you got an idea of how to insulate a brick wall. And which material is best for you. We examined the main types of heaters and the features of their installation. Now you know what the construction of brick walls looks like with different types of insulation.
