Production of monolithic floor slab. Do-it-yourself floor slabs. Drawing and cost of manufacturing the slab. Calculation of a monolithic floor example. What diameter of reinforcement is needed for a monolithic floor.
Concrete or individual blocks, monolithic flooring can be done independently. It must be resistant to vibration and also have fairly impressive strength. This structure can be installed between floors and under the attic. The slab can take on a wide variety of shapes, which eliminates planning restrictions when designing a house.
It should be recalled that this method has the advantage of not requiring any formwork and avoiding the various fractures that can occur in non-ceramic chains. This is not required since the product is included inside the cooker. There are for mezzanines and ceilings, and it will depend on each specific case, the convenience of the solution that is convenient.
Reinforced concrete slab: this monolithic structures from cement, sand, stone and iron armor. They have the advantage that, together with supports, beams and columns, they provide better structural behavior; they can have a thickness lower than other options, on the order of 8-10 cm, depending on the distance between supports. These can be placed in front of the concrete, both electricity and possibly heating. They demand more work force than others because you need to build the formwork and you can have a bottom edge if you want.
Preparatory work
Before starting work, you should know how to install formwork, reinforce it using the reinforcement method, and finish pouring. When it is planned to install a monolithic floor, calculations should be made exclusively for spans within three meters. Other situations are also possible. If we are talking about longer spans, then a monolithic beam floor is used. If you get flooded reinforced concrete floor monolithic type, then you will have to make a reinforced concrete slab, the dimensions of which will be calculated taking into account the design parameters of the building. As an average calculation, you can take into account the value of 1 in 30. This means that for a span of 6 meters, a slab with a thickness of 200 millimeters will be needed.
Pouring formwork with concrete mortar
Slab with beams and bricks: its thickness is greater than concrete, about 18 cm, depending on the distance between the supports. The placement is simple, as concrete beams reach 50 m in length, which are separated every 50 cm by bricks to lighten it, and then concrete with a 5 cm layer. Formwork is eliminated and with suitable fastening and reduced execution time is reduced. Bricks can be ceramic, cement or expanded polystyrene. In the first two cases the performance is similar, but in the latter case the slab can be lightened in addition to some thermal insulation.
Formwork calculation

Before it gets poured monolithic slab floors, it is necessary to calculate the formwork. You can use a specific scheme for this. It takes into account the layout wooden beams formwork and arrangement of telescopic racks. But you can also use the ratio that was presented above.
Monolithic floor slabs for garage
Tiles: Can be light or heavy. Lightweight polystyrene foam tiles: They are lighter in weight and easy to assemble. They have a compression layer with concrete, so if necessary, you will also need to increase the thermal insulation. This may be the underside of the face, as they have good finish. Lightweight concrete bags only: they are 30 cm long and although they are heavier than the previous ones, they also have quick placement. Heavy ledges: These are similar to the last mentioned, but with a width of 60 cm, they must be placed with a tap.
Arrangement of formwork for pouring a monolithic floor
The monolithic ceiling is poured into formwork, which is based on tripods. They allow you to install racks on uneven surfaces.
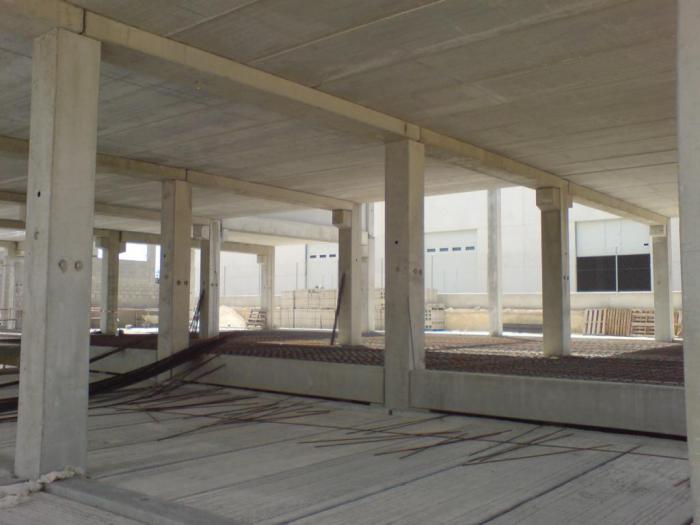
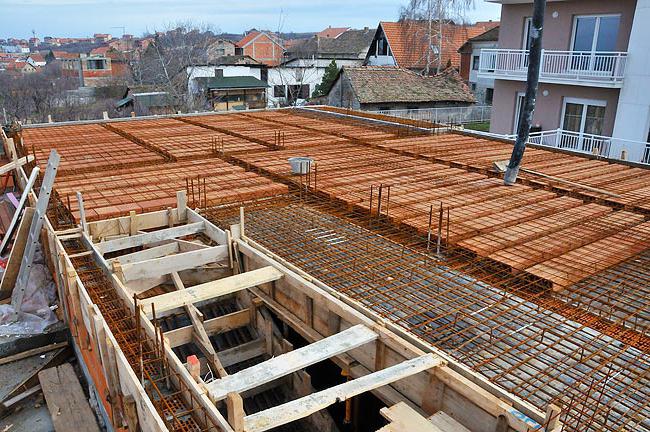
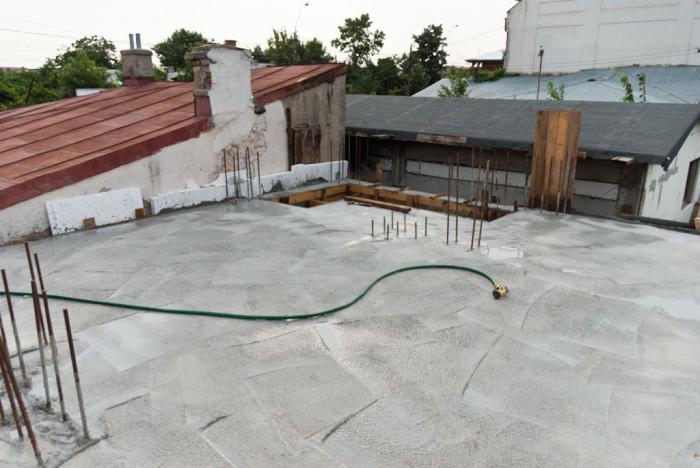
Monolithic flooring should begin to be installed after support posts have been installed over the entire surface of the site. The distance between them is determined according to a scheme that takes into account the load created by the ceiling. In this case, the thickness of the structure is taken into account. A unifork is installed at the upper end of the racks. Longitudinal beams are mounted and secured to the walls. Transverse beams are mounted on top of the beams, which are located lengthwise. The latter are covered with waterproof plywood, which can be replaced with steel panels.
They have the advantage that, if the stands are prepared, the assembly is quick and this saves a great deal of labour. Are you looking to make or redo your home's driveway on the cheap? Do you need to create a driveway, a cheap way for your home?
What is a gravel or turf stabilizer?
Have you thought about road stabilizing slabs? Why use stabilizer plates for your driveway? How much do stabilizing plates cost? Having been operated on a voluntary basis by companies for many years, they are now available to individuals.
The monolithic floor slab must have ideal horizontality, therefore, in the end, the structure must be checked using a building level, and if necessary, the height must be adjusted by adjusting the racks. To prevent leakage cement mortar, which can seep through the cracks, roofing felt should be laid on the formwork flooring. These manipulations must be performed before pouring the solution.
Stabilizing tiles for gravel or grass also play a role - you choose according to your needs and the effect you are looking for! Receive free quotes for garden design. Lateral maneuverability, impossible to roll with light material!
Also, you basically need to smooth out the gravel since your passage created an awakening in it. Even trying to push the gravel out, everything remains stabilized. So gravel isn't expensive, it's easy to install, it's very nice, but without stabilizing slabs it's even less practical.
Floor slab reinforcement
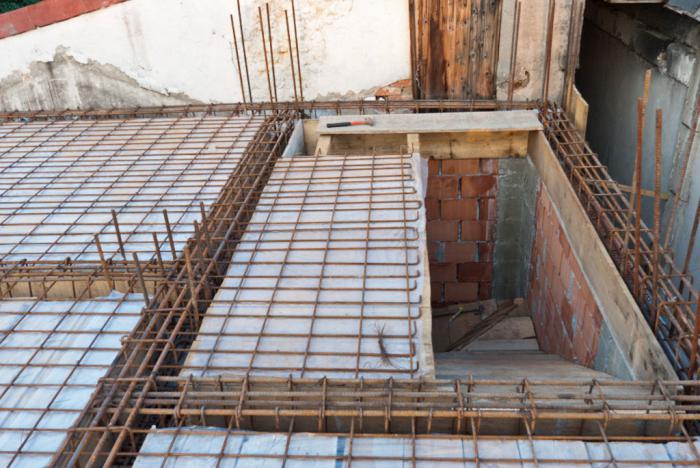
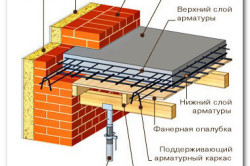
After the calculation is made monolithic ceiling, you can move on to further work. The filling is preceded by a reinforcement procedure. To do this, you should use reinforcement, the diameter of which varies from 8 to 16 millimeters. In this case, the grid cells can be square and have sides equal to 150 or 200 millimeters. After reinforcement mesh will be tied, it must be positioned five centimeters higher in relation to the lower plane of the future slab. Reinforcement with mesh bottom and top parts slabs can be produced using rods that have different diameters.
Requirements and tips for filling walls
Once you have fully mastered your garden, you can consult. To remedy this, there are gravel stabilizing slabs. Passage with stabilizing plates. Before pouring, especially when dry and hot weather, until you give up the Stepok wall.
Caution: Allow the water at the bottom of the wall to drain. Avoid cold casting. If reinforcements are present, absolutely avoid anti-freeze additives. In case of access to the edge of walls up to 1.4 m high, concreting can be done without a pump; directly with the mixer truck chute and, if necessary, with some extensions.
The construction of a monolithic floor quite often involves the use of rods of larger sizes when it comes to lower reinforcement. This is due to the fact that the monolithic slab bends. The reinforcement should be joined with some overlap, while the joints should be spaced apart.
Pouring a monolithic slab
The installation of a monolithic floor at the next stage involves pouring. In this case, there is no way to do without the use of special equipment, which is a concrete pump.
Recommended filling heights. The level of housing provided that they are not armed. Allow reduction of max. Diameter 80 mm, preferably flexible. The pump must provide sufficient flow to ensure continuous pouring of concrete without clogging or jerking.
Direct the flow of concrete onto the cross wall to dampen the fall of the concrete and less to emphasize the underlying blocks. It is best to focus on cross walls penultimate bed to avoid splashes. Make a quick pass around the corners. To fill them, press the folded corners. Concrete slips through its fluidity. This precaution allows the angle of inclination to be reduced and the joints to be tightly closed.
Filling technology
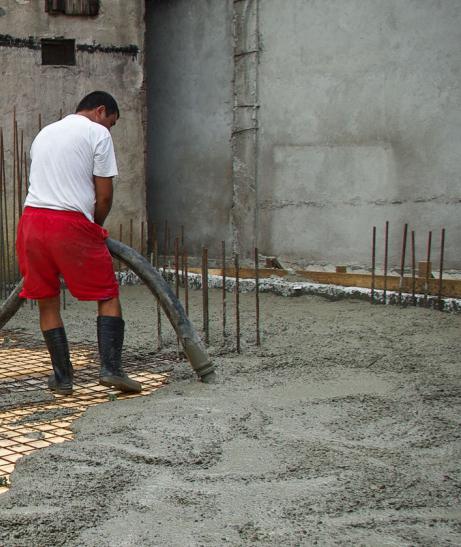
When choosing a brand of material for filling the floor, you should prefer the one determined by the value “400”. The concrete mixture should be poured in layers; the thickness and period of pouring each layer will depend on temperature factors that affect the hardening time. It is important to take into account the depth of vibration treatment. If the mixture is compacted using a manual vibrator, then pouring should be done on 1.25 of its working part. The entire thickness of the monolithic floor must be exposed to this effect. In this case, the deep vibrator must be immersed through the last layer, penetrating 15 centimeters into the depth of the previously laid layer. During the entire pouring process, it is necessary to analyze how intact the formwork remains, as well as its reinforcements and supporting elements. When monolithic reinforced concrete floors are poured, the formwork must be constantly checked for defects. If any, then the submission concrete mixture must be stopped. This will eliminate the occurrence of flaws. Concreting of floors should not be carried out without technological interruptions. In this case, it is necessary to make working seams. They are installed exclusively in those places where there is the smallest bending moment.
Instead of filling the entire wall in one pass, it is best to do 2 passes with partial fills. Follow the person who is guiding the pump hose to the second person who is vibrating the concrete height. Absolutely necessary in the case of an armed wall.
Vibration with a 40 mm needle, 1 time per block, down to the base of the wall. Time 1 or 2 seconds at the bottom of the wall before reassembling the needle. Don't infuse too much pain without having consistent concrete. If there is no wall covering, fill in the last layer of blocks to form a ridge that drains water, thereby preventing penetration into the wall.
Final works
 As soon as the monolithic reinforced concrete floors harden and also gain their strength, which takes about 30 days, the formwork can be dismantled. If the floor of the second floor is being concreted, then even partial dismantling of the formwork racks that hold the floor of the first floor is unacceptable ahead of schedule.
Diagram of a diffuse open perimeter wall
Scheme of the ceiling structure and floor in the attic
Difference between white and gray polystyrene. What is the difference between the white and gray polystyrene you are using. This improved the insulation properties of the entire house. Sulfur polystyrene has 20% better insulating properties.In other words, 100 mm of gray and 120 mm of white are isolated. It is suitable in both urban and rural areas. The size of the house can be increased several times compared to the 600 mm longitudinal module. Offer houses in two panel wall widths. The main feature of the building system is the elevation of the perimeter wall and the truss structure of the purlin system. This leads to great advantages, such as high layout variability, significant freedom of stairs, the possibility of expanding houses several times modulo 600 mm in the longitudinal direction and lowering the usable area of a wooden building.
Features of the work
It is worth noting that pouring a monolithic floor is considered not the easiest and cheapest option to implement, but in the end it is possible to obtain a structure that is distinguished by its versatility and durability. This makes monolithic reinforced concrete flooring the most popular among others.
Houses of this type can be built both on the left and on the right. The main advantages of this are the high variability of the layout solution, significant freedom in the placement of stairs, the possibility of expanding houses several times compared to a 600 mm module in the longitudinal direction and lowering the service block of the house.
Wooden buildings of this type can be built in left and right versions. There is a desire for maximum functionality, clean simple lines and distinctive style. The attic does not decrease along the slope of the roof, so it has the same full-size living space as the first floor.
If installation is done by yourself, then moisture-resistant plywood is used for formwork, the thickness of which should not be less than 2 centimeters. As for formwork boards, this parameter should not be less than 2.5 cm.
When constructing a building, in some cases there is a need to install a reinforcing element, which is called a belt. In this case, a reinforced concrete strip runs along the perimeter of the building and acts as a support for the structure.
The construction system is among the modern ones. The layout is open, modernly designed, with great attention to functionality and usability of the living space. Roof railings allow full use of the attic and add a non-traditional look to the home. The functionality and utility of a wooden building increases the location of the building, taking into account the thermal benefits, on the south, glazed side of the house.
They create a natural relaxation zone and barrier-free interior space. The size of the house can be increased several times compared to a 600 mm long module. The hamburger roof design allows for high layout variability according to the customer's ideas.
In order to raise the mesh during the formation of the reinforcing layer, special stands made of plastic are used. The second layer of mesh should be laid out at the same distance from the top plane of the future structure. To attach two layers of mesh at the required distance, it is necessary to prepare special stands, which are made of reinforcing bars. All mesh layers and elements must be connected to each other with wire.
Fully two-storey house suitable for development. The layout is designed with functionality and ease of use in mind. The minimum built-up area ensures maximum utilization of living space with unlimited comfort. The rooms can be adapted to their purpose on both floors according to the customer's wishes.
They are made of extruded profile, which gives it additional strength. Mats are easy to redraw when necessary. Standard sizes for aluminum masts: 6, 7 or 8 meters. The cheapest and simplest solution for fixing the flag. It is equipped with a cordel that allows you to easily lower and raise the flag. A wave flag in the wind, it is only visible when the wind is blowing.
It is important not only to reinforce the monolithic floor to obtain a reliable structure, but also to moisten it after pouring, which is done within a week. Then constant hydration will no longer be required. However, it is still necessary to control the drying of the surface.
A socket system is used to ground this type of mast. It is used when the mast needs to be installed very quickly and then easily moved from one place to another. 
Don't you know how to install a mast? On the surface, the pipe should be a meter from the ground. Check the vertical position of the tube. Once the cement has set, you can lift the mast and place it on top of the nest.
The mast is designed to allow viewing of flags from any location, not just when the wind blows. The flag rotates in the direction of the wind, which increases the service life of the flag. The flag can be changed by folding the mast using a basic hinge system. 
We offer two types of grounding.
Prefabricated floor slabs
Quite often the ceiling of the basement is made of prefabricated slabs, which are reinforced concrete products, manufactured in a factory. In this case, the calculation of the monolithic floor will not be required. Such structures can be hollow or solid. Installation of prefabricated slabs will not be possible without the use of a truck crane. These slabs have other limitations, for example, expressed in the fact that factories produce structures whose length does not exceed 9 meters. This comes down to the fact that such slabs cannot be used for a basement floor with an impressive area. When laying, the slabs are mounted on a layer of mortar, the thickness of which is within 20 millimeters. After installation is completed, the seams between the elements are cemented. You should not delay these manipulations, as over time the gaps become clogged with debris.
Preparation for construction
Dig a hole with the correct depth and width and fill the concrete hole. good quality.
Basic system with rods. Dig a hole with the correct depth and width and fill the hole with quality concrete. Press the anchor plate with the rods into the cement. To facilitate further adjustments of the mast, it is necessary to leave a free space of 30 mm between the slab and the concrete. Lift the plate of the rod and place it on a support to prevent it from slipping into the concrete. After the concrete has dried, secure the other bracket that is connected to the base of the mast to the rod plate through the crank.
Prefabricated monolithic slabs
Quite often, prefabricated monolithic floors, which contain 4 elements, are also used. It is important to take into account their difference from those described above, which is expressed in the fact that such slabs can be laid without the use of a truck crane. Every master should note this for himself. Installation work you should start by installing reinforced concrete beams and laying blocks between them. The latter are laid out in one row at both ends of the beams. This ensures that the beams can be installed at the required distance from each other. After this, you can begin to work with the remaining blocks. Prefabricated monolithic floors must be reinforced and then concreted.
Comments:
- Conditions for pouring a monolith
- Installation of formwork
- Formwork on racks
- Installation of reinforcement cage
- How to pour concrete
Pouring a floor slab with your own hands is an operation that almost every builder has to perform own home. Despite the fact that the work is labor-intensive, after the device you will receive:
- a flat ceiling surface with no seams;
- slab of any configuration and thickness;
- a durable slab that can withstand high loads and strengthens the overall structure of the house.
Conditions for pouring a monolith
It should be noted that concrete flooring can only be done in buildings with strong walls. Its filling in houses with wooden walls is unacceptable, and in buildings with partitions made of lightweight materials, a monolithic slab can be poured only after installing additional steel or reinforced concrete supports underneath it. In addition, buildings with such platforms must be built on stable soil and a strong foundation. If the building you are constructing does not meet these conditions, you should refuse to fill the floor slab with concrete.
Return to contents
Installation of formwork
Before pouring the ceiling between floors, above the basement, under the attic, etc. you need to build reliable formwork that can withstand the mass of poured concrete. After it hardens, the weight of the monolith will be distributed over the walls on which it will rest. In addition, the reinforcement will give the slab strength, but it will not be able to hold the liquid solution.
So, concreting sites is divided into 3 stages:
- Installation of formwork.
- Construction of a reinforcing grid.
- Pouring the solution.
You need to start with installing the formwork, since it will be necessary to accurately align it horizontally, and doing this after laying the reinforcement will be difficult, and in some cases even impossible.
The formwork structure for a concrete platform is a complex structure, the installation of which is difficult to carry out alone. First, we should talk about an easier version of its device, which the builder can handle on his own. Such formwork can be installed only in rooms with a small area, in which racks are not required to support its central part or 1 row will be sufficient. Such formwork can be installed in rooms where the distance between the walls does not exceed 3 m.
For its construction you will need:

- bars 50x100 mm;
- bars 50x150 mm;
- anchor screws or bolts 10x100 mm;
- self-tapping screws;
- moisture-resistant plywood with a thickness of 18 to 22 mm;
- thick polyethylene film;
- hydraulic level;
- chop cord with chalk;
- roulette;
- perforator;
- drill-driver;
- jigsaw
Please note that the beams of both tiers of the formwork will be laid on edge. Longitudinal (50x100) will be mounted on two opposite (and longer) walls, and transverse (50x150) will be mounted on top of them. When taking measurements, keep in mind that the distance (c) from the longitudinal beams to the ceiling is calculated by the formula: c=a+b (a is the width of the cross beam, b is the thickness of the plywood).
To determine the horizontal line on the walls, use a level, string and chalk. Drill holes for anchors in the longitudinal beams. The step between them is 50 cm. Make marks on the walls and drill holes in them. Secure the bars. Place jumpers on them at a distance of 0.5 m from each other. Additionally, check the horizontal plane with a level and tighten the longitudinal and transverse beams with self-tapping screws. Cover the sheathing with plywood.
Return to contents
Formwork on racks
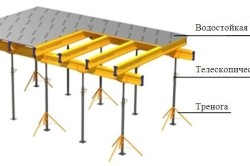
Another way to install formwork is to install it on racks. For them, you can use beams with a cross section of at least 100x100 mm. True, accurate alignment of the horizontal when using such supports will be difficult. In addition, these racks must be additionally reinforced with braces, which must connect the lower and upper parts of adjacent racks so that they are in stable balance. It’s a completely different matter when height-adjustable stands, equipped with tripods for greater stability, are used as supports. If possible, rent these devices.
Installation is carried out as follows:
- The outer rows of supports are installed at a distance of 20 cm from the longer walls.
- The distance between racks in a row is 1 m.
- The distance between rows (longitudinal bars) is no more than 2 m.
- The racks are aligned vertically and along the upper ends.
- Beams are placed and secured on them.
- Cross beams are laid and fastened in increments of no more than 50 cm.
- The level checks the horizontality of the plane under the plywood. If necessary, the height of the racks is calibrated.
- Plywood is being laid.
Now you need to attach the sides of the formwork to it with self-tapping screws. The optimal height of the side panels is the thickness of the ceiling. It should be 1/30 of the span length (the distance between long walls), but not thinner than 15 cm. Don't forget to install fencing in places where there will be openings.
A waterproofing material is placed at the bottom of the formwork. Thanks to it, water will not seep through the seams when laying concrete, and the ceiling will be more even. It should be noted that thin polyethylene is of little use as a waterproofing material. When pouring, it will shift, which will create unnecessary unevenness on the ceiling. You need to use thick film or bitumen roll materials.
Return to contents
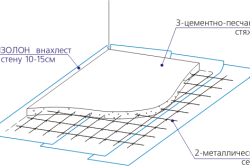
Installation of reinforcement cage
When building a ceiling with your own hands, you should not forget about laying reinforcement, without which its operation is impossible. To create the frame we use:

- reinforcing bars of class A3 with a thickness of 8 to 16 mm;
- binding wire for connecting reinforcement.
The first layer of the frame is laid at a height of at least 1.5 cm from the formwork. The size of its cells is no more than 20x20 cm. It is desirable that the length of each rod is sufficient from wall to wall. If the reinforcement is short, then 2 rods are connected with an overlap exceeding their diameter by 40 times.
The frame will be weakened if the location of the connections of short rods in adjacent rows coincides. It is necessary to ensure that the joints are as far apart from each other as possible. Gaps between the rods are allowed only in the place where an opening is provided in the ceiling. By the way, the reinforcement should border the perimeter of the future hole. Under the remaining edges of the frame there must be bearing structures. The second layer of the monolithic slab frame is laid in the same way. It is located at a certain height above the first one, but the grate must be recessed into the thickness of the concrete at a depth of 1.5-2 cm.
It must be said that steel pipes, laid parallel to each other between 2 frames, will lighten the weight of the monolithic floor slab. Their cross section depends on the distance between the gratings. If both ends of the pipe rest on the walls, the structure will acquire additional rigidity. The pipes should not reach the side panels of the formwork. It is not necessary to use new products to lay them in the frame.
Return to contents
How to pour concrete
To fill the first layer, more liquid concrete is used. It should only spread a little better, but in no case separate. This solution is used for pouring so that the concrete is evenly distributed over the entire surface to be poured.
After this, you can begin pouring the monolithic floor. To do this, prepare a solution whose thickness resembles sour cream. Concrete is poured evenly over the surface to prevent greater load on any area of the formwork. When laying concrete, you need to slightly vibrate it to compact it and remove air cavities (if you don’t have a special tool, use a hoe or shovel). Leave the top layer 2-3 cm thick unfilled and take a break for 1-2 days.
Rate this article:Thank you for your feedback
