Volumetric postcards for May 9. DIY postcard for Victory Day. Necessary materials for a three-dimensional postcard in honor of Victory Day for the competition
Victory Day is approaching, and, as usual, children will congratulate veterans on the holiday, remembering the military battles of 1941-1945. Today's schoolchildren must remember that such a terrible tragedy should never happen again. A beautiful DIY paper May 9th postcard will be a wonderful gift for people who gave peace to the world. Making such a souvenir is not difficult - you just need to follow the steps of the master class step by step. The main decorations of the postcard can be a dove as a symbol of purity, an Order Ribbon, a carnation, a star. In order for 1st grade students to show greater interest in making crafts, the school can hold a competition for the most creative postcard for veterans.
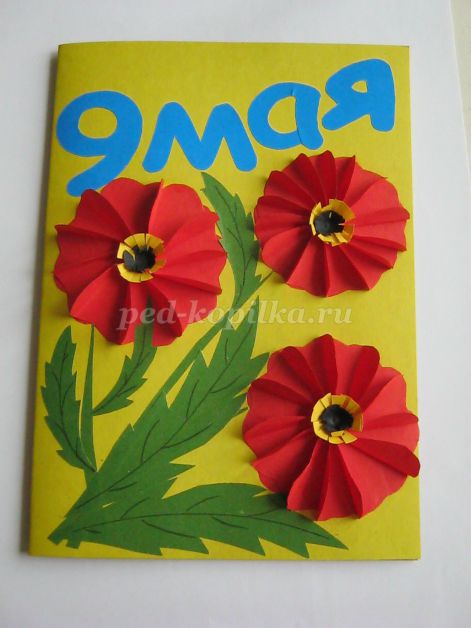
Do-it-yourself voluminous paper postcard for Victory Day on May 9
Do-it-yourself voluminous postcards are always original and unique. By following the recommendations of a master class of professionals on making such crafts, children can make an excellent gift for a veteran themselves. To do this they will need different colored paper, glue, cardboard, scissors, pencils, markers and a little patience.
Postcard with carnations and St. George's ribbon for May 9 - Master class on DIY paper crafts
A postcard made of paper and napkins with carnations and St. George's ribbon will be a wonderful gift for a veteran on May 9th. Making such a souvenir, the child will spend a little more than an hour; but how much joy his surprise will bring to a person who has gone through the war! Adults can help girls and boys by explaining to them where to start and in what order the steps should be performed.
To make this card you will need:
- Cardboard or thick paper;
- Multi-colored paper napkins (red, green and white);
- PVA glue;
- Brush;
- Pencil;
- Scissors;
- Stapler
Step-by-step instructions for making a paper postcard for May 9

Beautiful DIY May 9 postcard for 1st grade
In 1st grade, children already have skills in working with paper, scissors, glue and pencils. That is why it will not be difficult for first-graders to make a small beautiful postcard veterans, congratulating them on Victory Day. The teacher can explain in detail to students step-by-step instructions for creating original gift veterans on May 9, help the guys at the most difficult stages of preparing their surprise for WWII participants.
DIY postcard “Triangular letter” for May 9 - Master class for 1st grade

The postcard, made in the shape of a triangular letter, will remind veterans of the news that so rarely came from home during the battles of World War II. It will take first graders a little over an hour to make it.
Materials for the postcard for May 9 “Triangular letter”
To make such a gift for veterans on Victory Day you will need:
- A sheet of A4 paper;
- Brewed tea;
- Scissors;
- Glue;
- White, pink, red, green paper;
- Pencil;
- George Ribbon;
- Printer or ink pen.
Step-by-step instructions for making a postcard for May 9 “Triangular letter” in 1st grade

A small do-it-yourself postcard for a veteran on May 9th
A small handmade postcard will become the best gift to a veteran on May 9th. To make it, the children will only need multi-colored paper or cardboard, glue, brushes, scissors and other materials at hand, depending on the design of the gift. Among homemade postcards for Victory Day, crafts made from plasticine and paper napkins always stand out. You will find examples of such souvenirs for WWII participants on this page.

Examples of small do-it-yourself postcards for a veteran for Victory Day on May 9
If the guys want to sincerely please the veterans on Victory Day, they can easily do this by giving them homemade cards made with their own hands on the eve of May 9th. Maybe it will be simple beautiful drawing about the battle and victory of our soldiers or a craft made using modern techniques. The text of the congratulatory letter to the participants of the Great Patriotic War can be printed on a printer or written by hand. We present to your attention examples of several unusual postcards. We are sure that such surprises will give warm memories to former frontline soldiers. The variety of materials used to create cards will help you choose a craft to suit your taste.

Step-by-step making of a postcard for Victory Day on May 9 with your own hands
Of course, we are all familiar with the “classic” postcard - this is a thick small sheet of paper on which a thematic design is printed in a typographical way. Souvenirs for Victory Day depict the St. George Ribbon, flowers (usually carnations), photos of soldiers in helmets, etc. Today everyone can make a unique congratulation to a veteran with their own hands. Using cardboard, plasticine, paints and pencils, and applications from multi-colored paper, you can create your own greeting card for May 9th. Follow our recommendations step by step, and you will definitely succeed!

Examples of step-by-step making of postcards for May 9th with your own hands
The choice of material for the step-by-step production of postcards for May 9 is huge today. This is not only paper and cardboard of various colors, textures and thicknesses, but also fabric, silk paints, wrapping paper, wallpaper, clippings from old newspapers and magazines, stickers, etc. In addition, you can decorate the finished craft with your own hands using various accessories ( beads, rhinestones, seed beads, stones), glitter applied to glue, inscriptions pre-printed on a color printer. The main steps in making such a souvenir will be your following actions:
- Choosing a postcard theme;
- Selection of materials for its manufacture;
- Exact following step by step instructions on making crafts with your own hands;
- Final design of the card using voluminous, pre-made parts, sew-on stones, glass beads; congratulatory inscription to veterans.

You will find images of unusual postcards made by yourself here.

DIY children's card for May 9th for a competition
Unlike a stamped card bought in a store, a craft made with love by children’s hands conveys the love and caring attitude experienced by a girl or boy when making such a gift. On the eve of Victory Day, schools can hold a competition for the most interesting postcard for veterans. During craft lessons or after classes, schoolchildren can create a unique thing using only paper, cardboard, paints, natural and improvised materials.

Examples of do-it-yourself children's cards for the competition for May 9
By giving children the creative task of making a postcard for a competition dedicated to Victory Day on May 9, teachers can allow children to choose the design of the gift themselves. However, in order for each child to end up with a beautiful craft that is different from others, teachers must help each student design his souvenir for a veteran. It may be difficult for students to work with some of the selected materials - help the girls and boys realize their idea. Pay attention to the photos of unusual postcards made by children - we have posted them on this page.


Original do-it-yourself May 9 postcards with a dove
Among all the crafts for Victory Day, postcards with a dove are the most popular. The dove is a bird of peace, a symbol of opposition to war, a sign of hope and goodness. The guys make these cards from paper, napkins and feathers. At the same time, a variety of techniques are used to make such surprises for veterans - from regular pattern to complex silk-screen printing and beadwork.
DIY postcard with a dove for May 9th - Master class in making crafts

Making a postcard with a dove is easy - all you need to do is follow the step-by-step instructions below. Such a souvenir will be a real pleasant surprise for veterans who went through the war and will remind them that their feat has not been forgotten.
To make a postcard with a dove, prepare:
- Glue;
- White piece of paper;
- Plastic straw for cocktail;
- St. George's ribbon;
- Felt pen;
- Printer with copier.
Step-by-step instructions for making a postcard with a dove for May 9

Original do-it-yourself postcards for the holiday of May 9 for children
Having decided which card the children will make for veterans on May 9, they will also have to design a homemade envelope for their gift. Let it be as original as the surprise itself, made with your own hands. However, if you wish, you can buy a ready-made envelope in the store and decorate it with St. George’s ribbons, flowers from multi-colored paper, congratulatory inscriptions, and beads.

Examples of original do-it-yourself children's cards for the holiday of May 9
In order for the card for veterans on May 9 to turn out not only original, but also neat, adults should help younger children make such crafts with their own hands. Probably, the child does not yet know how to handle glue or cut out exactly along the contour of an image for a future applique-decoration of a souvenir. It doesn’t matter if you take on the work together with a student. Next time he will make a card himself. See what surprises kids can make for veterans!

Unusual, handmade May 9 postcard with love , will be a wonderful gift for veterans on Victory Day. Materials for crafts can be not only cardboard and paper, but also accessories, improvised means, fabrics, and stones. Explain to the 1st grade children the steps for making a postcard step by step, help the schoolchildren choose a theme for decorating a souvenir - flowers, a dove, a St. George's ribbon. On the eve of the holiday, hold an original postcard competition in your class and reward the winner with a sweet prize.
A grandiose date is approaching - the celebration of the 70th anniversary of the Victory over fascism and the end of the Second World War. The task before us is to convey to our children the history of that war, not to let them forget the horrors of fascism and the heroism of our grandfathers and great-grandfathers.
In addition to stories about the war, reading books and watching films, making postcards and crafts for Victory Day will help instill in children a historical memory. Motherhood.ru offers a selection of crafts for May 9 that you can do with your children.
Simple postcards-applications for Victory Day
Flat cards using the appliqué technique can be made even with younger preschoolers. The subject can be different: a festive fireworks display over the Kremlin, a soldier’s helmet under a branch of a blossoming apple tree, a poster composition with a St. George ribbon, a star and young foliage. Depending on the age of the child, he can be tasked with cutting out parts from colored paper or just gluing them onto a sheet.


Volumetric postcards with applique
You can include interesting details in the plot of the postcard: voluminous carnations, they are made according to the principle, or unusual clouds and sun.


Not a flat, but a voluminous red star - a symbol of the victorious army - looks very advantageous.


You can make such a star according to the following scheme:

The basis for crafts for Victory Day can be not only a landscape sheet. The circular composition made on an old CD looks interesting. The disk holds its shape perfectly, and such a craft can be hung, for example, from a lamp in a room or from a mirror in a car.

Multilayer cards and compositions
A three-dimensional picture can be made from several flat images arranged in several layers with indentation. To create space between the layers, use pieces of thick corrugated cardboard or foam board, and an ordinary candy box can become the frame for the composition.

Straw applique
If you know the technique of applique from straw or birch bark, then you may decide to take on such a serious work as the triptych shown in the photo below. It will take a lot of work and artistic taste, but the result is worth it.

Decorating a postcard with embroidery
Embroidery on paper or cardboard looks very original. For example, the famous fireworks display on Red Square can be decorated in this way. It is better to embroider not on white, but on colored cardboard - this will make the craft for Victory Day more elegant.


A bright craft for Victory Day, embroidered with sequins, perfectly conveys the festive mood.

Stained glass is a complex technique, but the result is very elegant and festive, so it’s worth a try! We select an image for the future stained glass window or draw a sketch. We place it under the glass, degrease the glass surface (you can use a cotton pad with nail polish remover) and outline it with contour paint. Let it dry and gradually apply colors to the glass.

Vytynanka - silhouette paper cutting
Loved by many, it can be used not only in New Year’s decorations, but also in crafts for Victory Day.
You can start with a simpler craft. Here large shapes are cut out of colored paper.

More painstaking work will require cutting out a thematic postcard-panel with inserts of colored paper. First, the main design is applied to the paper and slots are cut out, then colored paper is carefully glued to the bottom side. Depending on the background color, the panel will look different!


You can make a postcard from individual silhouette cutouts and paste them onto the base.


Volumetric crafts made from colored paper
By modeling from colored paper and cardboard, you can create interesting three-dimensional compositions. An excellent themed craft for the holiday would be the Order of the Patriotic War or the Order of Victory.


Kids can be asked to make a very simple plot: Eternal flame made of red and yellow paper, St. George's ribbon and inscription.

Older kids or a group of children can take on making a tank out of cardboard.

Well, for those who feel empowered, we offer an even more complex composition. The subject could be, for example, a monument to fallen soldiers, with an eternal flame, flowers and steps of a staircase leading to the monument.

Crafts for May 9 from plasticine
A real memorial can be made from plasticine. You can complement the sculptural image with a St. George ribbon and inscriptions cut out from last year’s postcard.

Plasticine is a very rewarding material. You can use it to make almost anything you imagine: tanks and planes, monuments to fallen soldiers, paintings and posters with slogans. It can be wrapped in foil or spray painted.


Battle reconstructions
Reconstructions of battles can be performed from the most different materials: clay, plasticine, cardboard and paper and even dough. Working on such compositions helps children deeply feel the stories they read about the war and the films they see.

Drawings about war
Drawings about the war speak volumes: sad ones, with hope for Victory, and joyful ones - with a return home.


Wall newspapers, collages and posters
It is imperative to publish a school wall newspaper for Victory Day. Look at some striking examples of thematic wall newspapers for May 9 and get inspired by ideas!


Making a collage of old historical photographs and letters, reviving them with poems and flowers is a great idea that conveys the atmosphere of the Great Patriotic War to the generation of our children.


A collage postcard is suitable for decorating an assembly hall or stand. Check out two decorating ideas using the same pattern:


You can make your own special military composition on the printed map of military operations. For example, with the famous “Katyusha”.

The article uses photos from the sites:
Alena Rukavishnikova, 4th grade student, MKOUSOSH, p. Kalinino, Malmyzhsky district, Kirov region.
Supervisor: Rukavishnikova Olga Leonidovna, music director of the MKDOU d/s “Kolosok”, p. Kalinino, Malmyzhsky district, Kirov region.
This master class is intended for educators preschool institutions, teachers primary classes, teachers additional education, parents, children of senior preschool and primary school age.
Purpose: gift for veteran
Target: learn how to create paper crafts with your own hands.
Tasks:
- practice using a variety of techniques for working with paper.
- develop imagination, artistic taste in choosing colors, fine motor skills fingers;
- strengthen the ability to select materials for work.
- cultivate a sense of pride for your homeland.
The day is bright and wonderful in the morning,
It blossomed all over with flowers!
We hear the sound of songs,
The holiday has come to our city!
This holiday is known everywhere
Celebrated across the country
They call it Victory Day
People are all over the Earth.
The path to the Great Victory was difficult, long, but heroic. All people, young and old, stood up to defend their Motherland. Many did not return home. We must remember the warrior heroes and civilians who worked during the difficult years of the war, bringing Great Victory. On May 9, at exactly seven o'clock in the evening, a minute of silence begins. At this moment we are silent and think about those who saved the world from the Nazis, about those thanks to whom we now live in a beautiful, peaceful country. In memory of the heroes, we pin the St. George ribbon to our clothes. Saint George the Victorious is the heavenly patron of brave warriors. The colors of the ribbon, black and orange, mean “smoke and flame” and are a sign of the soldier’s personal valor on the battlefield.
The years are going further and further into the past terrible war. But the feat of the people who stood up to defend the Fatherland will live forever in the memory of the Russian people.
The beauty that nature gives us,
The soldiers defended themselves in the fire.
May day of forty-fifth year
Became the last point in the war.
(A. Surkov)
We present to your attention two works. (The difference is in different ways making flowers).


Materials for the first work:
- colored paper
- colored cardboard
- scissors
- glue stick
- pink felt-tip pen
- pencil
- glue brush
- millet cereal
- PVA glue

Step-by-step execution works:
Prepare stencils of numbers, St. George ribbon, flowers

Cut out numbers from red paper - small size, from golden cardboard - larger size

Stick the red number on the gold one.

Cut out a wide strip and two narrow orange strips from black paper for the St. George ribbon.

Glue the orange stripes on top of the black one

Glue the number and ribbon onto the card.

Print the word May on red paper (select one of the styles in WordArt - size 56, no fill), carefully cut it out.

stick to the side of the number 9
Fold a strip of white paper (4-20 cm) like an accordion, draw a flower, cut it out

We arrange flowers
Place a drop of PVA glue in the center of the flower

Pour in the millet, press lightly with your finger,

Pour off the excess millet and carefully adjust the middle.

Use a pink felt-tip pen to draw the stamens, and use scissors to slightly curl the petals.

Glue flowers as shown in the photo or at your discretion.
The work is ready.

Material for making flowers of the second work
- pencil
- stapler
- plasticine yellow color
-pink napkins
- scissors
Step-by-step flower making:
Take a napkin Pink colour(3 layers), stencil around the flowers

fasten the centers of the flowers with a stapler.

“disguise” the stapler clips with pieces of yellow plasticine.

We begin to form a flower by folding each layer of napkin towards the center, slightly creasing the edges with our fingers.

Glue the flowers, the card is ready.

Thank you for your attention!
For the background it is better to use shades of blue and green.
The postcard is designed to express your attention and cheer up the person to whom it is intended. Postcards for Victory Day have acquired particular significance, because with their help we express our gratitude, respect and eternal memory to those who defended our Motherland! We invite you to make festive cards for May 9th with your own hands using various handicraft techniques.
Postcards for May 9 with paper flowers
The easiest way to decorate a postcard, which even small children can handle, is to make an applique from colored paper.
Cards with rainbow carnations
And even a child can do this
Carnations can be easily and simply made from colored paper or napkins.


...and napkins
How to make a carnation incredibly similar to the real one, see the master class ABC TV:

Postcards for May 9 using Quilling technique
Quilling is the art of making paper compositions, voluminous or flat. It involves twisting long pieces of paper into spirals. The resulting spirals or “rolls” can be used to decorate postcards.
It’s worth starting small, studying the basic elements from which the entire composition is formed:


Photo of the main elements of Quilling from the site vscrape.ru.
Having mastered the twisting of the basic elements, you can assemble simple but original postcards from them:

Beautiful inscription made of small elements

And here is a version with an apple tree branch
Before starting work, you need to decide what decoration elements you have available. Perhaps you have old, unused May 9 greeting cards lying around, or you have the opportunity to print out elements to decorate the card.

Strict postcard...

…Darling…

...and retro
A red star can be cut out of cardboard or felt, or a three-dimensional star can be glued together from paper and combined with other elements:

Star with leaves...

...roses...

...Ribbon of St. George...

...and other decor
Even a small wooden airplane clothespin can be used to decorate a card. Everything is very simple and original!

St. George's ribbon made of any materials (fabric, paper) in combination with clippings, floral elements, aged paper will always add brightness and symbolism to the author's postcard:


You can also use a ribbon with the colors of the Russian flag:

You can “scrape” either using glue or sewing elements of your story onto a postcard (on sewing machine or manually):


Battle maps, military documents such as the “Act of Unconditional Surrender” and others will all draw children's attention to our history when creating a holiday card:

He clearly shows how and from what materials to make such a postcard in his master class. MASTER FOREVER:
You can watch how to artificially age military documents or maps in the master class DIY Creative Ideas HANDMADE CRAFTS:
Decorative elements can be anything that reminds us of the Great Patriotic War and Victory Day: camouflage fabric, stars for shoulder straps, small cartridges, patriotic poems, old military letters or artificially aged notes.
In his master class, Podarki.ru shows how to make a scrap card with a gift using camouflage fabric:


Or photos of war heroes, perhaps your close relatives, grandparents...

Don’t forget that May 9 is a holiday, so your postcard can be decorated with joyful moments of Victory Day

Drawn postcards for May 9
If you are good with a brush and paints, as well as colored pencils, you can draw a bright card yourself. For this you can use colored pencils, watercolors or gouache, etc.

First you need to make a sketch using a soft pencil. Next, draw out the main details of the drawing more clearly and begin coloring.

Children's drawing...

...no worse...

...the creations of the masters
Postcards that can be sent by email
Nowadays, you won’t surprise anyone with electronic congratulations. If you want to congratulate someone on e-mail or through social networks, then these cards will perfectly cope with the task:


Happy Victory Day!


Have a good working day everyone! How are you doing? How are you? Today I wanted to please you again and surprise you with something special, in general, I was thinking and decided to start preparing you for the next upcoming event that awaits us all this year, and it will, as always, take place in the last month of spring, namely May 9 .
Yes, this Victory Day smells like gunpowder, this holiday... In general, you understand what I mean. In our previous post, we looked at all kinds of them. And in this one, I want to invite you to create holiday cards that you and your children can easily and quickly complete.
After all, a gift made with your own hands is the most valuable, and especially for veterans. On this day, rallies and concerts will be held throughout the country, and at the end of it all, fireworks will be launched into the sky. Hooray!
Among what I saw on the Internet, I’ll tell you, there are a lot of cool and unique ideas, all of them are good in their own way. And you can make it according to any sample and bring such treasures to school or kindergarten for an exhibition and take a prize.
For example, you can choose a craft in the shape of a star. It is done quite simply, take cardboard as a base, cut it out the desired shape, and then pasted over with self-adhesive sparkling paper. But, and this is not all the decorations you need, they can be any badges or something else, such as rhinestones or scrapbooking devices.

You can even glue a St. George ribbon, it will fit the theme here.

I saw that they even glue coins. It’s up to you, use your imagination to create a masterpiece that will captivate everyone. Don't forget with reverse side make the desired inscription with wishes.
The next option is a very stylish and cool thing, take a look. It is made, or rather its second part is in the shape of a ladder and decorated in this theme. It turned out to be an amazing souvenir.

Or you can also make a card with flowers. By the way, I’m talking about this kind of craft, because on this day you can give not only roses and tulips. In this image you see two symbols of this holiday at once, or rather even three, these are a red star, a ribbon and tulips.

How to make such flowers, and use the origami technique for this. Look here.

And the star too, print the template and bend it along the dotted lines, it will turn out voluminous and very beautiful.

But you can make it not only from paper, but also from other available materials, such as fabric such as felt or beads. Remember in the last article for May 9, I showed you
Keep the small instructions for foamiran, it will be a carnation, which, according to the author, was created in 15 minutes.

You only need 8 petals.

Using an iron, the edges of the petals are slightly curved.

Just get the desired effect.

Secure with glue.

This flower looks like a real one.

Take a look at this miracle from the video.
Now let's focus on a more voluminous option. After all, the symbol of victory is also a white dove. It can also be made from white paper, or rather a napkin or corrugated paper by trimming method.

Take a napkin and make small, I would say small, squares out of it, then circle and draw the bird yourself, attach it to a postcard and draw an outline.

Crumple each square of the workpiece onto a rod, drop a drop of PVA glue onto the tip and attach to the sheet. To create a red flower, fold the napkin several times and clamp the center with a stapler, then cut out a circle.
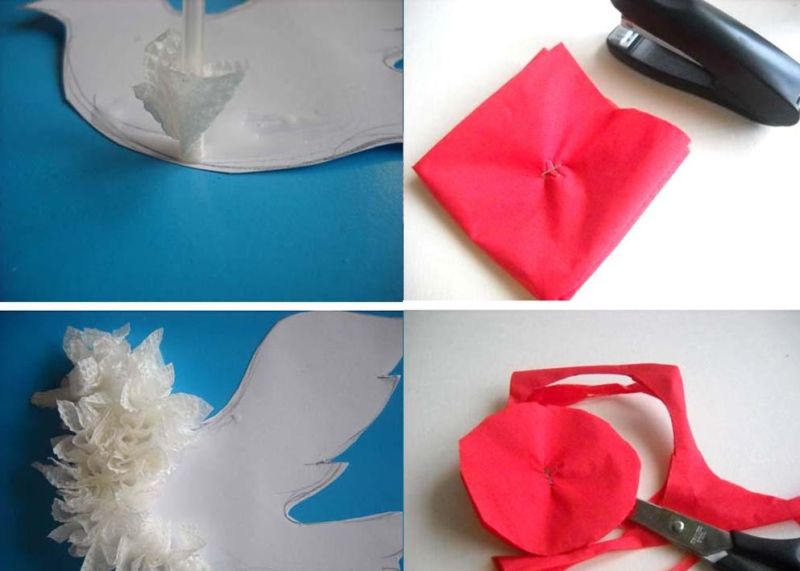
Fluff, while making cuts along the entire diameter of the clove. The petals can be raised a little for volume.

Now all that remains is to create the stem and leaves.

Well, then finish this beautiful work. Look simply wonderful and like spring.

Now I propose to make an antique version. To do this, take a red sheet of paper and make it square.

And roll it up as shown in this picture. You will end up with a five-pointed star.

She's so lovely.

Then copy this blank from your computer and print it on a printer.
Arrange it however you like. And the ribbon with stripes can be assembled.

And glue it in some interesting way using an accordion or a ladder.

Also, if you have decorative staplers and all sorts of things for decoration, you can easily use them here. There would be a desire).

And the last one is such a delicate idea made from corrugated cardboard.

Cool ideas made from paper and cardboard
I want to show products made using the quilling technique, because they really look cool and at the same time unusual, damn cool. Look, it seems like nothing special, but it’s so solemn and festive.


This technique is not very complicated, the main thing is to understand its principle. Those who have encountered it at least once before know that everything is quite simple. The main thing is to want it and everything will work out.

Make the blanks, and then apply them and glue them together.

This is how you can put it in an envelope.

And here, in general, they depicted a tank and flowers and even the sun and clouds. The mood immediately lifted, it turned out to be a fun idea.

Another creation, modest and charming.

As you may have noticed, most of them use carnations.

Original cards for veterans for Victory Day
I think that everyone has at least once thought about and would like to present something so unexpectedly attractive, especially since these are our grandfathers and great-grandfathers, as well as great-grandmothers. Purchase chenille thread and figurines for decorations at a sewing or craft store.

Lay out the symbols of the holiday from wire on a sheet of paper, glue it with special glue like PVA or Momenta.

To make it all bright and reminiscent of real fireworks or salutes, add rhinestones, or so-called scrapbooking devices, they are sold in sets.

And finally, some other little things that will add a little mystery and mystery to this card.

Then, from corrugated paper, or rather cardboard, make such an antique rim and glue it to the base of the text.

It will also be necessary to create the necessary symbols and attributes of this significant event - a number, an eternal flame.

Here's roughly what might happen. Quite interesting and unusual.

You can also make a thing and display on it the military equipment of those times; for this you will need sheets and a printed sample, or rather a printed one.

For example, this is what the template will look like, you can take absolutely any one, with an airplane or even a gun.

Make a frame and decorate it with orange and black ribbon and a star.

It looks cool and healthy, thanks for the ideas to the masters.

Now take a paraffin candle and rub it on a sheet of paper.

And then paint with watercolors.

Let the work dry, attach the child’s hand and trace it, cut it out with scissors.

Cut out squares from colored paper or multi-colored office paper.

Glue the hand onto a suitable background.

And crumple up the squares. What do you think this is all for?

Yes, there will be fireworks or a torch of victory.


This is what happened. Write down the years of the Great Patriotic War.

The best greeting card ideas with flowers
On this day, of course, in most cases, one of the gifts will be flowers, they will be live or in pots. And you can also decorate your wishes with them. How to do it? Watch the next master class and repeat all the steps in these instructions.
We will need:
- colored napkins
- cardboard
- scissors
- pencil

Stages of work:
1. Start with the fact that you will first have to decide on the background of the work. Next, fold a sheet of cardboard in half and glue a white sheet onto one part.

2. Cut small square shapes from a red paper napkin.

3. Roll them into balls, this is how it will look, as if they were crumbs.

4. On the postcard itself, draw an image of victory - this is a star, fireworks and the necessary words.

5. Note that it turns out quickly, easily, and most importantly, so colorful that you can’t even take your eyes off it.


7. Lay out letters from them.

8. Make a snail from napkins of a different color.

9. These snails will make flowers.

10. Lay out the St. George ribbon in the same way.

11. A wonderful plot, and most importantly a very cool gift! Bravo to the author, he's great!

In my last article, I promised to give more detailed instructions for this delightful creation.

Well, cut out circles from corrugated paper, the diameter of which is approximately 5 cm.

Then make a triangle out of the circle, first fold it in half, then fold it in half again. Pinch the sharp corner with a stapler.

Don't forget to cut lengthwise to make petals. Then glue the green stems onto the leaf.

And then the bud heads themselves.

Leaves can also be done in an unusual way, make a notch like this, as shown, due to this the craft will look more voluminous.
We finish with a ribbon in the desired style.

By the way, you can tie a bow from such a ribbon.
Also, if you wish, you can use this diagram and build a three-dimensional view.


Here’s another masterpiece I found on the Internet.

It’s not bad, if you also decorate it with appropriate inscriptions and words, you can also add a poem here, don’t you agree?

Pictures and postcards for free download
Friends, we came up with what I would say is not a labor-intensive option, namely, take ready-made templates and ask your printer to print them). And voila, for this purpose you can also do coloring books, all this will deserve admiration and approval from adults.
The proposed illustrations will help you congratulate your friends and relatives on this day, as well as your elderly and beloved veterans who defended our Motherland through social media, such as Odnoklassniki or VKontakte.


Step-by-step master classes for kindergarten and school children
I’ll probably start with the simplest and easiest product, it turns out bright and solemn. First of all, cut out all the details from colored paper, these are leaves, the flower heads themselves, there will be lilies of the valley and of course the number 9.


It turned out delicious!

Here is another application to help you.


This is what else came out of children's little hands.

Here's another charming masterpiece I caught.

I found a short description.

This was done, as it turned out, using the origami technique.


Maybe someone else will find it useful to have a sample of how military letters used to be folded in the shape of a triangle.


Or maybe the very idea of such a postcard in the form of a field letter is needed. Hold it. This is the background, print it out.

Then fold it as shown here.
Then do the same with the star, crumple along the dotted lines. Or draw a star or other attributes yourself on a sheet of colored paper.


Or the second option.

Ha, I forgot about plasticine. After all, you can also use it to post something cool.

It is also easy to replace plasticine with special modeling dough.


Present in the shape of a three-dimensional star with a template and instructions
On the YouTube channel you will always find what you are looking for, for example, I liked this story, it will definitely suit someone.
I suggest you create quick option, according to a ready-made model. To do this, print out this sample, and then glue it to a sheet of paper and decorate it with rhinestones at your discretion; you can even use cereal and any other items.
By the way, you can glue these two options together and you will get a voluminous beauty, it will be stylish and effective.

I also saw this idea, maybe you will like this look more.


Look what a great idea. Repeat all necessary steps with the blogger.
How to make a postcard for May 9 so that it is not difficult?
You know the answer to this question, I didn’t know, and then I saw a super craft, and you will need colored pencils and a couple of blanks.

So you apply it and draw it with vertical lines, as if painting it, cool.

But when you remove the template it will look smooth and clear.

Wow, how cool it looks.

This is the trick, it’s easy and accessible, especially for children of kindergarten age or primary school.

You can design it differently, or recreate it inside.

The next type is not exactly a vytynanka, but something in between.

Using a sharp cutter or a special knife, cut out the letters and numbers along the contour.

Do the same with pigeons.


You can decorate it with something else, for example, a twig or an eternal flame.


Fold the sheet into a triangle to make a letter-message. Glue the blanks to the corner.

And at the bottom there is a St. George satin ribbon.
Draw a stamp with a gel pen.
Super, and at the same time original.

It was performed by a child who was still a very young talent, look how this girl does everything carefully and slowly.
Children's drawings in a military theme with holiday symbols
Well, it’s impossible to do without drawings on this day, young artists take paints and realize their ideas on the theme of Victory, War and the like. This is what you can depict, if you have absolutely no thoughts on this matter, take a look.


Or if you don’t know how to draw at all, then you can take a coloring book and use a brush or felt-tip pens to add brightness and color to it. Choose.


That's it, dear friends and guests of the blog. I say goodbye and say see you all again. Create, do wonders and please the elderly, take prizes at exhibitions, and most importantly, don’t forget about the most important thing, congratulate all those who defended our Motherland! Good luck to all! Bye!
Sincerely, Ekaterina Mantsurova
