Everything for the school made of paper. Crafts from colored paper. Beautiful basket: paper crafts in stages
In the fall, the world becomes extraordinarily beautiful. And, as a rule, this time inspires everyone to be creative. Children are especially impressionable by this time of year, they want to express their feelings in their crafts and demonstrate what they feel. In creativity lessons, the most popular material for creating crafts is cardboard, as well as colored paper. Therefore, we are in a hurry to present you autumn paper and cardboard crafts for elementary school with templates. We hope that these ideas will definitely be received with "Hurray", and that the schoolchildren themselves will be able to get a great mood from the creation of such products.
Craft ideas on the theme of Autumn from paper and cardboard
If crafts made of cardboard and paper are voluminous, then they are interesting for every child. In this post, we will offer a lot of crafts. Therefore, be bold about choosing and creating what you like.
Unusual autumn leaves.
If you use double-sided colored paper in creating crafts, then you can get attractive leaves.

In this case, the sheet is bent in half and irregular contours are drawn on it in random order. These outlines can mimic a maple leaf or any other. Then, using scissors, cut out the knife and unfold it. The sheet that has turned out must be folded with an accordion with neat movements. Then the accordion is bent in half and the place of the fold is intercepted with an ordinary, but very long strip of paper.
If you make a lot of these leaves, you get an autumn garland.

Vegetables and fruits from paper.

If you use threads, then ordinary cardboard figures will turn out to be voluminous and beautiful. But everything should be told in order.
So, at first, the outlines of vegetables or fruits are drawn on cardboard of any color. Of course, everything is worth cutting out. Now thick yarn is used, which matches the color of the vegetable or fruit.

And so that at the time of wrapping the figure, the threads do not slip off, you need to make small cuts along the edges of the figure. When the figurine is wrapped around, the ends of the yarn are securely fastened.
On a note! If you try to make the layer of yarn thick, you will get a beautiful volumetric figure.

Tuyeski for storing gifts of autumn.

So what kind of autumn paper crafts can you make yourself? And here it is worth saying that there are many options. For example, to store autumn gifts, you can make bright and unusual tuesques. First, prepare the paper. Sheets in yellow, brown and orange will do. If you don't have one, then paper will do. white, which we paint with pencils. Then, it is worth bending the narrow edge of the paper inward.
And on the wide side, parallel notches are made, of which there should be many. At the same time, the distance between them should be 2-3 cm. At the next stage, the sheet is folded from those sides that remain. Then a maple leaf template is cut out of the cardboard. Attach this template to the center of the workpiece, circle it. Now, with a knife, the sheet is cut out on the counter. Glue a transparent colored film to the inside of the workpiece. Collect the canteen and glue its edges together. Then we glue it with scotch tape. Next, the bottom of the tuyeska is outlined on paper and the circle is cut out. Now a strip of paper is cut out of the paper, which will be a pen.
Volumetric paper craft.
All autumn paper crafts that are available here are suitable for children. But the next craft is a little complicated, so only patient kids can do it.

Here you will need thick lumps of colored paper or napkins. But first, autumn leaves are cut out of cardboard. And lumps are formed from napkins and paper. Then they are glued to a piece of cardboard. Little by little it is worth making all the leaves in such lumps. And they are glued to the glue. To make the craft look finished, you need to attach the resulting leaves to a branch.

Autumn lanterns.
We continue to make paper crafts on the autumn theme. Many of us are used to making paper lanterns for the New Year to decorate the Christmas tree. However, if you use paper in bright autumn colors, then colorful lanterns will perfectly decorate the interior of your home. And the kids will definitely do them with pleasure.


Application painting.
Using handy materials, you can make something wonderful. And to create the next crafts, just those are needed. You should use: tree branches, toilet paper base, thick paper and PVA glue.

At first, the cardboard base is slightly flattened so that it can take on the shape of a leaf. Then, using scissors, this base is cut. Cardboard leaves are glued into the holes of this form. Then the whole composition is collected on canvas. It is advisable to use good glue in the work.
Finally
As you can see, paper fall crafts are just wonderful. Therefore, these crafts can be created not only at home, but also at school. In any case, this activity will turn out to be positive.
Material provided by the site - http://www.svoimi-rukamy.com/
Probably all schoolchildren love to do crafts at school and at home. It is worth saying that a wide variety of materials can be used for crafts today. But quite often schoolchildren make crafts from cardboard and colored paper. Why is this happening? Yes, all then, that this is the most best material, which is convenient to work with. Today our article will tell you about what paper crafts exist for schoolchildren. You will definitely like these crafts and you will probably want to make them for some kind of holiday or just for a good mood.
Simple paper crafts for schoolchildren
Applications.
First graders and pupils primary grades, of course, will not be able to make complex crafts. And the teacher should invite them to make easier crafts. For example, you can make cute applications that the guys can give to their mothers or grandmothers. There can be many options for applications. You should just turn on your imagination and try to do something unusual and at the same time cute. The applications are very easy to make. Just see what kind of beauty you can create with your own hands.


Figures from colored paper.
If you want to see all the paper crafts for younger students, then this article will help you do it. In addition to paper appliqués, you can make cute animals. However, in this case, for decoration, it is worth using additional details that will imitate eyes and other parts of the animal's face.


And if your child is not yet a first grader, but is just going to school and it is difficult for him to cut out all the parts exactly, then print a template for him.

You can make caterpillars from strips of colored paper. To do this, use bright colored paper and create such interesting crafts.

See what fun chickens you can make out of bright colored paper.

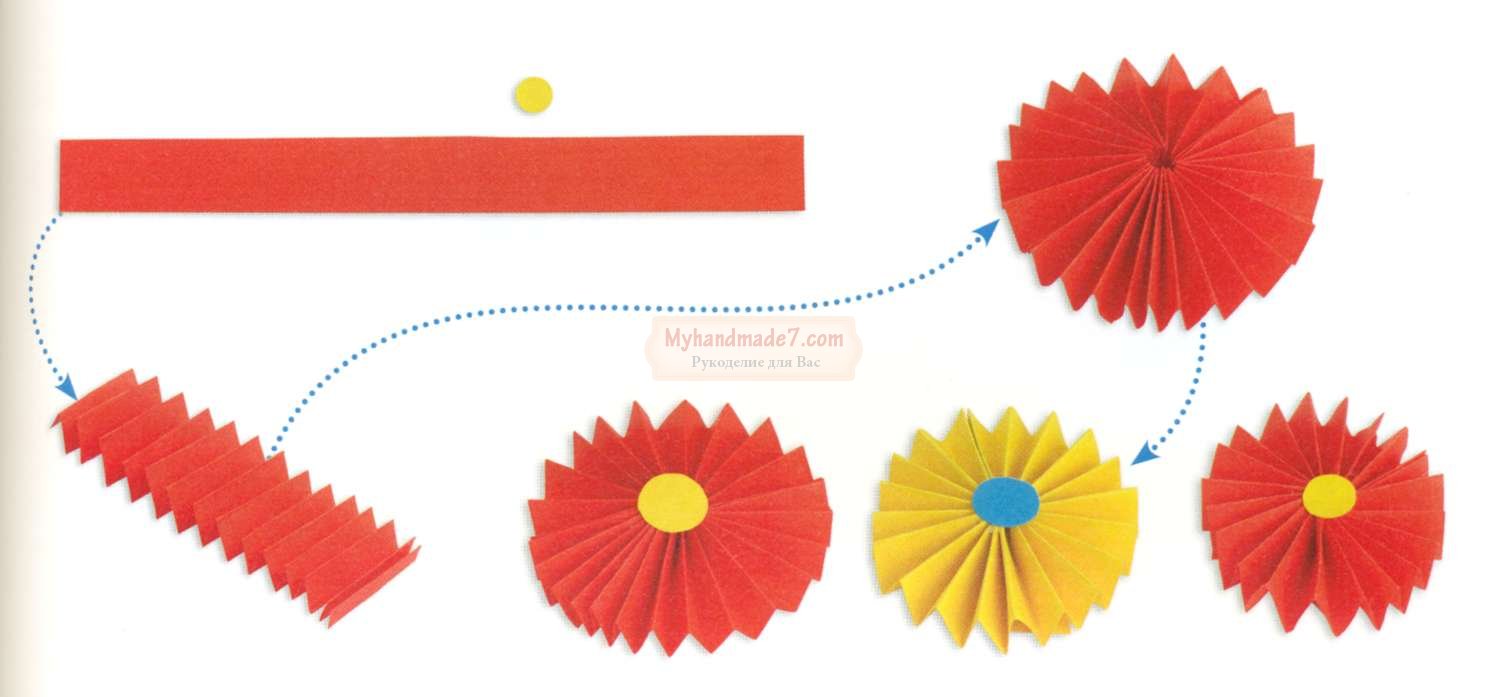
Flowers from colored paper.
And to make such a wonderful craft you need to work hard. However, you will definitely like the result. And if you liked this idea, then we will tell you how to make such a craft.

Progress:
- First, you should prepare several sheets of colored paper.
- After that, according to the templates, it is worth cutting out large and small flowers.
- Once you have selected a pair for each large flower, all the parts are mounted on a flexible and solid rod. WITH back side the flower on the stem should be fixed so that in the future it does not fly off of it.
- And to make your paper flower even prettier, it should be sprayed with perfume.
Autumn time is the most the best time in order to prepare natural material, from which in the future they will be created various crafts... Many schools celebrate today - fall day. And for this holiday, it is customary to make various crafts from natural materials. Indeed, crafts for grade 1 in schools at the beginning of autumn are made mainly from natural materials. Therefore, in our selection of handicrafts for grade 1, you can also find such wonderful handicrafts made from materials that nature has generously rewarded us with. In addition, here you will see other options for crafts that you will definitely want to make.
Crafts for class 1 from natural materials
Look at what a wonderful composition can be made from materials that are lying under our feet in the fall. And for this composition you will have to collect acorns. You will also need PVA glue and a sheet of cardboard, from which you must cut the shape of a regular sheet.

Probably all 1st grade students are familiar with the popular cartoon - Smeshariki. So, these characters can be made from natural materials in a creativity lesson at school. To create this craft, you should only prepare vegetables and plasticine. You may also need felt-tip pens with which you will decorate the characters. Everything looks very funny. Is not it?

Crafts from handy materials
In this article, you will be able to discover crafts for younger students. You can make all these crafts at school in the classroom or at home, for example, for a school exhibition. We all have a lot of unnecessary things at home. And if you have old glass jars lying around at home, then we suggest making them a little brighter.
So, you should prepare:
- a clean glass jar,
- acrylic paints,
- flowers for decoration.
It is very simple to make such a craft. To do this, just paint the jar with acrylic paints. And as soon as the paint dries, you need to write notes on it with a marker. That's all the wonderful vase is ready. You just have to insert flowers into it.

If there are matches at home, then you can make such a picture out of them. Here you will need glue and a piece of cardboard. Get creative and see what you can do.


Crafts from colored paper
Many crafts can be made from colored paper. And therefore, such material is used quite often in classes with schoolchildren. You can make such bright and interesting things from paper. And the diagram will tell you how to do them.


Indian.
To make such an Indian it is worth preparing:
- colored paper: red, yellow and orange;
- toilet paper roll;
- scissors;
- glue;
- a pair of buttons;
- marker;
- a pair of large buttons.

Progress:
- First, a couple of buttons should be glued onto the toilet paper roll. As a result, you get eyes.
- Cut out a triangle from orange paper, which is instead of a beak. And from red paper it is necessary to cut a squiggle, which is glued under the beak.
- Now place your palm and circle it. Then it is worth cutting it out. This palm should be used as a template. And you should cut out a few of these palms. There should be approximately 6 of them.
- Now we glue the palms on the back of the sleeve. And you need to stick it in 2 layers in order to get feathers.
- Finally, we glue 2 large buttons to the bottom of the sleeve, which will be the legs of the craft.
A toy from the hand - a cheerful octopus.
This craft is very easy to do. To work, you need to prepare:
- scissors and pencil;
- glue and colored paper.
Progress:
- First, you should put your palm on a sheet of paper. Then it should be outlined with a simple pencil. Moreover, the fingers are the legs of an octopus.
- Now, with the help of colored paper, it is worth making the face of an octopus.
- Then, out of paper it is worth cutting out a skirt for an octopus girl.

That's all the fun craft is ready.
Finally
Now you have learned about what crafts can be done for school in grade 1. It is worth saying that this is just a part of the crafts. And you can complement these ideas with your creative thinking and imagination.
Today we will learn to do interesting and original paper crafts together with children or for children.
First, let's see what we need for this:
To create crafts we will use different types paper and cardboard:
decoupage napkins on boxes;
a newspaper to create papier-mâché balloons;
old magazines for crafts with beads;
crepe and wrapping paper;
colored double-sided paper;
corrugated and regular cardboard;
paper plates, cardboard tubes, various boxes and much more.
For creativity, the child will need such basic materials and tools as scissors, glue, paints and felt-tip pens.
Do you have a situation where a lot of small necessary items are collected, but there is nowhere to put them? Let's make a funny pocket that will fit everything and which you can hang in a conspicuous place.
Paper crafts for kids: USEFUL POCKET
What you need:
colored paper
pencil
lace scissors glue
Sequence of work:
Draw the outline of an animal's face, such as a bear.
Cut out two such shapes along the contour. Make details for the ears and nose as shown in the photo.

Apply glue around the edge, connect the parts to make a pocket inside. Punch two holes.

Glue the ears and nose. Pull in the ribbon for hanging.

This pocket is perfect for storing small items: hairpins, combs or office supplies.

Paper Crafts for Kids: RACE RIDE
Did you know that you can make unusual racing cars with your own hands? Let's create them and have a real ride. I wonder which car will win?
What you need:
cardboard tubes of paint, markers
colored paper, cardboard
scissors glue
Sequence of work:
Paint the straws in bright colors.

Cut out parts for cars from colored and white paper (for wheels it is better to take black cardboard - then your "car" will stand firmly). Use a felt-tip pen to draw what you need.

Make a hole in the tube as shown in the picture (you can ask an adult for help).

Now glue all the details. Wait until it dries up - and go ahead, play!

Paper crafts for kids: PAPIER MACHE BALLOONS
Who doesn't dream of flying in a hot air balloon? Someday you will definitely do it. Now let's try to make an unusual balloon from an ordinary newspaper.
What you need:
glue bead
needle knitting needle
cream paint
Sequence of work:
Inflate the balloon, grease it with any cream. Prepare a newspaper for crafts - for this you need to tear it into small pieces. Wetting them in water, glue the ball over so that there is no gap.

Now apply a layer of glue to the ball and glue it again with pieces of newspaper soaked in water - this is how you need to make 2-3 layers. You may need the help of an adult.

When the ball is completely dry (for this you will need to wait 1-2 days), pierce it with a needle - we do not need it now - and cut the ball, as shown in the photo.

Now paint the balloon with paints.

Now let's make a basket. To do this, the newspaper sheet was divided into 4 parts to get rectangular blanks. Then, starting from the bottom corner, roll the newspaper into a tube with a knitting needle, and glue the tip.

Take 5 tubes and put them side by side, and stretch the sixth across under the first, over the second, under the third, etc., alternating. The next tube needs to be woven the other way around: what was below will be on top.

To secure our base, take one tube and weave it around, also passing it between the other tubes through one.

Now you can make the basket itself: for this, bend all the ends up and start weaving them around the same way as you did before. Weave 4 rows.

Weave the unnecessary ends on top and glue, some you can just cut off. Color the basket with gouache.

Make holes at the bottom of the ball and use the thread to secure the basket. The balloon is ready!

FUNNY ANIMALS
It turns out that you can quickly and easily make yourself a striped friend. And to be able to play with friends, let's find out how to make not only a tiger, but other animals as well.
What you need:
colored paper
scissors glue
Sequence of work:
Take a sheet of colored paper and fold it as shown in the picture. Glue the ends together to form a strip.

Fold the strip like an accordion in three places to form the letter "M".

Cut out blanks from colored paper for an animal.

Glue the blanks to the base. Ready! You've got a tiger.

HOME THEATER
What if you put on a real theater in your home? It will be possible to invite adults to the play and show them some fairy tale, for example, "Kolobok". I think they will definitely appreciate your skill!
What you need:
colored paper compass scissors glue
markers stick
Sequence of work:
Draw a blank on a sheet of colored paper, as shown in the photo.

Cut out the workpiece and glue.

Cut out colored paper base for an animal
Glue the parts to the base. Look who we got

Take your favorite animal fairy tale as a basis and make all the characters out of paper. If sticks are glued to the blanks, it will be possible to show the performance from behind the screen, as in a puppet theater.
Paper crafts for kids: FUNNY TRACKS AND SPIDERS
Have you ever seen a real spider? And the caterpillar? Let's make funny animals with furry legs out of a cardboard egg box. They will look real!
What you need:
egg carton
scissors glue
colored paper
wire
Sequence of work:
Cut out blanks from a cardboard box: for caterpillars three cells, for bugs and spiders - one.

Color the blanks with gouache.

Prepare the details for the animals: cut out the eyes from colored paper, make the legs from fluffy wire.
Make holes in the workpieces and push the legs. Then glue the eyes.

Try to do them the same way.

AMAZING MASCARADE
You can celebrate your birthday in an extraordinary way with a masquerade. Invite your friends and let everyone make themselves an animal mask. It will be fun!
What you need:
cardboard plates
colored cardboard and paper
scissors elastic
Sequence of work:
Color the plate blue.

Cut out the ears and paint them too.

Prepare bunny details from colored paper.
Cut out the holes for the eyes and glue the details as shown.


PAPER BEADS
What girl doesn't love jewelry? Let's try to make beads from old magazines. You will get bright ones that you can wear with your favorite dress or give your mom.
Sequence of work:
Cut out details from a magazine sheet: strips about 1 cm wide and elongated triangles.

Wrap the blanks on a knitting needle - these will be paper beads. Glue the tip well.

Make as many beads as you need for the whole piece. Take a needle and thread and carefully thread all the beads.

It's so easy to make unusual ones: original multi-colored beads, bright bracelets. You can even give them to someone: what girl would refuse such beauty ?!
Paper Crafts for Kids: JEWELRY FOR PRINCESSES
All girls dream of becoming real princesses. And what kind of princess is without a crown? Let's make it out of a regular cardboard roll.
What you need:
cardboard tubes of paint
colored paper
scissors elastic
Sequence of work:
Cut the crown out of the roll. You can do a few things.

Color the blanks in different colors.

Decorate the crowns. To do this, you can use beads, ribbons and strings.
Punch holes in the sides and thread through the elastic so that the crown can be worn.

You can make an adornment for a real princess from an ordinary hoop: use colored paper to turn it into a beautiful tiara.
Paper crafts for kids: TOY CABINET
Probably, like all children, you have a lot. Sometimes there are so many of them that it becomes difficult to fold neatly. Let's make a nice little toy storage cabinet.
What you need:
boxes of different sizes
gouache white
napkins with a pattern
stationery knife
brush handle
Sequence of work:
Paint the boxes with white so that the pictures and text on them do not show through.

Glue the box on all sides with a napkin. To do this, put it on the box, pressing along the edges, and using a brush, apply a thick layer of glue on top so that it sticks.

Cut out the doors with a clerical knife - here you need the help of an adult. Superglue the handles and glue the boxes together to create a cabinet.
Everything! Our dresser is ready. Now you can put your toys there. Here mom will be delighted when she sees what order you have!

CREATIVE BOX
Do you like to draw? Or maybe you like to cut or tinker something? This is great! Let's make a creative box bag where you can put everything you need to get creative.
What you need:
shoebox
wrapping
colored paper
glue lace
Sequence of work:
Glue the box and lid on all sides. If it's hard for you, ask an adult about it.

Make the blanks inside the box. At the bottom of a sheet of colored paper folded in half, make a cut to the middle, as shown in the photo. Two blanks of the same length as the width of the box, cut from top to middle.

Insert the blanks into each other and place them in the box - these will be the compartments of our bag.
Make holes on the sides of the box so that they are level so that you can close the box with a lid. Make the handles of the same length from the cord so that the box is easy to hold in your hand.

HANDMADE PHOTO ALBUMS
Where did you go on vacation the last time? Maybe it was a trip to the sea with your parents or a vacation in the village with your grandmother? You probably have some memorable photos. Let's make a photo album for them in the form of a suitcase.
What you need:
colored paper and cardboard
hole punch scissors lace
Sequence of work:
For a photo album cover, take a sheet of colored cardboard and fold it in half.

For the pages, take sheets of double-sided paper of different colors and fold in half as well.

Now connect the cover and the pages to each other: for this, put everything together and make holes on the side with a hole punch. Tie the sheets with a string or string.

Cut out the parts for the suitcase from colored cardboard and glue them to the photo album.


Paper Crafts for Kids: FUNNY BOOKMARKS
What's your favorite book? Or maybe there are several of them? It's great that you love to read. Let's make an interesting bookmark for the book.
What you need:
colored paper
Sequence of work:
Draw three squares with a ruler on a sheet of colored paper, as shown in the photo. You will not need the triangles that are filled in.

Cut out the workpiece.

And her, as shown in the photo: first bend on inner corner, then on top of it another. Glue them together. Cut out details from colored paper.

It turned out great, right? Now you can easily find the place in the book where you finished reading. You can also make a bookmark in the form of another animal, for example, a dinosaur with sharp teeth.

CARDBOARD BAG
Do you know how you can make a bright bag out of an ordinary box? Very simple! Let's dream up and make a handbag that you can take outside in sunny weather.
What you need:
cereal box
colored paper
scissors glue
Sequence of work:
Color the box with gouache.

Cut out a bag with handles from the box. An adult's help may be needed here.

Cut a strip and a circle out of colored paper - this will be the core of the flower. Fold the strip with an accordion and glue the ends. To keep the flower, stick it on a small square. Glue the core on top.
For butterflies, cut out blanks from 1 colored paper. To make the figure three-dimensional, you need to make 5-6 identical parts. Glue them together in the middle. Glue all parts to the box.

DIY paper crafts: stand for quarantines
Do you want to make a present for a friend, but do not know what to choose? Don't be upset, I have an idea! Make an original stationery stand out of an ordinary cardboard box. Your friend will definitely like this gift!
What you need:
boxes
equal width
white and colored paper, cardboard
adhesive tape
Sequence of work:
Build a ship out of boxes: cut off the lids and trim them to height. Make the bow of the ship and pipes out of cardboard.

Paste over every detail with colored paper inside and out.

Cut out and glue the windows, lifebuoy, steering wheel, anchor.

Glue the boxes together and glue them to the base cut along the contour.

APPLIQUE WITH PUZZLES
Do you have unnecessary jigsaw puzzles in which you have already lost a lot of details? I have an idea how you can apply them. Let's make an amazingly colorful applique with autumn leaves.
What you need:
unnecessary crepe paper puzzles
paint glue
Sequence of work:
Color the puzzles in the colors of bright autumn leaves: yellow, orange, red.

From crepe paper cut out a brown rectangle - this will be the trunk of the tree - and make the grass green.

Glue the brown blank in the form of a barrel: for this, somewhere you need to squeeze the paper in layers, and somewhere to straighten it.
Use the prepared puzzle pieces to make a crown of a tree. Also glue several layers of weed to make it volumetric.


Paper crafts for children: VOLUME PICTURE
Do you want to make a volumetric applique? It's not difficult at all! You will get a real painting that can be presented to your grandparents.
What you need:
candy box
corrugated cardboard
double adhesive tape
Sequence of work:
Cut out the necessary details for the picture from corrugated cardboard.

Stick the first layer of applique on the bottom of the box - whatever will be in the background.
Other details are pasted on top.

What's the beautiful! It turned out to be real three-dimensional picture... In this way, you can make a city where there are cottages and high-rise buildings, or the underwater world with shells, algae and fish.

BOUQUET IN A CARD
Do you want to give your mom unusual flowers? Let's make a postcard-bouquet from colored paper. Trust me, she'll love it.
What you need:
double-sided colored paper
scissors ribbon
Sequence of work:
Draw a blank on a sheet of colored paper, as shown in the figure.

Cut out the workpiece and separate the triangle.
Glue the small triangle underneath and fold the large piece as shown.

Draw and then cut flowers of different sizes and colors. Make leaves for the bouquet.

Glue flowers in the form of a bouquet inside our card, tie the bottom with a ribbon.


3D CARDS
Surely you watched a cartoon in 3D and noticed how characters come to life in a three-dimensional image. It turns out that making objects three-dimensional is quite simple. Let's try to make a postcard with a 3D effect.
What you need:
colored cardboard, double-sided colored paper
scissors ribbon
Sequence of work:
Take two sheets folded in half: one of cardboard, the other of colored paper.

On a sheet of colored paper, make cuts on the side of the fold, as shown in the photo. You should get 3 even squares of different sizes.

Now what you cut, push forward and inward. You should get a ladder, as if from boxes.
Stick the blank on a sheet of colored cardboard. Decorate the boxes: glue colored paper and ribbons.

By this principle, you can make a postcard with balloons

POST-CARD WITH PADS
Do you want to make another unusual postcard? You don't need anything special for this: just a sheet of colored paper and cardboard, scissors, glue and your wonderful pens.
What you need:
colored cardboard and paper
Sequence of work:
Trace your palm on a piece of cardboard.

Cut out the workpiece with scissors. You will need two such details.
Cut a strip out of colored paper and fold it like an accordion.

Glue one end of the accordion to one "hand" and the other to the other. Cut out from colored paper or write congratulations with felt-tip pens.

ENVELOPE
Do you know how to decorate a small present? You don't have to be an adult to do this, and you don't need any special devices. Repeat after me, and you will definitely succeed!
What you need:
colored paper glue
ribbon
Sequence of work:
Draw 4 identical circles on a piece of colored paper. This is easy to do if you take a mug, put it upside down and circle it.

Cut out the circles and fold them in half.

Glue the circles together as shown.

Bend the loose halves of the circles so that one is on top of the other. Then take the lower one up from one side.

SWEET GIFT
Have you ever seen a candy-shaped gift? Maybe you were given something similar? Let's make such a surprise, and you can "treat" someone to them.
What you need:
cardboard tube
wrapping paper glue
scissors ribbon
Sequence of work:
Cut from wrapping paper square. It should be larger than the cardboard tube in size.

Cover the tube with paper. Tie a ribbon around one end of the candy.

Fold the candy into a present and tie the other end.
3D FIGURES
Have you ever wanted to decorate your room in an unusual way? Let's make three-dimensional decorative figures out of colored paper. They can be put on a bedside table or hung on a string from a chandelier.
What you need:
colored paper glue
scissors ribbon
Sequence of work:
Draw a half of an apple on a sheet of colored paper folded in half, as shown in the photo.

Cut out the workpiece and, using it as a template, make 5 such copies. Additionally, cut out the details for the apple.

Glue the workpiece together, as shown in the photo.

Glue the rest of the details.

Fruits and vegetables can be anything!
Crafts from cardboard and paper: bright flowers
Do you want to grow bright flowers on your window? Let's make them out of cardboard tubes, but so that no one will guess what material they are from.
What you need:
cardboard tubes of paint
colored paper glue
scissors skewers
Sequence of work:
Make cuts on both sides of the tube so that they do not reach the middle.

Color the tubes in different colors.

When the blanks are dry, spread the petals as shown in the photo.
Glue the centers cut from colored paper.

Glue the skewer with colored paper, cut out the leaves.
Connect all the details. Use a skewer to make a hole in the core of the flower.
Such a flower can be put in a vase and presented to someone.

FRAME FROM UNUSUAL FLOWERS
Do you have a boring one-color frame at home? Let's make a real masterpiece out of it!
What you need:
egg carton
scissors glue
Sequence of work:
Cut out the blanks of the petals from the cells of the cardboard box, as in the picture.

Color them in one color. You should have 15-18 such sets of different colors (depending on the size of the frame).

Glue the petals together in the middle, press down carefully and let them dry.
Glue the flowers to the frame. You won't be able to attach everything at once, so do it in stages and wait until everything is dry.

The frame is ready. Now you can insert your favorite photo into it.
CUTE CACTUS
How do you like such a cute cactus? It is completely safe for children, because the thorns are drawn on it. Let's make such a cactus and put it on the windowsill.
What you need:
markers
Sequence of work:
Draw a potted cactus on cardboard.

Color the picture on both sides and make another one exactly the same.

Make cuts: on one cactus from bottom to middle, and on the second from top to middle.

Insert the blanks into each other. The cactus is ready.
In the same way, you can make a rocket or a bear cub.
COLORED LIGHTS
Do you have a birthday soon and want to decorate the room to make it festive and beautiful? Then let's make some unusual colored lanterns.
What you need:
toilet paper rolls
crepe paper
ribbons
scissors glue
Sequence of work:
Cut a square out of crepe paper and glue one side of the tube over.

Make crepe paper blanks: cut out strips and make cuts on one side along the entire length.

Begin to glue the tube from the bottom. You should have a skirt like in the photo.
Thus, glue over the entire flashlight. Make holes on the top on the sides and thread a ribbon through them so that the craft can be hung.

Such lanterns can be not only a decoration, but also a useful thing. For example, at a holiday, you can arrange a game with prizes: hang lanterns on a rope and put something valuable in them, gluing the bottom. Each blindfolded guest should cut off his gift with scissors.

ROOM DECORATION
Do you dream of having a bird? Of course, nothing beats the real one, but still an extraordinary and beautiful bird can be made from ordinary colored paper. See how it's done.
What you need:
double-sided colored paper
crepe paper scissors
ribbons
wire
Sequence of work:
Draw the silhouettes of the birds on a piece of paper.

Cut them out. Make some of these blanks. They should be of different colors.

Make wings out of crepe paper: for this, cut out rectangles of different colors and fold them like an accordion.
In the blanks of the birds, make cuts and insert the wings there. Tie ribbons to the figures and hang them on a circle made of wire.
Fast navigation through the article
Making paper crafts with your own hands is a simple, inexpensive and very interesting activity for both children and parents. All you need is paper, scissors, glue, and some cool ideas. In this material you will find 7 step-by-step master classes on needlework from different types of paper and 50 photo ideas for your inspiration.
Idea 1. Volumetric crafts
We offer the smallest needlewomen to make a simple volumetric paper craft in the form of such a cat.

Materials:
- A4 sheet of paper;
- Scissors;
- Glue.
Instructions:
- Download and print the template (see the cat template below) on white or colored paper;
- Cut out the template with scissors, and then make 4 cuts in it along the outlined solid lines;
- Bend your neck along the markings with an accordion and twist the ponytail;
- Bend the dashed fold lines on the legs and glue them to the cardboard.
For older children, there is a more difficult task, namely a master class on making a volumetric paper craft in the form of a bird.

Instructions:
Step 1. Download and print the layout diagram (see below). Note that the file contains a colorless template so you can print it on colored paper.
Step 2. Cut all the pieces exactly along the solid lines using a breadboard knife.
Step 3. Fold all the fold lines according to the principle: bold dotted line = fold inward, thin dotted line = fold outward.
Step 4. Glue the parts together by glueing their corners (with the words Glue). Stick to the following order:
- First glue the beak to one side of the bird, then to the other.

- Glue the back of the bird starting from the beak, as shown in the photo.

- Glue the wings.

- Now take the part, which is the poultry breast, and at one end, fold and glue the triangle as shown in the photo.


- Assemble the legs, make sure the knees are at a 90 degree angle, then glue the legs to them.

- Well, that's all, it remains only to glue the legs to the body and your volumetric paper craft is ready. If you wish, you can make a whole flock of such birds in different colors with your own hands.


Idea 2. Wall panels, paintings and applications
It is known that you can draw not only with paints on paper, but also ... with paper on paper. Such classes are no less exciting and useful for the development of hand-eye coordination, fine motor skills, perseverance, the ability to plan their work, to combine colors, shapes and materials.
The next selection of photos presents ideas for paintings, panels and paper applications for children of different difficulty levels.


By the way, an applique can be made of parts of the same shape, but different sizes and colors. These can be circles or hearts. The next slider shows examples of such paper crafts and schemes for their manufacture.


Here are some more examples. interesting crafts from paper of different types.

Now we offer you to get acquainted with a master class on making an original, but very light paper craft. We have no doubt that such cute figures will help instill an interest in reading books in your child.


Materials:
- 1 sheet of colored A4 paper;
- 1 sheet of A4 white paper;
- Scissors;
- Glue stick;
- Markers, pencils and paints.
Instructions:
Step 1. Bend one half of a white A4 sheet in half and let the child draw on it the cover of his favorite book on his own, also signing the title and the name of the author.
Step 2. Cut three long strips from a colored sheet about 2.5 cm wide. You will have 4 parts: 2 stripes for the legs, 1 stripe for two arms and one rectangle to create the body of the figurine.

Step 3. Take two strips (for the legs), fold them like an accordion, and then glue them to the body-rectangle.
Step 4. Divide the remaining long strip into two equal parts, draw fingers at the ends and glue to the body.
Step 5. Bend upper part figurines on the front side and make her bangs using scissors as shown in the photo.

Step 6. Cut out circles from the remaining half of the white sheet and glue them on the figure as if they were glasses.
Step 7. Draw the details of the eyes, mouth, nose and temples of the glasses with black marker.
Step 8. Now glue the book to the hands of the figurine and finally place it on the table or hang it on the wall, for example, near a bookshelf.

Idea 3. Hats
All children love transformation games and for this they use everything that comes to hand. To provide your child with props, you can make fancy hats with him. By the way, such colored paper crafts can be made for one or several children for a performance, masquerade, themed birthday or any fancy-dress party. In the next selection of photos, you can see examples of a wide variety of paper "hats" - from pirate cocked hats to wigs.


Today we invite you and your baby to make a hat in the shape of a dinosaur head. This master class is so simple that a child from the age of 3 will need very little help from you.

Materials:
- 3 sheets of colored paper;
- Glue stick or PVA;
- Scotch;
- Scissors.
Instructions:
Step 1. Cut 4 strips about 3 cm wide along the long side of the sheet of paper. Two of these strips will turn into a headband, and the other two - into “cap” crossbars, on which the dinosaur spikes will stick.

Step 2. Take two other sheets of paper and cut them into strips about 5 cm wide along the short side of the paper. You can measure and cut stripes by eye, but in the end you should get 5 strips from each sheet. We need these blanks to make thorns.

Step 3. Fold each blank for the thorns in half and, stepping back about 1.5 cm from the fold, draw a marking in the form of a triangle up to the very edge (see photo). Next, just cut out the future spikes.

Step 4. Glue two strips-crossbars, and then glue spikes on them in a row as shown in the photo below.

Step 5. While the glue is drying, adjust the two pieces of the headband to fit the circumference of the child's head, and then use tape to join them in a circle.
Step 6. Now let's go back to the spikes. Turn the crossbar over so that the spikes are on the table and bend each of them well (see photo). Form the first spike: cover one side with glue and connect it to the other. Use paper clips to hold the spike in place until the glue dries. Repeat these steps for the rest of the pins.

Step 7. After the glue is dry, remove the staples from the cleats and simply glue the crossbar to the headband at the front and back.

Idea 4. Toy figurines from toilet paper rolls
Toilet paper rolls are great kid's craft blanks that only need a little embellishment. For example, you can make such wonderful toys from them.


