How to burn a multiboot disc from an iso image. If the operating system crashes: create a bootable Windows XP disk. Types of boot disks
The need to install or reinstall an operating system on a computer may arise at any time. In this case, it will be very helpful to have a bootable USB flash drive or disk on hand. The site already has an article on how to create a bootable USB flash drive. But keep in mind that you may need to reformat it to write other data, or you simply lose it.
If your computer or laptop has a DWD-RW drive, then it would be an excellent option to have a bootable disk with the required operating system at home, just in case. In this article, we will look at how to create a bootable Windows disk using various programs.
To create it, you need a computer with a working operating system, the disc itself, the volume of which must be larger than the files you have that you are going to copy. You will also need a burning utility and an image of the operating system you want to burn. A suitable program can be downloaded from the Internet, preferably from the official sites. The system image can be downloaded via torrent, most likely, it will be a file with the .iso extension.
Using Astroburn Lite Utility
So let's make a Windows boot disk using Astroburn Lite. You can read about Astroburn Lite and its installation on your computer by following the link. Insert the disc into the drive and launch Astroburn Lite by clicking on the corresponding shortcut on the desktop.
In the main window, go to the "Image" tab and in front of the "Image" field, click on the "Browse" magnifying glass.
Using Explorer, find the folder on your computer where you have a suitable ISO file, click on it with the mouse and click "Open".

In the "Speed" field, select the speed for recording. Here it is better to choose the smallest value from the list.
I don't have an empty disk, so the window shown below looks like this. It will have a slightly different look for you. Check the box "Check". In this case, immediately after recording, the program will check for errors.
Click "Start Recording" and wait for the process to complete.

We burned a Windows boot disk from an ISO image using the Astroburn Lite utility.
With UltraISO
Now let's make a bootable disk with with UltraISO... Download and install it on your computer.
After launching UltraISO, the following window will appear. Click on the button in it « Trial period» .

Click on the "File" tab and select "Open" from the menu.

Find the ISO file of the operating system you want to burn on your computer and click Open.

In the menu at the top, click Burn CD Image.

Check that the correct drive and file is selected for recording, select the minimum write speed. You don't need to change anything in the Recording Method field. Click Burn.
Wait a little and you're done.

I will end on this. I think now you understand how to make a bootable disk from an ISO image with the Windows operating system using one of the programs described in the article.
Rate article:
(3
estimates, average: 5,00
out of 5)
Webmaster. Higher education in the specialty "Information Security" .. Author of most articles and lessons of computer literacy
- blank CD / DVD disc;
- image with Windows XP. This means a CD / DVD disc with a recorded Windows XP operating system;
- program for creating and working with images. For example, Nero, DAEMON Tools, Ultraiso. Beta versions of these programs can be downloaded from the official websites of the developer (www.nero.com, www.daemon-tools.cc, www.ezbsystems.com/ultraiso).
- To create a new image in the DAEMON Tools application window, select the "Burn image" button (located on the top panel).
- In the window that appears, select the DVD drive. From the Write Rate drop-down list, select greatest value- "4.0". In the "Path to image file" field, specify the path to the image of the Windows XP installation disk.
- After completing all the actions, press the "Start" button.
- DAEMON Tools will burn the image to CD for some time.
- Create a folder on the hard drive, into which we will enter all the necessary data. First of all, there should be a file manager adapted for DOS: Norton Commander, FAR or Volkov Commander.
- To make it convenient to launch the file manager (for example, Volkov Commander), we create a bat-file. Everything is very simple: open notepad and enter there:
- Subsequently, when you use the boot disk, you will need to select the exact drive letter that corresponds to the CD drive. This is done as follows: in the command line, first write down D :, then E: and so on until the notification "The disk is set incorrectly" pops up. The most recent disc in existence will most likely be your CD drive.
- Next, we will use the Partition Magic program, namely, its DOS version. This software product is designed to work with hard drives: formatting, dividing a hard disk into partitions, converting file system types and much more.
- In the folder where we collect everything we need for the boot disk, create an additional directory called "PQ" with the program files. Similarly, with Volkov Commander, we create a starting notepad file with the following content:
- Start the Nero program (or any other imaging program described above). In the menu that opens, select the "Create a bootable data disc" item.
- Click the "Add" button and add in the window all the folders and files that should be written to the installation disc. Then click the Next button.
- At this point, you may be prompted to insert a bootable floppy disk, ignore this requirement and select Next again.
- Now we directly select the button "Record".
- program for creating an image;
- Windows XP system files.
- When enabled, the BIOS checks the functionality of all PC components.
- The BIOS determines where to boot from.
- The BIOS transfers control to the UEFI boot (if any) or immediately to the Master Boot Record (MBR) on the hard drive, after which the operating system starts up.
- Top menu bar and buttons. At the top are, as usual, the menu bar and the toolbar. In the menu, you can find almost all the functions of the program, but almost everything that needs to be moved to the top and side toolbars, so we don't have to look there. On the toolbar there are buttons to open the folder with images, start loading the selected images, burn the disc and test the finished disc or flash drive.
- Left toolbar. Here we have collected large buttons that allow you to download and add typical disk images with antiviruses, system utilities, Linux distributions and even Windows. In addition, it is possible to add any images that are not listed in the previous lists using the "Extra" button.
- Right toolbar. This panel contains tools for selecting a flash drive to write an autoload image to it, buttons for creating an image or a USB disk, a button to go to the developer's site and a button to exit the program.
- Central area. This is the main working area, the content of which changes depending on the activated instrument.
- Name. Here we enter the name of the system, in the form in which we want to see it in the list and in the boot menu.
- Derivate checkbox. If we know on the basis of which system the added image is built, we can activate the checkbox and select the desired one in the drop-down list. This saves us from having to choose a bootloader.
- Drop-down list Mode. Here we select the bootloader. I advise you to use the generic GRUB, which is the default.
- ISO Name. Here you can write either the full path to the image (if it is not in the ISO folder, which is undesirable), or just the name of our image.
- the medium itself (disk or flash drive);
- utility for working with disk images;
- disk image or Windows 7 system files to create it.
- First, you need to put the files for writing to disk in a separate folder and save it in a convenient place, for example, C: \ Win7ISO. Why convenient? Because the shorter the path to the file, the easier it is to write it in the console.
- Then you need to download a set of utilities from the Microsoft website, which you will need to create the image. The utilities need to be unpacked and installed.
- After installing the utilities, you need to open the command line as administrator (press the combination Win keys+ X and in the menu that opens, select "Command line (administrator)") and enter the following code in it:
oscdimg -n -m -b "C: \ Win7ISO \ boot \ etfsboot.com" C: \ Win7ISO C: \ Win7ISO \ Win7.iso
Dmitriy
remontka.pro
- diskpart
- list disk
- select disk N (here N is the number of the disk under which your flash drive is displayed)
- clean
- create partition primary
- format fs = fat32 quick
- active
- assign
- list volume
- antiviruses;
- utilities;
- Linux distributions;
- different versions of the Windows system;
- other (allows you to upload your images, but only available in the paid Pro version).
- In this case, you should create an image of the system (in the same window as the recovery disk, there is the item "Create a system image".
- When the system collects and writes the image, you will need to write it to the USB flash drive in one of the ways discussed above. A little longer, but more convenient: a flash drive is more reliable than a disk. The only drawback: the system image for recovery weighs quite a lot, so it is recommended to use a large flash drive or a removable hard drive.
Most often, the operating system does not load correctly if the files that start Windows have been damaged. The reasons for such damage can be different: loss of files, damage to the boot sector, viruses, incorrectly working drivers, and others.
Unfortunately, you won't be able to fix this problem quickly.
So that this situation does not create problems and malfunctions, we recommend creating and keeping a bootable disk in reserve. The fact is that the Windows operating system was designed in such a way that it could start not only from a hard disk, but also from a CD. Moreover, in this case, repeated Windows installation is not performed, it is about loading the system itself.
A bit of theory
The boot disk is an ISO image - an exact copy of the software. That is, the image includes the entire contents of the CD / DVD disc.
The program that will be used to open, create, edit and extract DVD image files will allow users to convert the extracted content into an ISO image that accurately reflects the DVD content.
What is required to create a bootable disk?
To create a bootable disk, we need:
If you are convinced that you have everything you need in stock, then you can get down to business.
Since the procedures for working with programs for creating images are somewhat different, we will write out a step-by-step guide for each of them.
How do I create a bootable disc with Nero?
Step 1.
To get started, take a bootable Windows XP disc and run it using the CD-ROM, run the Nero program. Based on the type of disc - CD or DVD - launch the appropriate project. In the list of project types, find the item "Image creation". Please note that the name of the project may differ depending on the version of the program. In any case, the name of the project will contain either the word "image" or the abbreviation ISO. 
Tip: use the largest discs for recording, since the entire array of information may not fit on a standard disc of up to 700 MB.
Step 2.
In the list of information sources, you should choose an optical drive, the hard disk will be the receiver of information. Click the "Next" button.
Step 3.
A copy window will pop up on the screen, followed by a window where you need to select the path to save the image.
Tip: to make it easier to find the folder with the image, we recommend that you save it to your desktop.
Step 4.
After clicking the "Save" button, the process of creating an image will start. At this stage, all that is required from you is patience - wait until the process is completed, and the notification "Burning completed" will appear on the screen. 
Step 5.
Now the bootable Windows XP disc can be removed and replaced with a blank disc of the same size - CD or DVD.
Step 6.
You should select the "Burn image to disc" project. Again, a window will pop up, in which you should determine the path to the image created the day before. Now you can start the burning process.
Step 7.
How to create a bootable disc using DAEMON Tools?

How do I create a bootable disc using Ultraiso?
Step 1.
We launch the Ultraiso program. It is important that this action is performed with administrator rights. To do this, when you click on the program shortcut in the window that appears, select the "Run as administrator" item. Next, the program will offer to go through the registration procedure. When using the trial version, click on the corresponding button "Trial period" and go further.

Step 2.
On the left side of the program, select the "File" tab. This will open File Explorer. In it, you should select the file with the * .iso extension, which contains the Windows XP image.

Step 3.
In the main menu of the program, select the "Tools" tab. In the menu that will "drop out" from the top, click on the "Burn image" button.

Step 4.
Here are the basic methods for creating a Windows XP boot disk. However, we cannot but say about another method - the "dosovsky" method. Despite its relative complexity and some obsolescence compared to the previous ones, it also has a right to exist.
How to create a bootable disk using the "dos" method?
Let's explain a little. The first line is a command to replace the directory with Volkov Commander. The second line is the command to run the file named "vc.com".
Save the notebook file under the name "vc.bat". The presence of a file under this name makes it possible to enable Volkov Commander with a letter combination in the command line: vс. And confirm everything with the Enter key.
However, this should be checked. To do this, enter the "dir" command on the command line. This command will display all files and folders on the disk. In this simple way, you can make sure that the disk is selected correctly and continue.
We give it the name "xp.bat".
Thus, everything needed for the boot disk is created.
How to create a Windows XP multiboot disk
Unlike a bootable disk, a multiboot disk can contain not only operating system files, but also others required programs... For example, text and image editors, social applications, and so on. At its core, the procedure for creating a multiboot disk is not too different from the one described above. The files of all the necessary programs are accumulated in one folder, and then the image is recorded.
But let's take a closer look.
What do we need
As before, you need:
In addition, we need the xpboot.bin file, as well as the files of some program.
A guide to creating a multiboot disk.

In conclusion, we note that it is easy to check if the boot / multiboot disk is working in autumn. To do this, once after burning, return the burned disc back to the CD-ROM. If it automatically starts and the "Run Autostart" window appears on the screen - congratulations, you did it.
2 votesWe will also give one last tip: you may not be able to create a bootable disk the first time, so we advise you to rehearse on RW disks.
Good day, dear readers of my blog. I remember the times when we downloaded all programs, games and other software from the Internet in order to then insert the disc and start the installation process. Then we learned that you can create a virtual drive. Surprisingly, all these skills are useful today.
I will show you easy ways to burn a bootable ISO image disc using four of the most popular programs.
There are different cases, for example, the need to reinstall Windows or save important programs in electronic form. The skill cannot be called useless.
I still think that it is very important for any beginner to understand the terminology, so first I would like to talk a little about what we actually have to face today, what is ISO and why it is preferable to work with it. Computer literacy has never harmed anyone.

So, you are probably familiar with this situation. You insert a CD into the drive or insert a USB flash drive into a USB port, immediately after that, the installation window automatically opens. This process is called multiboot.
In order to start this operation, we need an external device or virtual drive. I already wrote about this process on my blog and described the work in the best, in my opinion,.
Programs such as Ultraiso, Nero, Alcohol or Daemon Tools can create the illusion that a CD is on your computer, and today we will talk about them again.
Any program needs an image, an ISO file. It saves users a lot of hassle. You don't have to search for any files, collect them from different parts of your computer and download them manually. From any set of documents for a game or program, you can create your own bootable discs. Roughly speaking, a single archive.
I have not yet written about this process in my blog, and if you are interested in this, subscribe to the mailing list and be the first to know about the release of the new publication. In the meantime, you can download ready-made images from the Internet.
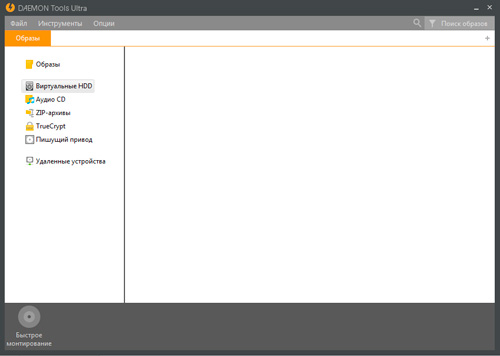
2. Daemon Tools
I really like the Daemon Tools program, with its help I always work with images. You can go to the official website www.daemon-tools.cc/rus and download a free trial. She knows how to crack write protection if you need to copy a finished disc. Creates up to 36 additional drives, edits and converts.

If you want to write images to a USB flash drive, then you will need the Ultra program. If a CD / DVD is enough, then you can get by with the PRO version.
The completely free Lite program does not have additional features and does not know how to write images, but only emulates them on a virtual disk drive.
Personally, I use the Ultra version and by the way, you will understand its advantages very soon. Frankly, I myself did not think about it.
In the top panel, open "Tools" and select "Burn to Disc". Insert a blank CD or DVD into the drive first.

Unfortunately, I don’t have such a thing now, but I did it a thousand times and I know that all you have to do is click on “Start” and drink tea until the download is complete. This takes at least three to five minutes.

If you want to make a bootable disk on a USB flash drive, then in the same place, in the "Tools" select "Create bootable USB".
Learn how to burn bootable discs and create your own multiboot assemblies with the tools you need to reinstall and restore the system.
What's the difference between a shaman and a sysadmin?
- The system administrator has a tambourine with a hole :)
As you may have guessed, today we will talk about the "shaman" "magic" disks, which are found in a variety of holders of various kinds of computer masters. And these are not only discs with programs. Some of them allow you to run an almost full-fledged operating system even on a non-working computer! Such disks are called bootable ...
Booting Windows
Before we start talking directly about boot disks, a couple of words should be said about how Windows and the computer are booted in general.
In modern computers, two subsystems can be responsible for booting: BIOS and / or UEFI (in newer PCs). In a simplified form, the process of starting a computer looks like this:
By default, it boots from the hard drive after the BIOS has tested the functionality of the main components of the computer. To be able to boot a PC from disks or flash drives, you need to reconfigure the BIOS a little to boot from external media. To do this, set the First Boot Device parameter to CD-ROM (or USB). If you don't know how to do this, you can read about it.

After you make this setting, after checking the location where you should look for boot files, a check for the presence of a disk in the drive (or a flash drive in a USB socket) and a search for a bootloader on it will be added to the boot cycle. Many, by the way, have the option to boot from the floppy drive by default (PC builders simply did not change anything back), so, perhaps, no manipulations with BIOS will be required :)
Types of boot disks
All bootable discs can be roughly divided into 3 categories according to their area of application:

The first category includes all installation discs that are used to install or reinstall a specific operating system. A regular Windows disk that we buy (kh-kg-m :)) in a computer store or a Linux distribution from the Internet are just of this type.
The second category includes disks that contain tools for restoring the underlying operating system. These resuscitators are usually off-the-shelf Windows LiveCDs that can be run directly from disk. The usefulness of these kinds of tools is increased by the inclusion of additional software for fighting viruses, data recovery, etc.
The third category is disks that do not have a full-fledged operating system and contain programs designed to perform one or two tasks. Examples are programs for partitioning a hard disk or backing up data.
The above classification is not universal, since, for example, a disc with a LiveCD can be an installation disc at the same time. And there is also the concept of multibooting, when several different systems or programs can be placed on one disk at the same time. To clarify the situation, consider the question of where to get a bootable disk ...
We write the finished image
When we found out what bootable disks are and what they are for, the question arises: where can you get such a miracle tool? As in any business, there are two ways: simple and difficult ...
A simple one consists in downloading a finished disk image from any of the many torrent trackers, or copying a real disk taken from a friend. Complex assumes the creation of a hand-made assembly containing all the tools you need. Let's start with a simple one ...
Downloading a ready-made ISO image from a torrent, I think today will not be a problem for anyone, so we will consider the case of copying a real disc. For this business, almost any CD and DVD burning program is suitable for us. Here we will consider the algorithm of actions using the example of the CDBurnerXP program.

If you just open a boot disk on your computer, copy its contents to a folder, and then write it to your disc, then nothing will work, because the boot area is not written to the disk normally. We need to create an exact copy of your friend's boot disk (or, in another way, its image) and then burn this copy for ourselves.
To do this, insert the disc into the drive and press the "Copy Disc" button on the main CDBurnerXP screen. In the window that opens, you can select the drive into which you inserted the disc, the speed (if you are not in a hurry, it is better to set about 8-x) and the copy method:
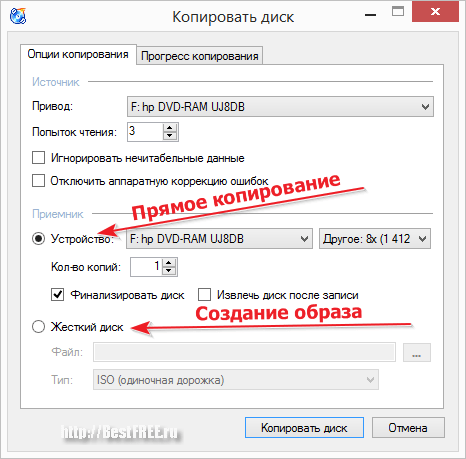
There are two copying methods. By default, direct copy is active. In this case, at the first stage, an image of the inserted disc is created in a temporary folder, and then it is proposed to remove the disc and insert an empty one to record the resulting image. After recording, the image is deleted from the temporary folder.
The second option - you can only create an image and save it on your computer in order to burn it to a real disk in the future or, for example, put it on the Internet. Since there should be no questions with direct copying, we will consider the second method in more detail.
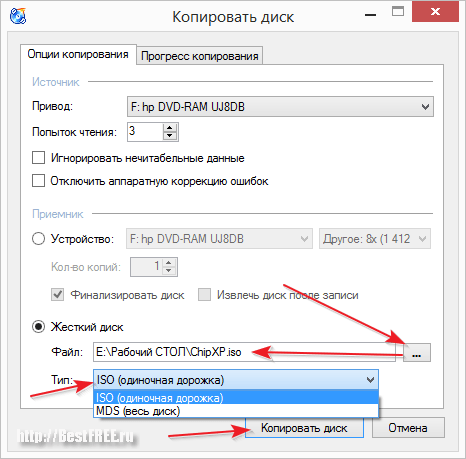
First of all, in the "Receiver" section, we need to switch to the " HDD". Then all that remains is to specify the path for the created image and select its format. ISO and MDF / MDS formats are available in CDBurnerXP. I recommend saving to ISO, since this is the most common and supported by most programs option for storing images. Now click the Copy Disc button and wait until the end of creating our ISO image.
As I said, the image can then be written to a real disk without losing its boot properties (this also applies to images downloaded from the Internet). In CDBurnerXP in the main window there is a separate special section for this - "Burn ISO image":

In the window that opens, we need to specify the path to our image in ISO or MDS format. If you downloaded the image from the Internet and it is in BIN or NRG format, then CDBurnerXP has a tool for converting such images to ISO. Click the "Convert to ISO" button and specify the path to the desired image there.
After the image is selected, all that remains is to check the "Finish disc" box (some computers may not want to boot from a disc that has not been finalized) and click the "Burn disc" button. We are waiting for the end of the recording and become the owners of our own boot disk :)
What is multiboot
Following the classification that we discussed above, a boot disk can be designed to solve one specific task, be it installing a system, repairing it or maintaining it. It used to be that way. A separate disk had to be created for each purpose. However, today there is such a thing as "multiboot" ...
Its essence is that using a non-standard bootloader (for Windows standard is NTLDR), we can run from one disk, for example, several operating systems or make it installation and repair, writing several images to it at the same time!
The most popular bootloaders for Windows that enable SysLinux and GRUB4DOS. Setting them up manually allows you to literally work wonders in terms of booting the PC, but this requires the user to know and be able to work with the code ... However, there are more simple ways self assembly own multiboot disks using third-party programs.
Create a multiboot disk
On the pages of our site, I once wrote about a program that allows you to create bootable disks and flash drives - xBoot. Here we will consider another method, which may be even better and more convenient for you, using the SARDU program (short for Shardana Antivirus Rescue Disk Utility):

On our site you can download the Russian version of the program 3.2.3, which is newer and more understandable for the Russian-speaking user (thanks for the translation to our regular reader Valery!). IMPORTANT: unpack the program into a folder with no Russian letters in the path. Best at the root of Drive C or Drive D.
Despite the fact that the original program is in English, it will not be difficult to figure it out. Its entire interface can be divided into four parts:
In order to create your own multiboot assembly, it is desirable to place all the ISO images of bootable disks we need in the ISO folder. If you decide to download images directly from the Internet using the links provided, they will automatically go to this folder. However, your images will need to be copied manually. There is one more nuance. There should be no Russian letters in the path to the program and images. Therefore, it is advisable to unpack SARDU directly to the root of the disk.

Here we press the "Add" button and fill in the proposed fields. Of the required fields, it is worth noting:
The rest of the fields are optional and we can fill them in at will. After completing the filling of the fields, click "Save" and our image appears in the list. However, in order for us to add it to the assembly, we need to manually specify the path to it again by clicking on the red button after the image name:
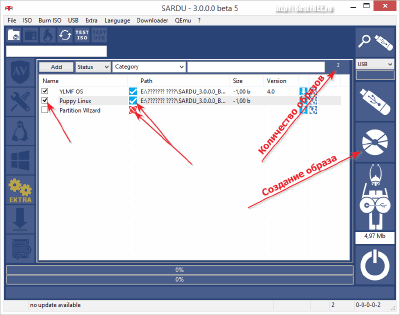
Now all that remains is to tick the necessary and confirmed images by the program (the red button is replaced by a blue one) and click one of the buttons on the right panel: "Create SARDU USB" (to create a bootable USB flash drive) or "Create SARDU ISO" (to create a disk image). Upon completion of the work, we can immediately test the performance of the new multiboot disk using the built-in QUEmu emulator by clicking the "Test ISO" (or USB) button on the top toolbar:

If everything went well, you can start your newly created image and find the systems added to it in the Extras section.
conclusions
So we figured out what bootable disks are and how you can make them yourself. In the article, we did not consider, perhaps, the principles of working with the loaders themselves directly, but this, I think, is for ordinary users, like you and me, and to nothing :) The result is important to us, which, I hope, we got.
Creating multi-boot assemblies is not such a difficult task, but it brings tangible benefits in cases where we are faced with the need to reinstall or fix something in the computer OS. As for me, I have already created an ideal USB flash drive for myself quite a long time ago, on which there is both Linux and a small Windows that can be run or installed on a PC, as well as a set of the most necessary programs.
I wish you to have such flash drives and disks in your arsenal. And even more I wish you less damage to your computer!
P.S. It is allowed to freely copy and quote this article, provided that an open active link to the source is indicated and the authorship of Ruslan Tertyshny is preserved.
OS installer media is helpful. You never know at what point the system will refuse to work or a friend will need to urgently reinstall Windows, let alone a recovery disk that can bring a dying operating system back to life. Let's take a look at how to create and burn bootable (installation) media for different cases.
How to create a bootable Windows 7 disk
To create a disk or flash drive to boot the system, you must have with you what you need directly in the process of work:
Nothing else is needed from the user. To get started, let's get acquainted with the first, preliminary part of creating a bootable disk - compiling an ISO image for its subsequent burning to media.
Create and burn an ISO disc image
Boot disc creation assumes that the user has an ISO image that will be burned to the media. A disk image is a file that is a complete copy of the entire contents of a disk with software and is widely used in the creation of bootable disks and flash drives. If the image is not available, you can create it yourself without experiencing any problems: just for this ... you will need an existing installation disk with Windows 7 or the system installer files copied to a separate folder. If you have any of this, you can safely start creating an image for a new boot disk.
ISO is the most popular image format, and it is with it that most utilities for creating and burning images work. You can also create a file for recording using standard OS tools, but there is no data on the quality of such a recording on systems younger than Windows 7. Therefore, it is recommended to use third-party programs in any case.
Ashampoo Burning Studio Free
It is a free, lightweight disk utility that is easy to use, has a clean interface, and is free of ads and built-in malware. In it, you can not only write files to a disc or flash drive, but also create an image in two ways to choose from: from a physical medium (CD or DVD, which is previously inserted into the drive) and from a folder with files on your computer.
Working with this utility is very simple: an ISO image is created in just a few clicks.
You can download Ashampoo Burning Studio Free on the official website.
CDBurner XP
This program is also free, very easy to use, and is considered one of the best of its kind. It is adapted for old versions of Windows, but it also works with a bang in the new ones (unless you are confused by the antediluvian interface). Just like the previous one, the program can create disc images from CDs, DVDs and from user files, as well as burn them.

The utility is available for download on the manufacturer's website.
UltraISO
The most famous and widespread program that is usually used to create and burn discs is UltraISO. A wide range of functions makes this program a universal tool for creating and recording images, so it is recommended to use it. We'll come back to this program later when we turn to burning a disc, but for now we'll look at creating an image in it.

UltraISO is not a free program, but on the official website you can download its trial version, which you can use for free for some time.
Video: Create an Image in UltraISO
Creating an image manually
If you don't want to mess with programs (keep in mind, you still have to write to the installation flash drive), then Windows has good news for you: you can create a disk image via the console using standard Windows tools. To do this, however, you still have to download the utilities: this time the official tools from Microsoft, working from the console.
However, there is nothing particularly difficult about this.
The console will start creating the ISO image, and all you have to do is wait until the build is complete. After that, the newly created image will be available on the path you specified.
Burning an image to a disk or USB flash drive
When the boot image is created, it remains to go to the most important thing - writing it to disk. This can be done both using Windows tools and through special programs, some of which have already been discussed above. Programs are the simpler and more popular option, but we'll cover both.
Image recording to UltraISO
We will show the software recording method using the example of UltraISO, since this particular program is the most convenient and popular among users. However, you can use any other utility for this: general principle their work is similar.

Video: how to burn an image to UltraISO
Manual recording
This option is suitable for people who use new versions of Windows (7, 8, 8.1, 10): they are the best way to write discs. In the case of a USB flash drive, everything is a little more complicated: the instruction will work only for computers with UEFI. If you do not have UEFI, you will have to use programs.
If the installed system is Windows 7 x32, then this method will not work either.
Let's start by burning a disc. Everything is extremely simple here: you just need to right-click on the image and select the option "Burn disk image". Of course, you first need to check that the disc is inserted into the drive and there is enough space on it to write the image.
 To manually record a disk image, just right-click on it and select the appropriate item
 But with a flash drive, everything is a little different. To write it, you need a command line opened as administrator (how to do this is indicated above).
On the command line, enter the following commands in order:
Ready! The flash drive is formatted as bootable, then you need to copy the files into it. This is how it is done.

Creating a multiboot disk
To create a multiboot disk (that is, a disk on which more than one OS is installed, but several, and in addition, more programs), you will need a slightly different software.
The best choice for today is the free Sardu program, which in addition also provides a variety of images to choose from, which it downloads itself.
The interface of the program is rather complicated, so some explanations will not be in the way.
 In the main menu of the Sardu program, you can select images and write them either to a USB flash drive or to a disk
 On the right are buttons for recording.

Create a system recovery installation disc
To create a system repair disk (this is the one with which Windows 7 can be restored in case of failure), you need the disk itself - and that's it.

The creation of a recovery flash drive looks a little more complicated.
Reliable media is a very important item in the "cure" or installation of any system. Record correctly and do not neglect recovery discs: you never know when you need to reinstall or roll back Windows. And specialized software tools will help you with this.
