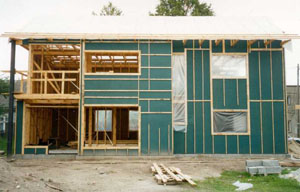
Construction of a frame wall. Construction of a frame house: roofing material
Today we will look at frame walls, the construction principle of which is simple and ingenious at the same time. For example, consider wooden frame, which in this moment used for the construction of 80 percent of all frame residential low-rise buildings.
So, wood frame walls. The construction principle is simple and essentially resembles, on the one hand, a children's construction set, and on the other hand, labor lessons at school. Remember when we beat stools during labor lessons? So this is the principle of construction frame wall- exactly the same. Each adjacent rack, each frame element supports each other through fastening elements and bonds.

It turns out that any individual part of the supporting frame, be it a stand or a jib, is individually quite fragile. However, when combined, when all frame parts are correctly assembled and secured, the frame elements create an amazingly strong system.

This page presents general diagrams of frame walls and their individual elements. As can be seen from the drawings, when installing a frame wall the following principles must be followed:
- Structural rigidity.
- Wise use of material.
- Construction speed.
In fact, these are racks that are connected to each other by jibs. Using the lower and upper trim, the load is transferred from the roof through the racks to the foundation. Strength elements of window and doorways unload these units and remove the load from window and door units.

The outer cladding of the frame wall also serves as a strength element. Sometimes reinforcement is performed not through the outer skin, but through the inner skin. Sheathing can be done either with any rigid slab material (plywood, OSB) or with thin boards (20-30 mm thick) diagonally.

Using DSP to strengthen the frame is unwise, since hardware (nails, screws) in this material do not have a rigid fastening. Over time, the structure will begin to “walk”, which will contradict principle number 1.
-
Any design frame house, the components of which are calculated and competently executed, is reliable by default. You can count the frame nodes yourself using a calculator, or you can use ready-made... -
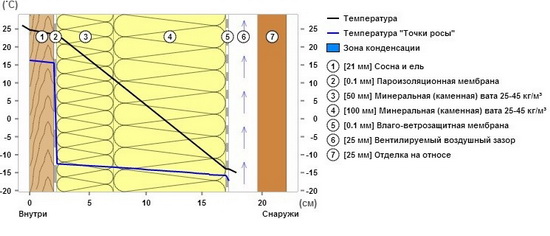
To imagine what the wall pie of a frame house with mineral wool as insulation looks like, just look at the diagrams located on this page. For different conditions... -
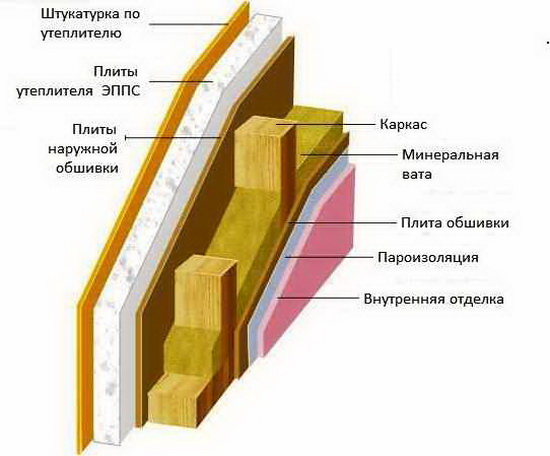
This page shows a sectional view of a frame wall along with insulation, which is mounted between the frame posts. Simply put, a frame wall in cross-section is like this... -
Vapor barrier during the construction of a frame house is used to prevent moisture from entering the house thermal insulation materials, located in the walls of the frame. One of the main conditions for using a heat insulator... -
The simplest design of the walls of a frame house is vertical posts connected by upper and lower frames and tied with jibs for additional structural rigidity. When using slab...
In this article we will analyze in detail how to insulate a frame house with your own hands. Let's consider which insulation is better to use for a frame house, what thickness of insulation is needed in a frame house, and in general how to properly insulate frame house. In addition, we will tell you how to cover the walls of a frame house, both internal and external.
Insulating the walls of a frame house
Insulation for walls of a frame house
Insulation of the walls of a frame house is usually carried out between the frame posts. In this part, we will look at what options exist for effective insulation for the walls of a frame house and how insulation is carried out. Let's consider the following insulation:
- Mineral wool, density 30-50 kg/m3;
- Fiberglass wool, density 17-20 kg/m3;
- Foam plastic, density 25 kg/m 3 ;
- EPPS, density 20-35 kg/m3.
Note: We do not consider sawdust, expanded clay, slag, flax tow, straw, etc. as insulation. The use of these materials, as a rule, requires the construction of walls of greater thickness (in comparison with the effective insulation materials listed above). Therefore, each case of using such materials must be considered and calculated separately, and they will not be considered within the framework of this article.
Of the listed insulation materials, we recommend using mineral wool of the specified density, since with other almost equal characteristics, mineral wool is not flammable, dampens sound well and is easy to use (in comparison with foam plastic and EPS). And in comparison with fiberglass wool, mineral wool behaves better in vertical structures (it does not settle or wrinkle if it is of the required density).
Note: The fact that we recommend mineral wool for use does not mean that we do not recommend other insulation materials. Our recommendation is, rather, an answer to a frequent question from readers “which insulation is best to use for the wall of a frame house.”
Important points:
- The wool (either mineral or fiberglass) must be slab, not roll.
- The thickness of the insulation in each specific house is determined by calculation. We do this calculation, ask a question and we will calculate. According to experience, this thickness is within the range of 100-250 mm, depending on the climate zone.
- It is better to lay the insulation in layers of 50 mm, with overlapping seams. This will eliminate cold bridges. Layers of 50 mm, because wool (both mineral and fiberglass) has positions of 50 and 100 mm, intermediate positions are most often not available for free sale.
Technology for insulating walls of a frame house
Insulation of the walls of a frame house is carried out between the frame posts. Mineral wool and fiberglass wool are placed in the spacer between the posts. Polystyrene foam and EPS are cut to size between the posts and foamed.
Where the jibs are located, the insulation is cut and inserted into the space between the jibs and the stand. If the jib is of a smaller cross-section than the stand, then one layer of insulation (50 mm) can be placed on top of the jib from the outside.
House frame insulation scheme
External wall cladding of a frame house
In this part we will look at how external rough wall cladding is performed.
Note: Judging by the questions on the site, readers are often interested in whether it is possible not to do rough sheathing and attach finishing material (for example, siding) directly to the frame posts. Let's look at this moment. The presence of the skin, together with the upper and lower slopes of the frame, forms the spatial rigidity of the frame (for more details, see section). And we recommend, as a mandatory element, both sheathing and bevels at the top and bottom. Without bevels, even with sheathing, the frame can have mobility. And vice versa, with bevels, but without sheathing, there is also mobility.
Options for rough sheathing materials (the most common):
- Board.
Note: For all these materials you will need to perform finishing. This could be siding; this option is described in the article. You can plaster the walls. Under the plaster layers it is better to place a layer of foam plastic (density 25 kg/m3), 30 mm, or EPS (density 20-35 kg/m3), 30 mm. You can apply plaster layers over a mesh, without insulation (described in the thread), but there is a greater risk of cracks in the plaster. The technology of insulation using a layer of insulation is described in the article.
Note: Sometimes there are recommendations to leave the board cladding as a finishing touch. In order to do this, the board will need to be processed. In addition, in this case, it is necessary to arrange the wind and waterproofing of the wall under the board in a certain way.
Important! We do not recommend covering the frame with boards without first roughing the OSB. That is, if a board is used as a final finish, then it is mounted on top of the OSB. Let me explain what our opinion is based on. If you nail the board directly to the frame posts, without OSB, then, as a rule, the board will unscrew and will be unscrewed at least 2 times a year (spring and autumn). But we need to give the frame spatial rigidity, and not vice versa - subject it to additional loads from the unpredictable behavior of the skin. Therefore, we recommend cladding with OSB boards only.
In this part we describe in detail OSB sheathing (since this is the most universal and frequently used option). Besides OSB boards In comparison with the listed options, they are more moisture resistant. The sheet area of OSB is larger, which allows you to make fewer joints.
For cladding we use OSB with a thickness of 10-12 mm.
Fastening OSB to racks, top and bottom trim, fastening pitch
OSB is attached to the racks as shown in the figure (joint in the middle of the rack).
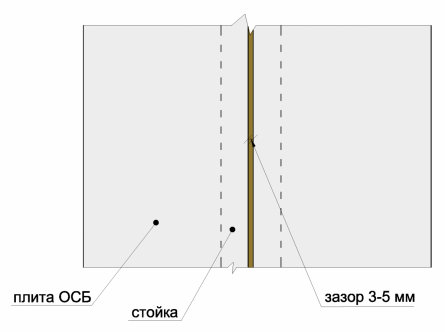
Attaching OSB to the frame post
The OSB sheet should completely cover the bottom trim. There are two options for the top trim, depending on whether the house has one floor or two:
- If there is one floor, then the top trim is completely covered, and the edge of the OSB is flush with the edge of the trim.
- If there are two floors, then it is better to position the sheet so that it extends onto both the racks of the second floor and the racks of the first, and the top trim overlaps approximately the middle of the sheet. This is not necessary, but adds additional rigidity to the structure.

Attaching OSB to the harness
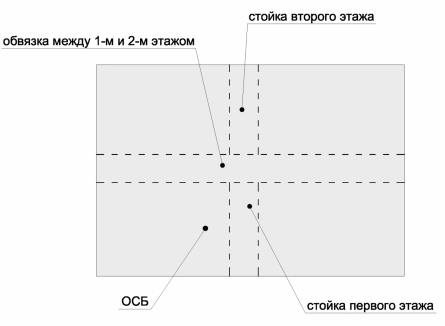
Attaching OSB to the frame (if there are 2 floors)
Where OSB is attached to a window opening, it is better to “cover” the window opening with a whole sheet of OSB so that the joints fall outside the opening studs, onto adjacent studs .

Fastening OSB to a window opening
In this case, the window opening is cut out in the OSB board.
To make it easier to join the slabs, you can make additional vertical or horizontal jumpers in the frame. As a rule, they are made of the same cross-section as the racks.
OSB is attached to the vertical posts of the frame either with spiral nails or self-tapping screws with a diameter of 4.5 mm and a length of 50 mm. It is better to fasten with self-tapping screws; you can combine self-tapping screws and nails.
OSB boards are attached:
- In intermediate sections - in increments of 30 cm.
- At the joints of the plates - in increments of 15 cm.
- Along the outer edges - in increments of 10 cm.
- To ensure that the OSB board does not crack from the fasteners, a distance of 8-10 mm should be left from the edge of the board to the fasteners.
- A gap of 3-5 mm must be left between the plates, otherwise the joint of the plates may warp.
- When fastening, a self-tapping screw or nail should fit 40-50 mm into the rack.
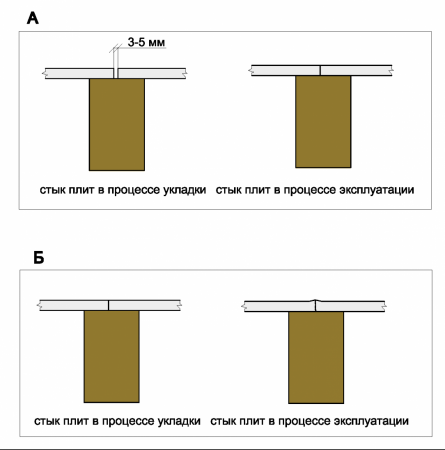
OSB joint with and without gap

Depth of screwing into the rack
Wind protection and waterproofing of frame house walls
The function of wind protection and waterproofing of the (outer) walls of a frame house is performed by a superdiffusion membrane with a vapor permeability of 800 g/m2 per day and above.
Note: There are recommendations that the use of a membrane is not necessary; waterproofing films or polyethylene can be used instead. We are categorically against the use of films, polyethylene or glassine as windproofing and waterproofing in this structure. Films have very low vapor permeability (up to 40 g/m2 per day) compared to membranes. This means that the film simply cannot cope with removing moisture from the insulation. And this is necessary, since insulation - (see article) , and this is its normal location in this design. And moisture should be able to erode. A membrane with the specified vapor permeability copes with this.
The location of the superdiffusion membrane in the wall structure depends on the type of rough lining and finishing:
- The membrane is nailed to the frame posts, close to the insulation, Figure 9. Then the lathing (wooden slats 20x50 mm, 30x50 mm) creates a gap. Then lining (OSB, DSP, SML, board).

Frame wall construction
This scheme is used:
- when plastering over lining (with or without insulation);
- in the case where boarding becomes a final finish;
- when facing with siding over OSB, SML, DSP, boards.
2. Rough lining (OSB, SML, DSP, board) is nailed to the frame posts. A membrane is nailed on top of it, tightly, without a gap. On top, along the sheathing (due to the gap), the siding is attached. This scheme is applicable when facing material (such as siding) is attached to the rough lining.

Frame wall construction
The membrane is secured with a construction stapler. Membrane joints are made with an overlap of 10-15 cm.
Vapor barrier of frame house walls
Vapor barrier of frame house walls is carried out vapor barrier film. The film is attached from the inside of the room to the frame posts, close to the insulation, using a construction stapler. The joints are made with an overlap of 10-15 cm.
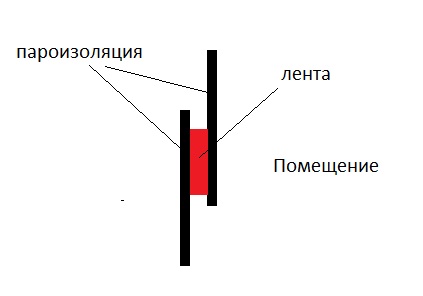
Sealing the vapor barrier joint
Important points:
- When using polystyrene foam or EPS as insulation, a vapor barrier is also needed. Although these insulation materials do not absorb moisture, in addition to them, in the thickness of the wall there are wooden frame elements that need to be protected from vapors coming from inside the room.
- All joints and junctions of the vapor barrier must be taped with tape, as shown in the figure. In this case, it is important to use not ordinary construction tape, but a special double-sided adhesive tape for vapor barrier.
- Vapor barrier can be done with foil foamed polyethylene. It is important to take into account that the use of this material does not in any way affect the thickness of the main thermal insulation of the wall.
Internal wall lining of a frame house
For internal lining of the walls of the house, you can use plasterboard or OSB. In our opinion, OSB is better. I'll explain why. If you attach plasterboard to the frame studs from the inside, then the studs, as a rule, are not perfectly level, and the plasterboard (it is softer than OSB) takes on these irregularities. Then the drywall will need more leveling layers. And OSB boards are stiffer and smooth out unevenness, making it less necessary to level.
Note: Often the internal lining is made with MDF panels. If these are not laminated panels, they must be used with caution, as they are susceptible to moisture. It is not recommended to use them in the kitchen, bathroom, or toilet.
Finishing can be done on OSB or drywall. Materials such as lining must also be mounted on OSB lining, directly to the racks without lining - not recommended.
Frame houses quickly became popular not only in our country. They are being built in short time, do not require huge financial outlays, have good performance characteristics, environmentally friendly.
If insulation occurs outside, then polystyrene foam can be used. You can read how to insulate walls with this material. But this material is not recommended for use as insulation for houses on a wooden base.
Wall thickness of a frame house
The thickness of the walls of a frame house is always different and depends on many factors. It is believed that to feel warm in a frame house, a wall thickness of 20-22 centimeters is sufficient.
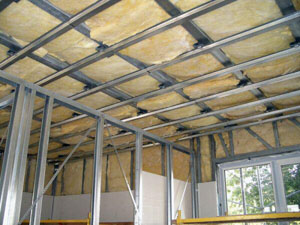
Ceiling device
The ceiling “pie” is similar to the floor one. In a frame house, you can decorate the ceiling as follows:
- Using double-sided adhesive tape, fix the vapor barrier membrane on the floor beams on the room side
- Mount OSB boards, 9 millimeters thick, on top of the vapor barrier, attaching them to the floor beams using self-tapping screws
- Move to the attic and continue work. Place insulation in the space between the ceilings and lay a moisture-proof membrane on top of it
- Install logs perpendicular to the beams
- Lay OSB board or plywood, 9-12 millimeters thick, on the joists
- Do interior decoration ceiling, for example, sew it up with clapboard
All that's left to do is to install double-glazed windows, doors, remove garbage, carry out additional internal work and enjoy life! You can live in a new house immediately after its construction.
Video about building a frame house with your own hands
Read also:
Minuses frame houses
Frame or timber house?
Construction of a frame house from foundation to roof
Build a frame house with your own hands: stages of construction
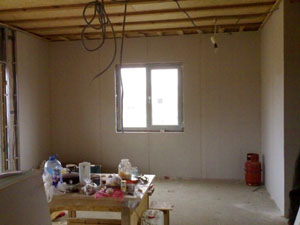
After the main structure of the frame house is completely ready, it is time for the next stage - covering the walls of the structure. This is necessary to achieve two goals - increasing functionality and giving an aesthetic appearance.
The cladding process is carried out from the outside of the structure and from the inside. Properly performed work makes it possible to protect the building frame from external factors, protecting it from excess moisture, frost, mechanical damage. In addition, internal and external are an excellent basis for finishing materials. In some cases, with the appropriate choice of materials, the cladding surface itself can serve decorative purposes.
In parallel with the sheathing work, insulation of the walls is also carried out. Taken together, all these properties of cladding materials make it possible to extend the life of a frame house.
Materials and technology of internal cladding of frame structures
 In most cases, materials for interior works for plating the frame are:
- Fiberboards
- Drywall
- Magnesite slabs
- Plywood
The purpose of these materials implies rather the preparation of the foundation for the implementation finishing works than ensuring structural rigidity and protection from external influences. The interior lining made of these materials is convenient for wallpapering, laying tiles, painting, plastering.
 The sheet materials of the internal cladding are fastened with nails or screws directly to the elements.
The second option for installing sheathing elements is on special frame profiles, which are installed along the perimeter of the wall and connected by diagonal, vertical and transverse profiles.
The joints between the slabs are puttied with special mixtures based on alabaster and cement.
The use of such materials eliminates the need to level the surface of the walls, thereby reducing budget costs and saving time. However, their smooth surface cannot be used for tiling and plastering without additional preparation. In such cases, it is necessary to cover the wooden surfaces of the sheathing with shingles in the form of wooden slats with a width of 15 to 20 mm. When preparing plasterboard sheets for cladding, a plaster mesh is attached to their surface.
Exterior cladding of a frame house
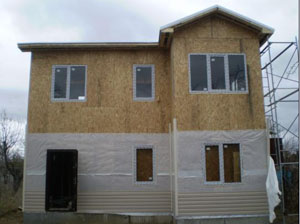 The outer cladding plays a more significant role in making the frame more practical, strengthening its rigidity and increasing the insulating properties of the walls of the structure. Therefore, the material for external cladding selected according to the goals set.
Along with practical functionality, a frame house, when properly carried out on the exterior wall cladding, becomes quite presentable appearance. Therefore, very often, after external cladding, additional cladding work is not carried out. And such a building completely creates the impression of completeness of the structure and has a good design.
In order for everything to turn out exactly like this in reality, when cladding the outer part of the building, it is recommended to use the following categories of cladding materials: CSP - cement-bonded particle boards, chipboard - chipboard, OSB - oriented strand boards, edged boards.
CSP – cement bonded particle boards
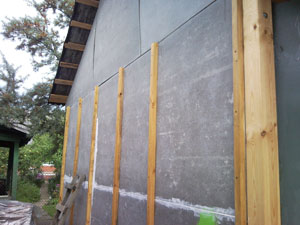 This type of materials exterior finishing known for its affordable price. However, it also has another advantage - DSP has quite high strength. And the presence of a cement binder in the structure of the slabs extends their service life.
But for all their advantages, CBPB boards have one significant negative point - DSPs are extremely inconvenient during installation. All because of the same cement, such a material has increased fragility. At the same time, efficiency indicators for thermal insulation and strength do not suffer from this. But the installation itself must be carried out with extreme caution and scrupulousness, since when attaching the slabs they can crumble.
Chipboard – chipboard
 It is somewhat more expensive to purchase chipboard compared to the previous material. But this drawback is compensated by good efficiency parameters. For example, Chipboards are effective when changing temperature conditions and can perfectly withstand low temperatures. This is possible thanks to the use of wood with high heat capacity in chipboard.
Chipboard boards obtained by pressing have noticeable strength and at the same time excellent sound insulation properties. The impression of this material is slightly spoiled by the fact that phenol-based adhesives are used in the manufacture of slabs, which cannot be called environmentally friendly. For this reason, particle boards are not recommended for use in interior, using them only for external cladding.
OSB – oriented strand boards
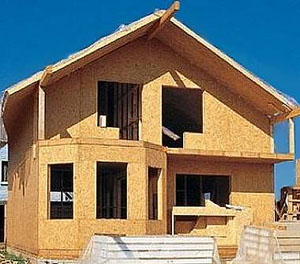 The manufacturing technology of this OSB () is more advanced than that used in the production of chipboard. Thereby OSB boards have greater resistance to humidity and mechanical stress. In addition, as a result of the fact that their structure contains multidirectional layers of wooden elements, OSB has fairly high strength and durability indicators. For cladding a frame house, OSB is one of the most promising materials. However, like all other materials, these boards have a drawback - it lies in the high cost of OSB boards.
Edged board
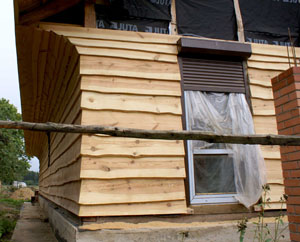 When cladding a house, edged boards are used as the most accessible and one of the cheapest materials. The problem with using edged boards is the complexity of installation. Many operations and the need to adjust each piece of board to its dimensions make cladding a frame house with boards on the outer part of the walls of the house difficult. But all labor efforts are compensated by the low cost of the board and its long service life.
Installation and insulation of sheathing
All materials used for cladding a frame house, with the exception of boards, are sheet materials. Therefore, installation usually does not pose any particular difficulties. To fasten the sheets to the base of the frame, nails with a wide head of a suitable size are used. However, the length of the nails must be at least 70-80 mm.
 Since some of the materials are more fragile, they can be fastened using screws - when screwed in, they do not leave cracks and do not split the slab.
The slabs can be installed depending on the size of the wall and the size of the perimeter. Their location can be vertical or horizontal - this allows, depending on the situation, to more economically use the remaining material after trimming.
In order to enhance the insulating qualities of the sheathing material and give an even greater degree of heat capacity to the structure itself, it is necessary to lay thermal insulation materials under the sheets of sheathing material. The building materials market currently produces enough products with such qualities.
Thermal insulation materials can be roll type or in the form of small slabs. For this purpose, the following can be mounted under the casing:
- Foam sheets. Depending on the sheathing material, the thickness of this insulation should be from 50 mm and above
- Expanded polystyrene– the material is even more efficient than the previous version due to its high density. However, its cost is much higher. In cladding work, polystyrene foam thickness from 30 mm is used
- Mineral wool– roll type of materials. Has excellent insulating properties. But due to the characteristics of rolled products, this material is characterized by higher labor intensity during installation
Along with these classical materials, their modern analogues can be used. In most cases, the procedure is completed by laying insulating materials and installing sheathing materials. However, in some cases, additional treatment of the outer surface of the cladding is carried out with soil mixtures to give them greater technological characteristics, withstand the external environment and strengthen the outer layer of the slabs.
Video about cladding a frame house
Interior cladding of a house with plasterboard
Insulation of a frame house
