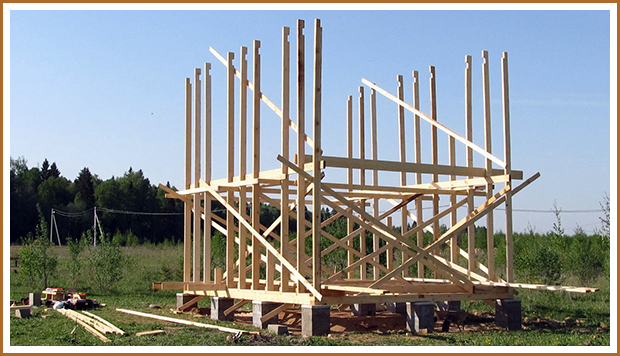
Fastening the corner posts of the wooden frame. Beams in a frame house
You need to know the main rule - the installation of jibs. The jib is an important, one of the main elements for ensuring the rigidity and stability of the structure of your wooden house. Without this detail, the house will be shaky, easily exposed to the forces of nature, and its service life will be reduced tenfold.
Ukosiny: necessity or myth
There is an opinion among the people, "myths" about the need for jibs:
1. jibs are a waste of time and money during construction. So, people who are far from the construction business can reason. As stated earlier, the fundamental role of this structural element is its rigidity.
2. They can be replaced with external cladding. You can do without them if you are going to build a barn or other outbuilding. However, the exterior should be of tiled material or the finishing boards should be at a 45 degree angle.
3. For interior walls(partitions) they can be neglected. In this case, the load taken by the structure of the house, from wind, snow on the roof and static load from the roof itself, will be perceived only by the outer walls. Partitions without jibs will undergo deformation, and the entire interior decoration will be broken, and cracks will appear.
4. Spacers are jibs. Often, developers confuse spacers with jibs. In construction, spacers are used when the height of the walls is 3 m or more. This is done to eliminate the "spring" effect on the board. But they do not give the structure of the house the necessary rigidity and stability in three-dimensional space.
Jibs in a frame house are a must!
If you still doubt the installation of jibs when building a house and hope that they can be replaced with sheet sheathing or slabs (chipboard, OSB), then on the Internet you can find a lot of photos of houses without jibs that refute your hopes.
Consider what the use of jibs gives when building a house:
Without the use of these parts, the frame and the whole house will not have sufficient reliability and durability.
Prevents deformation and damage to external and interior decoration at home.
Eliminates the "walking" of the insulation between the walls.
Stabilizes the house and prevents it from collapsing.
Wind load, snow load and static load from the roof itself are distributed evenly over the entire frame structure of the building.
Correct jibs
In the structure, it is important not only to provide for the presence of jibs, but also to make and secure them correctly:
1. Angle of installation of jibs - 45 ° (ideal angle, provides maximum rigidity of the structure). In places where there are door and window openings it is not always possible to maintain this angle. Therefore, an angle of 60 ° is allowed, and an increase in the angle is compensated by an increase in the number of jibs.
2. Do not use hollow jibs. An exception may be small one-story buildings with flexible diagonal connections.
3. Correctly install the jibs from the bottom of the center of the wall upwards to the ceiling of the vertical rack with the upper harness. At the top, the jibs should fit snugly (without gaps) to the edges of the struts and the upper floor.
4. When installing the jibs under them in vertical racks, in the upper and lower strapping it is necessary to make grooves for the jibs. The depth of the groove is made depending on the thickness of the jibs. V steel frame jibs should go inside the metal profile of the racks.
5. The dimensions of the cross-section of the jibs are calculated depending on the requirements of SNiP for each region separately.
6. Fasten the corner stiffeners to each upright with two nails.
Errors that can be made when installing jibs:
Using forests with unnatural moisture. With further drying, the boards "dry out" and gaps are formed in tight joints. The rigidity of the structure is significantly reduced.
The dimensions of the cross-section of the frame members are smaller than those required to withstand the loads.
The use of low-quality sawn timber.
Placing jibs in the corners. Leads to a decrease in the rigidity and stability of the structure.
The consequences of building a frame house without jibs
Refusal to use jibs in the construction of a frame house can lead to disastrous consequences:
destruction of a house under the influence of snow and wind loads;
external sheathing with plywood (it has a high degree of spatial rigidity compared to chipboard, OSB, etc.) does not provide the required rigidity;
under the influence of soil movement, the house can "walk" by itself;
Temporary jibs
Installation of temporary jibs is necessary stage at the stage of construction of the building frame. They are used:
During the installation of the corner posts. Temporary jibs do not allow the connection of the corner post with the lower harness to loosen, until the upper harness is installed.
For leveling frame walls and eliminating the following problems when installing doors, windows, interior and exterior finishes. When the doors are not hung and the finishing boards do not converge in the corner.
For installing and leveling the rafters under the roof.
The procedure for installing temporary jibs:
1. First align the corners. For this operation, you can use a bubble or laser level. You can also use the "American" method. Fix the level on a board with a long wall.
2. Temporary jibs are attached with blocks, fixed at the bottom to the floor or platform, at the top to the upper logs.
3. The step of installing the jibs is from 1.2 m to 1.5 m. They are made from a board with a section of 25x150 mm.
With the help of temporary jibs, significant defects can be corrected by creating the necessary leverage.
Diy jigs
Although the jibs are an important element of a frame house, it will not be particularly difficult to make them yourself:
1. As a rule, a board with a section of 25x100 mm is used (for areas with increased wind load, a section of 50x100 mm is recommended). The length of the board should be 30% longer than the height of the wall.
2. We apply it to the uprights at an angle of 45 - 60 ° (depending on the structure of the wall, where it turns out). We mark the grooves in the racks, from the top to the bottom lags. The jib should come from the center of the wall, the top is directed towards the upper corner of the rack, the bottom, if possible, is set aside to the maximum distance.
3. With an ordinary hacksaw or hand-held circular saw, make grooves and remove the tree with a chisel. On the outsole, the corners of the jib itself are also cut.
4. The jib must fit tightly into the grooves made to ensure maximum rigidity.
5. In places of window and doorways jibs are recommended to be placed from corner to hole. Thus, additional fastening of the opening racks is carried out.
6. Jibs are fastened with nails 2 pcs. for each vertical rack and 3 pcs. on the top and bottom harness.
By following these steps in the manufacture of jibs, you will obtain the necessary rigidity of your structure to absorb wind and snow loads.
When building a reliable frame house, you need to know the main rule - the installation of jibs. The jib is an important, one of the main elements for ensuring the rigidity and stability of the structure of your wooden house. Without a detail, the house will be wobbly, easily succumb to the forces of nature and the service life will be reduced tenfold.
Ukosiny: necessity or myth
There is an opinion among the people, "myths" about the need for jibs:
- Ukosiny – this is a waste of time and money during construction. So, people who are far from the construction business can reason. As stated earlier, the fundamental role of this structural element is its rigidity. Resistance to gusts of wind, heavy snowfall is practically reduced to zero.
- They can be replaced with external cladding. You can do without them if you are going to build a barn or other outbuilding. However, the exterior should be of tiled material or the finishing boards should be at a 45 degree angle.
- For interior walls(partitions) they can be neglected. In this case, the load taken by the structure of the house from wind, snow on the roof and the static load from the roof itself will be perceived only by the outer walls. Partitions without jibs will undergo deformation, and the entire interior decoration will be broken, and cracks will appear.
- Spacers – these are jibs. Often, developers confuse spacers with jibs. In construction, spacers are used when the height of the walls is 3m or more. This is done to eliminate the "spring" effect on the board. But they do not give the structure of the house the necessary rigidity and stability in three-dimensional space.
Jibs in a frame house are a must!
 If you still doubt the installation of jibs when building a house and hope that they can be replaced with sheet sheathing or slabs (chipboard, OSB), then on the Internet you can find a lot of photos of houses without jibs that refute your hopes.
Consider what the use of jibs gives when building a house:
- Without the use of these parts, the frame and the whole house will not have sufficient reliability and durability.
- Prevents deformation and damage to the exterior and interior of the house.
- Eliminate the "walking" of the inter-wall insulation.
- Stabilizes the house and prevents it from collapsing.
- The wind load, the "snow" load on the roof, and the static load from the roof itself are distributed evenly over the entire frame structure of the house.
Correct jibs
 In the construction of a frame house, it is important not only to provide for the presence of jibs, but also to make and secure them correctly:
- Installation angle of jibs - 45 °(ideal angle for maximum structural rigidity). In places where there are door and window openings, it is not always possible to maintain this angle. Therefore, an angle of 60 ° is allowed, and an increase in the angle is compensated by an increase in the number of jibs.
- Do not use hollow jibs. An exception may be small one-story buildings with flexible diagonal connections.
- Correctly install the jibs from the bottom of the center of the wall up to the overlap of the vertical rack with top strapping. At the top, the jibs should fit snugly (without gaps) to the edges of the struts and the upper floor.
- When installing jibs under them in vertical racks, in the upper and lower strapping, it is necessary to perform grooves for jibs. The depth of the groove is made depending on the thickness of the jibs. In the steel frame, the jibs must go inside the metal profile of the racks.
- The cross-sectional dimensions of the jibs are calculated depending on the requirements of SNiP for each region separately.
- Attach the corner stiffeners to each upright with two nails.
 Errors that can be made when installing jibs:
- Using forests with unnatural moisture. With further drying, the boards "dry out" and gaps are formed in tight joints. The rigidity of the structure is significantly reduced.
- The cross-sectional dimensions of the framing elements are smaller necessary to resist loads.
- The use of low-quality sawn timber.
- Place jibs in corners. Leads to a decrease in the rigidity and stability of the structure.
The consequences of building a frame house without jibs
 Refusal to use jibs in the construction of a frame house can lead to disastrous consequences:
- destruction of a house under the influence of snow and wind loads;
- external sheathing with plywood(it has the highest degree of spatial rigidity in comparison with chipboard, OSB, etc.) does not provide the required rigidity;
- under the influence of the movement of the ground, the house can "walk" by itself;
Temporary jibs
 Installation of temporary jibs is a necessary stage at the stage of building the frame of the house. They are used:
- During the installation of the corner posts. Temporary jibs do not allow the connection of the corner post with the lower harness to loosen, until the upper harness is installed.
- For leveling frame walls and elimination of subsequent problems during the installation of doors, windows, interior and exterior decoration. When the doors are not hung and the finishing boards do not converge in the corner.
- For installing and leveling the rafters under the roof.
The procedure for installing temporary jibs:
- First, align the corners. For this operation, you can use a conventional plumb line, bubble or laser level. You can also use the "American" method. Fix the level on a board with a long wall.
- Temporary jibs are fixed in blocks, fixed at the bottom to the floor or platform, at the top to the upper logs.
- The installation step of the jibs is from 1.2m to 1.5m. They are made from an inch board (section 25x150 mm).
With the help of temporary jibs, significant defects can be corrected by creating the necessary leverage.
Diy jigs
 Although the jibs are an important element of a frame house, it will not be particularly difficult to make them with your own hands:
.
According to Norwegian building codes, permanent diagonal bracing is used in the absence of rigid sheathing. A cladding plate is considered to be sufficiently rigid if it is capable of withstanding horizontal loads of up to 3 kN / m.
This means that in low-rise buildings with no more than two floors and a ceiling height of ~ 2.4 m to ensure the spatial rigidity of low-rise frames wooden houses it is enough to use drywall outdoor installation 9.5 mm thick or MDVP 12 mm thick.
In cases where the wind protection of frame walls is carried out using wind and moisture-proof membranes, and the inner lining consists of lining, it is imperative to provide for the use of permanent diagonal stiffness ties in the project. As permanent diagonal stiffness ties, you can use jibs from a 23x148 mm board.
Jibs should cut into the posts and straps of wooden frame walls from the outside in such a way as not to interfere with the fastening of the sheathing materials to the posts. The jibs must be at such an angle that they bind at least 3 struts with a center distance of 600 mm. See fig. 9.29 (A). Jibs should be attached to the upper and lower strapping of a wooden frame wall by 3 nails 2.8x90 and 2 nails 2.8x90 at each point of intersection with the posts of the wooden frame wall. See fig. 9.29 (A). The maximum load that a wooden jib can withstand depends not only on its section, but also on the way it is attached to the frame. It would be incorrect to believe that the strength of the jib joint with the wooden parts of the frame wall will be equal to the shear strength of the fastener. The fact is that nails and screws under significant stress can deform and split the tree in which they are located. This is especially pronounced when the forces are directed along the grain of the wood.
Rice. 9.29 The use of jibs in Scandinavian frame houses. Installation of permanent diagonal stiffening ties to ensure the rigidity of the frame of a wooden house with the perception of wind loads. Installation principle of jibs and perforated steel belts. The safety margin of 23x148 mm wooden jibs is greater than that of perforated steel belts 2.0x25 mm.
- Horizontal loads caused by wind pressure
- Compression timber jib
- Tensile timber jib
- Perforated Tensile Steel Tape
- Installation of additional steel perforated strips takes place in parallel, with an offset of at least 600 mm
- As permanent diagonal stiffness ties, you can use jibs from a 23x148 mm board.
- Top wall trim
- Wooden jibs should be attached to the upper and lower strapping of a wooden frame wall by 3 nails 2.8x90 and 2 nails 2.8x90 at each point of intersection with the posts of a wooden frame wall
- Steel perforated strips are mounted with a stiffener in a special cutout, which is prepared in advance in the wooden frame of the wall
- Perforated T-bar steel strip used as permanent diagonal stiffening
Steel perforated strips should be attached to 4 nails 2.8x90 at each point of intersection with the frame details wooden wall... According to Norwegian building codes, in low-rise buildings (up to 2 floors), there must be one perforated steel tape for every 2.4 m of timber frame wall. In this case, 4 permanent diagonal ties made of steel perforated strips must be provided in the frame of a wooden wall with a length of 8 m. In this case, the installation of additional steel perforated strips takes place in parallel, with an offset of at least 600 mm. See fig. 9.29 (B). For more detailed instructions, see the technical recommendations of the individual manufacturers.
Permanent diagonal stiffening bonds can effectively resist wall shear in two ways: by working in compression or in tension. The wooden jib can work in both compression and tension, and the steel perforated tape only in tension. This means that only one pair of belts will work in a wooden frame at a time, while both wooden jibs work simultaneously: one for compression, the other for tension.
The recommendations given in this article relate to low-rise wooden houses with no more than two floors and a ceiling height of ~ 2.4 m. In other cases, contact a competent specialist for calculating the elements of a wooden frame house.
Temporary stiffness links and stops
Temporary stiffness ties and stops are necessary to ensure the rigidity of the frame of the house during the construction phase. The most critical moment is the situation when the roofing is installed, and the walls are not sheathed and the doors with windows are not installed.
If the project provides for wind protection using wind and moisture-proof membranes, and the outer sheathing consists of lining, it is imperative to use temporary diagonal stiffness ties installed on the inside of the frame walls at each corner of the house during the construction phase. See fig. 9.30. For these purposes, boards with a cross section of at least 23x98 mm are well suited, they are. Depending on the weather conditions temporary diagonal ties are fixed on 1-2 nails 2.8x75 mm at each point of intersection with the details of the frame of a wooden wall.
In Norway, special telescopic stops are used as stops, which is very convenient. Stops are needed to secure the wall in the direction perpendicular to it. The stops should be installed every 4 meters. 
Rice. 9.30 Installation of temporary connections of stiffness and stops for the period of construction
- Temporary diagonal stiffness ties from a board with a cross section of at least 23x98 mm
- Temporary jibs are attached with 2 nails 2.8x75 mm to the upper and lower strapping of the frame of a wooden wall.
- Temporary jibs are attached to 1 nail 2.8x75 mm at each point of intersection with the details of the frame of a wooden wall.
- Telescopic stop
- Place of attachment of the telescopic stop to the foundation slab / to the floor.
Anchoring(from Norwegian forankring) - this is the fastening of load-bearing enclosing structures relative to each other and to the foundation. Anchoring the walls of a timber frame house is necessary so that the structure of the house can withstand strong gusts of wind. A hundred years ago, such problems did not exist yet - buildings were built of heavy brick or stone, and their massiveness, combined with a low height, made them resistant to gusts of wind. But the transition to new materials, frame structures and high heights of buildings and structures posed very acute "wind" problems for the designers.
Let's analyze a typical situation with a gable roof: depending on the angle of inclination of the gable roof, the windward slope experiences a significant wind pressure, and the leeward one is sucked out due to rarefaction; therefore, the leeward roof slope seeks to take off.
With a more complex roof shape, the effects of the wind are distributed differently, but it is still more or less clear why reports of storms and hurricanes refer to roofs being torn down. In the case of the lungs load-bearing structures and roofs, the roof can be in the position of an airplane wing - due to its shape, a lifting force arises that exceeds its own weight and the strength of its attachment to the structure.
Norwegian scientists from the research institute SINTEF Byggforsk very thoroughly approached this problem. The task was important - to compose easy-to-understand guidelines for construction low-rise building, while taking into account all sorts of factors, without forcing a private developer to plunge into complex calculations.
I have collected, translated and illustrated the current Norwegian building rules and technical guidelines from the SINTEF Byggforsk research institute. However, please pay attention to the fact that the recommendations given in my articles are valid only for two-storey houses with a ceiling height of ~ 2.4 m and a house width of 9 m. In other cases, a private developer should seek advice from a competent specialist.
A structure exposed to wind loads must be given not only spatial rigidity, but also thoroughly fix it to the foundation. In this case, the outer walls serve as a link between the roof and the foundation. External walls should take horizontal and vertical loads from the roof and gable walls and redistribute them over the foundation in such a way that the deformations that occur in the structure frame do not exceed the standard values.
Redistribution of loads from the roof to the foundation occurs when the walls, floors and roof work together. Of course, for this, all enclosing structures must have sufficient spatial rigidity, and must also be reliably fixed relative to each other and to the foundation. In fig. 9.31 shows how the horizontal wind load is absorbed by the gable wall and, by means of the rigid cladding of the enclosing structures, is redistributed along the wall frames to the foundation. 
Rice. 9.31 Redistribution of the horizontal wind load on the foundation using rigid sheathing of the enclosing structures.
- Horizontal load on the gable wall caused by wind pressure
- Anchoring (fixing) a wooden frame wall to the foundation
Calculation of anchoring the enclosing structures of a wooden frame house
The anchoring is calculated according to the wind conditions at the construction site. Other important factors are the angle of inclination of the roof, the length of the roof overhangs and the width of the house.
A large angle of inclination of the roof increases the impact on the structure of the house of horizontal forces.
While a small angle of inclination of the roof, together with long overhangs, increases the lifting force, which means that the need for anchoring to resist vertical forces increases. These principles need to be known and understood by every developer who decides to build a real quality Norwegian timber frame house. Otherwise, the result of labor may not withstand the test of difficult weather conditions.
The lighter the structure, the more anchoring is required for the outer walls to absorb both horizontal and vertical loads. Walls one-storey house standing on a concrete slab of the foundation have a greater need for anchoring than the walls of a two-story one. Because in this case, the frames of the outer walls of a one-story house must be securely fixed to counteract both horizontal (wind pressure), so the vertical (lifting) forces. See fig. 9.32.
If the walls of the second floor two-storey house or attics are installed on a floor that is firmly fixed to the walls of the first floor, then fastenings bottom strapping to the end and ordinary floor beams, the floor will be sufficient for the perception of horizontal loads, additional anchoring is needed only to resist vertical forces. 
Rice. 9.32 Anchoring the outer walls of a one-story and two-story house to resist vertical and horizontal forces.
- Wall anchoring to resist vertical wind loads
- Concrete foundation slab
- Timber frame plinth floor, securely anchored to the foundation
- Anchoring timber frame walls to the basement frame
The greatest need for anchoring occurs during the construction period, when the frame of the house is assembled and sheathed, and the windows and doors are not installed. In this case, due to open openings, excessive pressure is created inside the structure, which, together with the normative wind loads on the wall and roof, can lead to very disastrous consequences.
Tables 9.9 and 9.10 are based on the original Norwegian technical manual №520.241
... and is used to determine the spacing of anchorage elements based on their ability to withstand horizontal and vertical loads.
Table 9.9 Determination of the pitch of anchoring elements
The recommendations are valid only for two-storey houses with a ceiling height of ~ 2.4 m and a house width of 9 m. 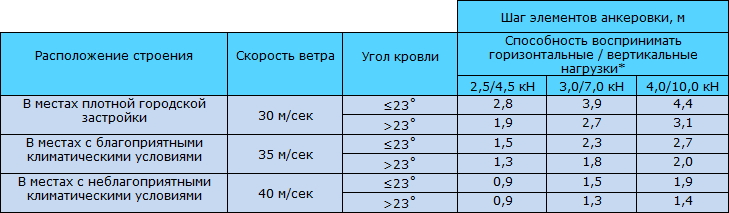
*) See table 9.10.
Table 9.10 The ability of the anchoring elements together with metal corners and with 4.0x40 nails to perceive horizontal / vertical loads. 
Responsibility for decisions made in the project regarding anchoring
Usually in Norway, the calculation of the anchoring of the building envelope is carried out by the designer himself, the so-called "ansvarlig prosjekterende" - (PRO). In some cases, in particular for two-storey houses with a ceiling height of ~ 2.4 m and a house width of 9 m the final decision can be made by a certified carpenter, guided by the tables above, without resorting to complex calculations. At the same time, he must know well and apply in practice the Norwegian technical manual. №520.241
... In this case, it is the certified carpenter who will perform the function of the designer (PRO) and be responsible for the decisions made.
If a building is located in a place with unfavorable climatic conditions, is located high in relation to the surrounding landscape, has long roof overhangs, facades not covered with walls, a small roof angle, etc., then a certified carpenter does not have the right to make decisions on his own. The law, the Norwegian national NS standards and building regulations oblige him to seek the assistance of a consulting engineer, the so-called "rådgivende ingeniør" - (RIB). However, a certified carpenter can continue to function as a PRO. Thus, the optimal distribution of labor and efficient use of the resources of highly qualified engineering and technical personnel is achieved.
Please note that “simple” structures are not always such - for example, you need to pay special attention to anchoring canopies and other structures with facades not covered by external walls. If such a structure is to be built in a place with unfavorable climatic conditions, the involvement of a consulting engineer is mandatory.
Anchoring timber framed walls to a concrete foundation slab
If the project provides for the installation of walls on a concrete foundation slab, then anchoring of the walls will be required to resist both horizontal and vertical wind loads. In such cases, C25 expansion anchor bolts are used to secure the lower wall trim to the foundation slab. .
In this case, one-story houses must be fixed to the foundation slab with expanding anchor bolts through a reinforced metal corner with a stiffener, as shown in Fig. 9.33.
If the house is two-story or with an attic, then the walls of the first floor must be attached to the foundation only based on the perception of horizontal loads. In such cases, the use of metal corners is not necessary, anchoring is carried out only using expanding anchor bolts with appropriate washers.
Determination of the pitch of the anchoring elements is carried out according to tables 9.9 and 9.10. See an example of anchorage selection below. 
Rice. 9.33 Anchoring timber framed walls to a concrete foundation slab
- Concrete foundation slab
- Wall anchoring to resist vertical and horizontal wind loads. The diameter of the bolts, and the number of nails for fastening the metal reinforced corner to the rack is selected according to table 9.10.
- Wall anchoring to resist horizontal wind loads
- Minimum distance between bolt and foundation edge
Initial data:
One-storey house 7.0 m wide and 12.0 m long with rafter system from free supported trusses, the roof slope angle of 40 degrees must be fixed to the concrete foundation slab. The climatic conditions at the building site are unfavorable, the wind speed is 40 m / s, the project provides for the use of a double lower strapping of wooden frame walls - 2 pcs. 36x198 mm.
Solution:
In this case, anchoring the walls will be required to resist both horizontal and vertical wind loads. Therefore, it is necessary to use expansion anchor bolts in conjunction with reinforced metal corners. In table 9.10 we see that the M10 expanding anchor bolt has the ability to take horizontal loads up to 3 kN. When used together with reinforced corners and 6 pcs. nails 4.0x40, the M10 bolt has the ability to take vertical loads up to 7 kN.
In the same table we see that minimum distance from the axis of the expanding anchor bolt to the edge of the foundation slab, it must be ≥ 65 mm. The expansion anchor bolt must penetrate at least 60 mm into the foundation plate. Because the project provides for the use of a double lower strapping of wooden frame walls - 2 pcs. 36x198 mm, the minimum bolt length is at least 134 mm (36 + 36 + 60 + 2). Therefore, in this case choose expanding anchor bolts M10, L = 140 mm.
From table 9.9 we see that the spacing of the anchoring elements in this case will be 1.3 m along all the outer walls of the house... Because the ability to take horizontal / vertical loads for this type of anchoring elements is 3.0 / 7.0 kN.
This means that with the selected expanding anchor bolts, together with reinforced metal corners, all corners of the house and every second post must be fixed to the foundation slab.
Anchoring timber frame walls to the basement frame
If the project provides for the installation of walls on the frame of the basement, then anchoring of the walls will be required to resist both horizontal and vertical wind loads. To counteract horizontal wind loads, the lower wall trims are securely attached to the basement beams. To resist vertical wind loads, the wall frames are fastened with nails / screws and perforated steel strips to the floor end beams as shown in fig. 9.34. See an example of anchorage selection below. 
Rice. 9.34 Anchoring timber frame walls to basement with perforated steel tapes
- Impregnated bed, securely attached to the foundation strip
- Basement end beam with a cross section of at least 48x223 mm
- Wood frame wall rack
- To counteract vertical wind loads, the wall frames are attached to the end beams of the basement floor using nails and steel perforated strips 2.0x25 mm. The number of nails and the pitch of the tapes are calculated according to tables 9.9 and 9.10.
Rice. 9.35 Anchoring timber frame walls to the basement with timber battens
- Impregnated bed, securely attached to the foundation strip and the end beam of the basement floor securely attached to it
- In this case, the project provides for membrane wind protection
- The wooden lath 23x36 mm must be fastened with at least 6 nails, securely connecting the wall post with the end beam of the basement floor and the impregnated bed under it, while the wooden battens should protrude 40 mm beyond the impregnated bed under the basement floor.
The walls of the first floor of two-story houses or houses with an attic do not require additional anchoring to resist vertical wind loads. This means that the frames of the walls of the 1st floor of two-story houses must be attached to the frame of the basement floor only through the lower strapping to resist horizontal wind loads. See Fig. 9.32.
An example of the choice of anchoring timber frame walls to the frame of the basement floor
Initial data:
A one-story house with a width of 8.0 m and a rafter system of free supported trusses, a roof slope angle of 20 degrees must be fixed to the basement frame. The house is being built in a dense urban area. The wind speed at the building site is 30 m / s. The basement floor is already fixed to the foundation, it is necessary to calculate the anchoring of the outer walls to withstand vertical wind loads.
Solution:
We accept as anchoring elements steel perforated strips 2.0x25 mm fastened with 4 nails 4.0x40 on each side. According to table 9.10, the ability to take vertical loads for this type of elements is 4.5 kN. From table 9.9 we see that the pitch of the anchoring elements in this case (2.5 / 4.5 kN) will be 2.8 m along all the outer walls of the house... Knowing that the center-to-center distance between the posts is 600 mm, we decide to mount perforated steel strips at all corners of the house and along the walls along every fourth post, which will give us a step of the anchoring elements ~ 2.4 m.
Care must be taken to ensure that the distances between the nails and the ends / longitudinal edges of the wall and floor parts are not less than those shown in Fig. 9.34.
Anchoring timber frame walls to the floor frame
The walls of the 2nd floor, mounted on the frame of the interfloor floor, require anchoring to resist both horizontal and vertical wind loads, as well as for the walls of single-storey houses.
In this case, to counteract horizontal wind loads, the lower wall trims are securely attached to the floor beams. To counteract vertical wind loads, the wall frames of the second floor are fixed with nails / screws and perforated steel tapes to the wall frames of the first floor, while the tape passes along the end beam of the floor slab as shown in Fig. 9.36.
In external walls with vertical wooden lathing for external cladding, wooden slats with a section of 23x36 mm can be used as anchoring elements. The slats should be firmly attached to the wall uprights by 6 nails 3.1x90 from the bottom and top of the interfloor overlap. See fig. 9.36. 
Rice. 9.36 Anchoring timber framing walls to intermediate floors with perforated steel strips and timber battens
- End beam of interfloor overlap
- To counteract vertical wind loads, the racks of the frames of the walls of the 1st and 2nd floors are fastened through the end beams of the basement floor using nails and steel perforated strips of 2.0x25 mm. The number of nails and the pitch of the tapes are calculated according to tables 9.9 and 9.10.
- In external walls with vertical wooden lathing for external cladding, wooden slats with a section of 23x36 mm can be used as anchoring elements.
- The slats should be firmly attached to the wall uprights by 6 nails 3.1x90 from the bottom and top of the interfloor overlap.
All reference materials are provided by the Norwegian Research Institute
Sincerely,
In this article, we will consider the most important stabilizing elements of any frame structure made of wood. Let's decide why they are needed, what materials to use to create blocks and jibs. We will also pay attention to the methods of mounting these parts.
The wooden frame in the vastness of the former Soviet Union is gradually gaining popularity. If into long-lasting lungs wooden houses many of our citizens, due to a number of prejudices, cannot yet believe that auxiliary and technical buildings (sheds, garages, premises for animals, baths, etc.) frame technology even skeptical people build with a bang. Which is understandable, because this method allows you to build quickly and reliably, it is not difficult to find suitable edged boards and beams, they are relatively inexpensive. The technology for the construction of lumber frames is quite simple so that a professional can do everything with his own hands. True, it is also not without important trifles (seeming at first glance insignificant), which, meanwhile, must be known and must be applied in practice.
Why use blocks and jibs
When a person puts on himself a skeleton, for example, of a Canadian frame house, a rather material-intensive wooden frame appears before his eyes, the main parts of which are made of a rather massive edged board (usually 38-50 mm thick and 150-200 mm wide).
It is used for the manufacture of vertical posts, upper and lower strapping, floor beams, roof rafters ... The material is used here with a low percentage of moisture (about 18%), often generally dry and planed, in a word, reliable in all respects.
But there is one "but". All the main parts of the frame house are located in parallel and perpendicular to each other, forming squares and rectangles that are not too resistant to "folding" under lateral load. In addition, many elements of the frame have a fairly large length and therefore the board is prone to bending "along the face". As a result, in order to resist various forces (including winds or earthquakes), special elements must be introduced into the frame that can stabilize the structure. For this, jibs and blocks are used.
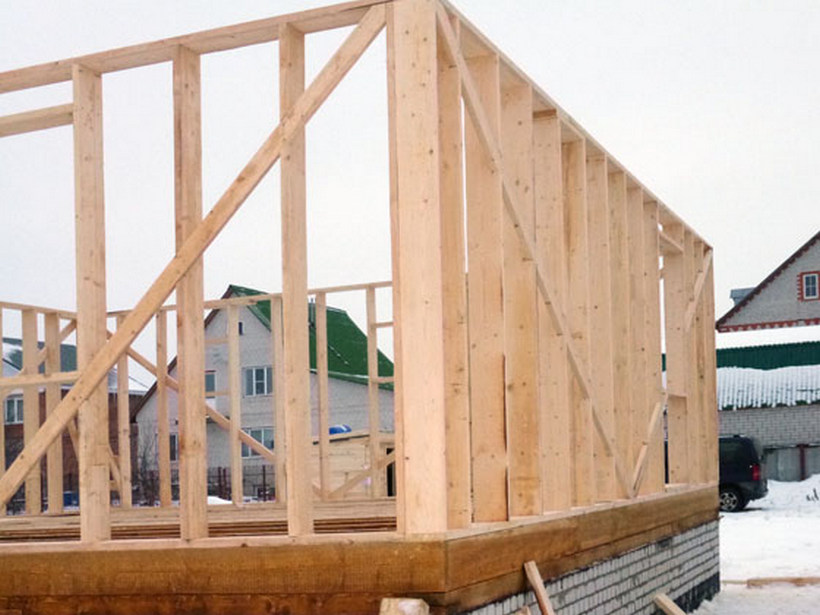
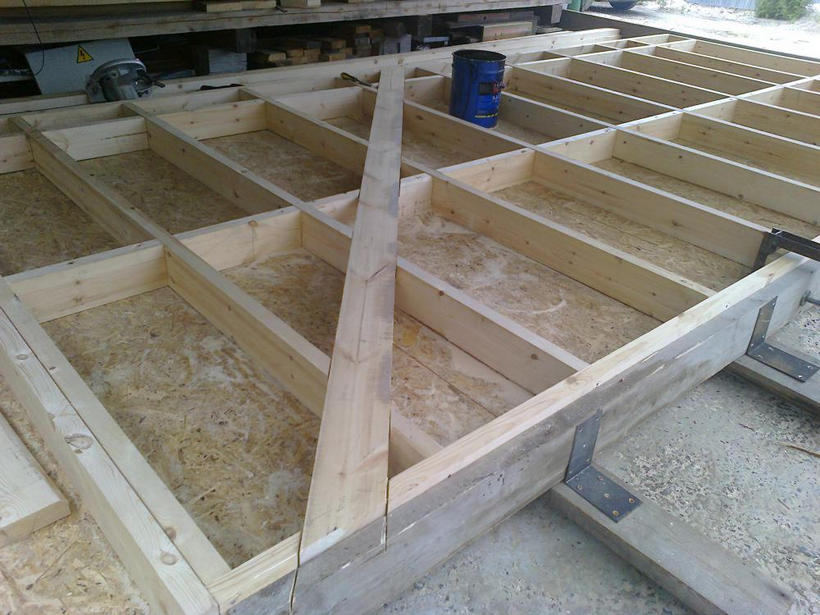
A diagonal element is called a jib. timber frame which, after installation, forms triangles. And the triangle, as we all know, is the most stable and reliable figure; it is on its basis, for example, that various “farms” are created, which have excellent bearing abilities.
It should be noted right away that jibs are used in two forms:
- As a part for temporarily fixing the racks in design position(especially important if the wall is assembled from single racks in place and does not have a sheathing). It is mounted overlay, it will be removed before the cladding.
- Like a part embedded in a frame that will remain in it forever. It is mounted using a tie-in method.
Stationary jibs are not always required to be installed. Its functions can be successfully performed by a cladding material, but only if it is reliable and represents a large sheet format - for example, such are OSB-3 boards or plywood with a thickness of 12 mm or more. Due to the significant area of each sheet nailed to the frame and a large number of fasteners included in the racks and straps, the plate begins to work as a stabilizing pad, significantly increasing the diagonal strength of the walls. However, these materials are not always used for cladding, in many cases small-piece products are immediately sewn on the racks - lining, block house, siding, or relatively thin sheets of corrugated board. An exception may be cladding made of lining, imitation of a bar, or planken - using the herringbone method (that is, diagonally). In some cases, OSB and thinner plywood can be used, or different materials can be combined on the wall. Then you cannot do without jibs, and even with good sheet sheathing, jibs are often used by designers and installed by craftsmen.
So, the jib is stationary. In the overwhelming majority of cases, it is made from edged coniferous boards, although in America there are also special metal profiles for these purposes, but they have a number of disadvantages and limitations. The section of this board is relatively small (the classic version is lumber 25X100, 25X120, 25X150), and there is a good reason for that. The fact is that the jib cuts into the frame, and, therefore, theoretically, it can weaken it. Therefore, there is such a rule that the jib should not be thicker than a fourth of the thickness of the racks.
Another reason for choosing a relatively thin board is economic feasibility and energy efficiency. Coniferous boards 25 mm thick do an excellent job here with the task - this is shown by world operating experience and any calculations. It just makes no sense to buy a board that is more expensive and heavier, which, by the way, will take the place of a heater inside the frame.
Sometimes from scraps of racks (for example, with a section of 40X150 mm), diagonal crossbars are made, which are fastened inside the frame, but it takes a lot of time and effort, does not allow the walls to be properly insulated (wood, after all, is more heat-conductive than basalt wool).
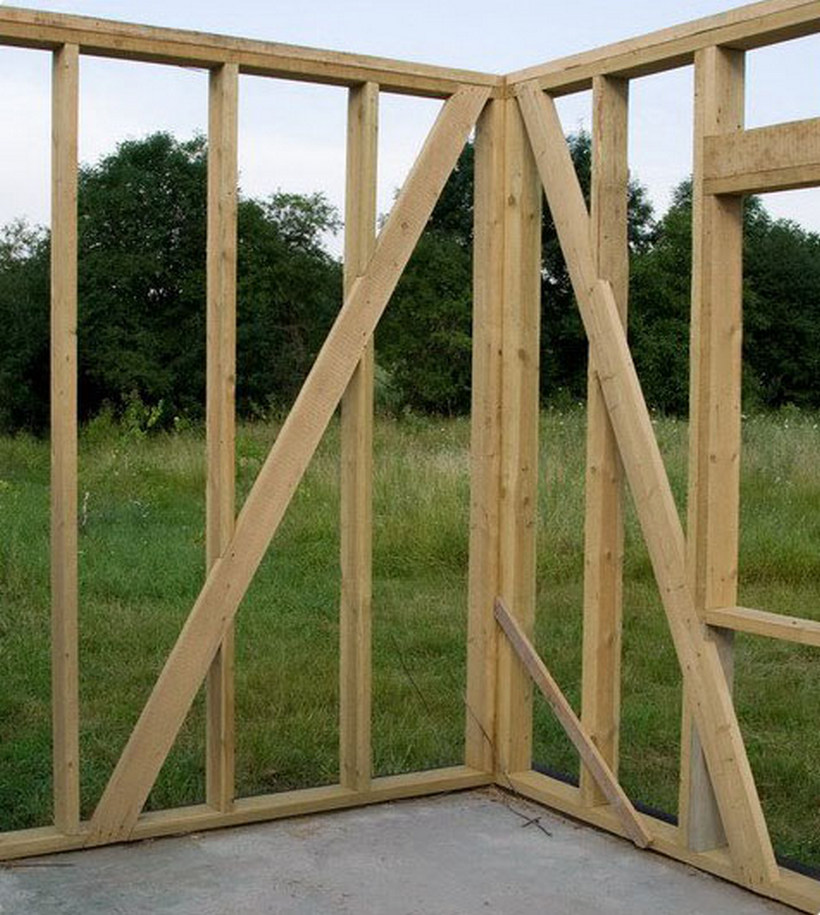
As for the required number of jibs, experts believe that at least two jibs should be placed on each wall along the edges in the area of the outer corners. If the wall is very long, then similar elements can be additionally placed somewhere in the middle.
The jib should be located at an angle of 45 to 60 degrees in relation to the racks, then it can properly play the role of a diagonal strut. So that the house is stabilized in both directions - jibs at different ends outer wall make multidirectional. The jib always starts from the top of the outer corner and deviates towards the center of the wall below (that is, it forms something similar to the letter "L" with the corner post).
It is imperative that the jib board cuts not just into the uprights, but also into the lower and upper harness. Otherwise, the meaning is lost in it, because the main task of the jibs is to prevent the mutual displacement of the upper free strapping relative to the lower one, which is rigidly fixed to the foundation.
If, for some reason, it is impossible to make a jib from strapping to strapping at an angle of 45 to 60 degrees (for example, the house has a huge panoramic glazing) - then it is better to abandon this element altogether and rely on high-quality plywood or OSB sheathing.
Installation of stationary jibs is carried out by the cut-in method, that is, our task is to ensure that the board becomes flush with the frame and does not interfere with the sheathing. For this, samples of the appropriate depth and width are made on the racks and on the harness boards.
In principle, the moment on which side of the wall the jibs should stand is not limited. Outside, masters like to place them from the point of view of ease of installation, but it is believed that they installed on the inside will have less effect on the heat transfer resistance of insulated walls.
The jibs are fastened with nails - two or three pieces are used for each rack, for each connection with the strapping - 3 pieces. As a rule, the element is first just baited, and after installing all the frames on the floor, checking the diagonals ... - they are finished off.
Blocks
In frame technology, blocks are called built-in elements that are mounted between vertical posts and are a kind of jumpers. Unlike the jib, the block is not located at an acute angle to the racks and is not tied with straps in any way - it is attached horizontally, at 90 degrees to the longitudinal direction of the racks. In addition, the block does not crash into the body of the racks, but a rasp is installed between them.

Note that blocks can be used not only in walls, the same parts are often placed between floor beams and joists, and even sometimes between rafters.
Blocks are used both when creating external walls and when assembling frame partitions. In both designs, these elements perform a similar set of functions:
- The racks are tied together, preventing them from moving relative to each other. That is, this is how we mechanically fix the chosen placement step, prevent the board from spinning. The frame becomes stiffer and more stable.
- They play the role of a basis for fastening cladding materials. For example, there is a technology when OSB or plywood is sewn on the outside horizontally, which means that the long side of the sheets hangs in the void - and this is unacceptable. Therefore, blocks are installed in the joining zones of the plates. A similar situation can be if the cladding is mounted vertically (drywall from the inside, for example), but its length is not enough to cover a high wall from floor to ceiling. You have to add the facing material in height, and at the junction - again, put the block as a support platform.
- In some types of walls, the block becomes an element of fire protection, since after treatment with fire retardants, the board does not burn itself and does not allow the fire to spread vertically through the voids.
- In some designs, the block acts as a reliable embedded element, which allows you to subsequently hang it on the hollow frame wall something massive: heating and household appliances, furniture, plumbing ...

The block design is extremely simple. This is an edged board, which in cross section does not differ from the dimensions of the racks. Often, blocks are cut from rejected lumber (knot curvature, cracks) purchased to create the racks, or they are just scraps from the planks of the racks. They are marked and cut according to a template, since the blocks along the length must clearly correspond to the repeatable distance (clearance) between the posts. In place, the blocks are placed along the edge of the coated cord, and the fastening is done with nails through the racks.
We continue the series of texts about the nodes of the walls of a frame house. Finally we got to the jibs. Jibs of a frame house- an important element of the wall, which is needed so that the house does not fold in any direction after construction. If you read news about careless builders on the forum, you probably saw such situations.
Jibs in a frame house
In order for your frame house to stand for a long time and firmly, jibs are cut into the racks of the walls of the frame house.
Important: the jib of a frame house should cut at an angle of 45-60 degrees into both straps (lower and upper). Sometimes the second upper harness also cuts in (as in the picture above), but less often.
Video on how to cut a jib into frame house?
How to do it in 1 minute
Ukosiny must be applied if no slabs are planned on the walls (OSB-3, plywood). With slab cladding, jibs are not needed, it is more than 5 times stronger than jibs (if it is OSB or 12 mm plywood). But for a one-story frame house, jibs are quite enough.
In any case (with or without slab cladding), you will need temporary jibs.
Temporary jibs in a frame house
Temporary jibs are used at the stage immediately after the walls have been lifted, while they are not yet fixed on top with floor joists, and the slab sheathing is not installed. Temporary jibs help the walls not to fall anywhere and stand in a given place. It is better not to skimp on the number of boards, then they are easy to remove.
It all looks like this: 
Small bonus:
How to raise a cladded wall(Photo). Note that even with slabs, the builder puts temporary jibs. 
Although this is rarely done, but maybe someone will decide that it is more convenient for him. I didn't translate, everything seems to be clear.
Little bonus # 2:
How to attach the second top wall trim frame (photo) 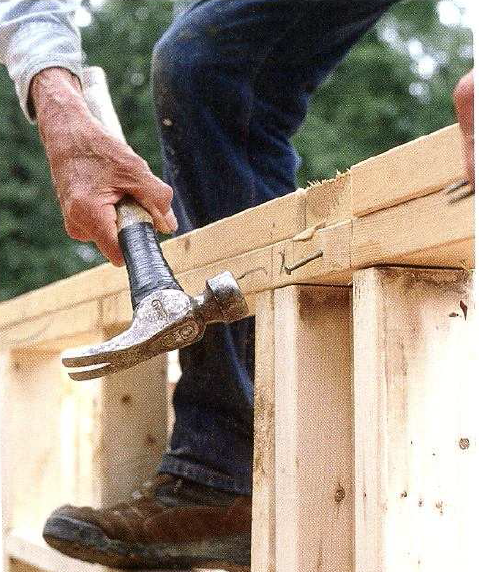
Ask questions in the comments or personally to me in individual consultations, and also remind you that our design team will develop for you in accordance with all your wishes.
