Monolithic foundation slab. The foundation is a slab: construction technology, how to fill it correctly. What makes up the price of a monolithic slab foundation.
The device of a slab foundation is economically justified with an unsatisfactory bearing capacity of the soil in a building spot, a high GWL, a high content of clay that swells during freezing. Do-it-yourself construction of a slab is possible on a flat area with a guaranteed absence of third-party communications.

The perimeter wall skirting board is where the aboveground wall insulation and basement insulation or connection to the basement are connected. This part of the wall must be insulated to a frost-free depth in order to avoid freezing of foundations or even the formation of fillet shapes. This insulation must withstand mechanical damage and water that accumulates in the basement after rain or melting snow.
It always depends on the specific field conditions - lays the foundation slab in the ground. A pedestal is such a sensitive detail of a building that during its design and construction itself, there are often serious mistakes, both in single-layer and in multi-layer insulated walls. A high-quality implementation without significant thermal bridging is not difficult and costly. We only need basic knowledge and an insulating material that is solid, non-absorbent, insulating, moisture-free and allows adhesives to be applied well.
When specifying the main disadvantage of the slab base - high cost, opponents of this technology do not take into account that the slab is also an overlap, floor on the ground, it allows you to integrate a heating system into it. Ultimately, this is cheaper than a deep strip base, the amount is quite comparable to MZLF with a safety margin of 300%.
Areas suitable for slab foundation applications
The thermal insulation of the base must extend 80 cm below ground level. The thickness of this insulation is usually 2-3 cm less than the thickness of the upper thermal insulation system. It should be at least 10 cm, the better. From the point of view of protecting the building from moisture on the ground, there is no need to carry out additional waterproofing on the vertical sections of the base of the pedestal, provided that the soil of a part of the thermal insulation is well drained. Insulation is recommended after building a house.
Site construction - insulation base plate, base plate, thermal insulation
Don't forget about: Drainage around the house - drainage. Can also be filled with sticky foam? In the drawings of building permits, the thermal insulation is precisely described so that the insulating polystyrene board is cut from the back side in the upper corner to eliminate the inequality, and the entire area of the upper part of the insulating board must be filled with construction adhesive, which is supposed to be able to "hold" on sheet metal for a long time.
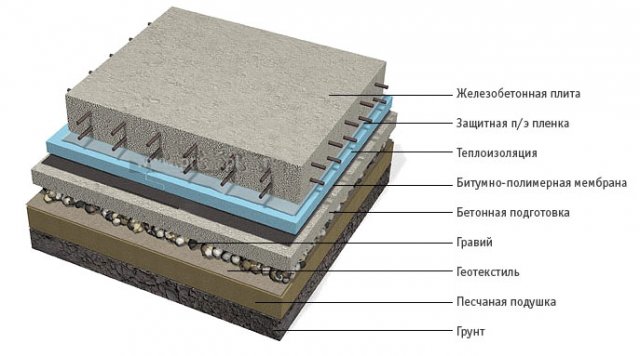
The scheme of a pie protected from frost heaving of a slab of a private house looks like:
- sand - 15 - 20 cm, replaces heaving soil;
- crushed stone - 15 - 20 cm, is a drainage layer;
- communications - necessary for life support systems;
- drainage - laid along the perimeter, collects water from the ground, removes it from concrete structures;
- concrete preparation - thickness 5 - 10 cm, used as a rigid base for roll waterproofing, which in its absence will be torn by sharp corners of rubble;
- waterproofing - two - three-layer, roll materials on a polyester, fiberglass basis (Technoelast, Linokrom, Bikrost) are recommended, the layer protects the concrete structure from moisture;
- thermal insulation - 15 - 30 cm, keeps the geothermal heat of the bowels under the sole of the house, heaving soil does not freeze, there are no heaving forces;
- stiffening ribs - increase the strength of the slab, are made across the long wall of the house and along the perimeter, directed downward from the sole;
- armopoyas - two reinforcing meshes with a cell of 20 x 20 cm from rods of 12 - 16 mm;
- underfloor heating - water circuits laid on top of the reinforcement or between the grids;
- concrete - thickness 20-50 cm, provides rigidity, strength of the slab;
- flanging - made of polystyrene foam, protects the plate at the ends;
- insulation of the blind area - with expanded polystyrene sheets, the perimeter of the insulation is increased, cutting off lateral freezing.
The main advantages of a slab foundation are:
The top of the board is left and the board is shredded on sheet metal to keep the gap as small as possible. A building permit project is a document. Drawing where the edge of the board is shown in detail, indicating the subsequent construction of the house. The drawing clearly denotes the "mutter - customer supply" area, and there is the "pitch" of the farmer's plate.
The speed, construction efficiency and thermal insulation performance are completely different from classic bricks. Building a self-help garage is not as difficult as building a home. And especially if it's a small garage where you only want to hide your four-wheeled bike from adverse influences. You will need to start work on a construction site and then you can quit yourself.
- lack of special equipment - all work can be done by hand;
- minimum excavation - it is enough to remove the fertile layer.
The main costs are for reinforcement, insulation, waterproofing and ready-mixed concrete, which is better to order for guaranteed filling of the formwork in one go.
Step-by-step instructions for installing a slab foundation

However, you can use other materials that are more available for your site. However, remember that it is always best to think about and, if necessary, consult the experts. They say that mistakes are being studied. In construction, however, mistakes can get very expensive!
The Porotherm garage is a building that must be made in accordance with the Building Act. Therefore, first of all, contact a designer who will explain to you what permission you need. For the construction of a garage with a built-up area of up to 25 m 2, a height of no more than 5 meters and only 1 above-ground floor, you do not need a building permit or an advertisement in accordance with the Building Act. However, you need a so-called territorial consent issued by the building.
Step by step diagram slab base devices
Research and calculation

Taking soil samples
When designing a monolithic slab, it is necessary to take into account the experience of similar structures in the region, the results of surveys (ground level, the nature of the soil, the bearing capacity of the formation), the conditions of the technical specification (number of storeys, wall, roofing materials). Prospecting includes a minimum of five geological pits (corners + mid-slab).
Location, size and appearance of a small garage
The location of the garage is greatly influenced by the size of the land, the orientation of the driveway and, just as important, the actual location of the family home. The ideal location is in the north on the north-east side of the hotel. Since it is inappropriate to be located in the south or west to the northwest side.
When from the driver's side we consider the free space 0.6 m wide and 0.2 m opposite. The amount of space before and after the vehicle is 1 meter. The height of the garage is at least 2.1 meters. Appearance garage is most dependent on the shape of the roof, the slope of the roof and the selected roof. For a small slope, we can use a light roof. The claims for farms are much higher if you use ceramic or concrete bags instead of shingles.
The result of the survey is the characteristics of strength, deformation of different soil layers in the building patch, and predicting changes chemical composition during the operation of the dwelling, the degree of aggressiveness of groundwater.
It is necessary to compare several solution options to identify the best combination of construction budget, technical characteristics. Step-by-step instruction calculation:
Schematic demonstration of roofs over a small garage. Preparation of materials and tools - you can visit the construction site or order some material online. Ordering a dredger and removing clay - if you want to excavate the excavation yourself, you can skip this step. What about artisans? - bricklayer, tile, electrician, maybe even water.
- How do you bring electricity or water to the garage?
- Don't forget to penetrate the foundation.
- concrete grade - M200 and higher for the slab, M50 for preparation, according to the foundations of structures, buildings;
- the depth of the groundwater level - anti-corrosion measures in the presence of verkhovodka;
- when calculating prefabricated loads, the weight of the slab is not taken into account on sandy soil;
- calculates the bearing capacity, deformations that can destroy the structure.
For this, special programs are used that have proven the performance of the foundations made according to their results in real operating conditions. The main documents at this stage are:
Surely you will find many useful tips that you may or may not be using. This is not enough for you, because you will also need creative thinking... Even though building a garage is “easy,” you will encounter many hitchhikers that will make your life uncomfortable. You can use construction benches or wood dowels to secure the perimeter. Removal is done manually or mechanically.
In any case, mark the perimeter of the base, such as lime or spray. Perhaps you can figure out how to remove a large area. If you are using heavy technique for digging, then the second option will be better. On the other hand, if you can handle the basics yourself, use the first option. By using hand digging, you will get more accurate drilling and you will save some of the formwork. Bagrista can easily break a punch.
- classification of soils -;
- enclosing structures, load-bearing -;
- anticorrosive power frame of the building -;
- design, manufacture of MLF -.
Unlike tape bases, the slab has an increased bearing area, the prefabricated loads from the building are distributed evenly, the strength reserve is very large.
Schematic detail of the base of a small garage. The width and depth of the foundations depend on the subsurface and the material from which you will build the perimeter walls. Porotherm Freemasonry is much lighter than solid bricks, so there is no need for a solid foundation.
Manufacturing of formwork and reinforcing mesh
Also, in this small garage we will be using 175mm wide bricks. Unless you are using lost formwork, you probably do not need to create wood formwork. In the picture above, you have detailed information about this when removing the pottery just under the built-in area. What to remember is penetration for electricity and water.
Layout and excavation

We remove the fertile soil layer
It is forbidden to pour the slab over the fertile layer. The house layout scheme looks like:
- axes - are carried out in the building spot with a cord fixed on pegs installed beyond the perimeter of the drainage system;
- pit - 0.5 meters more than the slab on each side (for the drainage device), the slab protrudes beyond the dimensions of the building by at least 10 cm (depending on the project).
Due to the small amount of work to remove the fertile layer (20 - 40 cm) for a residential building, the work is done by hand without the involvement of special equipment. At this stage, it is necessary to provide protection monolithic construction from soil moisture (verkhovodka). For this, drains are laid along the perimeter:
To preserve the concrete mix, you can place concrete or old concrete in the concrete. Remember to insert reinforcement to connect the upper concrete slab to the base. The easiest way to roof a small garage is to use a classic tabletop. It has several advantages over saddle, hips and flat roofs. The most basic construction is the most important. Simply attach two garlands in a wreath, then place the rafters on top of them and slide a wooden plank or wood plank onto the rafters. Finally, lay the foil or cardboard outside and secure the roof.
- geotextile overhanging the edges of the ditch;
- a layer of compacted rubble;
- perforated pipe (corrugated or smooth in a dornite filter) with a slope towards the underground reservoir;
- backfill with a natural filter (crushed stone of fraction 10/20);
- covering with the remaining geotextile.
Drains must not be laid under the concrete preparation or foundation slab. The backfill height should be level with the crushed stone cushion of the base.
There is so much crying when our head starts to move. We need electricity to supply lights, power outlets, and control the sectional doors. We let the new plaster fully mature and penetrate. Penetration will unify the surface and reduce color consumption. Follow package directions to thin out the color and paint your entire garage.
In a few months we will paint the room again. Building a small self-help garage can be a superhuman performance for some of you. Don't try to save anywhere in the wrong places, but on the other hand, don't throw money out the window.
In addition, after the slab is poured into the building, it is impossible to enter communications, therefore, cold water supply pipelines, sewers are laid at the same stage. They do not have to be buried below the freezing mark, since the thermal insulation of the base of the slab will retain geothermal heat, and the ground will not freeze under the cottage. A depth of 1 - 1.2 m is sufficient.
Pouring with a concrete pump
Other resources to help you. A minimum of 24 hours of acclimatization is recommended in the new environment before the board is used on site. These boards should be fixed immediately after installation outside the building: on walls and roofs, reliably protected from adverse weather conditions. It may be necessary to sand the edges to get an even surface before placing finishing items such as bitumen roofing tiles. Depending on how the edge is cut, we distinguish two types of boards.
Substrate

We arrange a sand pillow. Sealing is required.
Another measure to reduce the heaving forces is the substrate. It is made by hand using the technology:
- layer-by-layer compaction of sand - 10 cm backfill, abundant moisture, ramming with a vibrating plate, a second layer of the same thickness;
- layer-by-layer compaction of crushed stone - fraction 10/20, similar.

Straight edge insert, 4-sided edge insert, milled and tongue. During assembly, the front plate must be routed so that it can be identified in the future. For structural reasons, it doesn't matter if the plate is printed face up or face down. A toothed-groove seal has left and right sides. The right side is on this side of the plate, after which we keep a smooth and even surface after assembly. On the left side, at the joint, you will see a small expansion joint and an identification mark on the surface of the plate.
We lay a layer of rubble.
Instead of crushed stone, sand, a mixture of ASGs can be used to a depth of 40 cm with compaction using the specified method. Only in this case monolithic base at home will receive reliable support on the lower layer.
Concrete preparation and waterproofing

Plates with straight edges must be connected to beams with min. Dilation 3 mm around the plate. The tongue and groove design automatically provides an expansion joint. When installing boards between walls or on floating floors, it is recommended to maintain a 12mm connection between the panel and the wall. The slabs should be laid on a main axis perpendicular to the joists, and the connection of the shorter edges of the slab should always be on beam ceilings... Long slab edges not supported on beam slabs must have contoured tongue and groove edges, suitable support or fasteners.
Making concrete preparation.
For a monolithic slab, a lower waterproofing cut is required to prevent corrosion of concrete and reinforcement inside it. Laying a carpet of waterproofing from roll materials on a layer of crushed stone does not meet the operating conditions:
- sharp edges of stones break through the material;
- seams cannot be properly sealed.
Therefore, when building the foundation of a house with your own hands, concrete preparation is often used. This is a common screed that solves two problems:
On uncovered roofs, during settling, drainage holes should be provided to drain the water. In the case of ground floor wooden flooring, the winding must be applied to the underside of the ceiling structure plus additional vapor barrier directly to the ground. Black drywall screws are not suitable for mounting plates. To increase the rigidity of the floor, the slab can be bonded to the joists with a chemical solvent based fixing adhesive, and tongue and groove bonding is recommended for floating floors with minimal expansion. 1 cm between floor and wall.
- providing a flat surface on which it is easy to stick the bitumen base of Bikrost, Linokrom, Technoelast, reliably seal the seams;
- creating an even base of the slab, enhancing its strength, stabilizing the geometry.

We install waterproofing.
The method of pouring into the formwork is standard, the screed thickness is 5 cm, reinforcement is not required. Roll materials provide a minimum budget for construction, impregnation, primers are not used here. The recommended overlap of the strips is 15 - 20 cm, the seams are treated with hot or cold bitumen-based mastics. The edges of the waterproofing carpet are extended beyond the perimeter concrete preparation, so that after pouring the slabs, run them on the sides and top surface.

We put insulation under the entire building area.
Extruded XPS expanded polystyrene is used as a thermal insulator. It is stacked in two layers (10 + 10 cm) back to back for smooth slabs. If stiffeners are provided in the project, the first layer is laid end-to-end with your own hands, in the second, gaps are created along the width of the ribs:
- around the perimeter;
- perpendicular to the long wall after 3 m.
In this case monolithic slab has a large margin of safety, the house is spared from distortions during operation.
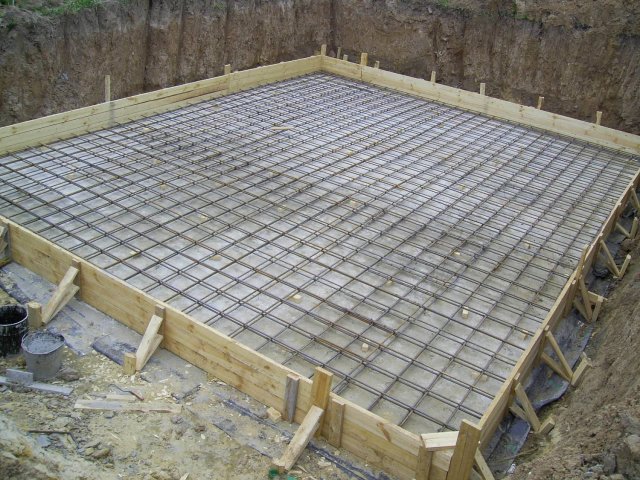
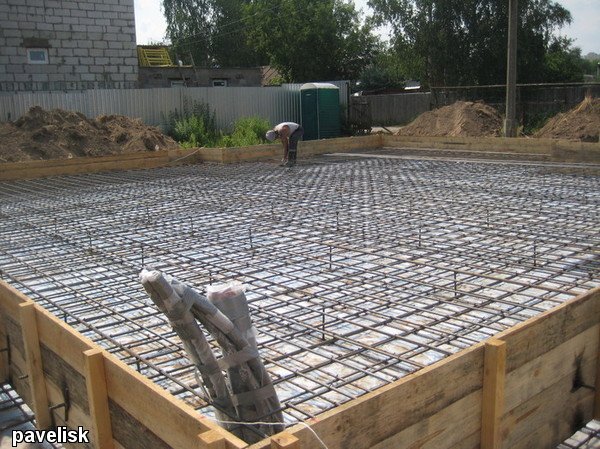
Reinforcement

We create reinforcement cage according to the project.
Reinforcement of the slab with armored belts is carried out in accordance with the regulatory documentation for reinforced concrete, concrete structures. the reinforcement scheme is as follows:
- production of clamps - a smooth 6 mm rod, bent in the form of a square, triangle;
- creation reinforcement mesh- longitudinal, transverse rods of a periodic profile with a diameter of 12 - 16 mm, tied with a knitting wire or connected by welding (cell 15 x 15 cm);
- reinforcement of stiffeners - four longitudinal bars connected with clamps;
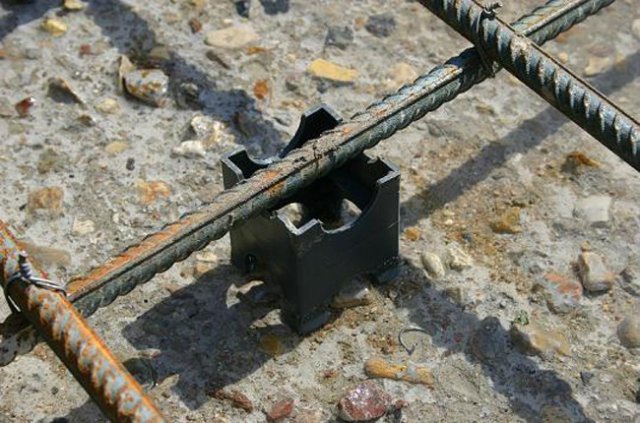
- laying the lower belt - installed on concrete pads (thickness 15 - 25 mm, section 10 x 10 cm) to provide a protective layer (reinforcement must be sunk in concrete);
- installation of the upper belt - clamps are placed on the lower grid, the upper card is attached to them.

From the ends, the plate is reinforced with U-shaped clamps.
It is not advisable to use separate rods inside the armored belt. They must be bent on curved sections, in the places of communication entry points with common grid maps. To save reinforcement, the cell is in some cases enlarged to 20 x 20 cm.
Formwork
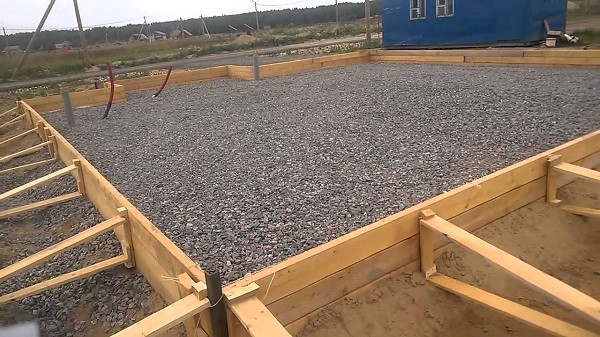
We install and strengthen the formwork.
To pour a monolithic structure with your own hands around the perimeter, you need to install the formwork. It is built from OSB boards, Chipboard, plywood or edged boards in the form of shields. The inner surface is sheathed with roofing material or foil to prevent the concrete from chipping off during formwork. The main document in the construction of formwork are standards; ...
Shields are mounted around the perimeter, to protect the structure from freezing, 10 cm of expanded polystyrene can be vertically laid inside them. This insulation is also laid under the blind area of the house to prevent lateral freezing. It is laid at the level of the base of the slab, flush with the bottom or top layer of the heat insulator inside the formwork.
Pouring and maintaining concrete

Pour concrete into the formwork and level the surface. Sealing is required.
Requirements for the design and manufacture of the MLF are specified in the standards according to which the work is carried out. When pouring, the following conditions must be met:
- filling the formwork with concrete in one go;
- the maximum interval between feeding the mixture with a mixer after vibration compaction of the previous section is 2 hours in warm weather;
- it is forbidden to distill concrete with shovels around the entire perimeter from one place - it is necessary to rearrange the mixer or use a concrete pump;
- vibration compaction is performed before the appearance of cement milk, the hiding of rubble and the absence of bubbles;
- the step of lowering the nozzle of the deep vibrator cannot exceed its radius of action;
- in winter, the mixture is heated with a cable laid inside the formwork, covered with film materials, heating with steam;
- it is forbidden to lean the nozzles of the vibrators against the grids of the armored belts;
- demoulding is possible on the fifth - seventh day under normal conditions;
- the concrete mirror must be protected from precipitation, covered with burlap, moistened from a watering can in the heat.
Subject to the technologies, recommendations for the choice of materials, sections of reinforcement, the slab foundation will not require restoration, it will serve three generations of real estate owners, at least. All the above technologies comply with the requirements of the specified regulatory documents, have operational experience in the regions of the Russian Federation.
Advice! If you need contractors, there is a very convenient service according to their selection. Just submit in the form below detailed description works that need to be completed and offers with prices from construction teams and firms will come to your mail. You can see reviews of each of them and photos with examples of work. It is FREE and non-binding.
On wet, heaving soils or soils with a high rise in groundwater, a reinforced slab is an ideal option for the foundation. This is especially true for buildings that are sensitive to deformations - buildings made of aerated concrete, bricks, etc. With strict adherence to all technologies, it is possible to make a monolithic slab foundation with your own hands without the involvement of specialists.
When can a slab foundation be used?
Unlike strip foundation, a plate with a thickness of 25-40 cm is not laid in them under load-bearing walls, but under the entire building. When the ground moves, such a "pillow" will rise slightly at the same time as the house, without causing any damage to it. Shallow slab foundations are most commonly used in northern Europe for buildings with low weight.For the manufacture of such a base, a frost-resistant concrete М300 waterproof W8. If the groundwater is located too close, it is desirable to use a special sulfate-resistant concrete.
Advice... With a large structure weight, to protect the slab from cracking, you can use ribbed structures directed towards the ground. Such ribs, as well as the base itself, are reinforced with metal rods.
Ribbed foundation slab
The most significant disadvantage of slab structures is the complexity of the basement arrangement and basement floors... Indeed, during their construction, the cost of the insulation layer will be equal to the cost of the foundation itself.
Selection and laying of reinforcement
1. For foundations of this type, only ribbed reinforcement is used. The frame is made of 12-16 mm rods with 20 cm cells. country houses, garages) use rods 12 mm thick. Heavier and more massive one and two houses are erected on a foundation with reinforcement with bars from 16 mm thick.2. The reinforcement is laid in two layers. The top and bottom horizontal layers should consist of longitudinal and transverse rods. The vertical reinforcement binds both chords together.
Reinforcement tab
Advice. The strength of the reinforcement at the point of welding decreases, so it is recommended not to weld it, but to tie it. In addition, if the rods are too rigidly fixed on moving soils, the rigid bundle can simply burst. Therefore, they must have a certain degree of freedom, which is provided by the bundle. However, in order to avoid displacement of the bars during pouring, they must adjoin the reinforcement quite tightly.
3. The reinforcement should be fastened knitting wire round section (not less than 1-1.2 mm). It must be burnt and bend easily.
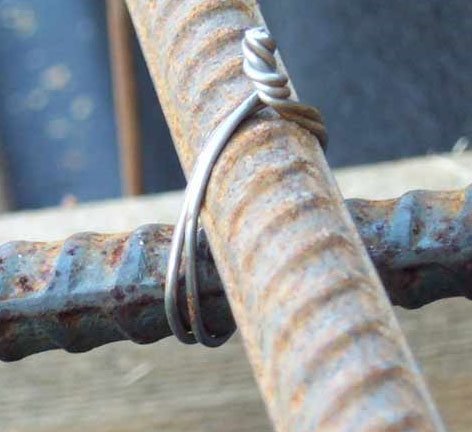
Rebar tying
4. For a bundle, the knitting wire is folded in half, then the reinforcement is wrapped around it and its ends are twisted together with pliers, a special hook, a collet (a device with a clamping sleeve) or a knitting gun. One knitting requires about 30 cm of wire.

Collet
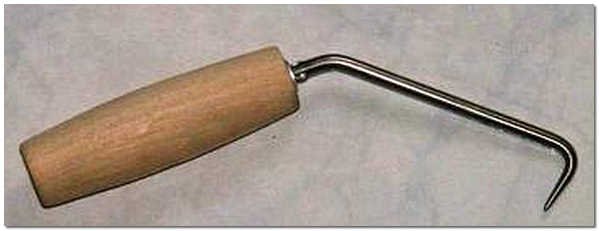
Rebar knitting hook
5. To prevent the reinforcement from touching the formwork, it is better to strengthen it with plastic grannies.
Plastic grandmothers for fittings
The order of laying the slab foundation
1. Over the entire area of the future foundation, soil is removed to the required depth. It must be carefully leveled, otherwise the ground pressure on the slab will be uneven. However, it is strictly forbidden to loosen or dig up the earth at the place of the laying.
Leveling the concreting area
2. The prepared site should be 2-5 m wider than the dimensions of the building.
3. A monolithic foundation slab made of reinforced concrete is placed on a 10-30 cm "cushion" of sand and crushed stone, which serves for additional shock absorption of the structure and protection of the base from moisture. The "pillow" is laid in layers, while each layer is spilled with water and rammed.

Slab foundation scheme
4. After the layer of the pillow, the communication is laid (water, sewerage and drainage pipes).
5. For the arrangement of the drainage system, transverse trenches are dug under the future foundation, which are closed with geotextiles, and then perforated pipes with holes for collecting water are mounted in them. The trench is filled with a fine fraction of crushed stone and again closed with geotextile.

Drainage system lining
6. On top of the sand layer is placed concrete screed 10 cm thick, and after its complete drying a layer waterproofing... As it is better to use modern bitumen-polymer materials that are resistant to temperature extremes: in this case, the foundation will last much longer.
Advice. To protect against moisture, it is advisable to additionally treat the concrete screed with a primer made of diesel fuel with the addition of 40% bitumen.
7. An overlap of 30-50 cm is made along the edges of the slab (in the future, the edges of the waterproofing material should be wrapped on the slab and soldered to its end). All its seams are soldered with a blowtorch.

Laying waterproofing
8. In the event that the foundation slab itself will serve as the subfloor, it should be reliably insulate with foam or more durable extruded polystyrene foam. Since when this material gets wet, its thermal insulation properties decrease, it is advisable to lay a polyethylene film on top of it.
Thermal insulation layer arrangement
9. Formwork erected just above the height of the slab. It is hammered from boards or made from shields. The outer side of the formwork is supported by boards (struts). It should be located strictly vertically (you can check this with a building level) and have right angles.
Formwork for slab foundation

Formwork scheme for a monolithic slab
10. After installing the reinforcement layer, the site is poured concrete mortar... It must have a sufficient degree of movement so that rubble does not get stuck between the reinforcement bars.
12. The poured mortar is carefully leveled and left to dry completely.

The proportions of the preparation of the mortar for the foundation of cement M400
