Reinforcement with clamps. Strip foundation reinforcement schemes. Reinforcement of slab base.
During the operation of a building, its foundation is affected by whole line factors. The foundation is under stress from soil shifts, frost heaving and, of course, from the weight of the building itself. Wherein top part the foundation, like a reinforced concrete floor slab, is subject to compression, and the lower part is subject to tension. The diagram of the influence of forces inside the foundation is shown in the figure below. It is very important to remember that the correct manufacture of the structure must necessarily take into account the forces of frost heaving, which sometimes exceed the weight of the building itself and lift it, causing stretching of the foundation in the upper part. In this case, the decisive role is played by correct and competent construction, thanks to which it is possible to protect not only the foundation itself, but also the walls of the house from destruction.
When a child begins to draw, at the age of three, the first figure he traces is usually the so-called "girino man", whose features are a very large head, limbs attached to the head and a thread-like aspect. This represents the child's first attempt to represent the human figure, and it indicates that he has not yet achieved awareness of the structure of the body. After three years, the child can reproduce the drawing from his mental model of the object, understanding the symbolic value of the drawing.
What begins at the beginning of the small drawing takes on some of the iconic shapes he has in mind, such as the human diagram, the house diagram, the animal diagram, the tree diagram. Eventually, these diagrams will be enriched by the child by adding details, but he still does not know the correct proportions and perspective.
In this lesson you will be given step-by-step instruction and a diagram of the correct installation of reinforcement, as well as methods for tying it and other important points, which are also further discussed in the video. In addition, this construction lesson will provide approximate drawings for laying reinforcement during pouring strip foundation, as well as a diagram of the correct connection of reinforcement in the corners of the structure.
Between the ages of three and four, the child realizes drawings, which are real, insightful movements that help him develop greater and greater coordination, improved knowledge of the surrounding reality and visual visualizations that help him reproduce What they see in the drawing. The child learns to better manage the space of the sheet, which is now used proximally and no longer extends over a large surface simply because the fingers of the hand tend to diversify; allowing thoroughness in a way that allows the child to make shapes that he can make more visible.
The maximum load during compression of a foundation or reinforced concrete slab falls on the concrete, and during tension the reinforcement must withstand the load. In this regard, the reinforcement must be located at the top and bottom of the structure. In this case, the middle part of the foundation does not need reinforcement, since practically no forces act on it. How to make structural reinforcement is explained in detail in the video and drawings located in this lesson.
He also tends to design floating shapes as he places them without spatial reference. The first form of spatial orientation that the child uses is verticality, so she tends to position her figures in different parts of the sheet and at the same time keep the patterns low so that all the characters are standing.
Which reinforcement is best for a strip foundation?
It then absorbs the horizon dimension. The child places his characters on the same plane, which is on the underside of the sheet. Horizontally, within the child's design, they appear lines of earth and sky, which are located parallel, on the top and bottom sides of the sheet. Before the age of four, a child can produce a closed line due to the maturation of motor dexterity. Also in the child's drawings there may be attempts to imitate the letter, often the child reports the letter o because it is easiest to reproduce, but also those that make up his name.
Correct placement of fittings
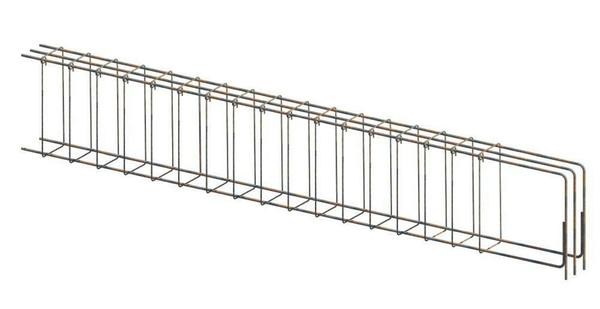
Any main load reinforced concrete structure or the slabs must be supported by longitudinal reinforcement, which is located in the lower and upper parts. Hot-rolled steel rods of class A3 are usually used as longitudinal reinforcement. When the height of the strip foundation exceeds 1.5 m, transverse and vertical rods of hot-rolled smooth reinforcement with a diameter of 6 to 8 mm of class A1 are also laid. Concrete floor slabs are also manufactured in the factory using the same principle. In this case, it is much better to make vertical and transverse reinforcement with a single clamp to create a connected solid frame. This process is explained very clearly in the video.
Letters can appear in a line on a perfect horizontal plane or traced, they can be turned upside down, folded or mirrored. Later, the child realizes that design and letters are two different things and tend to change features when he wants to write something, although he has not yet learned to do so.
After five years, a child can copy a square and learn to distinguish it from a rectangle, and then from a triangle. Always at this age, if the child is stimulated, he can write his letters, even if irregularly, with his letters, with his name. As for the person, he is most recognizable: in addition to the eyes, nose and mouth, there is a torso from which arms and legs emerge. Finally, the ears are often too large to taste a new discovery. The eye acquires its outline and bears the mark of the student in the center. The chest expands and expands to become wider than the head; the legs and arms are two-dimensional and sometimes appear to be items of clothing: a hat, buttons, trousers, etc. in addition, the person is almost always presented vertically.
The longitudinal rods must be located inside the slab frame or foundation. Thanks to this bond, the likelihood of cracks appearing in concrete and their propagation is reduced, and the reinforcement bars are fixed in the required position. What should be the pitch between the longitudinal bars and transverse reinforcement bars is indicated in paragraph 7.3.4 of SNiP 52-01-2003.
Design at this stage is especially important for the child because it will introduce him to the involuntary acquisition of graphic writing gestures, especially in relation to the gradual progression of gestures from large to small. In this perspective, the worksheet can be viewed as a gym where motor skills can be taught from the very beginning, widespread gestures to later, safe, accurate and highly detailed gestures.
Additionally, coloring the design is important because it helps your child guide the marker, crayon, brush, or finger to any area of the graphic space that you want to fill with color. Coloring requires a child at the motor level, long-term deformation of the arm and hand muscles at the perception level requires more attention and concentration to be able to guide the hand to prevent color from coming out of the edges.
Laying longitudinal reinforcement
In particular, paragraph 7.3.6 of SNiP 52-01-2003 indicates that the spacing between the longitudinal reinforcement bars of a concrete structure must be calculated based on its type (it can be walls, floor slabs, beams or columns), height and width of the cross section. In this case, it is necessary to ensure that the concrete itself is effectively involved in the work, taking into account the uniform distribution of deformation and stress over the entire cross-sectional area of the structure. In particular, the distance between adjacent bars of working longitudinal reinforcement should not exceed the cross-sectional height of the concrete element multiplied by two. However, this distance should not be more than 400 mm. In the case of linear elements eccentrically compressed relative to the bending plane, the step between the longitudinal reinforcement should not exceed 500 mm. And although it is quite difficult to comprehend this principle at first glance, the step-by-step instructions for reinforcing concrete structures with your own hands, given in this lesson, will help you avoid such mistakes.
At first the child, when he draws a large surface, even if he has a large sheet of paper at his disposal, tends to leave the field, because he cannot yet follow the movement of his hand, takes the color by chance and even the color of the table unconsciously.
The adult, through simple explanations, will be able to tell the child that what needs to be painted is the design inside the sheet and not the outer surface. To make this happen with a child aged three, it is good to give it a slightly larger design, about 15 cm wide, so the child will be helped in coordinating the eye hands so as not to go with the color off the edge. At this stage he can use a second color. At three and a half years old, when he dies, he launches a blow in one direction, and the child can do this in combination with the drawing he encounters, instead of turning his hand, turns the sheet so that he can Best result remains on the sheet, but it does not go beyond the field.
Principle of transverse reinforcement
How to properly make transverse reinforcement is indicated in paragraph 7.3.7 of SNiP 52-01-2003. IN reinforced concrete slabs and foundations, taking into account that the transverse force should not be absorbed only by concrete, it is necessary to lay transverse reinforcement bars. The step between them should not be greater than the value that ensures the inclusion of transverse reinforcement in the work when inclined cracks arise and propagate. It must be remembered that the distance between the transverse rods should be no more than half the working height of the section of the foundation or slab, but this step should not exceed 300 mm.
Over the course of four years, the child can color both a small design and a large one, which can remain within the outlines, so he can change colors without moving on to another, as might happen in the previous stage. The child has acquired, along with motor coordination and perceptual control of the pencil or any writing instrument, the knowledge of the correct use of color, care for detail, adaptation of movements to evoke appropriate features. Coloring in spaces separated by numbers is part of those activities that the child must learn to facilitate in the acquisition of writing, since the movements that are made increase attention and help him control the graphic gesture.
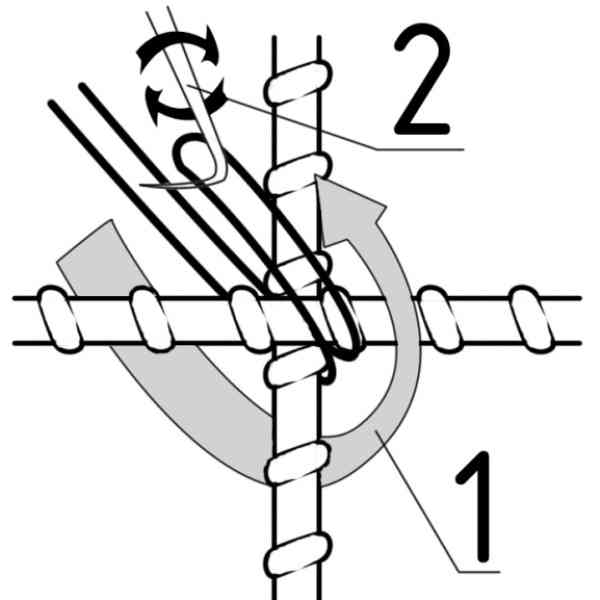
Proper tying of reinforcement
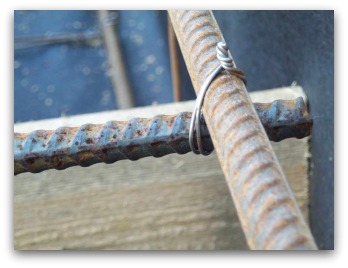
When tying reinforcement inside the foundation, it is undesirable to use welding, since an increase in temperature negatively affects the characteristics of the metal. However, if the symbol “C” is present in the marking of the reinforcement, it can be welded together. For example, if you have reinforcement grade A500C, you can use electric welding to connect it. In all other cases, the reinforcement inside the foundation or concrete slab is tied with tying wire.
In addition to coloring, there are other activities that lead the child to learning to write: cutting, cutting, pasting, inserting small, medium and large size marbles or pasta and different forms; All this allows the child to acquire a fine handicap, specifically for the writing hand; indirectly, for the hand, which has the function of supporting the body.
It's ironic that you don't just write with your hand! In fact, in order to teach a child to perform correct strokes, it is appropriate to do some exercises through direct experiences to focus on the muscles involved in writing. Through movement exercises we can lead the child to a specific knowledge of lines and circles, which will then be used within the prescriptive.
In addition, when reinforcing strip foundations, it is necessary to remember that the ends of the steel rods should not protrude beyond the formwork and come into contact with its walls. It is recommended to maintain a distance from the reinforcement to the edge of the concrete structure of at least 50 mm. This issue is further discussed in the added video.
You can use colored tape to draw a path with curves that starts with a ball of color and ends with one of the other colors for a good idea of the beginning and end, and then make him look at the barefoot child: he can walk normally or jump. To make a child understand a geometric shape such as a circle, we can touch it with our hands, feet and legs, and then make her play with the hula hop to make it better illuminated.
Another game that can help a child stimulate his body's coordination, but also attention and concentration is the traffic light movement, which consists of a stop with red, running in green color and walking with yellow in a very wide environment. It is important that in addition to control over your lid, the child also gains awareness of the structure of the body. He can be recognized by looking at his reflection in the mirror, naming or finding out the different parts that make him or showing some drawings where some body parts are missing that need to be added, still with songs like songs.
Reinforcement of foundation corners
When pouring strip foundations, the angles of the structure play an important role. The fact is that it is at the corners that the greatest stress occurs. As shown in the video, the manufacture of reinforcement for intersections and corners requires the use of pre-bent blanks from A3 reinforcement. It is important to remember that the usual crossing of steel rods in the corners of strip foundations is unacceptable, since this method of reinforcement will not ensure the solidity of the structure. You will end up with several reinforced concrete beams that are not connected to each other.
Awareness of his own body structure and topological knowledge that he experienced in living space, allows him to arrange mental representations within the sheet in a wide and orderly manner in the form of figurative forms. To prevent shame, it is useful to understand from the early years primary school which hand does it more skillfully simple exercises in a way that helps the child immediately understand which hand to use.
Carrying out work on a monolithic foundation
You can perform various exercises with a child: ride through a telescope, climb on a chair with adults, put one hand on top of the other, insert into a thin little paste, draw using both hands and, Carefully observing them while performing these tasks, they themselves help us understand which side laterality developed.
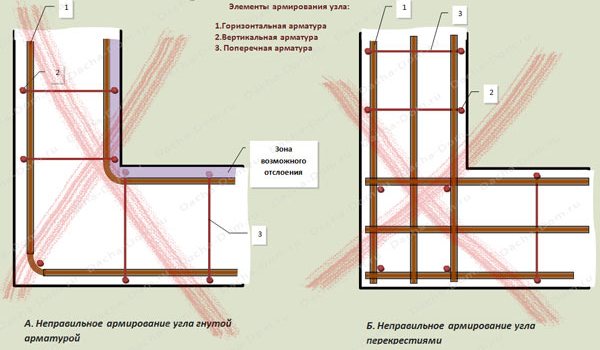
When building private houses with your own hands, an unacceptable method of tying reinforcement bars that intersect in the corners is often used. The drawing below shows two options for reinforcing the corners of a strip foundation, which are executed incorrectly.
A posture that allows flexibility in graphic gestures is also very important, and learning to sit properly prevents spinal injuries. The position is correct when the back and head are aligned and the shoulders are relaxed. When painting, drawing, or writing, the distance between the head and the sheet should be 30 cm, and the forearm should be relaxed along the supporting plane, so as to allow movement of the hand, wrist and fingers. The back of the chair on which it rests should have a proportional height to the shoulder blades, and the seat should allow the child to stand on the ground.
The diagram shows that the connections of the longitudinal rods are made in the form of ordinary crosshairs and do not have additional reinforcement. In addition, there are no additional clamps at the intersections of the reinforcement.
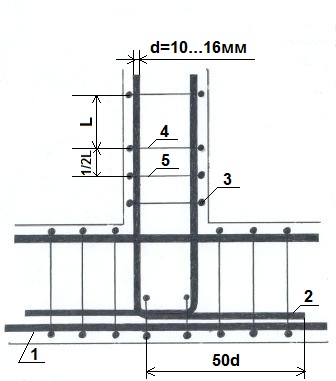
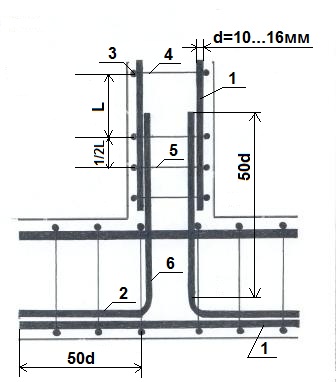
The usual crossing of reinforcement should also not be allowed during the reinforcement of sections that are T-shaped structural elements. All these places need to be further strengthened.
Knitting reinforcement using a special device
Correct body posture and segmentation allow smooth movements of small and large progressions and digital movements. In addition to the posture, it is good to teach the child, right now, to hold the chart tool in a comfortable way. The right graphic grip handle is ergonomic because it allows you to get maximum results with the least amount of effort and minimal fatigue. With this vision, the hand is in semi-pronation, thumb, opposite the pointer, is held on a pencil, which rests on the first phalanx of the middle finger, while the ring and little fingers, bent folds, ensure contact of the hand on the sheet. In order for the child to see what he is writing, it is good to teach him to hold an instrument with two fingers on the tip, this pen allows the child to control what he writes and also write for a long time without getting too tired.
Sometimes a house design includes bay windows, which are protrusions on the facade of the building. From the inside, bay windows represent part of a multifaceted room. To reinforce the foundation under the bay window, it is necessary to bend the reinforcement at an obtuse angle. In this case, the longitudinal reinforcement bars of the strip foundation must pass through the frame and communicate with the external reinforcement. In addition, the design contains additional clamps and L-shaped reinforcement.
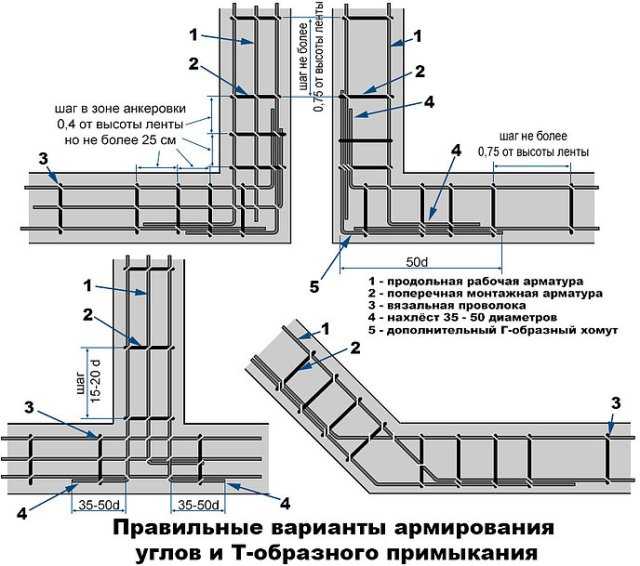
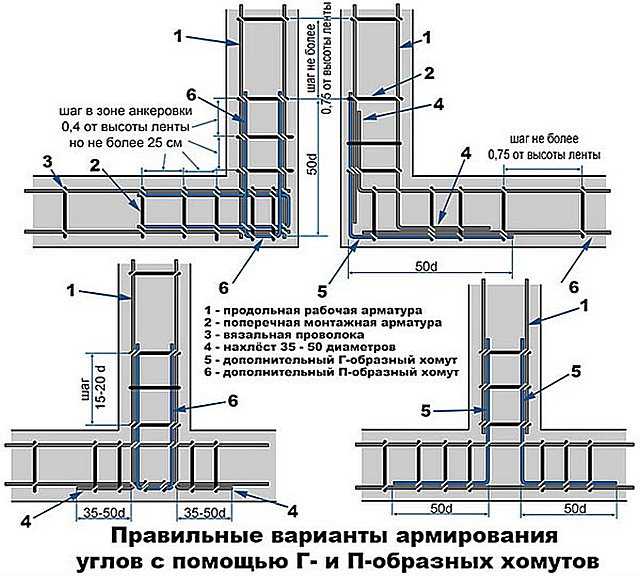
Step-by-step instructions for reinforcing corners concrete foundation in general, it is aimed at obtaining a monolithic frame connected into a single whole, which additionally leads to. Clamps are used to connect its elements. It must be remembered that all corners and joints of the reinforcement must contain additionally installed L-shaped or U-shaped elements. Vertical and transverse reinforcement clamps for strip foundations must be located in increments of at least 3/8 of the height of the foundation structure. In this case, the distance between the clamps should be at least 25 cm. In corners, at crossroads and under bay windows, the step between the clamps should be half as large as in conventional longitudinal elements of the foundation structure. Good luck with your construction!
- Pile foundation doing it yourself is quite a labor-intensive job, but not as difficult as many people think. Armed with theory, as well as all necessary tools and materials, quite...
The reinforcement is a steel rod with a smooth or ribbed profile. The most commonly used diameters are from 6 to 32 mm.
During operation, the foundation is constantly subjected to various loads, for example, from the weight of the house itself or various ground movements, including due to the forces of frost heaving. If we look at it in a simplified way, the lower part of the foundation strip experiences predominantly a tensile load, and the upper part experiences a compressive load.
Since the resistance of concrete to compression is 50 times higher than to tension, and
steel reinforcement, on the contrary, is capable of withstanding large tensile loads, we can conclude that it is necessary to reinforce the lower part of the strip foundation. At the same time, it is necessary to remember about the forces of frost heaving, the lifting force of which can exceed the weight of the house and cause stretching in the upper part of the strip foundation.
Therefore, it is necessary to reinforce the lower and upper parts of the strip foundation. In fact, with the help of reinforcement, concrete is transformed into a new material - reinforced concrete, which is able to withstand tensile and compressive loads. It makes no sense to reinforce the middle part of the strip foundation, since it experiences practically no loads.
The figure shows an approximate reinforcement diagram for a strip foundation.
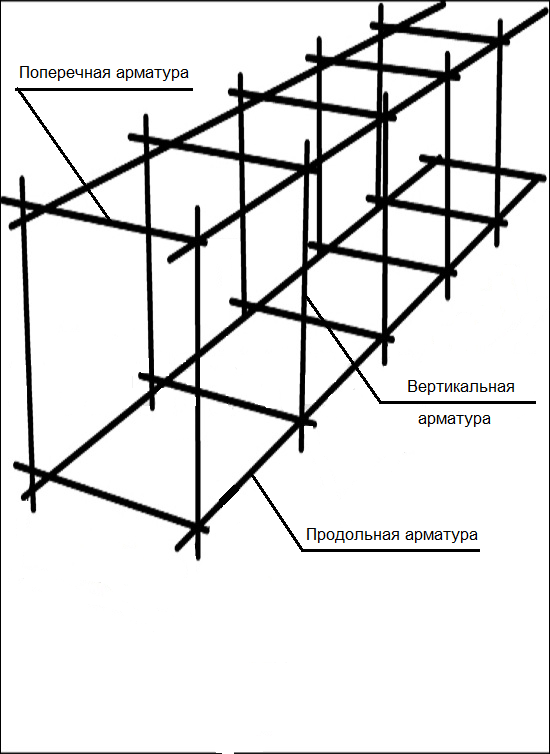
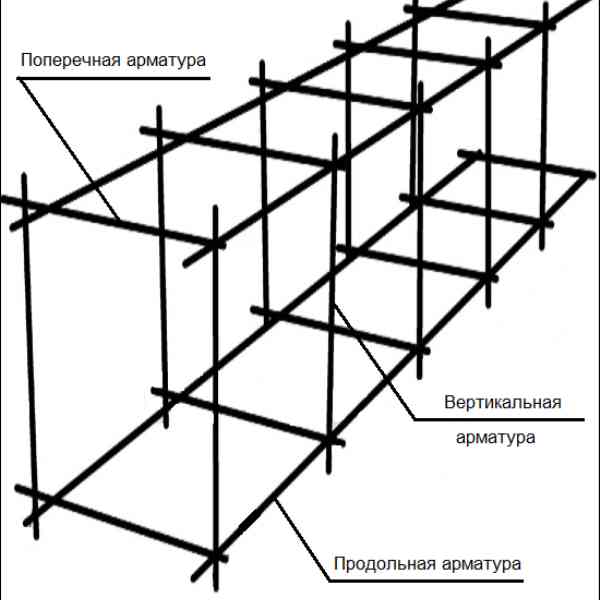
Longitudinal tiers of reinforcement are located in the upper and lower parts of the foundation, since together with concrete they absorb the main compression and tension loads acting along the longitudinal axis of the foundation. If necessary, if required during calculations, additional tiers can be installed. Class AIII reinforcement is used as longitudinal reinforcement, which is round profiles, usually with a diameter of 10 to 16 mm, with two longitudinal ribs and transverse projections running along a three-way helical line.
If the height of the foundation is more than 15 cm, it is necessary to install vertical transverse reinforcement, for which predominantly smooth class AI rods with a diameter of 6–8 mm are used.
Transverse reinforcement when reinforcing a strip foundation is installed based on the calculation of the loads acting along the transverse axis of the foundation. Installation of transverse reinforcement limits the development of cracks in concrete and secures working longitudinal bars in design position. It is better to bend transverse reinforcement into frames and install longitudinal reinforcement inside these frames.
The distances between the longitudinal reinforcement rods and the pitch of the transverse reinforcement of the strip foundation are determined by SNiP 52-01-2003:
7.3.4 Minimum distance between the reinforcement bars in the clear should be taken depending on the diameter of the reinforcement, the size of the coarse concrete aggregate, the location of the reinforcement in the element in relation to the direction of concreting, the method of laying and compacting concrete.
The distance between the reinforcement bars should be taken to be no less than the diameter of the reinforcement and no less than 25 mm.
Longitudinal reinforcement
7.3.6 The distance between the bars of longitudinal working reinforcement should be taken taking into account the type of reinforced concrete element (columns, beams, slabs, walls), the width and height of the element’s section and not more than the value that ensures the effective involvement of concrete in the work, uniform distribution of stresses and deformations across the width section of the element, as well as limiting the width of cracks between reinforcement bars. In this case, the distance between the rods of the longitudinal working reinforcement should be taken no more than twice the height of the element’s section and no more than 400 mm, and in linear eccentrically compressed elements in the direction of the bending plane - no more than 500 mm.
Transverse reinforcement
7.3.7 In reinforced concrete elements in which the transverse force, according to calculation, cannot be absorbed by concrete alone, transverse reinforcement should be installed with a step of no more than the value that ensures the inclusion of transverse reinforcement in the operation during the formation and development of inclined cracks. In this case, the pitch of transverse reinforcement should be no more than half the working height of the element’s section and no more than 300 mm.
Also, when reinforcing a strip foundation, you should remember that the reinforcement should be 5-8 cm from the edges of the formwork and the upper level of concrete pouring.
The connection of individual reinforcement rods is carried out using knitting wire and a special crochet hook. It is allowed to weld only fittings that have the letter “C” in their marking, for example A500C.
Reinforcement schemes for corners and junctions of strip foundations
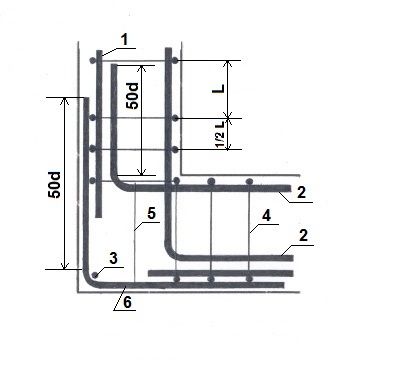
To reinforce corners and junctions, class AIII reinforcement must be bent. Reinforcement of corners with a simple crosshair of reinforcement is not allowed if the reinforcement of the corners of the foundation is carried out with separate rods of longitudinal reinforcement.
A monolithic foundation must be a single rigid spatial frame, and this is only possible if correct reinforcement corners and foundation junctions.
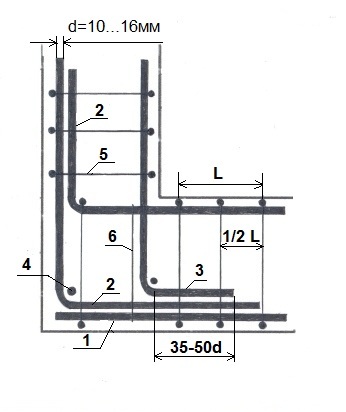
1 - horizontal reinforcement; 2 - overlap; 3 - foot; 4 - vertical reinforcement; 5 - transverse reinforcement; 6 - additional transverse reinforcement; d is the diameter of the reinforcement bar; 50 cm Scheme of corner reinforcement using overlap and tab 1 - horizontal reinforcement; 2 - overlap; 3 - vertical reinforcement; 4 - transverse reinforcement; 5 - additional transverse reinforcement; 6 - L-shaped clamp; d - reinforcement diameter; 50 cm Scheme for reinforcing the corners of a strip foundation using an L-shaped clamp 1 - horizontal reinforcement; 2 - overlap; 3 - vertical reinforcement; 4 - transverse reinforcement; 5 - additional transverse reinforcement; d is the diameter of the reinforcement bar; 50 cm= Scheme of reinforcement of strip foundations at junctions