DIY photo album. Photo album with your own hands. Design ideas with step-by-step photos What materials are needed for a homemade photo album
Taking pictures is a unique activity that is not only popular these days, but also helps a person to open up and show himself. Modern technologies allow not only to take high-quality photographs by inventing and improving modern technologies, but also to share them instantly.
Every day, every second person shares their personal or other people's photos on social networks, by mail. However, it is much more pleasant to fit comfortably and look through the album. Especially if it is decorated with clippings, quotes and interesting thoughts. Undoubtedly, the second such will not be found.
A lot of articles have been written about how to make a photo album with your own hands, a lot of videos with master classes have been shot. It's quite difficult to make a choice. However, there are basic knowledge and invaluable tips that are worth learning before getting started.
Choosing a theme for the upcoming album
Of course, the idea of creating a unique photo album with your own hands does not arise just like that. Perhaps a person is driven by the idea of making money on such things. However, most often the decision comes suddenly, after a significant event in the desire to save every bright moment.
Creating an ordinary classic album is not difficult. It is enough to have a few hours of free time and a rich imagination. You can decorate an ordinary photo album, or you can create your own album from scratch.
The most popular photo albums are:
- wedding theme. A wedding is a wonderful moment to start a new family life. The mass of events on this day exhausts the newlyweds, depriving them of the opportunity to enjoy this day and just contemplate each other. A professional wedding photographer is no longer a novelty. Beautiful photographs that convey every emotion of this day simply must be framed accordingly.
- Photo album for the birth of a baby. The arrival of a child in a family is an important milestone. And every parent strives to remember everything and display it in the photo. However, even the most attentive mother is not able to remember every important moment, because there are so many of them. A photo album with quotes will help you remember the most important thing even after many years.
- Album with a school, educational plot. The first day of kindergarten, first grade, graduation party, institute are the stages of growing up, which are accompanied by wonderful memories.
- Capturing a bright moment in life. This is not only a vacation, or a trip. You can also create an album as a gift, for example, for an anniversary, or for a memorable date. Thematic albums for beloved, beloved are popular.
The reason for creating a photo album can be anything. The main thing is the creative inclinations and the availability of tools.
Tools and materials needed to create a photo album
The original handmade album is quite an expensive thing. Its cost will include not only the price of the materials used, but also the dignity of handicraft. But this does not make such a photo album inaccessible. On the contrary, everyone can make it with their own hands, using their talent and imagination.
In order to make a photo album yourself at home, you must have:
Required tool:
- miniature scissors;
- hole punch simple;
- knife-cutter;
- pencils;
- paints;
- markers;
- glue stick;
- curly scissors;
- figured hole puncher;
- Double-sided tape.
Necessary materials:
- paper. It should be tight enough. You will also need paper for substrates for photographs, its density should be lower than the density of the main sheet;
- thick cardboard (2 sheets). You need it to create a cover. You can use old unnecessary cardboard boxes;
- cover material. To do this, you can use completely different material. Old pieces of fabric, jeans, decorative colored paper, to create a soft cover you will need thin foam;
- decorative material (depending on the general idea: fur, leather, wood, iron, beads, buttons, ribbons and other decor). You can make small details of the decor yourself: knit, sew, dazzle, dry.

Interesting details for your creation can be found both at home and in the scrapbooking store.
Making an album cover
When all the materials and tools are prepared, you can get to work. When making a photo album with your own hands, they often start with the cover.
There are two options for creating a cover:
- Use a ready-made one: buy a new one, or remove it from an old album. This method is the easiest. All that is required from the master is to decorate beautifully using decorative material. You can sheathe such a cover with any fabric (depending on the idea), use colored paper, various decor. Often this option does not require gluing the inside.
- Create a new one. This option is already more complicated. Since it requires certain knowledge. In order to make a cover, you need to decide what form the future album will be, how many photos to fit on 1 page. Having decided, you need to cut out a page from cardboard that we need in size. Do the same with the second sheet of cardboard. Next, you need to draw 2 lines on each sheet (2.5 and 3.5 cm from the left edge of the sheet). After that, cut with scissors along 2 lines.
To decorate the top of the cover with colored paper, you need:
- take a sheet of colored paper, 4 cm more than a cardboard sheet on all sides;
- place the album sheet in the middle and circle with a pencil;
- it is good to cover with glue a sheet of colored paper, or both parts of the cover sheet;
- put the cut sheet of the cover in a drawn square on a colored sheet of paper so that its edges clearly coincide with the drawn lines;
- wrap the remaining edges of the colored paper onto the cover, gluing them tightly. It is important to try to do this carefully so that the waters come out as even and beautiful as possible;
- also needs to be done with the trim of the inside of the cover. Colored paper can cover poorly glued corners.
When making the first albums, you should pay attention to the already finished covers. Building new ones from scratch can be tricky.
To work less on the cover design, you can use designer cardboard instead of ordinary cardboard.
Useful page design tips: how to fill the page correctly
It will be easier to fill the pages of the album in a disassembled state. Having issued each sheet, you can begin to collect the album.
Making an album is a whole science. Therefore, when filling out the page, you should follow certain rules:
- Initially, the semantic center of the page should be determined.
- Choose the right colors that complement the photo without breaking out of the overall color scheme.
- Choose decor for pages that will match in color and meaning.
- Choose captions for photos that will definitely correspond to the general meaning. These can be quotes of famous people, aphorisms, or your own thoughts. You need to write down words in the album based on the harmony of color.
- Arrange large and small details on the page should be based on balanced proportions.
- Each album page should have a bright accent. However, you should make sure that the page is not reloaded. It's hard to watch this album.
- Each page should visually resemble a triangle "photo - title - caption".
It's good if the page has an odd amount of detail.
In order for the page to be balanced, one should try to follow the rule: a large item - several small ones. For example, in the upper corner you can place a large three-dimensional detail, and in the opposite corner below, several small ones.

Family Album Ideas
Creating a family album is quite an exciting undertaking that can be a great project for the whole family.
A family album is not only a collection of family pictures in one book. With this album, it is important to convey the history of the family, its spirit, having collected all the memorable moments in one photo album.
A family album can consist of named pages:
- Little dad with grandpa or little mom with grandma and vice versa. This is an interesting idea that will help determine the similarities between all generations.
- The birth of a new family or marriage. Here you can also place not only the wedding of mom and dad, but also grandparents. Scanned documents look original, their clippings, newspaper clippings made in vintage style.
- The birth of a baby in the family. How to design this page is up to each mother individually. After all, everyone has their own ideas about the importance of a particular moment in a child's life. However, experience shows that a couple of pages are not enough for this event. Sometimes one album is not enough. The creation of mini photo albums made in the style of diaries looks original. It can be a whole series from birth to the right moment. Such an album is filled not only with pictures, but also with important records.
- First year of life.
- First time in first grade and beyond.
Pages that are intended for the baby can be supplemented with envelopes that will help save the first curl, the tag from the hospital, the first fallen tooth of the child.

A mother can supplement a children's album with her thoughts and memories. Addresses to your child, which he will read with pleasure when he grows up. You can also write down all memorable dates here: the first sound, laughter, the first word, the first step, the first tooth. Such records will be a great addition to the corresponding pictures.
Another great idea for a family album is to make a family tree.


When choosing the style of making a family album (any other too), it is important to maintain this style in the smallest detail. So old photos, baby pictures will go well with retro and vintage style. Decor for such an album can be found in grandmother's things.
Original do-it-yourself photo album design ideas
Before you start work, you need to complete its sketch. On a regular sheet of paper, outline everything, down to the smallest detail. So you can not only visually evaluate the final result, but also not forget anything. Do this with every sheet. Their number, by the way, must be calculated in advance at the rate of 1-2 photos per sheet.
The photo album page must have 5 elements:
- name of the picture;
- a caption for each photo: when, under what circumstances the photo was taken. Perhaps there is something important in the picture that you would not like to forget over time;
- page background;
- decorations;
- additions.
The blank pages of the album need to be marked with a simple pencil, so, after completing the design, it will not be difficult to erase the extra lines.
The page must be filled from top to bottom. The probability that paints, color works will be smeared will decrease to 0. To begin with, it is worth doing the work with a felt-tip pen and paints so that they have time to dry before the photo is pasted.
Inscriptions and quotes are written in the album with ink, felt-tip pen or helium pen. Ink color, font size, and letter tilt should also be considered in advance. You can use newspaper clippings to beautifully lay out the right words. Only after that the album is decorated with flat decorations. They are glued and sewn on. Volumetric parts of the decor are recommended to be fixed at the very end. Do this with glue, thread and needles, carnations.
It is better to glue the details of the album with a special glue gun.
Regarding the decoration of the album cover, the cover design looks beautiful with the help of small photos collected in mini collages. The form of these collages can be given completely different from banal geometric shapes to more artistic ones.
You can fasten album pages in various convenient ways:
- using massive rings. Then each sheet of the album must be processed with a hole punch, making a hole in the right place;
- use the same hole punch to make holes on each page and fasten them together with beautiful ribbons. In this case, you can use different methods of interlacing: from the simplest, all in to more complex;
- album pages can be stitched;
- you can glue the album.
Today, in the world of digital technologies, it is much easier to save your life in pictures. No need to sit for hours waiting for the result. Just a second and the perfect shot is ready. Most people store their photos on their gadgets, on the Internet. It is much more pleasant to look at photos, to touch them with your fingers. It is even more pleasant if this is an album with a unique decor, where there is something to remember, something to touch. Such an album captures, and every detail evokes its own emotions.
If there is a great desire, but no imagination, you can use ready-made ideas, which are quite a lot on the Internet. A lot of articles have been written about how to make a photo album with your own hands, a lot of master classes with detailed instructions have been filmed.
Now it is fashionable to create various handmade things. Try it and you will make it. It will not just collect photographs, it will become an exclusive thing and decoration of your home. If you make such a gift to a child or newlyweds, it will always remind you not only of the most pleasant events in the life of the owner, but also of you, its creator.
Basic principles of work
To do this, you can use ready-made kits for creativity, which are sold in specialized and online stores. The kit usually contains everything you need for decoration: beautiful paper, stickers, voluminous decorations. Most often, the sets are made in a certain style and are dedicated to some topic: a gift for a newborn, newlyweds, romance, travel.

Picking up all the necessary elements is easy and on your own. But it is better to design photos, pages and cover in the same style.
Necessary materials
To create a beautiful DIY scrapbooking album, you will need the following:
- Thick cardboard for the manufacture of the base (covers and pages).
- A piece of fabric for decorating the workpiece.
- Sintepon, if you want to make the front and back of the cover soft and voluminous.
- Scissors.
- Pencil.
- Ruler.
- Glue.
- Figured hole punch (for decorating the edge or creating small template blanks for appliqué).
- Clippings from magazines or other pictures.
- satin ribbons.
- Flat or 3D stickers.
- Various decor (bows, flowers, beads).

Of course, the list depends on your desire, capabilities and design theme. Usually all of the above are used, but it is worth remembering that the photos should still be the main ones. Then you will get exactly a scrapbooking album with your own hands, and not just a collage using this technique. It is not necessary to stick all the elements on one page, it is better to limit their variety. See that the design looks harmonious, choose one central element, and let the rest just complement it.
How to make a cover
To make a scrapbooking album with your own hands, you first need to complete the base - the frame of the cover and pages. Decide what size the product will be, and prepare a sheet of cardboard of the appropriate size for the front, back and the desired number of pages.

The sequence of execution of a beautiful cover is as follows:
- Take one cardboard blank and cut a piece of synthetic winterizer according to its size. Glue it to the base.
- Cut out a piece from a suitable fabric, such as canvas or any other, taking into account the gluing allowances (1.5-2 cm on each side).
- Apply glue to the free surface of the synthetic winterizer and attach the fabric evenly. Bend the allowances and glue to the cardboard.
- To prevent the folds from being visible, glue a sheet of beautiful paper or cardboard on top. The back cover is ready.
- The front part can be made in the same way or make another window for a photo. To do this, in the base of cardboard and synthetic winterizer, make a cut of the desired shape and size. The rest is done using the same technology as for the reverse side (there is no need to pre-cut a window in the fabric). After gluing the fabric and synthetic winterizer, the material is cut and folded.
- Insert a slightly larger photo into the window, gluing it along the allowances to the base. On the reverse side, as in the first case, a beautiful sheet of paper or cardboard is made.
- Make holes for the eyelets and install them in the front and back of the cover.
- Insert the rings into the eyelets.
The cover is ready. This option is good if you want to make a children's album with your own hands. A scrapbooking workshop on creating an album design, pages and various design options will help you choose the right solution.

You can do the cover in a different way. In order not to use the ring mechanism, you will also have to make the end of the cover, either at the same time with the front and back, or glued to the binding (stack of pages). Choose the method convenient for you.
Pages and binding
So, you are making a scrapbooking album with your own hands. The tutorial from the previous section showed you how to make a cover, but that's not enough. You also need to pin the pages. If your cover is supposed to be on the rings, you can install the sheets in the same way. Another option is to make a binding. The technology is like this:
- In addition to the blank pages, cut out strips of paper as long as the height of the album and 1.5-2 cm wide. In the middle of each part, draw a strip 2-4 mm wide with a knitting needle or other similar object. Cut the corners of the rectangle at a 45 degree angle.
- Using paper strips, glue the album sheets together. The groove left in the middle will be between the sheets.
- Glue on the end of the stack with glued sheets a piece of bandage with allowances on the sides of 1.5-2 cm and two pieces of tape along the width of the cover.
- Glue the tape to the top and bottom edges. This will give the binding strength and a neat appearance.
- Cut with a margin, like a bandage, a piece of decorative cardboard. Glue it over the bandage, and the protruding edges on the cover.
The structure is ready. Get started with the creative process.
DIY album for a newborn: scrapbooking
This technology allows you to create a gift or a souvenir for any holiday quite quickly and at no particular cost. Everyone will enjoy being creative, so decorating postcards, folders and other things will help you have a good time and become a new hobby.

If you are looking for information on how to make a scrapbooking album with your own hands, then you already have a certain idea or need. If you decide to create for your future baby, then you made the right choice. By the way, you can make such a thing for the birth of a baby to your friends or relatives. The main thing is to correctly determine the purpose of the pages, distribute information and leave space for photographs.
In the album for the newborn, do not forget to provide a page where the parents will write down the height and weight of the newborn. You can leave free fields for other important information, for example, the first day at home, the first step and the tooth. It is even worth devoting separate pages to these things.
You can make an album in a certain color scheme, if you know the gender of the baby in advance. If not, then use neutral hues (white, green, yellow) and baby pictures. Suitable bears, bunnies, pyramids, crib, stroller, balloons. Lace and soft, soft-touch materials such as fleece will look good. Satin ribbons look very decorative and festive.
DIY wedding album (scrapbooking): master class
A married couple can make this memorable relic themselves, but at the same time, a spectacularly designed blank can be presented as a gift to the newlyweds.

When making, try to follow these tips:
- Decide on the format and size. Don't make it too big, but a small one won't work either. Focus on a regular A4 landscape sheet or a little more.
- Given the standard size of photographs, you can choose the square format of the pages of the album, so that there is room for signatures and decor.
- Be sure to plan how many pages it is appropriate to make, and try to use a uniform design on them (the same arrangement of inscriptions, headings). Focus on how classic books are designed.
- Choose discreet pastel colors. Usually they use white, cream, golden, pale pink. They symbolize romance, and photographs against their background will look like the main objects.
- In the sequence of pages, it is better to follow the chronology of the event (first place a photo of the official ceremony from the registry office, then pictures in nature and in a restaurant, after photos from the second day).
If you decide to make a wedding album for scrapbooking, this is the most suitable design technology. Buy special paper, as well as a hole puncher with heart-shaped clichés and (preferably) to make a curly lace edge. This will help create a romantic memento that will become a family treasure. It will be a pleasure to see the newlyweds themselves, to show relatives and friends.
Gift for a child
Do you want to create a children's album with your own hands as a keepsake for your baby? A scrapbooking souvenir will always tell the baby about happy moments in life. Beautifully designed, it will keep your love for the little one. The matured "big man" will appreciate the efforts of his mother.

It makes sense to make such an album on rings in such a way that you can gradually add pages to it. You can also make separate "volumes", for example, "My baby is under a year old", "Life in the kindergarten", "1st grade", etc.
In this album, you are free to paste everything that seems relevant and important to you: information about the first step, tooth, words. It is interesting to make an imprint of the palm, legs, to keep the curl.
Original photographs combined with delicate fabric decoration, children's pictures and other decor will look great.
Family album
This product can be made in any style that matches your ideas of beauty and harmony. You make it as a memento for yourself. Choose a design on the rings if you want to add pages. In this case, individual sheets can be designed in different ways. It is worth providing separate children's pages dedicated to family holidays and travel.
As you can see, it is not so difficult to master a new technique of artistic mastery - scrapbooking. The do-it-yourself album will be made not just as an accessory for storing memorable pictures, but will become a real work of art.
Valeria Protasova
Reading time: 12 minutes
A A
Who among us does not like to be photographed and photograph loved ones and loved ones? Over time, we accumulate a huge number of photographs at home, which, of course, we want to preserve and pass on to future generations. Therefore, today we will discuss with you ideas for decorating a family photo album with your own hands. It would be nice to make this pleasant activity one of the most, doing all the creative work on the design of the family album together.
Scrapbooking family chronicle - do-it-yourself vintage family album
Scrapbooking is one of the techniques for creating and designing family or personal albums. Where, in addition to photographs, newspaper clippings, postcards, buttons, drawings and other memorabilia are added that carry a story about you and your loved ones. Thanks to this art, instead of an ordinary album, we will get a whole story about the life of your family. The cover of the photo album can also be given an original look. Decorate it with some memorabilia - for example, a ribbon to which you can attach an amulet, or yellow maple leaves. On the cover you can put a beautiful inscription symbolizing something important only for you and your family. 


Making a family album in the form of a genealogical tree
Try to make your own family tree of your family and attach it to the title page of your photo album. It will not be difficult - list all the closest relatives that you remember and whose photos you can find in the family archive. First, add photographs of the most distant ancestors to the album, and finish the design with photographs of our days. Such a self-made photo album will be of interest to absolutely everyone - both the older generation and the younger. After all, considering it, you will have the feeling that you are reading a real saga about the history of your own family. 

How to make a family album with children's pages - ideas for designing a children's family album
Of course, one of the most important events in every family is the birth of a child. We always want to decorate this chapter of our life somehow in a special way. After all, even the smallest detail matters. We have a great many photographs of growing children, because we want to capture every moment of the life of a little man. And it can be very difficult to choose some individual photos from them to put in an album. But still try to select the most characteristic photographs that most clearly reflect important moments in the life of your baby. At first, these can be your photos, where the baby is still in your tummy. Next - an extract from the hospital. A newborn baby gets acquainted with family members and closest people. First smile. First steps. Walks. Deep sleep. Breakfast. For any mother, all these moments are incredibly important and everyone will remain in memory forever. Also in the photo album you can attach the first hairs of the baby, make decoration from the first booties, ribbons, from a lace baby scarf or bonnet. Do not forget to describe next to the photographs the events that are depicted in them. Over time, it will be possible to add your child's drawings and various school or sports trophies and certificates to the photo album. 


Do-it-yourself wedding family album - lace, satin bows and dried flowers from the bride's bouquet.
A wedding is a very important and special day for every woman. I want to keep in my memory every moment of this happy day. And, of course, we have a huge number of photographs that require a decent design. You can unusually decorate a wedding album by putting satin bows and lace from the bride's accessories into it. You can also attach dried flowers from the bride's bouquet to the photos, if you have them. All these little things will become more and more valuable to you over the years, and when you open a wedding photo album made by yourself, you will return to that magical day every time. 


The idea of designing a family album about a vacation with trophies from long journeys
We all love to relax, and from each trip we bring a bunch of photos. Naturally, these photos are also worthy of their photo album. You can decorate such an album with postcards depicting the countries where you rested, trophies from travels - whether it be a piece of a shell or a dried exotic plant. You can also make an ornament from the sand from the beaches where you sunbathed and took pictures. Don't forget about the descriptions of what is shown in the photos. After all, many years later, your children will be very interested to read about the adventures of their parents on vacation, and see colorful illustrations for this exciting story. 

How to make a family album as a gift to parents - a chronicle of the parental family
A handmade photo album is also a wonderful gift that you can present to your parents for an anniversary, or any holiday, or just like that. Collect the best photos of parents from all family albums to transfer them to one. When adding photos, add some words from yourself for your mom and dad in the description. Tell them how much you love them and how much they are dear to you. You can decorate the photo album with clippings from old magazines and preserved old theater tickets that your parents attended. An album for parents can also be decorated with hand-made decor items - an album cover crocheted or knitted, figurines for decorating a luxurious antique style, made by yourself. The album can also contain homemade collages, appliqué and decorative elements in vintage style, with antique lace and velvet. The flight of fancy here is simply limitless! 


DIY creative album - creating a family chronicle with photos, drawings, poems and stories of all family members
And, of course, every family should have a common album, looking at which is so warm and comfortable to spend time surrounded by loved ones. There are a great many ideas for creating such an album, and all members of the family will have to work on their implementation. Add your favorite photos to it in chronological order. Accompany them with poems of your own composition, let each of the family members write stories about some significant events. You can also collect children's drawings to put them in an album, small memorabilia. Bring all your creative impulses to life! In the photo album, in addition to photos, you can add everything that matters to your family. And then you get a real family illustrated chronicle, which can be left to posterity as a keepsake. 


A DIY photo album will breathe new life into your memories captured on film. After all, what if not viewing family photos on winter evenings, so brings family members closer making you appreciate each other even more.
scrapbooking- a kind of handicraft art, which consists in the design of photo albums, postcards, envelopes, notebooks and other accessories. In translation from English it is referred to as scrapbook . Today we will analyze why the clipping technique is used, how to do it correctly and get real pleasure from practicing this art.
The main thing in the article
What is scrapbooking and what is it used for?
- The scraping technique is to convey information through a visual image. For example, using this technique, the author can tell about a memorable day on one sheet or arrange information about a much longer period of his life in this way.
- Initially, scrap was used to decorate personal and family photo albums. Now scrap masters use the technique to design notebooks, postcards, boxes and other things.
- The scraping technique is very interesting and addictive. Scrapbooking products are quite expensive. But young craftsmen deftly come up with alternatives to expensive accessories.
- Currently, scrap can be used everywhere, not only in the design of albums and notebooks, but also in the workplace and in the room in general. The main thing is that fantasy works well.
Scrapbooking for beginners: what do you need?

For beginners and those who are not going to make money on this art form or generally work in this area for many years, you will need:
- Cutting mat that can be made from thick linoleum
- Stationery knife with spare blades
- Ruler
- Glue "MOMENT CRYSTAL"
- Decorative tape
- Cardboard or scrap paper
- beer cardboard
- multicolored pens
- Ribbons
- Buttons
- Hole puncher
- Scissors
- Hook or stick for creasing
- decorative elements
- Stamps, brads and chipboards - optional.
Paper and cardboard for scrapbooking: how to choose and do it yourself?

- Special paper is produced for scrap, it has a high density, which is necessary for long-term storage and operation. Such paper can be purchased at any specialized store or ordered via the Internet on a site that distributes these products.
- The range of scrap paper is very diverse. There are monochrome and color samples, most often the paper is produced in collections that capture a specific theme. For the design of albums, this is very convenient, since you do not need to select individual sheets according to the color scheme. But you can also purchase individual sheets if you do not need a collector's series.
- Special paper has drawings on both sides and on one side, the difference is in price and in the method of application.
- Cardboard can also be used for needlework, it also has a good density. There is one-sided and two-sided cardboard.
- Paper sizes vary depending on what you want to use it for. Eat 10×10, 20×20 And 30×30.
- You can make paper yourself by choosing pictures that are suitable in size and printing them out on a printer. The only thing is that you need to use thick paper. The density of paper directly depends on the purpose of its application. On average, it should be 200 gr to 350 gr.
- In many cases, scrap paper can be replaced with wallpapers that are suitable for prints and textures. You can also go the other way by making paper, as in the video.
- When choosing paper for the design of albums and other things that should last a long time, pay attention to the density and integrity of the cover. But do not forget about the appearance, such paper should convey everything that you want to capture on it.
How to use brads, chipboards and stamps in scrapbooking?
- brads- an element of decoration, which is shaped like a carnation with a beautiful hat. With it, you can attach photos and other paper and fabric elements, or use it for self-decoration. They come with arrows for holding sheets.
- Chipboards- a three-dimensional decoration element that has many motifs and shapes. It is used to convey the mood, meaning and nature of the page information.
- Stamps- elements in application with ink create different effects. These can be inscriptions, images, portraits or other fantasy effects.
How to make a scrapbooking card: a step-by-step photo master class

For such a postcard, you need to prepare:
- scrap paper;
- wavy scissors;
- stationery knife;
- decorations;
- glue;
- thread with a needle.

How to make an album for photo scrapbooking with your own hands: video master class
- Making an album is quite laborious and takes a lot of time. Get ready for the fact that it will take more than one hour, to create a good album you will need to set aside a whole day, maybe more than one.
- It should also be taken into account that filling the album with a new stream of photos will affect the design and allocation of time for this. But at the end of the work, you will be proud of yourself and your work. And the most important plus is that no one in the whole world will have such an album, because your soul, imagination and work are invested in it.
Do-it-yourself flowers and butterflies for scrapbooking: a master class with a photo
Flowers and butterflies for decoration are used in scrapbooking in most crafts. Butterflies can be made flat or voluminous by bending their wings. Materials for manufacturing butterflies:
- wallpaper;
- paper;
- cardboard;
- napkins;
- boxes;
- magazines;
- old postcards.
Flowers made from different materials, and by different methods: 
- knitted;
- from lace, ribbons and beads;
- paper;
- lace;
- umbrella flowers;
- flowers-bags;
- disk flowers;
- picturesque.
DIY wedding cards scrapbooking: creative ideas with photos
Ideas for creating wedding cards are endless, as each craftswoman finds her own source of inspiration. Postcards can be simple but elegant, discreet but romantic, creative but soulful.


DIY Scrapbooking Wedding Invitations: Video
- Before there was a demand for ready-made wedding invitations, they were handwritten for each guest. And rich families ordered from printing factories. With the advent of mass production, the tradition of issuing invitations has ceased to be relevant for the majority of the population.
- But with the entry into fashion of scrap, even invitations began to be issued individually for each couple. You can make them yourself or order from a craftswoman. It should be noted that the more invited, the more time it will take to work.
DIY notebook using scrapbooking technique

You will need:
- sheets;
- clamps;
- glue;
- cardboard;
- decorations;
- ruler;
- lavsan sliding threads and a needle;
- fabric tape;
- stationery knife.
Action algorithm:
- Measure the required number of format pages A4. Remember that they will turn out twice as much, as they will fold in half. If necessary, you can line each sheet manually or print out the finished ones.
- Fold the sheets in half with a book, iron the fold line, secure with clips and place under the press in the form of a pile of books.
- After pressing, align and fasten the clamps vertically.
- Measure the spine and divide into equal parts, then cut.
- Sew the binding of each stack, and connect them together with fabric tape.
- Then apply a large amount of glue or silicone sealant, compress with clips and leave to dry.
- Cut out three pieces of cardboard: one for the spine, the other two for the endpaper and backdrop. Cut 0.5 cm more of the glued sheets.
- Lay out the cover unfolded as you would like it to look. Then glue with cloth and glue.
- You can make the cover soft or hard by pasting the cardboard with paper or cloth.
- Glue the first sheet to the inside of the flyleaf and the last sheet to the back.
- Decorate the notebook the way you want with decorative elements.
Do-it-yourself envelope for money scrapbooking: how to do it yourself?

Prepare:
- paper:
- stationery knife;
- curly scissors in a wave;
- ruler;
- pencil;
- decorations.
Algorithm:
- Cut out the envelope according to the dimensions of the bills in expanded form.
- Cut the lower and upper parts with curly scissors in a wave so that when combined it is a single sheet.
- Glue the ribbon down the center and decorate the front of the envelope.
More original ideas making envelopes for all occasions with your own hands look at .
DIY passport cover using scrapbooking technique

You need:
- cardboard;
- textile;
- machine and thread;
- glue;
- scissors;
- pencil;
- ruler;
- decor cards;
- Velcro or button.
Course of action:
- Mark the dimensions of the passport on the cardboard and cut it out.
- Lay on the fabric and mark the borders.
- Make a loop for closing.
- Attach all the cards to the right side of the fabric and sew.
- Sew the second part of the button or Velcro closure to the outside of the flyleaf.
- Align the fabric with the cardboard and sew so that the tab coincides with the closing point, and there are areas for the passport to enter in the inside of the cover.
- Next, design the front side of the cover to your liking in a characteristic style.
DIY calendar using scrapbooking technique

Prepare:
- paper;
- cuts;
- decorations;
- creasing stick;
- binding rings;
- hole puncher;
- glue;
- typewriter;
- threads;
- printed names of months;
- stationery knife.
Algorithm:
- Fold a large sheet of scrap paper in half and create a composition on one front side.
- Glue all the cards, then sew.
- Arrange all the months in order and pierce the cards with a hole punch, make holes on the calendar itself.
- Fasten the cards with the months rings.
- Decorate the calendar with decorative elements.
How to make a scrapbooking box?

You will need:
- box;
- paper of low density;
- stationery knife;
- pencil;
- ruler;
- glue;
- decorations.
Process flow:
- Measure the box, and transfer the dimensions to paper.
- Cut out the measurements and glue the box.
- Decorate with decorative elements: flowers and butterflies made of paper and fabric, buttons, beads.
- You can use the decoupage technique to decorate the box, like -.
DIY scrapbooking photo frame: instruction with photo
You need:
- cardboard;
- paper;
- textile;
- glue;
- scissors;
- brads;
- machine and thread;
- sintepon.
Process of creation:

DIY document holder in scrapbooking style

Materials:
- beer cardboard;
- textile;
- stationery knife;
- glue;
- scissors;
- machine and thread;
- decorative gum;
- decorations.
Process:
- Cut out 4 rectangles from cardboard 12×20 cm. Glue the first to the second, and the third to the fourth.
- Lay out two crusts on the fabric so that there is room for the spine, about 2 cm. Glue the fabric, and then sew.
- Make fabric document pockets inside the holder and sew.
- Sew an elastic band to the back cover to hold it.
- Decorate the flyleaf with appropriate decor elements.
DIY school album scrapbooking

You will need:
- beer cardboard;
- paper;
- glue;
- scissors;
- hole puncher;
- eyelets;
- stationery knife;
- scissors;
- decorations.
Course of action:
- Cut out blanks for future sheets from cardboard, and each subsequent sheet should be a couple of centimeters larger than the previous one.
- Tape each page with crap paper, then poke holes with a hole punch at equal distances. Insert eyelets.
- Fasten the pages with ribbons.
- Decorate the endpaper and other pages of the school album.
Do-it-yourself scrapbooking cutters

- Scrapbooking cuts are needed as an inscription, decoration or just a design element. In general, they are made using special figured hole punches. They can be in the form of figures of people, animals, birds, clothes or everyday objects. Cuttings are in the form of frames or inscriptions, different colors and textures.


- To make the cutting yourself, you can either purchase a special hole punch, or buy a stencil, or use a sharp clerical knife to cut out a simple figure. True, to do this, you need to make a lot of effort and patience.
Stencils and templates for scrapbooking

- Stencils and templates are used to decorate pages with an album, postcards, notebooks and other products made in the scrap style.
- They can be used for outlining with colored pens or paints. Attach to the right place and outline.
- Using stencils and templates, you can make cuttings, although the process will be very laborious and painstaking. You need to circle the template, and then cut it out with a knife.
- They are also in high demand for embossing - the technique of drawing a convex image. For this technique, a special powder is used, which is heated with a hair dryer for embossing. After heating, the image applied with powder becomes voluminous.
Newborn Scrapbooking: Photo Album Ideas for Boys and Girls
The birth of a child is so beautiful and unforgettable, so you need to create an equally wonderful place to store these memories. An album for a newborn can contain not only memorable photos, but also the first tags, records, curls and other things that parents want to carry through many years of their baby's life.


DIY New Year's scrapbooking: ideas with photos
New Year's scrap is the most magical, as there are no borders and limits for decoration. Breathe magic into each of your creations.


Do-it-yourself postcard for a loved one using scrapbooking technique: video
The art of scraping smoothly moved from a hobby and entertainment to a profitable business. Although there are few people who value manual work, their number is growing. Even if scrapbooking is not the first place in your life, you can do something nice for yourself and your family, having a good rest. Give your loved ones a piece of your soul in a product of your own composition and handicraft. Such a gift will be not only creative, but also one of a kind.
In the article you will find ideas for creating your own wedding photo album.
Creating and designing a wedding photo album is not only symbolic, but also a very pleasant experience for people in love. Of course, you can sew thick cardboard pages with ribbons or canvas thread yourself, but the most common classic “adhesive” photo album (blank pages without inserts, on which photos should be glued with glue) will do as a base.
Before you start decorating the pages and cover, you should decide on the style and choose all kinds of embellishments. You can buy them at any hardware or craft store. You will need:
- Satin ribbons
- Lace
- sequins
- sequins
- Organza
- Mesh
- Crystals and rhinestones
- Pearl
- Beads and half beads
- Bows
- Roses
- frames
- Patterned paper cuts
- Decorative figurines for sticking
- satin fabric
- Guipure
You can decorate not only the cover. The album that traces a certain theme to the last page looks much more impressive. Such an album can be safely displayed in a trellis so that it is the pride and highlight of your family, and every guest can admire it.
How and how to decorate a photo album:
An album with photographs, decorated with voluminous and textured patterns, for example, flowers from foamiran or satin ribbons, will look spectacular and very festive. They can be laid out in the shape of a heart and supplemented with a variety of beads, sparkles, rhinestones. Remember that such decor is the main and brightest accent, and therefore it should prevail on a simple background (lace, satin or guipure).


Volumetric decorations in the form of flowers, leaves, petals or bouquets will help you create an elegant style for your photo album. These are easy to find at any craft store. Just arrange them on top of the cover in the way you think is most beautiful, and then start gluing.


You yourself determine in what style your photo album should be. Focus on the photos themselves, for example, if the wedding was in a classic style, you can’t do without lace, satin ribbons and pearls. A Greek or beach wedding will go well with turquoise colors, shells, stars. A wedding in retro style “loves” bright colors and images, clippings, bows.


In addition to the photo album, you can also make a box or case to store it in the same style, color, or similar patterns.


It is completely unprincipled to stitch the pages yourself to get a unique photo album of incredible beauty. You can purchase the simplest store-bought version and decorate to your liking by covering it with fabric, embroidering with beads, gluing lace or other decorations.

Of course, the decor of a wedding album cannot do without symbols of love and marriage. Hearts, cooing doves, wedding rings, a kissing couple, hearts will do. They should be sewn or glued, playing with different decorations.


If you want to create a certain mood every time you look at your wedding photo album, try complementing the album decor with phrases and words, famous quotes and sayings about love, marriage and family. They can be handwritten, cut from postcards, or printed on paper. This is the perfect decor not only for the cover, but for every page.


In modern needlework stores, you can easily purchase words, drawings and patterns carved from plywood wood thin sheet. Such a decoration will perfectly complement the cover of a photo album in the spirit of minimalism, but it always looks spectacular.
How to beautifully design the cover of a wedding photo album: ideas, photos
Ideas:
- Scrapbooking - This is a three-dimensional decoration technique using different types of decorations: dried flowers and fruits, burlap, postcards, clippings, ribbons and beads, wooden patterns, buttons and much more. This decor always looks very impressive and is perfect for decorating a wedding album.
- a good way to decorate an album. It can be glued in the center, and around it can be beaten with any decor in the form of lace or sequins, voluminous roses and petals.
- Embroidery - if you know how to embroider, you can embroider the words with beautiful gold thread on white fabric, and then cover the cover with it.
- wedding color - modern weddings are sure to have color and style. These options can also be followed when creating an album.
- Creative - creative albums will tell about the couple as a creative and unusual family. You can find decor ideas at any art and craft store.
- Book - modern printing houses will easily print a photo album with colorful photographs in the form of a book for you, but you can decorate the cover yourself to your taste.


How to beautifully arrange the sheets of a wedding photo album: ideas, photos
Ideas:
- Design paper - Depending on the style you are pursuing, you can choose some beautiful paper with patterns or words and make a background on each page of the album.
- Words and inscriptions - print on plain or design paper using a printer (in a beautiful font) phrases, beautiful words about love or poems. Paste them next to each photo.
- Paper lace - you can buy special sheets of lace paper or cut it yourself, and then decorate the pages.
- Decoupage - any drawing can be cut out and applied in advance to each page of the album.
- Stickers - you can find themed stickers with hearts, declarations of love, images of the bride and groom, wedding cake and so on in the store.
- Envelopes - on each page, along with photographs, you can also place small paper envelopes in which all kinds of notes or things associated with the wedding day should be placed.


How to arrange wedding photos beautifully: ideas, photos
How to decorate photos in albums:
- Satin ribbon bows
- Dried flowers and petals
- Cut-out lace patterns
- Glitter and golden sand
- decoupage
- Rhinestones
- half beads
- clippings
- Poetry
- words
- Wishes

 Words for decorating pages of a photo album
 What to make inscriptions for wedding photos: tips, ideas
Beautiful words and wishes will complement your photos and album pages. Browse through the available options to find the one that suits you best.
Options:


Making wedding photo albums and photos: the best examples
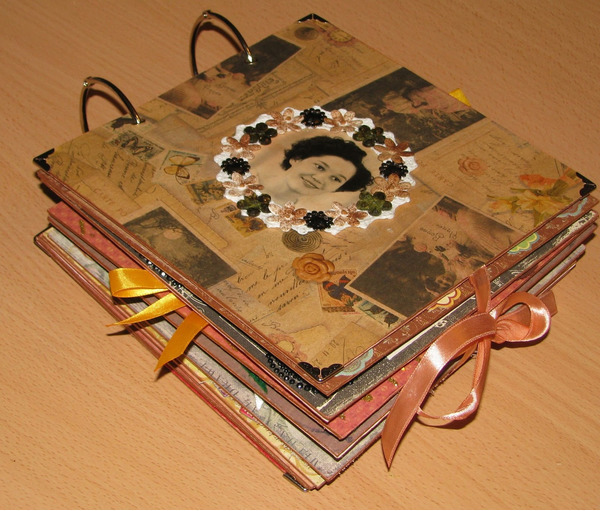
To get ideas for decorating your album, you can view the finished work. Album No. 5
How to buy a ready-made wedding photo album in the Wildberries and Aliexpress online store: links to the catalog
If you prefer a store-bought version of a photo album to something you can do yourself, pay attention to those options that can be purchased on the pages of a modern store wildberry. Only the highest quality goods, stylish design, with inserts or with adhesive pages are collected here.
Also, if you are looking for a special album that will be unusual and stylish, browse the range of the store Aliexpress, where there are many affordable and extraordinary options for honeymoon albums, as well as many options for their decor, and a variety of decorations.
Video: "Scrapbooking Wedding Album"


