PVC window installation technology
How is the installation of plastic windows; what nuances should be paid attention to during measurements and installation; common errors, as well as ways to identify them - we will consider these and other pressing issues in this article.
Why are problems with plastic windows so common?
Many people think that PVC windows are as good as they are installed. In many ways, this is true. The fact is that the manufacture of plastic windows is carried out using automated systems, and calculations and design are carried out on computers using specialized software. That is why defects in the assembly of translucent PVC structures are extremely rare, and the notorious "human factor" is at the forefront. It should be noted that in addition to high-quality installation, it is very important to correctly choose a window system that is optimal for certain conditions. And yet, an incorrectly measured window simply cannot be properly installed.
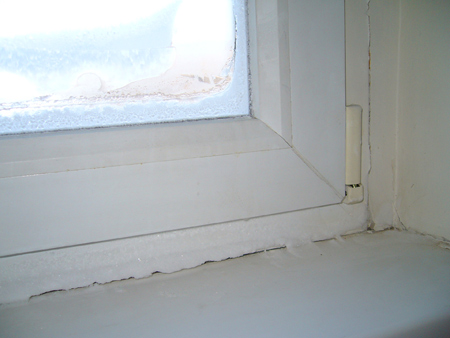 Consequences of poor-quality installation
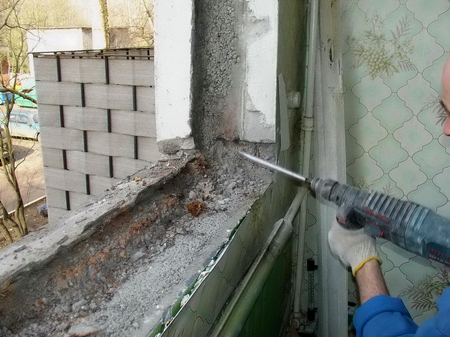
Opening preparation
Carrying out work on the installation of windows, you always have to spend some time preparing and restoring the opening. This problem is especially relevant when replacing window blocks in old buildings due to extensive damage to dilapidated structures. In an amicable way, it takes two or three days for a high-quality solution, which is simply impossible in residential premises. Quick-hardening cement-based compounds, polyurethane foam in combination with sheet insulation come to the rescue.
After dismantling the old window, the opening must be freed from moving, crumbling particles, protruding elements of the old internal slopes. All surfaces are cleaned of dust, dirt, oil stains. Loose areas should be fixed by filling with a waterproof binder.
Large voids formed when replacing window blocks, for example, between the rows of facing and bearing brickwork, are sealed with dense insulation, all through holes are foamed.
In addition, it is necessary to remove the build-up of mortar, repair cavities and chips on the inner surfaces of the quarters, exceeding 10 mm in height. Such attention to this area of the opening is due to the fact that a hermetically sealed band seal will be placed here.
Installation of plastic windows
Placing and temporary fixing of window blocks
Windows can be installed in a pre-prepared opening, both assembled and with the shutters and double-glazed windows removed. In any case, the window unit must have an installation profile designed for mounting the window sill and ebb.
With the help of a level or a plumb line, the windows are exposed in compliance with the required mounting gaps within the permissible deviations - up to 1.5 mm per meter, but not more than 3 mm for the entire length of the product. The difference in window diagonals should not exceed 8 mm. If the opening does not have a quarter limiting the location of the window block, then it is recommended to install the product at a certain distance from its outer edge - at least 1/3 of the thickness of the load-bearing wall. If the wall is heterogeneous, with insulation - in the zone of the insulation layer.

With the help of plastic mounting wedges, the window is fixed in the opening. Such wedges are installed in pairs in the corners of the window block, the thickness is adjusted by moving them relative to each other by several intermeshing teeth. The prefabricated plastic shoe has an air chamber, therefore it is not a cold bridge, like a homemade wooden block, and moreover, it does not deform with changes in temperature and humidity. The recommended wedge width is 100-120 mm. After fixing the window with fasteners, all mounting blocks are removed, except for the lower support wedges. It is they who transfer the load to the supporting base, and not the lower assembly seam.
Attention! If the window has a vertical central bulkhead - impost, then the supporting wedges should be placed directly below it.
Fastening PVC windows
Depending on the design and density of wall materials, the weight and dimensions of the product, the strength of wind loads, the size of the mounting clearances, the optimal type and number of fasteners are selected. For fastening windows to openings, plastic or metal anchor dowels, construction screws or mounting plates are used.
Polymer dowels are used for walls made of materials of low strength - lightweight concrete, hollow brick, wood, as well as to avoid contact corrosion in aggressive environments. Plastic frame dowels provide good thermal insulation of the connected elements.
Self-tapping screws fasten windows to wooden bases - rough frames, embedded elements, wooden frame racks.
Flexible anchor plates are used for multi-layer wall construction, if there is insulation in the area of the window block, and the attachment point must be moved outside of it.
Metal expansion dowels provide excellent resistance to shear loads arising in solid mineral substrates such as concrete, solid brick, natural stone.
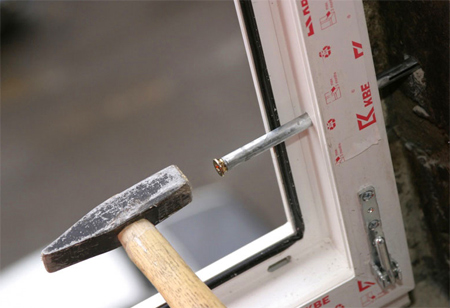
The length of the fasteners is selected in such a way that the expansion element of the anchor is immersed in the base for at least 40 mm. The diameter of the dowels should not be less than 8 mm.
Fasteners must be located in the range of 150-180 mm from the inner corner of the window block and 120-180 mm on both sides of the impost. If there is no impost connection, then one dowel should be located along the line of the shtulpovy vestibule of the two doors. The distance between the fasteners should not exceed 700 mm for white and 600 mm for tinted windows, therefore an anchor is almost always placed in the area of the middle of the side profile of the window.
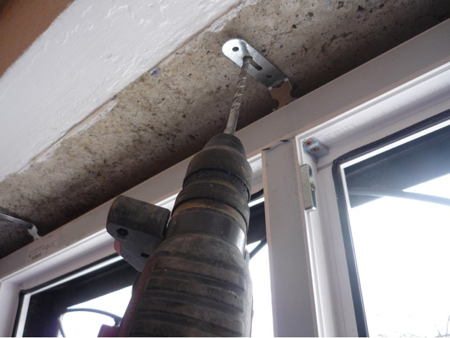
Through holes are drilled in the pre-determined places in the window frame, so that the heads of the dowels and locking screws are recessed into the rebate of the window profile and can be closed with decorative plugs or caps. Depending on the features of the wall materials, anchor holes in them are drilled or drilled with a perforator in a mixed mode - drilling with a blow.
Attention! The drilling depth of the holes in the walls must be at least 10 mm deeper than the length of the base part of the anchor.
Flexible anchor plates are attached to the windows before they are installed in the installation opening. To do this, they are snapped into the grooves outside the plastic profile and screwed to it with screws with a drill, the diameter of which must be at least 5 mm and at least 40 mm long. After fixing the window in the opening, the plates are bent and are attached to the wall using plastic expansion dowels with a diameter of 6 mm.
Attention! Each plate should have two attachment points.
Mounting gap filling technology
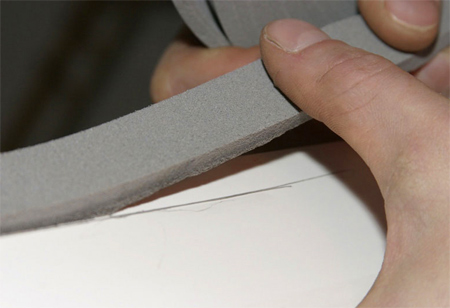
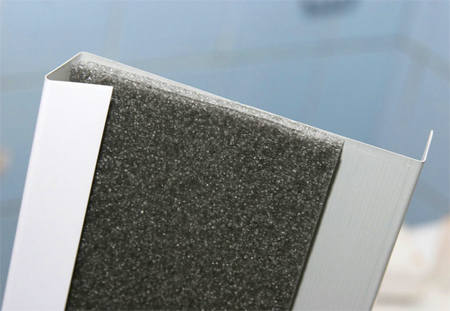
According to the current GOSTs, when installing plastic windows, a three-layer system of assembly seams must be used. This design was based on a rather simple idea, which was once implemented by German specialists. The main component of the installation gap is the central layer in the form of polyurethane foam, which performs a sound and heat insulation function and must remain dry under all circumstances for correct operation. The inner layer protects the insulation from moisture penetration from the inside of the room, in other words, it is a vapor barrier. Self-adhesive tapes or vapor-proof mastic sealants are used for this. The outer layer is a pre-compressed self-expanding sealing tape (PSUL), which allows moisture to pass from the foam insulation, but is waterproof from the outside.
The device of a complex seam begins with the installation of the PSUL on a quarter of the opening, 3-5 millimeters from its edge. Thus, a front mounting gap is formed, the size of which is regulated by the working thickness of the sealing tape compressed by at least 25% - in practice, this is about 3 to 20 mm. In some cases, for example, if a quarter of a brick has joining or other minor irregularities, the tape is glued directly to the window profile.
Attention! The current GOST 2007 in article 5.1.9. permits the embedding of the outer layer with plaster compounds, while the previous standard forbade this, allowing only the use of profile details: cover strips, false quarters, ebb tides.
Note that the use of an ebb tide is a prerequisite for ensuring reliable protection of the assembly seam from atmospheric moisture. The ebb tide should extend 30-40 mm beyond the facing of the outer walls; noise-suppressing pads can be installed under it.
Further, after the final fixing of the window in the opening with the help of anchors or flexible plates, the assembly seam is filled with a layer of foam. Foaming is carried out with a fully assembled window unit. Please note that expansion gaskets must be installed between the glass unit and the profile.
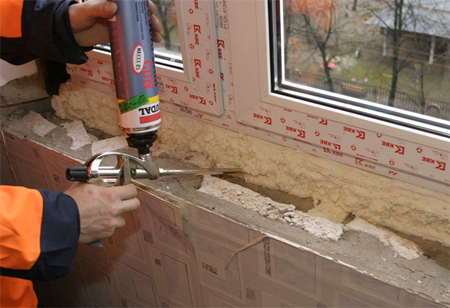
As we have already said, the central layer, depending on the dimensions and features of the windows, can vary from 15 to 40 millimeters. The foam sealant should be applied in a continuous uniform layer, without the formation of voids, tears, cracks. That is why, with a large width of the window profile, or if the width of the installation gap significantly exceeds the standard, polyurethane foam is applied in stages, observing technological breaks for drying the layers. It is recommended to do a test foaming of a small area before filling the joint in order to determine the expansion of the polyurethane sealant. The foam should not extend beyond the outer plane of the window profile.
Attention! Cutting off excess foam makes the central layer too hygroscopic, so this operation is performed only in extreme cases and only from the inner surface of the assembly seam.
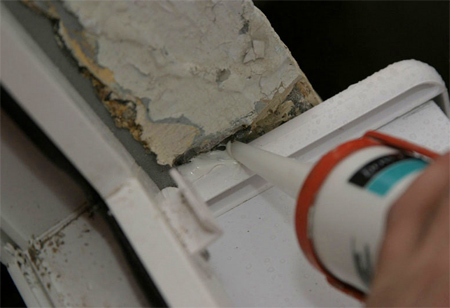
On top of the dried foam insulation, a vapor barrier tape is glued onto the opening or mastic is applied. An important stage in the construction of the inner layer of the assembly seam can be considered the treatment of mating elements of the window system with silicone or acrylic sealants, such as the cladding of the slope, the window sill, as well as the joints of individual window blocks with each other and with pedestal, pivoting, expansion profiles.
At the end of the installation of windows, the protective film must be removed from the frames and sashes.
The main mistakes when installing plastic windows
The first thing worth paying attention to is the deviation of the details of the installed window unit from the vertical and horizontal lines. Let us recall that modern standards allow inaccuracies of installation up to 1.5 mm per linear meter or 3 mm for the entire product. The vertical, perhaps, is best checked using a plumb line and a tape measure fixed near the window, measuring the distance from the thread stretched under the weight of the cone to the window profile. When using this method, the dimensions of the product do not matter, because we are able to measure along the entire length of the profile. The horizontalness of the parts can be checked by placing on the vertical profiles of the window, including imposts, control marks using the hydro level and subsequent measurements of the distance from them to the edges of the product. Note that only expensive rack levels allow a more or less qualitative study of deviations, but in most cases their length is clearly not enough to understand the overall picture.
If there are deviations only vertical or only horizontal, then this means that the box is skewed and has no right angles. The lengths of the diagonals are checked with a tape measure - the maximum allowable difference can be 8 mm.
Next, you should check the window for deformations of the window profiles. For these purposes, along the lines of the outer edges of the window profiles, from corner to corner, pull the cord - the deviations are determined visually. A very common problem is the curvature of the middle of the side profiles towards the center of the window. This happens when the installation is carried out on flexible anchor plates that are not able to contain the pressure of the expanding foam, or if there are no spacers between the glass unit and the profile. The deflection of horizontal profiles occurs for the same reasons.
It is very important to check the correctness of the choice and technology of application of a certain type of fasteners. Very often, installers completely unreasonably prefer to use anchor plates for all occasions, since it is much easier to display a product with their help, moreover, they do not need to remove the sashes and remove the double-glazed windows. You should be as serious as possible in meeting the requirements regarding the number and location of fasteners.
The absence of support blocks under the installation profile (most often under the vertical impost) or the use of homemade wooden wedges instead. As a rule, this error is paired with a more serious one - too small or zero mounting gap at the bottom of the window.
Violation of the technology of the installation of assembly seams is mainly in the too small dimensions of the gaps, the discontinuity of the insulating layers or their absence. The most common mistake can be considered overflowing foam material, which entails deformation of the profiles and the need to cut off excess gasket.
A related problem causes the blowing of the joints of the elements of the window system - the window sill, the facing of the slope, connecting, expansion, turning profiles. This is a banal lack of sealing their joints with self-expanding tapes or acrylic, silicone.
Installers often incorrectly mount connected window units, for example, on glazed balconies. The windows are not located in the same plane - "little book". It is quite simple to check this, you should pull the cord in front of the front line of the window, from corner to corner, and take measurements with a tape measure.
Also, there are frequent cases of placing adjacent windows not along one horizontal line, or without reference to the geometry of the facade. For example, this is very important on a bay window, panoramic glazing, where one complex window sill can be used with several window blocks. And again, the water level will come to the rescue, making it possible to put mutually located horizontal marks at a sufficient distance.
Problems arising from errors in the assembly of PVC windows, and how to solve them, we will definitely consider in the following articles.
How to avoid poor-quality installation of plastic windows?
- Use the services of a large company, it is better if it is a manufacturer of window systems, and not an intermediary.
- Study in detail the technology of installation of PVC windows. No wonder they say: "Aware is then armed."
- Prepare a storage area for materials. Free up space near window openings as much as possible, cover pieces of furniture and household appliances with polyethylene, isolate the rest of the premises, and fence off the working area outside.
- Discuss all the technological nuances with the measurer, be constantly present during the installation - do not forget about the large number of hidden works.
- Before and after installing windows, check the integrity of the profiles and glass unit, the performance of the fittings.
- Do not sign the acceptance certificate for new windows until you check the quality of their installation.
- If you still find problems later - blowing, mashing, then feel free to contact the contractor with a request to eliminate the malfunctions. In the overwhelming majority of cases, all problems are promptly resolved by the manufacturer.
