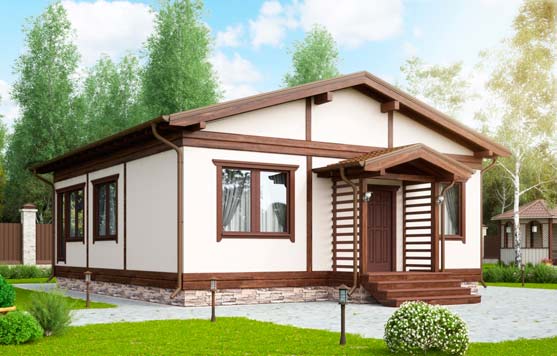
DIY frame house: step-by-step instructions with a photo
Frame construction is rapidly gaining popularity among individual developers. If in Canada it is a state program. In Russia, this means solving housing problems on your own, and in the shortest possible time at the lowest possible cost.
It is possible to build a skeleton frame with your own hands, even in the absence of special construction education, skills, experience. To do this, you will have to make an effort, understand the technology, and also acquire the simplest skills for performing construction work. As a result, you can build a frame house with your own hands. , and get an individual house for an affordable price for your special requests, needs, needs.
Here is a detailed description of technological operations. Using the technology, you can follow the step-by-step instructions (6x6 m 2 - the dimensions of the house, which we took as a basis) with high quality.
DIY frame house: step by step instructions
We list the main steps that must be followed sequentially in order to build a new house.
Scheme of the wall of a frame house
- Design - planning, thinking through the structure of the house, layouts of walls and rooms, doors and windows, plumbing fixtures, water supply, sewerage, electrical wiring, heating. In the design process, a diagram of a frame house is drawn , on which the locations of engineering networks and plumbing, heating devices are indicated. Carrying out the scheme of a frame house with your own hands , utility rooms, it is important to consider how the house will be heated - to choose a heating system, a scheme for laying its elements. According to the ready-made scheme, step-by-step construction will be carried out.
- Groundwork is the preparation of a pit for the foundation and the actual construction of the foundation.
- Assembling the frame of walls and roofs.
- Construction of walls and sub-floor.
- External doors, windows and piers.
- Interior decoration and interior doors.
And now let's go directly to the question. , how to make a frame house with your own hands, what to consider for high-quality construction and the correct performance of work.
DIY frame house: step by step preparation
Preparatory work is required for any construction. If you thought over the project of the house yourself, then you took into account the peculiarities of the location of the building on the site. If you bought a ready-made project and decided to implement it on the spot, then you will need to "tie" the structure to your relief.
Convenient location of a frame house on your site
Site preparation
What you need to do on the site:
- Clean it from old buildings, if any on the site, from construction debris and from stumps, snags.
- Provide the ability to deliver building materials, clear the road for the car and a place for a turn.
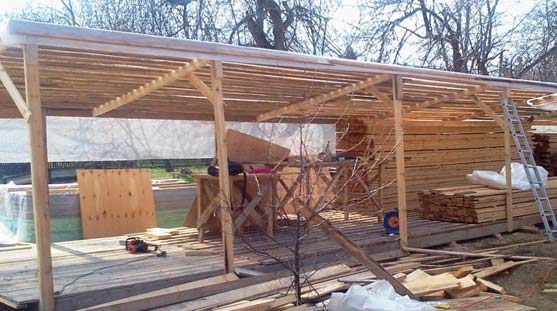
A canopy for storing boards of a frame house
- Consider places for storing building materials, if the relief is uneven, they should be located on elevations.
- Perhaps the site needs to be leveled, for this you need to call the construction equipment.
- For some construction sites, it is important to build a fence to prevent theft of materials.
Frame house step by step: plot marking
Marking is understood as the designation of the location of the future structure on the ground. The plan of the house is transferred to the area using pegs and ropes. The pegs are driven into the ground and a rope is pulled between them, indicating the location of the future outer walls.
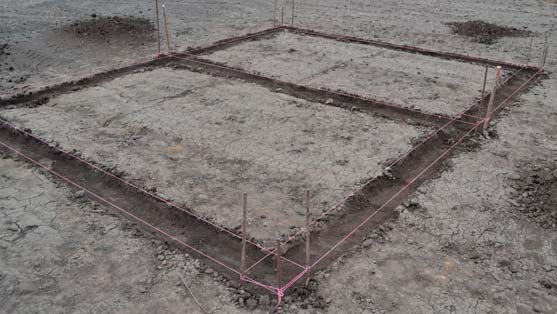
Marking a site for a frame house
All angles are carefully measured, the degrees (clearly marked 90 °) and the length of the walls are observed. Deviations of at least a few degrees are not allowed. They lead to distortion of the structure and incorrect distribution of loads. As a result, it can reduce the strength of the entire structure and reduce its reliability.
We build a frame house step by step instructions for the foundation
The step-by-step construction of a frame house with your own hands begins with the foundation. This is the foundation of the house, a large, flat and solid "stand" on which the entire frame structure is supported. It can be poured out of concrete or assembled from ready-made concrete blocks.
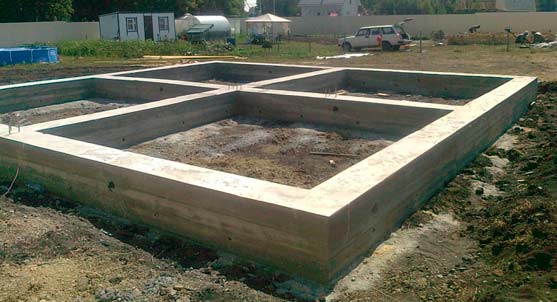
Strip foundation for a frame house
Frame construction is called "lightweight". The walls of the frame are much less pressing on the surface of the earth than capital structures made of bricks or monoliths made of concrete. The frame is also lighter than a log house. Therefore, your structure will need a small, shallow foundation.
On a note
When deciding how to build a frame house yourself with your own hands, you invariably face the question of choosing structures and materials. For frame structures, shallow strip foundations or slabs are erected. In some cases, the foundations for the frame frames are made deep.
This happens when the soil is unstable, mobile, free-flowing and the structure is planned on the shore of the reservoir. In this case, a pile-screw foundation is used, which will rest on deep and fixed layers of soil.
Tape
It is a stone tape, a path buried in the ground by 400 mm. The foundation rises above the ground by 100-200 mm. Thus, the total height of the strip foundation for a frame house is 500-600 mm.
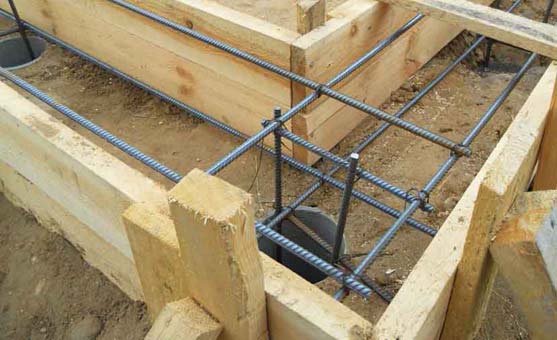
Strip foundation formwork with reinforcing mesh
On a note
You can make the foundation deeper and higher - but this is at your discretion, if you want to use up more building materials and get a more massive structure of the base of the house.
The foundation tape is poured into trenches prepared in advance. You can mix the concrete for pouring yourself. Before pouring, a layer of sand is poured into the trenches and thus a so-called sand cushion is made (up to 100 mm thick) and metal reinforcement is laid.
Platen
The slab foundation is also called floating. The frame house will rise and fall with it, with seasonal expansion of the ground. Therefore, the slab must be strong enough.
The slab foundation is poured from concrete and reinforcement, while the reinforcement is tied with wire. Reinforcing mesh provides the slab of the frame house with the necessary strength.
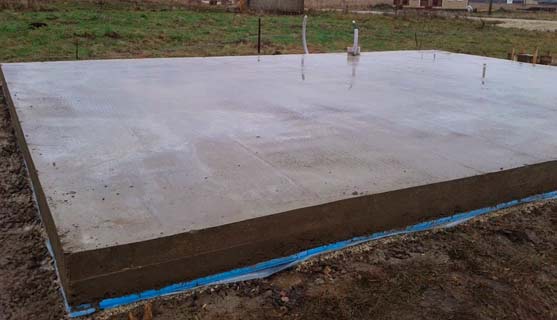
The foundation is filled with a monolithic slab
The slab base can be buried at least 100 or 200 mm into the ground. The total height of the slab should be 200-300 mm.
It is important for the foundation slab to provide resistance to the rise of ground moisture. Therefore, when mixing concrete, a waterproof additive is added to it. This will ensure the water resistance of the concrete slab and the dry floor inside the future room. It will also extend the durability of the foundation and the entire structure.
Pile-screw foundation
To obtain a pile-screw foundation, asbestos pipes or metal piles can be used. For asbestos pipes, pits are prepared into which the pipe is installed and concrete is poured into it. Pre-reinforcement, i.e. put metal fittings inside the pipe. Metal piles are screwed into the ground without removing the soil, without digging holes.
In order to make it easier and clearer how to build the foundation of a frame house with your own hands – we will give a step by step photo.
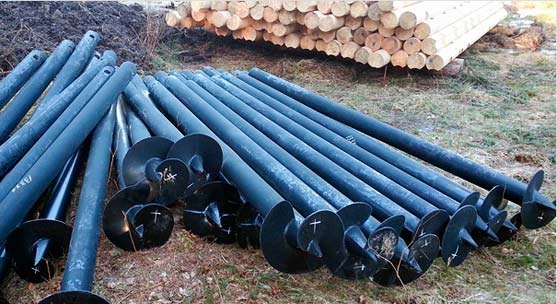
Set of piles for a screw foundation
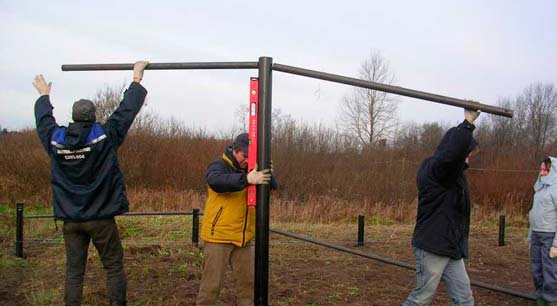
Screwing in foundation piles manually

Connection of screw piles of the foundation to each other
Pile-screw foundation
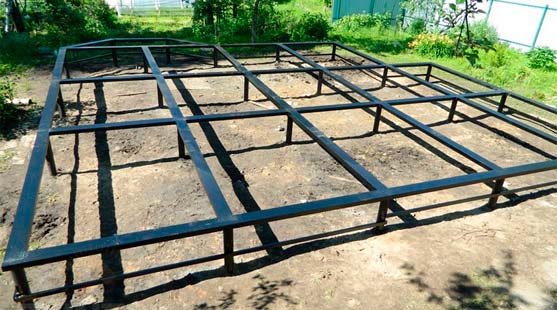
Strapping with a bar
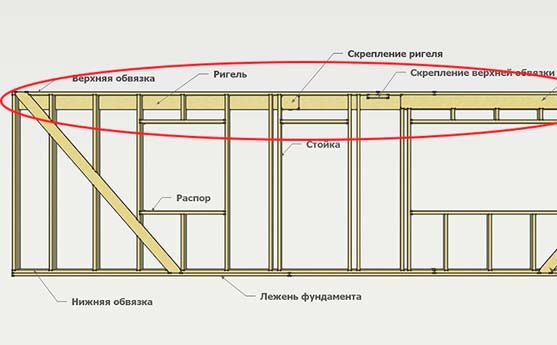
Horizontal beams are laid on top of the finished piles. This design is called a grillage. When constructing a frame house, the grillage is also the bottom strapping of the frame, on which the vertical supports will be attached.
For the lower strapping, a wooden beam with a section of 150x150 mm is chosen. It is a load-bearing structure element that must be strong enough to support walls, roofs, finishes and domestic appliances.
To connect the corners of the harness, choose one of the methods proposed in the picture - in half a tree or in a half paw.
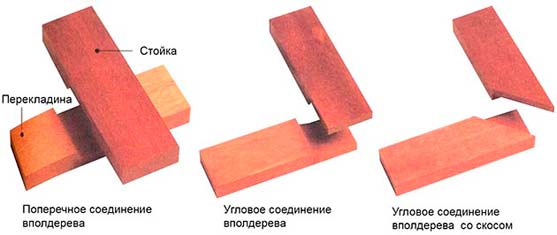
Half-tree connection options
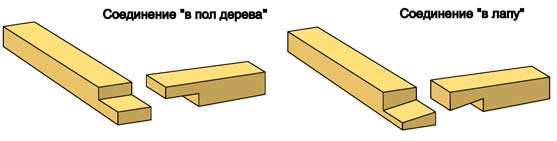
Half-wood and half-lap connection
They differ in the thickness of the wood cut for the corner joint. Half a tree - exactly half the thickness of the beam is cut, half-paw - the beam is cut at an angle to each other. From above, the connection is reinforced with a metal bracket or plate. After that, the corner of the strapping is fixed to the foundation with a metal anchor. After the installation is completed, the timber is treated with an antiseptic.
How to build a frame house: instructions for the rough floor
The floor of the building consists of a rough layer and a finishing coat. The sub floor is made of concrete or wood. Finish covering made of wood, laminate, linoleum and other finishing materials.
Concrete sub-floor
The concrete floor is poured over the ground. It represents a multi-layer structure, which has a layer of waterproofing, thermal insulation, reinforcing mesh.
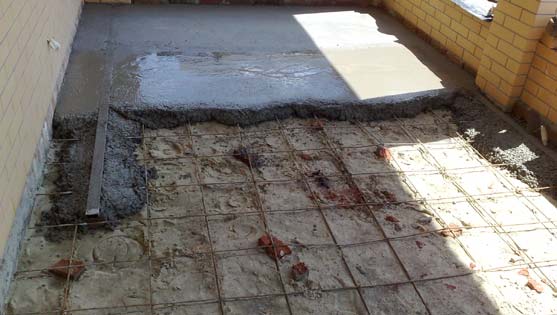
Concrete sub-floor - concrete screed
The bottom layer is sand 10 mm. Above - expanded clay thermal insulation, sawdust with clay - the so-called adobe, penoplex. Further, concrete with a waterproofing additive.
Wooden sub-floor
If a tree is used to construct a sub-floor, then an empty space is formed under it.
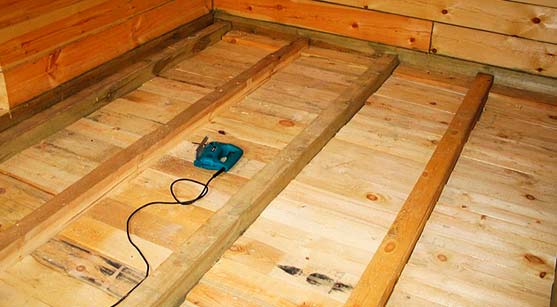
Rough floor between lags
Wooden logs are laid on top of the lower strapping and are used as a base, to which subfloor boards are nailed from below. Insulation is laid on the boards of the subfloor. Then the floor covering is spread on the logs: laminate, linoleum, OSB, parquet.
Frame construction: instructions for the construction of the frame
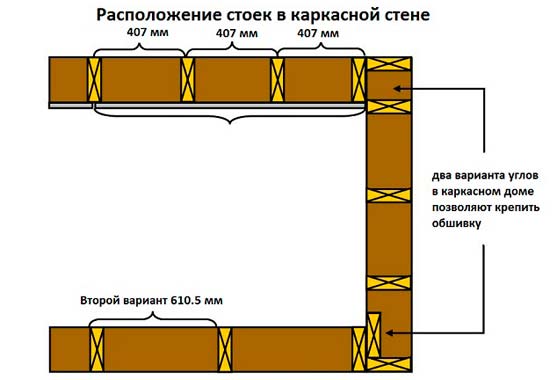
In the step-by-step construction of a frame house, the construction of a frame is one of the most important construction operations. It is important to choose the right beams and boards (size and section) and connect them correctly. What features of the installation of frame supports, beams, oarlocks and crossbars should a novice builder take into account?
- The locations of the racks and the junction of wooden elements are measured with a ruler and marked with a pencil.
- Carefully verify the verticality of the supports, the horizon of the beams and the angle of the connection. The angles between supports and beams must be 90 °.
- For the connection of frame elements, the most reliable options are used - metal brackets and corners.
- The installation of a frame house is carried out from elements assembled in advance on the ground - templates of walls, trusses. They are lifted, installed, temporarily propped up with oblique beams and then fastened with connecting elements.
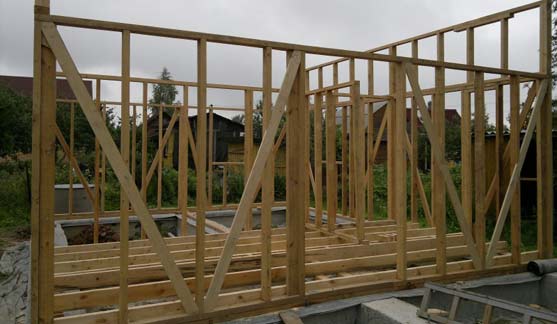
Installation of walls in a frame house
The technology for collecting the frame of the walls is as follows:
- Lay the bottom harness.
- The frame of each wall is assembled separately (lower, upper and vertical elements) - the so-called wall template. After the assembled template is completely lifted and installed on the lower harness.
- On top of the wall templates, the upper harness is laid, on which the rafters for the roof are then placed
On a note
It will take three people to lift the 6m wall template. Three of us to raise such a template is quite real. Longer walls are assembled from several templates and connected by their joints with special perforated plates.
The assembly of a frame house in the photo shows the progress of construction operations - assembly of the template and its installation in the place of the future wall.
Ukosiny
In some schemes for installing a frame house, not only vertical and horizontal frame elements are used, but also inclined ones - the so-called jibs. They increase the strength of the frame structure. They are made from boards of 150-50 mm or 100-50 mm.
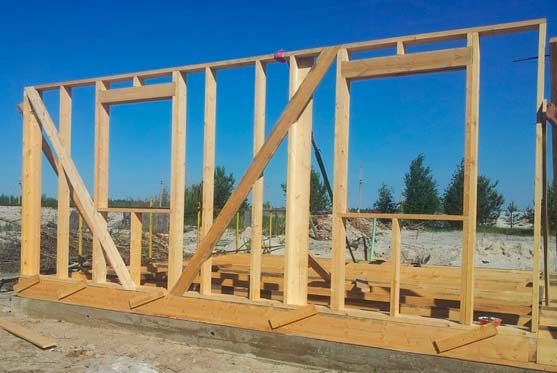
Correct placement of jibs
Rigel
A crossbar is a horizontal beam that is attached next to the beam of the upper harness. The crossbar is attached to the template during assembly on the ground. For crossbars, wooden boards with a thickness of 50 mm or more are used.
Crossbar to the entire wall of a frame house
A crossbar is also called a horizontal support between inclined roof trusses. In general, a transom is any beam that works in compression.
Corners
The corners of the frame bear the maximum load. Therefore, they are made from a thicker bar or assembled from two or three support boards.
Options for fixing the corners of the frame wall
Internal walls
The frame of the inner walls is assembled from wall templates in the same way as for the outer walls. Internal walls do not carry a large load, and therefore can be of a smaller section.
The main requirement for interior walls is sound insulation. Therefore, their thickness should ensure the installation of noise-insulating material during the subsequent arrangement of the walls and their insulation.
Windows and doors
After assembling the frame, windows and doors are installed in the openings provided for by the scheme. This work is easier to order from the manufacturer - a finished window with installation in the window opening. As for the doors, their frame can be successfully assembled independently from wooden planks 25-30 mm thick.
Frame house: instructions for proper insulation
Thermal insulation of a house ensures its ability to maintain a comfortable temperature in winter, and also determines your future expenses for paying for winter heating. Therefore, here it is better to overdo it and insulate too well than to save money and insulate the walls of the building insufficiently. What is used for insulation:
- Mineral wool in the form of pressed mats- the best option for warming the frame structure. It allows air to pass through, provides air exchange, limits heat loss due to the fact that it does not conduct heat from the house to the street, does not cake and does not lose its properties over time. When installed, it shrinks a little and then straightens out, which ensures that there are no assembly seams, slots through which heat loss usually occurs.
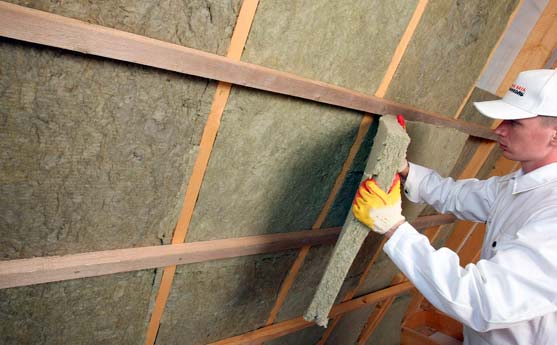
Wall insulation with mineral wool
- Styrofoam- rigid polyurethane foam boards. They have one advantage over mineral wool mats - they are cheaper in price. In all other respects, they are inferior to wadded insulation. They do not shrink during installation and leave small gaps that must be blown out with foam. They do not allow air to pass through and do not provide air exchange. Require the construction of exhaust ventilation, with permanent residence in a residential building.
Since thermal insulation with mineral wool mats has clear advantages, we will turn to this particular technology.
- Mineral wool- moisture absorbing material. Therefore, when installed inside the wall, it is covered from the outside with a special film. This film must be made of a membrane that will not stop air exchange. That is, the membrane structure should allow wet steam to pass only from one side, i.e. do not allow moisture to pass from the atmospheric air and release it from the inside.
On a note
Using polyethylene instead of a membrane negates the effort to build a breathable wall at home. You can just as well insulate the wall with airtight foam.
- Exterior finishing material can also block the removal of moisture. Therefore, an air gap is provided between the membrane and the outer plates - a void or an air layer with a thickness of 50 mm. The moist air that has passed through the wall will come out through it. For the construction of such a gap, a wooden lathing is used - wooden slats with a width of 50x50 mm. They are attached along the supports on top of the insulation. After that, panels of the outer wall are attached to the crate.
How to build a frame house with your own hands: step by step finishing
After installing the walls, proceed to the interior wall decoration. The basis for finishing are panels of wall material, which were installed during the installation of the wall from the inside of the frame. The following materials are used as internal walls:
- Gypsum plasterboard- represents a natural material, environmentally friendly, with an absolutely flat surface, which does not need to be plastered and leveled in any way. It is only necessary to seal up with putty the joints between adjacent gypsum plasterboards.
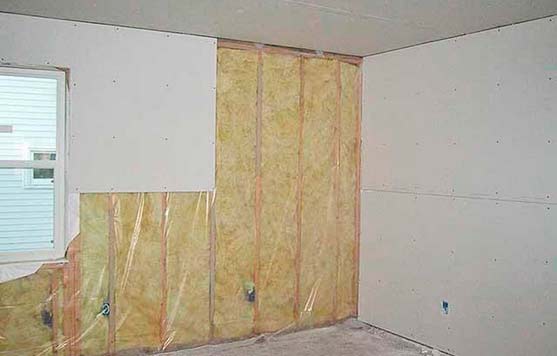
Wall decoration of a frame house with plasterboard
- Gypsum fiber boards GVL- a variant of a plasterboard wall with higher strength indicators.
- OSB- wood-containing material, shavings bonded with synthetic glue. Has a lower degree of environmental safety. In addition, it has a rough surface, requires plastering and putty.
So, the sequence of operations when performing wall decoration is as follows:
- Installation of an internal wall (GKL or OSB wall panels).
- Sealing joints between panels. If it is drywall, then puttying and gluing the joints with paper tape. If OSB - then plastering the surface of the wood board.
- Primer for matching wall finishes. For gluing wallpaper - primer with glue. For painting - paint primer.
- Direct execution of wall decoration - wallpapering, painting, decorative plastering of the walls of the room.
If wall panels (MDF, cork) are used as wall decoration, then they turn to another decoration technology. They do not make a rough wall, but immediately mount the internal finishing material.
Finally, we offer you an interesting educational video about building a frame house with your own hands (video with a step-by-step demonstration of technological operations). It is important that the result is of high quality. If I build a frame house with my own hands, then I do everything reliably and correctly.
