How to make a pile foundation for a bath with your own hands
The pile foundation is quite simple to manufacture and a reliable type of foundation for a bath. On suitable soils, it is good for light buildings, which are almost all baths (except brick). This type of blade is popular because it requires the least materials, time and effort, and much less money. It is easy to do it yourself without even having any special skills in construction. But they can not be placed on all soils. Designers are not very fond of them, because on heaving soils, the effect on piles of horizontal heaving forces is poorly calculated.
If you do decide to build a foundation on piles, you better play it safe and take into account the worst predictions. Consider the most pessimistic data on soil freezing (you need to drill below the freezing depth) and loads. By drilling more often, making the distance between adjacent supports smaller, you will spend more money, but you will get a stable base. Having laid a certain margin of safety, one can hope that it will stand for a long time.
On unstable, loose, peaty and boggy soils, a pile foundation is the only option. It allows you to transfer the load from the house to dense soil layers located below
Most often, the pile foundation is made on soils that cannot provide the stability of the building. These are quicksands, sands, peat bogs, unstable moisture-saturated loams. In this case, the piles are lowered to the level of dense soil layers. All the load from the building is transferred to these layers.
It is recommended to use this base also on soils, the freezing depth of which is more than 1.5 meters. The device of the strip foundation in this case is associated with large volumes of land work. Putting piles is many times easier and cheaper.
Another option when it is convenient to use this type of base is areas with complex relief. Sometimes leveling the area under the house is too expensive. Then the piles also help out.
The third option for using a pile foundation is too dense, heavy soils in processing. It is very difficult and expensive to dig a foundation pit in them. Drilling wells requires less pitchfork and less time.
Design
In places of frequent flooding, on the banks of water bodies, they tried to raise houses above ground level. For this, logs pointed at one end were driven in, which were located at each corner of the building, and also supported the walls and partitions. This was the pile foundation. Used for piles hard wood, which could resist the effects of water for a long time. The best wood for this is from larch, because it only becomes stronger from water. The palaces and houses of Venice have been standing on the trunks of larch for several centuries.
Today, wooden piles are used very rarely, although it turns out to be the cheapest, but at the same time reliable foundation. Moreover, even where larch is not uncommon.
Types of piles
In total, builders distinguish twelve types of piles. But in low-rise construction, only three are used:
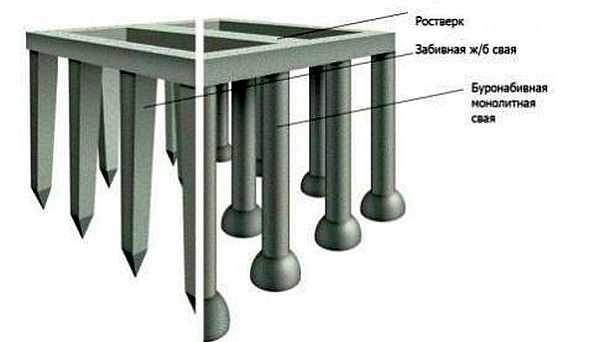
Reinforced concrete columns are rarely used to build a bath or a summer residence: a technique is needed that will drive them into the ground. But the foundation is solid.
Screw iron piles are good because they can even be screwed in by hand. Their disadvantage is that steel is an excellent conductor of heat. With a non-insulated subfloor, they take away heat, the floor underfoot always remains cold.
If the pile foundation is made by hand, then in most cases the supports are made bored. Although it is the most labor intensive, it saves on materials.
Location
Supports must be in key places: at corners, at the junction with the walls. Intermediate piles are then installed between these nodes. The distance is chosen based on the type of soil and the planned loads, but it cannot be more than 2 meters. There should be supports around the perimeter of the walls, as well as under all the walls.
Dimensions (edit)
The most common pile diameter is 20 cm. Making them smaller is undesirable, since their bearing capacity becomes much less. The larger the diameter, the greater the bearing capacity, but the area to which the forces of winter heaving will be applied (on heaving soils) also increases. There are two options for determining the required pile depth:
In each area and even on each site, the depth will be different. If the level of freezing is determined by the region, then the dense layers can be located as you like. If necessary, test drilling is carried out nearby, below the achieved level, to make sure that there are no cavities and pockets below and that the support will be reliable.
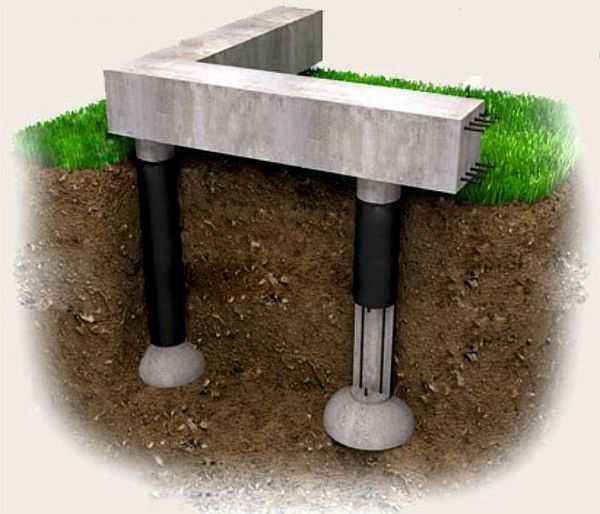
With and without grillage
In some cases, the piles are connected to each other into a single structure using wooden beams or a square steel pipe (sometimes a corner). This strapping is called a grillage, and the foundation is called a pile-grillage. This harness is needed if the walls are made of blocks, bricks or frame, and is not at all necessary if there will be a frame.
How to make a foundation on bored piles
The first step is to mark the perimeter of the future building on the site. Then it is very advisable to remove the top layer of soil with vegetation over the entire area and add rubble. Many do not, as a result, plants rot under the house and spread "aromas". Worse, parts of the rot can get on the wood, and this contributes to its spread (maybe the impregnation will protect, but why take the risk).
Then, using pegs and cords stretched between them, mark all the lines along which the piles will be located. In this case, you need to monitor the verticality of the marking pegs (usually with the help). You also need to check that the laces are stretched horizontally (this is already with the help). Having arranged everything, you measure the diagonals of all rooms. Deviations should be minimal - a few millimeters, no more. This is the only way to be sure that during construction everything will be as it should be.

It all starts with land work - removing soil, then you need to mark the plan of the house with pegs and cords
Calculation of the number of piles
To lay the foundation, wells are drilled along the perimeter, into which piles are then installed (poured / driven in). The number of piles for each project will be different. When building and planning with your own hands, proceed from the following rules:
- The distance between the piles should not be more than 2 meters.
- Supports must be at the corners of the building, as well as in places where partitions leave. Further, place supports between these nodes, proceeding from the fact that the distance between them should be less than 2 meters.
But 2 meters is for a one-story bath made of light materials. If you are going to put the bath on two floors, the supports must be installed more often. The bearing capacity of the soil also affects the distance. If it is dense, you can put it less often, if it is loose or unreliable (peat, wooded soil), put it more often.
The depth of wells on heaving soils is calculated based on the depth of soil freezing in winter: add 30-50 cm to this value.When installing a pile foundation on unstable soils, the installation depth of supports depends on the depth of a dense layer that can withstand the load. The support should enter into it at least the same 30-50 cm.
Preparing skujin
Wells are made at the locations of the piles. When building private small houses / summer cottages and baths, they do this with the help of hand drills. Their diameter is about 20-30 cm. Choose the one that you see fit. The handle of the drill is usually composite, which is why it can be used to make holes up to 4-6 meters deep.
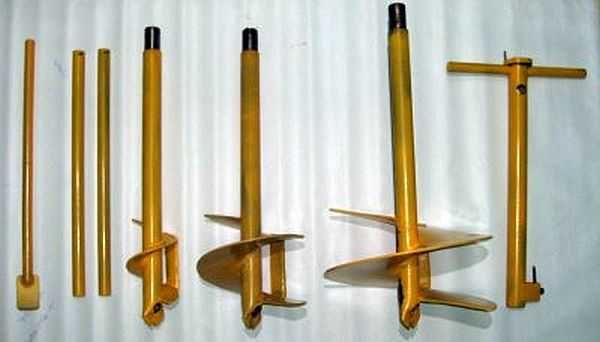
Bored piles are made of two designs: with an extended base (heel) and without. The "heel" at the bottom increases the chances that the building will not budge when heaving. Therefore, it is desirable to make such an extension. For this there are borax with a folding knife. When you reach the desired depth, release the wide knife by pulling on the special lever.
Several buckets of crushed stone and sand are poured into the drilled wells, rammed (alternately, first crushed stone, then sand). On top of the sandy layer, concrete with gravel backfill, which will serve as a support (sole or heel - whoever says it).
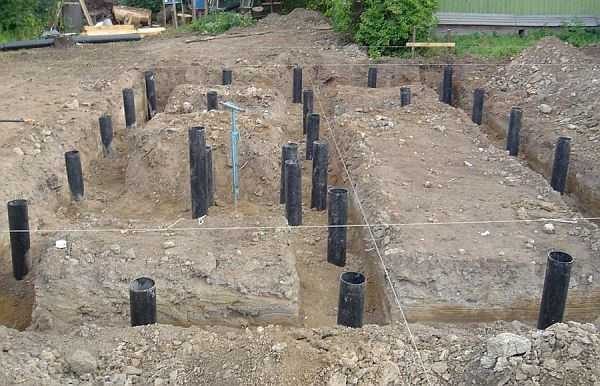
Before the mortar hardens, the formwork is immersed in it, into which the reinforcing frame is then inserted and all this is poured with concrete.
Formwork for bored piles
It is not so important what material the frame will be from, into which the concrete will be poured. The most common option is asbestos-cement pipes (diameter greater than 200 mm).
The use of asbestos-cement pipes is not necessary, but desirable: they do not rot, have sufficient strength, and their outer surface is sufficiently smooth, which allows the piles not to change their position when the soil swells (i.e. your bath does not squint).
Advice:It is advisable to coat the underground part of the asbestos-cement pipe with a mineral-based lubricant (construction). This will prevent the pipe from freezing to the ground.
Instead of an asbestos pipe, you can put a steel pipe (you never know, maybe someone has a lot of them), but they must be well primed and painted over, otherwise they will quickly rust and collapse.
Some people use plastic sewer pipes of a suitable diameter as formwork. The choice is not bad: they normally tolerate being in concrete, and are not afraid of moisture. The surface is very smooth and slippery, which will not allow horizontal heaving forces to move them.
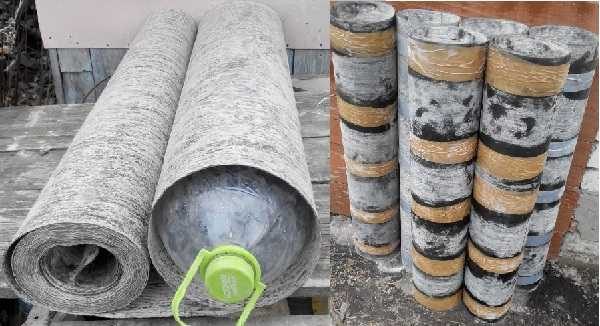
There is another option for piles: to make formwork from roofing material. This material is wound in two or three layers, fastened and used as a frame. To make it easier to work, you did not have to suffer every time with the diameter of the pipe, find yourself a mold. It is more convenient to screw roofing material onto a large-capacity water bottle. The main thing is to find a suitable diameter. Having screwed on several layers, you fix the roofing material, and take out the "pattern" by the handle and you can make the next post.
Only it is not very convenient to fasten the roofing material. Previously, wire was used, but it is easy to pinch, and its area is small. More convenient with scotch tape. Only he does not want to stick to the sprinkling. To help trouble is simple: with a stiff brush in the right places, brush off the crumb (if any), then wipe it with white spirit. After drying, the adhesive tape sticks perfectly.
Sliding formwork can be used. For this, a pipe with a diameter of at least 20 cm is formed from a sheet of iron, plastic, thick cardboard or roofing roofing. Handles are attached to its upper part. The formwork is lowered into the pit, reinforcement is inserted, the space around it is covered with coarse sand, it is carefully compacted. Concrete is poured inside the formwork. Shaking the formwork, lift the handles upwards by 40 centimeters. Pour sand outside, ram it, pour the next batch of concrete. This is how the pile is prepared for the entire length. This, of course, is a very economical option, but in terms of strength and reliability it is much inferior to piles with any formwork. The fact is that without a protective layer, cement milk can (and usually does) go into the soil. As a result, the concrete has insufficient strength.
Reinforcement
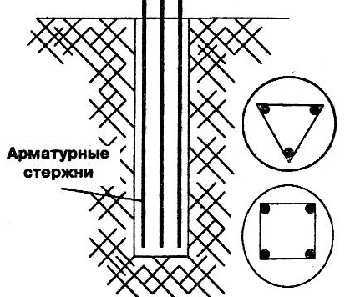
To give the piles more strength, three or four reinforcement bars are inserted inside. Diameter 8-10 mm (you can play it safe and take 12 mm, but this is a clear overkill). They are tied together with thinner reinforcement and knitting wire, so that a frame is obtained. The distance between the longitudinal bars is chosen such that they are all at least 5 cm from the wall. (How to knit reinforcement).
Pouring concrete
This structure is installed inside the pipe. The space around the pipe is covered with soil or crushed stone with sand, carefully compacting it and making sure that the pipe is vertical.
The last stage in the manufacture of a bored pile is filling the pipe with concrete. For this, they usually make a cement-sand mortar. Its composition is as follows: for 1 part of cement (grade not lower than M300), take 3 parts of medium-grained sand, mix it all in dry form. Then water is gradually added. Its amount is slightly less than 1 part: the solution should be like thick sour cream.
To increase the strength of the concrete, it is necessary to remove any air that might have entered the solution. To do this, take a long pin (reinforcement rod), pierce a freshly poured solution, then swing the rod from side to side. Do this on each support several times. As a result, air comes out, the solution settles a little, it must be added to the required level.
Immediately try to make piles of the same height - then there will be less work. It is much easier to remove / add a little bit of fresh solution than to knock / cut off the excess later. After making them all the same, level the surface. Grinding hardened concrete is also not a great pleasure.
It is better to process the solution in piles using a submersible. In addition to increased strength, it will also become frost-resistant.
Finishing works
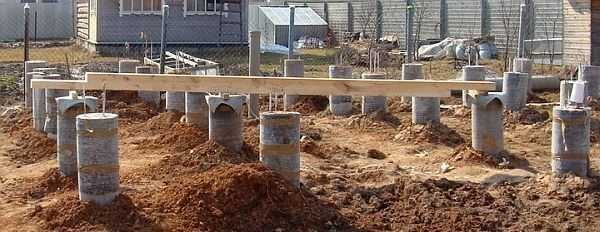
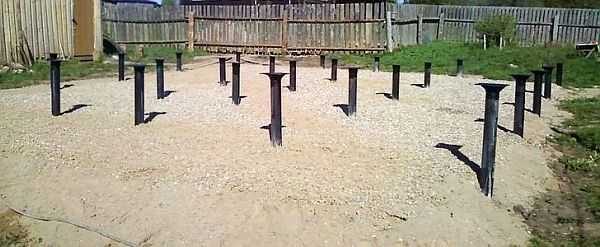
On top of the finished pile, a head is installed - a sheet of steel, on which you can then lay roofing material. Actually, that's all. The do-it-yourself pile foundation is ready. If necessary, a grillage is attached to the ready-made supports (timber 200 * 200 mm or more, impregnated with antiseptics). After a few days, you can start building the walls.
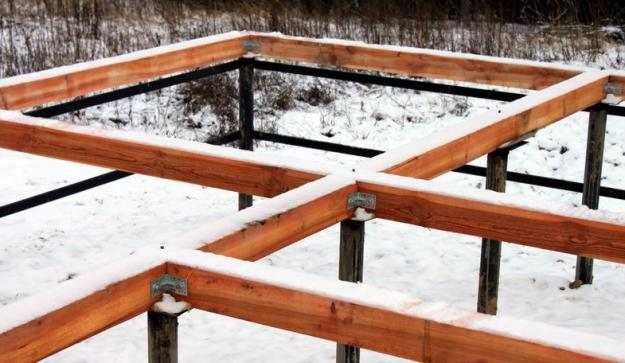
If necessary, the tops of the piles are tied with a grillage. It is needed if it will be built, block or
To fasten the grillage or the first crown of a log house, it was easier to insert pins into the concrete, before it has frozen. After the mortar has set, holes are drilled in the right places of the bar / log, and it is simply pushed onto these pins. There is another option - steel heads with a U-shaped plate are installed. But such a mount is more expensive, and they do not differ in strength. Unless, to put adjustable heads, so that in case of subsidence of certain piles, the difference can be corrected.
If you are going to make the grillage iron, then you need to use steel pipes as formwork. In this case, it will be more convenient to install screw piles, but they are expensive, and you also need to monitor the quality of their manufacture and painting. In this case, it is better to take galvanized ones - they last longer.
The distance between the finished piles is then poured with concrete or concrete / wooden beams are installed and fastened together. This is done so that the wind does not walk under the floor.
Brick pillars
Piles / posts for the bathhouse foundation can also be made of bricks or rubble stone, which are connected with each other using concrete mortar. Then the foundation is called columnar. The choice of location and the distance between the supports are similar. The manufacturing technique is changing - they put bricks on the mortar.
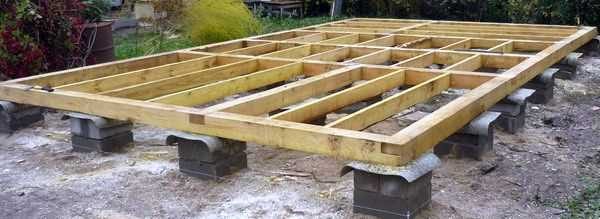
In the corners, they are placed in a square section (at least 38 * 38 cm), intermediate ones are made rectangular 38 * 25 cm.To save on brick (rubble stone), half the depth of the pit can be filled with coarse sand. The sand is covered with layers of 10-15 centimeters, each layer is poured with water and carefully tamped.
Brick piles / pillars are made 30-40 cm above the ground level. The space between them is then laid with bricks (thickness - brick or half-brick). These brick walls need to be buried 25-30 cm into the ground. Piles and walls are leveled with mortar, covered with a layer of roofing material to ensure waterproofing.
