Floor installation in a house without a basement
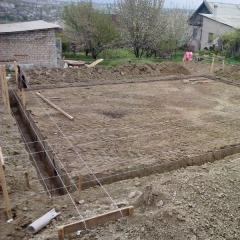
The most common version of the foundation for small private houses, when a non-buried strip foundation is made (there is no basement), and the base of the floor is created directly on the existing soil. This is done where there is no threat of high standing groundwater, and the relief of the site is homogeneous, lying approximately at the same level of the horizon. If the soil is located under a large slope, soil moisture during the year is excessive, it makes sense to make the base of the floor of the first floor of the house at a distance from the ground, leaving a ventilated space between them. Features of the device of both floor options in private homes will be considered in this article.
Features of the foundation device

The advantage of floors that rest directly on the underlying soil layers is that they do not carry an additional load on the foundation of a private house. The floors of the first floor, which do not come into contact with the soil, provide for the device of a kind of floor slab, which is based on the foundation. Therefore, the second option requires taking these features into account when designing and calculating the required width of the base sole.
If the base of the floor of the first floor is a reinforced concrete slab, be sure to take care of the waterproofing of the foundation itself and the place of its contact with the overlapping structure, especially if this option is chosen due to the high soil moisture. A slab that is not insulated with a hydrobarrier will pull moisture from the foundation, which will lead to its premature destruction and loss of strength, as well as the penetration of dampness into the house. In addition, care should be taken to ventilate the space between the ceiling and the soil, thereby reducing the level of humidity here.
The device of the floor of the first floor on the ground
This method of arranging floors in a private house where there is no basement is considered the simplest in terms of execution and inexpensive in terms of material costs. There are two main options that apply in this case:
- installation of a concrete floor base (screed);
- installation of wooden floors on logs.
Each of the presented options has its own characteristics, both in terms of the complex of necessary works, and in terms of the final result. The choice often depends on what building material is the main one in the construction of the house itself. If the walls are made of logs or timber, a wooden floor will be more organic. In a stone or brick building, a screed is better. But this is not an absolute pattern, so there may be other combinations.
Concrete insulated screed

The base of concrete, which is poured on the ground, has long been used in all kinds of utility and technical buildings, such as garages, sheds, warehouses. On the first floors of private houses without a basement, concrete screeds have been used relatively recently as the basis for finishing flooring. Several factors influenced the popularization of this method, such as:
- the need to create smooth horizontal surfaces, which require some types of modern flooring;
- the emergence of affordable materials for effective thermal insulation;
- arrangement of systems of water heat-insulated floors for heating.
Now let's take a step-by-step look at how to properly create a concrete screed on the ground on the ground floor of private houses.
Preparation and rough filling

Preparatory work begins with tamping the soil and adding a pillow for a rough screed. The soil can be compacted both manually, using a simple device in the form of a piece of log with an attached double-sided handle, and mechanical devices that exist for this purpose. In order for the ramming process to be most effective, the soil surface is abundantly wetted with water.
The initial layer of backfill is selected based on its total thickness. If the distance from the soil to the level of the intended floor is significant (more than 25-30 cm), the most accessible material is used first. It can be construction debris or clay.
Further, the pillow is formed by a layer of large gravel, the thickness of which should be about 10 cm. The gravel creates a rigid base, roughly levels the surface and prevents a possible capillary rise of moisture from the underlying layers. On top of the gravel, a sandy (or small gravel) pillow is formed about 5-7 cm thick. The quality of the sand does not play a role here, so a clay-saturated quarry option is quite suitable. The sand cushion is leveled as much as possible, after which a durable plastic film is laid. The latter performs two functions:
- the first layer of waterproofing;
- an obstacle to the water contained in the concrete.

The film is laid continuously with a wall approach of up to 15 cm. Now you can pour a rough layer of concrete. For these purposes, a lean mortar is usually prepared, where the ratio of fillers (sand and gravel) and cement is approximately 9:1. Here, instead of crushed stone, if possible, you can use expanded clay. A pillow made of expanded clay concrete will provide additional insulation for the base of the floor. The rough screed is formed with a layer of about 10 cm. Despite the fact that the initial filling does not have to have an ideal surface, it is desirable to level it more carefully. This will facilitate further waterproofing and laying insulation.
Important! For the preparation of concrete, any sand is not suitable. There is a lot of clay in the quarry material, which will drastically reduce the strength of the concrete slab and lead to its cracking. For these purposes, river sand or washed sand is needed, including for the preparation of expanded clay concrete composition.
The draft layer is usually not reinforced, since the load on it is small. After pouring, a break in work is necessary to allow the concrete to gain strength. Although the material completely crystallizes within 26-28 days, it is sufficient to wait a week. During this time, concrete with sufficient moisture gains about 70% strength. During this period, it is necessary to monitor the proper moistening of the concrete surface, especially if the work is carried out during the hot season. To do this, abundantly moisten the ripening concrete 1-2 times a day.
How to make waterproofing and insulate the floor?

For the main waterproofing layer, it is better to use not a polyethylene sheet, but a full-fledged, reliable material. Here it will be enough to process the rough concrete base with bitumen, followed by laying the rolled material. Suitable roofing material or hydrostekloizol. The rolls are rolled out with an overlap of adjacent strips by 10-15 cm. Hot gluing in this case can not be used, but it is necessary to process the joints with bituminous material. The rolled material is laid on the surface of the wall above the level of the intended finishing screed.
You can insulate the floor with dense foam (it is cheaper), or extruded polystyrene foam. The second one is preferable for these purposes, as it is much stronger, absolutely hydrophobic, and its plates usually have tongue/groove-type docking elements at the edges, which greatly simplifies its installation. The seams between the sheets of insulation can be filled with polyurethane foam or treated with special glue. Foam also needs to go through the gaps around the perimeter of the room between the wall and polystyrene foam.
Finishing fill

For these purposes, a solution is prepared with a normal ratio of 4:2:1, or 3:3:1, where, respectively, gravel, sand, cement. Before finishing pouring concrete, it is necessary to lay a mesh for reinforcement and install beacons, thanks to which it will be possible to achieve a strictly horizontal surface.
Reinforcing mesh can be used metal with a cell of 100 mm, or rigid plastic. The reinforcing elements are overlapped (1-2 cells), not reaching the wall about 1.5 cm. Here, a damper tape is glued along the perimeter, which is designed to compensate for temperature changes in the linear dimensions of the screed. The mesh should not lie on the insulation, but should be located approximately in the center of the concrete layer. To do this, use special stands or improvised means (bottle caps, brick fragments, etc.).
After the installation of the final base of the floor and its careful leveling (grinding or self-leveling solutions), it remains to wait for its full maturation and proceed with laying the final floor covering.
Wooden floor installation
Despite the wide variety of modern floor coverings, wooden floors have a lot of adherents among consumers. This can be understood given that wood is the most environmentally friendly material that can create a favorable microclimate in a residential area. Moreover, a modern board that is used for flooring allows you to make an ideal surface without cracks, which in appearance is in no way inferior to parquet.

The classic way of laying a floor board involves the presence of a log, - wooden beams, which are located in parallel with a certain step, which depends on the thickness of the floor wooden layer. On the ground floor of a private house, when the floors are laid on the underlying soil, preparatory and intermediate work until the creation of a rough foundation and its waterproofing is no different from that described above. That is, for the device of a high-quality wooden floor, a reliable leveled concrete base is also required.
After installing the bearing bars, the floor should be insulated. The use of expanded polystyrenes is undesirable here, since these materials do not allow steam to pass through, which can cause water condensate to form, which will adversely affect the wood. In addition, foam, for example, can be chosen by rodents, which will entail some discomfort.

For a wooden floor on the logs of the first floor of a private house, it is better to use mineral wool, or rather one of its varieties. However, when laying mineral wool, you should take care of the moisture insulation of the insulation. If the hydrobarrier has already been created from below (on top of the rough screed), then it remains only to arrange the top layer of the hydrobarrier film.


