How to set up login. Windows user automatic login. Video - Auto Login to Windows
If you run Windows 7 on your personal computer, then often you must confirm the login (by clicking on the icon), even if you do not have a password assigned to your account. Therefore, every time your computer boots, the process stops at the login screen. Windows 7 which is sometimes very annoying. This article provides you with a quick solution to skip this step, saving you a few invaluable seconds.
So, how to skip the Windows 7 login screen:
Step 1. Enter netplwiz in menu search "Start" and press "Enter" or
Open a dialog box "Run" by pressing Win + R on keyboard. And then enter control userpasswords2 in the dialog box and click on "Enter".
Figure 1. Run Dialog Box
Step 2. In the opened window "User accounts" uncheck the box "Require username and password" and press the button Apply. Figure 2. Setting in the "User Accounts" window
Step 3. The following dialog will appear "Automatic login"... You can configure your computer so that users do not need to provide a username and password when they log on. To do this, specify the user on whose behalf the automatic login will be performed, as well as his password, if it is set. Then press "OK". Figure 3. Entering data for automatic login
Step 4. The process completed successfully. Reboot Windows 7 to see your changes.
Based on the search statistics, a large number of people are interested in the answer to this question. Although, to be honest, the business is here only for five minutes of work, no more. You will see everything for yourself soon. So we begin.
And now, when you turn on the computer and load the great and terrible Windows, we have a dialog box where you are asked to select the desired user and enter a password. This is how this picture looks clearly:

But we don’t want that, now we will need to enter data every time. We love when there is an automatic login, so that nothing is required of us. Okay, now let's do everything as it was, in the old way. It’s very simple.
It is also worth saying that all the settings in the article will be made using the example of the Windows 10 operating system. But if you configure this case on versions 7 or 8 of this OS, you will see that everything is absolutely identical.
So, first, click on the "Start" button and select "All Applications":

Then you need to find the "Command Line" in the general list of programs and run it:

In the black window that opens, enter the service command:
Then press the "Enter" key:

At this step, you will need to uncheck the box "Require username and password", and then click on the "Apply" button:

Now a dialog box will open in which you will need to specify the user account on behalf of which the automatic login will be carried out when starting Windows versions 7, 8, 10:

It is logical that this should be the "account" of the computer administrator. That is, a person who is endowed with maximum rights is the boss here. As you can see in the screenshot above, in the "User" column there is already the value "Admin" we need, so you just need to enter the password and confirm it.
Once again, I focus on this point, so that later there would be no confusion. "Admin" in our case, not a name account, and its type specifying the rights. And the name of the recording itself can already be different, so to speak, in your opinion.

I hope that it will be more accessible this way, since it is very important to understand this very moment of the settings in order to really understand the whole essence of these actions. In general, for the final of all our joint gestures, click on "OK":

Well, folks, now let's check the correctness of the changes made. To do this, you need to restart your computer and see if automatic login works.

So it starts to start operating system, the nerves are stretched like strings:

And ... It seems that the matter has gone. Yes, we have coped with this task together with you:

So, dear readers, as you can see for yourself, we easily and simply set up automatic login to Windows 7, 8, 10. But if suddenly something did not work out for you, ask questions in the comments to the article.
At this point, allow me to take my leave. After all, as they say, it's time and honor to know. Thank you all for your attention and understanding. In the meantime, you can pause the music. And as always, the author is nostalgic. 😉
If in Windows one user other than the administrator, and he does not have a password, then login is automatic... But, if a user has a password or several users, a user selection window appears. How to make Windows automatically booted under a specific user account?
If the computer is not a member of a domain
In this case, configure automatic login (autologon) you can use the command control userpasswords2 or netplwiz(Windows Vista and 7 only).
- Press "WIN + R" and type control userpasswords2, press enter or "Ok"
- In the opened window "User accounts" uncheck the “ Require username and password”. Click “ Apply”.
- In the opened window “ Automatic login”You must enter Username: Password and password confirmation. You need to enter exactly the user whose account will be used for automatic login. Click “OK”.
- Close the user accounts window.
Also customization autologona can be done in the registry as described below.

If the computer is a member of a domain
Specify the domain when configuring using the command control userpasswords2 there is no possibility. The necessary settings must be entered into the registry through the registry editor.
- We press "WIN + R". We recruit regedit... We press Enter or "OK".
- In the opened registry editor, find the registry key - “HKEY_LOCAL_MACHINESOFTWAREMicrosoftWindows NTCurrentVersionWinlogon”.
- In this registry key, you must fill in the values for the following parameters. If they do not exist, you will have to create them.

| Parameter | Parameter type | Required value | Note |
| DefaultUserName | string | Username for autologon | |
| DefaultPassword | string | user password for autologon | If there is no password, leave the parameter value blank |
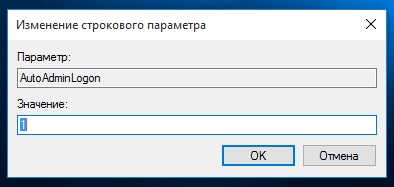
| AutoAdminLogon | string | 1 | Autologon included |
| DefaultDomainName | string | Domain | The name of the domain that the computer belongs to |
How to change user when autologon is on
If you need to change the user when the autologone or boot under a different account, then when you select "Logout" or when you boot the PC, hold down the key Shift.
In the above registry key there is one more parameter related to autologon - ForceAutoLogon... If “1” is written in its value, it will be possible to change the user only by holding down the key Shift.
Method 1
1. Start -> Run -> in the Open field write the command control userpasswords2 and click OK
2. Place the cursor on the username for which you want to configure automatic login to Windows (this will save you from writing the username in the next window - it will be substituted automatically) and uncheck the checkbox Require username and password, then enter the account password (if applicable) and click OK.
Method 2
1. Start -> Run -> type regedit and click OK.
2. Find the following registry branch:
HKEY_LOCAL_MACHINE \ SOFTWARE \ Microsoft \ WindowsNT \ CurrentVersion \ Winlogon
HKEY_LOCAL_MACHINE \ SOFTWARE \ Microsoft \ WindowsNT \ CurrentVersion \ Winlogon |
3. Double-click the option DefaultUserName(if there is no such parameter, then create a String parameter with this name), enter your username and click OK.
4. Double-click the option DefaultPassword, enter your password in the "Value" field and click OK.
5. Double-click the option AutoAdminLogon, enter 1 in the Value field, and then click OK.
Note. If the computer is a member of a domain, the methods listed above will not work, you need to slightly modify the second method by prescribing the values for entering the domain:
In the registry on a branch
HKEY_LOCAL_MACHINE \ SOFTWARE \ Microsoft \ Windows NT \ CurrentVersion \ Winlogon
HKEY_LOCAL_MACHINE \ SOFTWARE \ Microsoft \ Windows NT \ CurrentVersion \ Winlogon |
- parameter AutoAdminLogon set the value 1
- parameter DefaultUserName set the value equal to the username for which you are configuring automatic login
- parameter DefaultDomainName set the value equal to the login domain name
- parameter DefaultPassword set the value equal to the password of the user for which you are configuring automatic login
If there is no parameter, then it must be created, for all parameters the type is String (REG_SZ)
Method 3
If your computer automatically logged in for a while and then stopped, check the following options:
1) The system stops at the welcome screen, waiting for a user to be selected or a password for an existing one:
Autologin occurs when there is ONE UNPASSWORD user. Try to bring the system in line with this condition.
2) The system displays a dialog box for entering a username and password, although there is no password (by pressing Enter, the download continues):

You may have turned off the system greeting. Included here:
control panel \ user accounts \ change login method \ use the welcome screen
Advice . To bypass the automatic logon procedure or log on as a different user, hold down the SHIFT key after you log off or restart Windows XP. This only changes the first login procedure. To apply the modified procedure later, you must configure the following registry key.
If you don't want to waste time typing a password at boot time and skipping the Windows logon screen, then this can be easily accomplished by following a simple set of steps. By setting up automatic login, you will save a few seconds, which will ultimately reduce the overall boot time of Windows.
This method can be applied to both a local account and a Microsoft account.
It is not recommended to enable automatic login if the computer is used by someone else besides you and works under separate accounts. It is also unsafe to use this setting if you carry your laptop frequently and leave it unattended for a while.
Can be used 2 ways to set up auto-login in Windows:
Method 1: Through User Account Settings
1. Right-click on the " Start"And in the window that opens, select" Execute". A similar action can be performed using the key combination Windows + R.
2. Now enter the command and press " OK».

3. As a result, a window with a list of accounts should be loaded. Select the account you want and uncheck the box next to "". Click the " Apply».

4. Enter your user password twice and click " OK».

Now, when you reboot the system, you will automatically be taken to your user's desktop.
Method 2: By tweaking the Windows registry
If, for some reason, the above method for automatically logging into Windows 10 did not help you, try using another option.
1. Open Registry Editor. To do this, start the window " Execute» ( Windows + R), enter the command regedit and press " OK».

2. In Registry Editor, navigate to the following section:
HKEY_LOCAL_MACHINE \ SOFTWARE \ Microsoft \ Windows NT \ CurrentVersion \ Winlogon

3.On the right side of the window, find an option called DefaultUserName and double click on it. Make sure the value matches your local or Microsoft account.

4. Next, in the right part of the window, find the parameter DefaultPassword... If there is no such parameter, then create it. To do this, right-click on an empty spot in the right part of the window, select “ String parameter"And give it a name DefaultPassword.

Then set a value for it, opening it with a double click, which will correspond to the password from your account.

5. Well, the last step is to enable automatic login. To do this, find the parameter in the same place AutoAdminLogon and assign it a value 1 .
As in the first case, try restarting your computer and make sure Windows 10 boots without prompting for a password.
It's also worth noting that by setting up automatic login, you are on the way.
Finally, I would like to remind you that auto-login in Windows is a convenient but unsafe function. Therefore, it is better not to turn it on without special need. But if you still turned it on, then in some cases you can use the key combination Windows + L to lock the account.
