Estimate for foundation and excavation work. Strip foundation is the most common foundation in our country
IN mandatory before the beginning construction work it is necessary to draw up not only a project for the facility being built, but also estimate documentation, which will help determine, if not the most accurate, then at least an approximate amount of costs for each stage of the installation enterprise and for the entire scope of construction as a whole. In our material we will look at how estimate documentation for the foundation of a house is prepared. Since a correctly drawn up estimate for the foundation can save money. After all, as you know, installation of the base takes about 30% of the entire construction budget. The amount is impressive, especially if you don’t know the intricacies of the calculations.
Important: if you miss one or more important points when making calculations, you risk getting into trouble and encountering forced downtime of the enterprise due to lack of money. But according to SNiP, the foundation must be poured in one go. Otherwise, its strength will be doubtful.
Sections for estimates for the foundation
To have an idea of what an estimate for installing a foundation of any type should look like, we will analyze in detail the step-by-step drafting of the document and clarify which sections should be included in the paper. And for clarity, we will attach a sample estimate at the bottom of the material.
So, let's start with preparing the soil
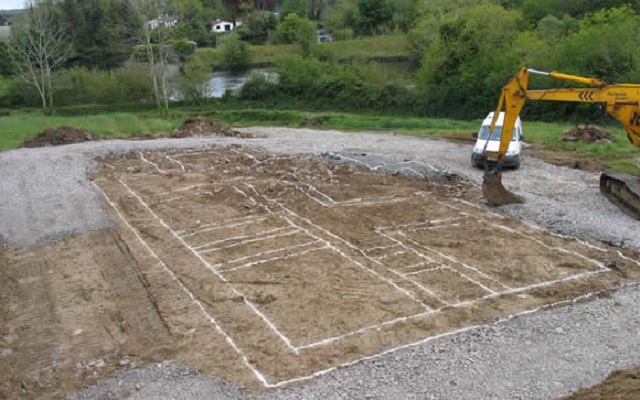
This item must be included in the estimate if the building site is heavily clogged and will have to be thoroughly cleaned before pouring the base. This section includes the rental of special equipment if you need to uproot old bushes, trees or remove construction waste from old buildings. It is also necessary to remove the fertile layer of soil, which can later be used for planting garden crops. For such work you will need an excavator with a bucket. Since it is difficult to remove 25-30 cm thick soil around the entire perimeter of the site on your own. It is advisable to store the earth at the far end of the site and cover it.
Also in the “site preparation” section you need to take into account the work on setting up the axes. This work can be performed by a competent specialist using goniometer instruments. After all, any deviation from an angle of 90 degrees threatens incorrect performance of work and careless installation of the base.
Important: strip foundations and columnar (pile) foundations are more complex in their axes. Therefore, you will have to spend a little more money here. It is easier to break a slab monolithic base along its axes.
As a result, under the section “ preparatory work“You should have a certain amount of costs, including hiring workers, renting equipment and the cost of some components (rods and cords for setting up the axles).
Excavation
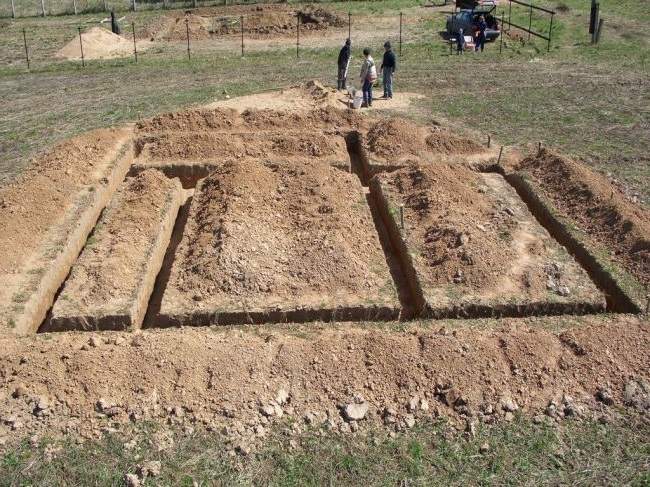
This item in the estimate section assumes the following types of work:
- Digging the soil. Depending on the type of foundation, this can be a strip trench, a foundation pit for a monolithic base, or wells for pillars. Moreover, if in the first case you can save money and dig a trench yourself, then digging a pit by hand or drilling wells with your own hands will not be easy. Here, the estimate includes the rental of special equipment based on the cost per hour.
Important: when drawing up estimates for this type of work, they do not include digging of soil for auxiliary premises - terraces, garages, etc.
- Then the estimate includes compacting the soil and pouring a sand cushion (of course, if the work is not carried out independently). It is important to know that the sand cushion can be installed under any foundation, be it a strip, slab, FBS base or columnar foundation.
- Backfilling of the foundation with soil compaction is also included in the cost. As a result, for the section of this stage of work we receive a certain amount of costs.
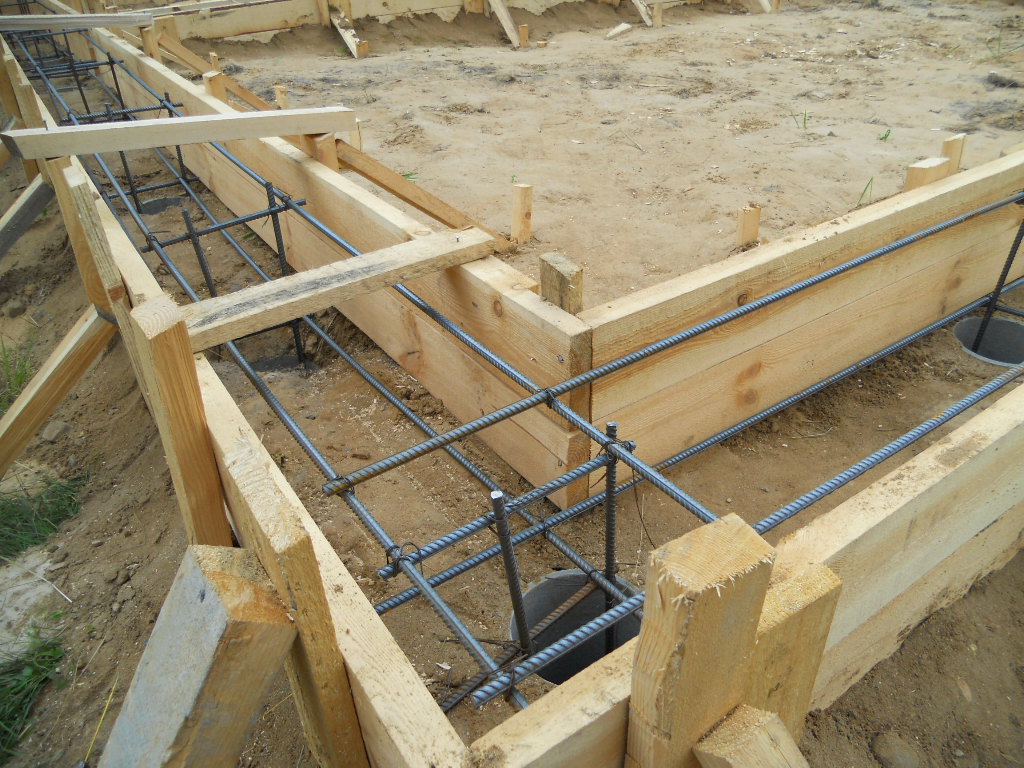
Foundation installation
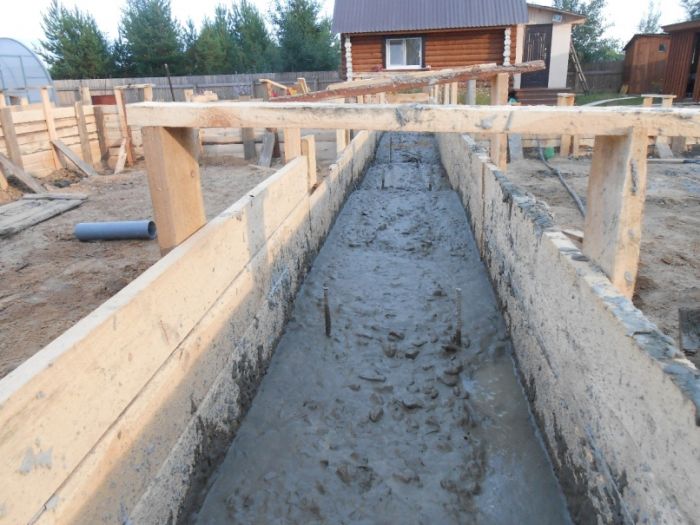
- In this section you should indicate the cost of installation work concrete mixture. The cost of the solution itself is also added here. For a tape base, the volume of the solution is calculated by multiplying the length of the tape by its height and width. We get the volume in m3. For slab foundation Volume is calculated by multiplying area by height. For installation columnar foundation you can prepare the solution yourself, since much less of it will be needed for concreting the supports. Therefore, here it will be enough to indicate the cost of consumables (sand, crushed stone, cement, plus rental of a construction concrete mixer or hand mixer).
- Waterproofing the base along the side walls. This stage of work should not be overlooked, since high-quality waterproofing is the key to the reliability of the foundation of the house. Waterproofing is carried out in two approaches using roofing material and bitumen mastic.
Important: if the work is performed by craftsmen, then the cost of their work is included in the estimate.
Cost of all building materials
All of the above estimate items are based on the fact that the foundation will be installed with the help of invited craftsmen and rented special equipment. In the same section of the estimate, the actual costs of construction materials will be indicated. So the device strip foundation in the estimate, the same as for slabs, it will be displayed in this way:
- Sand for making a pillow (volume calculated by multiplying the length of the tape or the perimeter of the pillow by the height and width of the bedding).
- Fittings. It is calculated by multiplying the total length of the belts (upper and lower) by the number of rows in the harness. This results in the length of the rod for longitudinal reinforcement. Transverse rods are calculated by dividing the length of the tape by 0.5 (the pitch of the transverse rods). The number is then multiplied by the height of the base. For a slab foundation, the calculation will look different. Here you can determine the footage of the reinforcement by multiplying the length of one wall by the number of rows of rods in the upper chord. Then the number is multiplied by two (upper and lower belt). It remains to add the number (footage) of perpendicular rods, determined according to the same principle. If the reinforcement is calculated for pouring a grillage on a columnar or pile foundation, then it will be enough to calculate the length of the belt, multiplying it by 4 (two lower longitudinal and two upper longitudinal). The transverse rods in the grillage are located at a distance of 20 cm from each other. They are calculated by dividing the total length of the grillage by 0.2. Then the resulting number is multiplied by 2. In total, we have the footage of the necessary reinforcement for longitudinal and transverse knitting. For a columnar foundation, take three or four steel rods per support.
Important: when calculating reinforcement, you must take a 2% margin for overlaps. Also, for the estimate for the foundation, it is necessary to determine the quantity and cost of the knitting steel wire.
Calculation of materials
| WALLS: | |
| aerated concrete Ytong (600x250x400mm): | |
| 49.97 m³ x 4440 RUR/m³ | RUB 221,867 |
| adhesive mixture for blocks: | |
| 40 pack x 290 RUR/pack (25 kg) | 11600 rub. |
| U-foam blocks Ytong (500x375x250mm): | |
| 26 pcs. x 400 rub./pcs. | 10400 rub. |
| masonry fittings Ø10 AIII: | |
| 0.1 t x 37500 rub./ton | 3750 rub. |
| reinforcing steel D12 AIII: | |
| 0.25 t x 37500 rub./ton | 9375 rub. |
| concrete mortar B15: | |
| 1.8 m³ x 4200 RUR/m³ | 7560 rub. |
| mineral wool (Rockwool): | |
| 0.1 m³ x 3700 RUR/m³ | 370 rub. |
| extrusion insulation Penoplex 35: | |
| 0.3 m³ x 5100 RUR/m³ | 510 rub. |
| flexible masonry connections BPA 4-2P 250mm: | |
| 520 pcs. x 3.3 rub./pcs. | 1716 rub. |
| facade single brick: | |
| 5356 pcs. x 13 RUR/pcs. | 69628 rub. |
| building mixture: | |
| 2.4 m³ x 2700 RUR/m³ | 6480 rub. |
| TOTAL: on the walls | 343256 rub. |
| FOUNDATION: | |
| crushed stone preparation: | |
| 7.4 m³ x 1900 RUR/m³ | 14060 rub. |
| concrete mortar B15: | |
| 5.6 m³ x 4200 RUR/m³ | 23520 rub. |
| concrete mortar B15: | |
| 26.9 m³ x 4200 RUR/m³ | 112980 rub. |
| reinforcing steel D10, 12, 14 AIII: | |
| 1.7 t x 37,500 rub./ton | 63750 rub. |
| concrete blocks FBS 24-5-6: | |
| 38 pcs. x 3830 rub./pcs. | 145540 rub. |
| building mixture: | |
| 1.7 m³ x 2700 RUR/m³ | 4590 rub. |
| pine lumber for formwork: | |
| 1.1 m³ x 6500 RUR/m³ | 7150 rub. |
| roofing felt tape RKK-350: | |
| 5 rolls x 315 RUR/roll (10m²) | 1575 rub. |
| TOTAL: by foundation | 373165 rub. |
| COVERS: | |
| pine beams 150x50; 150x100: | |
| 2 m³ x 7000 RUR/m³ | 14,000 rub. |
| plasterboard panels Knauf (2500x1200x10): | |
| 15 pcs. x 260 rub./pcs. | 3900 rub. |
| galvanized profile with fasteners: | |
| 129.3 l.m x 51 rub./l.m | 6594 rub. |
| mineral wool (Rockwool): | |
| 11.2 m³ x 3700 RUR/m³ | 41440 rub. |
| : | |
| 108 m² x 68 RUR/m² | 7344 rub. |
| vapor barrier film p/ethylene: | |
| 108 m² x 11 RUR/m² | 1188 rub. |
| plywood FC 1525x1525x18: | |
| 0.8 m³ x 19,000 rub./m³ | 15200 rub. |
| subfloor planks: | |
| 0.9 m³ x 6500 RUR/m³ | 5850 rub. |
| TOTAL: by floors | 95516 rub. |
| ROOF: | |
| wooden beams (150x50mm): | |
| 2.7 m³ x 7000 RUR/m³ | 18900 rub. |
| bioprotective solution: | |
| 39 l x 75 rub./liter | 2925 rub. |
| waterproof fabric (Tyvek Soft): | |
| 119 m² x 68 RUR/m² | 8092 rub. |
| metal tiles (Monterrey): | |
| 124 m² x 450 RUR/m² | 55800 rub. |
| roofing screws 4.8x35: | |
| 4 packs x 550 rub./pack (250 pcs.) | 2200 rub. |
| ridge element (2000mm): | |
| 6 pcs. x 563 rub./pcs. | 3378 rub. |
| timber lathing 100x30mm: | |
| 1 m³ x 7000 RUR/m³ | 7000 rub. |
10:0,0,0,220;0,290,220,220;290,290,220,0;290,0,0,0|5:177,177,0,220;0,177,97,97;177,290,140,140|1130:220,140|1330:152,34;152,107|2248:0,127|2148:71,0;71,220;211,220|2419:290,49;290,90|1930:212,-20
RUB 971,782.0
Only for the Moscow region!
Calculation of the cost of work
Do you want to find out how much it costs to build your house and choose contractors?
Place an express application and receive proposals from construction professionals!
Example of 9x7 m layout for calculation |
||
 |
1.
Gas silicate block d=400mm; 2. Facing brick d=120mm; 4. Air gap d=20-50mm; 5. Concrete reinforced belt h=200mm; 6. Extrusion insulation d=30-50mm; 7. Wooden beams d=150-250mm; 8. The roof is metal tile; 9. Monolithic slab foundation with block walls h=1.8m; |
|
Gas silicate wall with brick facade

Gas silicate masonry
Despite the fact that aerated concrete blocks are promoted as very technologically advanced and energy efficient construction material, their use is justified only if the manufacturer’s recommendations are strictly followed and a high-quality product is purchased: Beston, Hebel, Wehrhahn, Hess, Ytong, preferably with the involvement of certified installers.
Compared to other stone blocks, blocks made of autoclaved aerated concrete are characterized by an increased micropore structure that is uniform throughout the body of the block, which determines their excellent thermal protection parameters, as well as “breathing” ability.
In terms of fire resistance, sound insulation, and energy efficiency characteristics, a block made of autoclaved gas silicate is many times ahead of ceramic bricks.
By existing standards, a single row is quite sufficient for the central area. outside wall made of aerated concrete 400 mm thick.
Exterior finishing aerated concrete walls should not block the removal of water vapor from rooms to the street. For this reason, it is unacceptable to paint cellular concrete walls with gas-impermeable compounds, line them with a sand-cement mixture, or cover them with foam plastic slabs.
Currently, some manufacturers produce autoclave-dried aerated concrete blocks (Hebel®, Ytong®, Beston®, Hess®, Wehrhahn®) with small dimensional deviations (±1 mm), which are recommended to be laid with a special adhesive solution.
Masonry made using this technology has minimal thermal conductivity, because “cold bridges” formed by inter-brick seams from the sand-cement mixture disappear, and the costs of laying aerated concrete blocks are reduced by approximately 20-30%.
Bonding solution for gas silicate block is sold at a price twice the cost of conventional cement binder, with five to six times less consumption.
When installing walls made of aerated concrete blocks, it is necessary to coordinate many construction features and rules, otherwise, in exchange for reducing the cost of materials, you will actually end up with walls that are too cold, damp, or simply dangerous.
- By technical description, it is necessary to reinforce the areas under the windows and the areas supporting the lintels with steel rods, as well as the next four to five rows of aerated concrete blocks.
- A substandard or slightly protruding block can be sharpened with a grinder to the required size at its location.
- In order to lay the reinforcing bars, grooves with a thickness and depth of 30x30 cm are made along the top of the wall using a wall cutter, which, when installing the reinforcement, are rubbed with an adhesive solution for gas silicate blocks.
- The installation of the initial row of aerated concrete blocks should be approached with particular responsibility, checking the level of horizontal and vertical blocks during work.
- It is quite possible to plan, mill, saw with a wood saw, groove, and drill autoclaved aerated concrete on a construction site.
- On the last row of gas silicate blocks, in the board formwork preparation, a reinforced reinforced concrete screed, 200 mm thick, is made. The outer surface of the mortar is insulated with a 50 mm strip of extruded polystyrene foam.
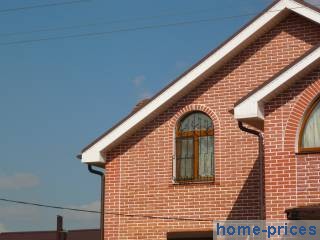
Front brick facade
The simultaneous use of a layer of ceramic bricks and aerated concrete blocks in the façade structure results in a fairly effective composition that combines traditional style and know-how regarding heat-saving materials.
Face brick is the most famous masonry material for building a home, which, in addition to the rich appearance, has high (up to hundreds of freeze-thaw cycles) frost resistance and low (about six percent) water absorption, which explains the long period of operation brick buildings. Among the facing ceramic bricks, in addition to standard ones, there are glazed, figured and clinker bricks.
Nowadays, facade bricks are produced in various textures (chipped, corrugated, smooth, rough) and profiles (beveled, wedge-shaped, rounded, rectangular), as well as colors (from white-yellow to chocolate), which helps to realize any innovative artistic ideas.
- The facade wall is folded into half a brick on a sand-cement binder, with laying, after 4-5 rows of spoons, a bonded row;
- From ceramic brick to aerated concrete bearing wall separated by a gap of 2-5 cm, along the entire height of the floor, for natural ventilation, with inlet and outlet openings in the lower and upper levels of the facing masonry.
- Since there is a possibility of cracks occurring, it is not recommended to tie the facade and aerated concrete block components of the wall with rigid metal mesh laid in the spaces between the rows.
- Having laid 2-3 rows of gas silicate blocks, the aerated concrete block and face masonry are coupled using a fiberglass mesh, while maintaining a ventilated gap through the interstices of the fastening mesh.
Slab-block concrete foundation with prefabricated block tape

The prefabricated slab base is made over the entire area of the structure in the form of a solid concrete slab on which standard reinforced concrete blocks are placed.
This type of foundation is used in individual house construction to form the basement level of the house, with heterogeneous geological foundations: peat bogs, reclaimed, bulk, in the case of low lying groundwater. In water-saturated areas, it is advisable to construct the vertical parts of the foundation using a monolithic method, using waterproofing measures, for example, impregnation, coating, and gluing.
At the same time, the prefabricated block diagram of the side walls of the foundation, according to what has already been done monolithic slab, is indispensable for limited construction periods, as well as when performing a “zero” cycle in the winter season.
A brief technology for laying a slab foundation with side parts in the form of a prefabricated concrete strip:
- First, the earth is excavated to the design level.
- Crushed stone, 40...60 mm in size, in a layer of about 20 cm, is poured onto the prepared base and compacted thoroughly.
- A cement-sand screed, 5 cm high, is installed.
- A waterproofing membrane is laid out with an outlet at the edges of up to 200 cm, for the purpose of further moisture protection of the sidewalls of the foundation.
- For the purpose of protection waterproofing material to prevent possible cuts during reinforcement, another layer of cement-sand mortar, 40 mm high, is applied over the moisture barrier, along the boundaries of which formwork is attached along the height of the foundation slab.
- The manufactured slab is reinforced with two rows of reinforcing bars with a diameter of 12-16 mm of class AII-AIII with cells of 200x200mm.
- For a slab foundation, only high-quality concrete mortar, grade no lower than M300, supplied by a mixer, is suitable.
- The setting time of the concrete solution when it is necessary to lay foundation walls from FBS blocks is from 28 days in the warm season.
- The laying of building blocks is carried out relative to the axial lines, in directions diverging at 90°, controlling the alignment using geodetic equipment. Row blocks are guided by a loader onto a “bed” of mortar.
- The installation begins with the installation of landmark blocks at home and at the crossroads of the center lines. The placement of linear blocks begins only after the position of the reference blocks has been verified according to the level and horizon.
- On top of the FBS blocks, in the panel formwork preparation, a reinforced concrete screed, 20-25 cm high, is placed.
Wooden beam floor
Since ancient times, coniferous lumber (spruce, larch, pine) with a moisture content of 14% has been used as beams. According to calculations, the strongest log is a beam with an aspect ratio of 7/5, for example, 140 x 100 mm.
In private construction, floors made of wooden beams, due to the simplicity and cost-effectiveness of their design.
When calculating the material for beams, it is necessary to use tables that determine the correlation of beam sizes with the distance between the walls and the weight of the load; otherwise, you can start from the approximate calculation that the wide side of the log should be at least 1/24 of the length of the floor, and the thickness should be 5÷10 cm, with a load of 150 kgf/m² and a beam laying step of 50 and 100 cm.
If there is a shortage of beams of a given section, bolted boards should be used, while maintaining the overall size accordingly.
Characteristic nuances of laying wooden beams:
- The gap between the smoke channel and the beams must be more than 40 cm, and the beam beams are at least 5 centimeters away from the masonry.
- V wooden log houses the edges of the beams are hemmed in the manner of a cone, and then driven into the groove of the last crown to the full depth of the wall log.
- As a rule, in brick-block walls, the end parts of the beams are located in wall niches in which condensation occurs; for this reason, between the end parts of the beams and the wall, a free gap is created for ventilation, and if the opening is significant, another layer of thermal insulation is placed.
- The end parts of the beam boards are cut at an angle of approximately 60 degrees, treated with an antiseptic compound (for example: Aquatex, Dulux, Biofa, Holzplast, Biosept, Tikkurila, Kartotsid, Senezh, Teknos, KSD, Kofadex, Tex, Pinotex) and covered with roofing felt, leaving the cut uncovered , to protect against possible mold that occurs when moisture diffuses in the surrounding stone wall.
- The installation of the beams is carried out in the following order: first the final ones, and then, with adjustment to the spirit level, the intermediate ones. The logs must start on wall structure no less than 0.15-0.20 m.
The basement floor is insulated with the installation of a vapor-proof film on top of the insulation layer, the interfloor floor does not require insulation, and the attic floor is thermally insulated with a vapor-proof film installed under the insulation.
If the question is the load capacity of wooden interfloor ceilings is mainly removed by an obvious increase in the size of the logs and their number, then with noise protection and fire resistance the matter does not look so simple.
One of the options for improving the soundproofing and fire-resistant performance of wood-beam inter-level floors looks like this:
- To the base of the beams, at 90° to them, on elastic brackets, after 300-400 mm, lathing bars are fixed, onto which a plasterboard ceiling is attached from below.
- A synthetic mesh is spread over the resulting lattice structure and stapled to the beams, on which slab mineral wool insulation, such as Knauf, Isover, Isorok, Rockwool, Isomin, Ursa, 5 centimeters thick, is tightly laid out, with the lags extending onto the side edges.
- In the rooms next floor A layer of chipboard (16...25 mm) is screwed onto the beams with self-tapping screws, after which a high-density mineral wool layer (25÷30 mm) is installed, and again, the chipboard slabs of the “floating” floor are laid out.
Metal tile roofing
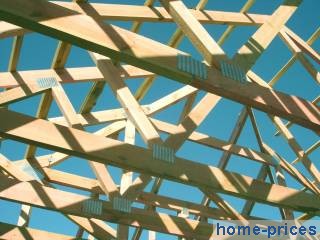
The roofing material is installed on a rigid frame assembled from timber sheathing and rafter legs.
For individual buildings, traditionally a two- or three-span structure with inclined rafters and middle supports is performed.
The distance between the rafters is set within 600÷900 mm with a rafter cross-section of 5x15÷10x15 cm; The supporting ends of the rafter legs are installed on a mauerlat with a section of 10x10÷15x15 cm.
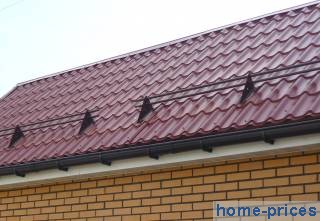
In order to reliably release moisture arising from residential premises and protect metal tiles from possible rust, the total area of ventilation channels (inflow and outflow) is calculated in a ratio of 1:100 to the area of the roofing surface.
Today, the sales leader is the Monterrey profile: wave height - 2.3 cm, wave pitch - 35 cm, produced by many manufacturers (Grand Line, Interprofile, Metal Profile, Poimukate, Pelti ja Rauta, Finish Profiles).
Important points for fastening strips of metal tiles:
- Before installing the sheathing layer, it is advisable to attach a waterproofing film to the rafter beams: Yutavek 115,135, Stroizol SD130, TechnoNIKOL, Tyvek, Izospan, to subsequently insulate the attic space. It is prohibited to use vapor-tight coatings, for example, bitumen-based, as waterproofing.
- Along the rafter beams, on a fixed moisture-proof material, 30x50 mm bars are packed, and to them a sheathing of 100x30 mm boards, with intervals of 350 mm (for metal tiles Joker, Monterrey). In this case, the gap between the lower end of the very first batten and the midpoint of the next one should be 30 cm, and the first board should be placed 18 mm thicker.
- When assembling the lathing structure, in the areas of further attachment of the snow-retaining profile, it is also necessary to lay support bars under the top of the profile.
- Before laying the m/tile covering, the gutter holders are secured to the eaves surface or rafter beams.
- Metal tile sheets are attached to the deflection of the wave, in areas adjacent to the sheathing preparation.
- To the first sheathing bar, which is thicker than the others, sheets of steel tiles are attached to the top of the profile step.
- The canvases bordering the ends of the slope are attached to the ends of the slope more often than usual, i.e. on all support bars.
- When installing sheets of metal tiles, the initial sheet is aligned along the cross section and the bottom of the slope and hung on one self-tapping screw to the ridge sheathing board; do the same with 2-3 adjacent sheets in a row, connecting them to each other and aligning them along the eaves line, and only after this, they are finally secured, using approximately 6–8 pieces of tile screws with rubber gaskets per m² of roofing.
- The metal tile sheets are laid starting from the bottom, from right to left (or left to right), following the rule that each subsequent sheet covers one wave and the capillary groove of the previous one.
Construction of baths
In Russia, the bathhouse has been known since time immemorial, becoming almost a symbol of our culture. In order for the bathhouse to bring as much benefit and pleasure as possible, it should be equipped according to certain rules.
Ideally, the bathhouse should be built away from the road, but next to the water - at a distance of 15-20 meters and enclosed with a fence or some kind of buildings from prying eyes. The entrance to the bathhouse should be made from the south side - in winter there are fewer snowdrifts on this side, and therefore the bathhouse is easier to operate.
Bathrooms (like saunas) must be built spacious - at least 1.8 square meters. meters per person, and also think over the lighting system.
The most important element of both baths and saunas is heating. Historically, our ancestors heated the bathhouse in a black way, that is, there was no outlet pipe in the bathhouse. Nowadays, electric heaters are increasingly used, which do not emit smoke in the room and do not require an outlet pipe. True, the effect of burning wood in this case is not felt. Therefore, the ideal option for connoisseurs of the Russian bath is a wood-burning heater - it is unpretentious in maintenance and in terms of the choice of fuel, it differs from an electric heater only in the heat source and the presence of an exhaust chimney.
In the process of building a bathhouse, stone, brick, cement, roofing iron, slate, clay, sand, glass, vapor barrier films and sheets, wood, particle boards and fibreboards, organic and mineral insulation and many other materials can be used.
Construction of a bathhouse from timber
The most common material for building a bathhouse is still wood (usually round coniferous wood), from which absolutely the entire bathhouse can be made - from the foundation to the roof. Such a bath is not only cheaper, but also environmentally cleaner, and simply more pleasant. And the simplest option for constructing wooden bath is the construction of a bathhouse from timber. Let's start with it.
Even before starting construction of the bathhouse, you need to clearly decide what kind of bathhouse you need: a traditional Russian bathhouse, a Finnish sauna, or perhaps a Turkish or Japanese one. But here we’ll talk about the ordinary Russian bathhouse as the most common option.
Next, you need to decide on the size and location of the bathhouse. Of course, the question of the size of the bathhouse depends on the size and location of the site, and on the financial capabilities of the owner, and on the expected number of people who will use this bathhouse. The standard version of a small bathhouse is 3.5 by 3.5 m. This area will fit everyone necessary premises: steam room, washing room and dressing room (instead of a dressing room there can be just a locker room). Again, the standard ratio of these rooms by area is 1:1.5:2.
The location of the bathhouse on the site is a very important point, since a mistake can lead to the fact that using the bathhouse will be uncomfortable or it will last much less time than it could.
Of course, it is better to build a bathhouse in the depths of the site and away from the road - and the point here is not only to hide from prying eyes. Firstly, dust and exhaust gases from passing vehicles will fly from the road, which is already unpleasant and, moreover, contradicts the purpose of the bathhouse, and secondly, this same transport will cause damage to the structure itself.
Many owners country houses want to build a bathhouse as close as possible to a river or lake, but it is better to place it at a decent distance from the reservoir - at least 15 meters.
The bathhouse can be erected as a separate building, or combined with others - summer kitchen, a shed and even attached to the house: if the waterproofing is installed correctly, then the humidity will not spread to the house.
The technology for building a bathhouse is not much different from building a house. Like any structure, a bathhouse begins with a foundation. The easiest way to build a bathhouse is to use the simplest strip foundation. However, it is not suitable for some types of soil - you will need pile foundation. Since the foundation is almost the most important part of the bathhouse, it is better to consult with a specialist who will tell you what type of foundation to choose, and to what depth to bury it, and will answer all other questions.
After you have sorted out the foundation (or better, of course, before that), you need to resolve the issue of the material from which the bathhouse itself will be built. Coniferous species - pine and spruce - are ideal for our climate. However, it should be remembered that not any pine or spruce is suitable for building a bathhouse - the durability of the building depends on this.
So, for baths built in Leningrad region, it is recommended to choose northern trees - for example, Karelian ones: they grow in a climate similar to ours, but somewhat slower, which makes the wood more dense and therefore less humid. But southern pine is more porous, and therefore in a couple of years the lower crown of the bath may well begin to rot.
For the construction of baths, glued or profiled timber with dimensions of 50x180 and 150x150 mm is usually used, ready for quick and accurate assembly of the walls of the building.
First of all, a concrete or brick base is erected, covered with a layer of waterproofing (most often - roofing felt), after which they begin laying the first crown, into which floor joists and beams of internal partitions must be cut.
The floor must have a slope towards the water drain, equipped with a sewer and a water lock, so that cold air from the street does not enter.
During the construction of a bathhouse, the beams are laid in an “end tongue” or in a “foot”; laying can also be done without a tongue - using wooden or metal pins mounted in the corners or in the middle of the beam. Inter-crown insulation made of flax or jute is laid between the beams. The roof of the bathhouse is laid similarly to the roof of a house.
The most important part of a Russian bath is the heater, which should be located as follows: the water tank should be in the washing room, and the firebox should be in the steam room. At the same time, the wall of the locker room should also warm up. The stove-heater is sometimes replaced either with pipes with hot water, or special electric heating devices. You can fold the stove yourself if you have the appropriate skills, but it’s easier to buy a ready-made one.
The shelf in the steam room should be wooden, its size can be any - for sitting (50-60 cm), for lying with bent legs (1.5 m) and, of course, for lying with outstretched legs (1.8 m). The length of the shelf depends on the size of the bath itself.
Construction of a bathhouse from logs
About the same General requirements there are also the process of constructing log baths - the oldest and still very common type of baths. Although there are, of course, some peculiarities here.
It is very important to choose the right logs here. The ideal diameter of logs for a bathhouse is approximately 20-25 centimeters: if they are thinner, the room will lose heat, and if they are thicker, they will be very inconvenient to install.
Nowadays you can buy ready-made rounded logs, but you can prepare it for construction yourself.
First of all, the log must be sanded so that its top and bottom differ in diameter by no more than 30 cm, after which the log is sawn.
Next, the logs are lined up in separate crowns, laid horizontally and connected with wooden spikes and arranged in a checkerboard pattern. For window openings you need to select 5 lower crowns and 2-3 upper ones, and for door ones - vice versa. Thicker logs are used at the bottom of the bath walls, and thinner ones at the top. The upper crowns laid on the foundation should be laid with cross beams, and the gaps above the foundation should be filled with bricks or filled with cement mortar.
A very important point is the insulation of a log bathhouse. The walls of the bathhouse can be windowed, and the inside can be covered with clapboard, which, in addition to having aesthetic properties, also retains heat. As the log house of the bathhouse dries, the gaps between the logs increase, so they must be treated again - with tow or dry moss.
Construction of a frame bath
A more modern and, perhaps, the simplest and cheapest option for building a bathhouse is the construction of a frame bathhouse. Another advantage over the log house is that it does not need to be left for a whole year to shrink; it can be finished immediately and used.
The general requirements for the construction of a bathhouse here are again almost the same as for a bathhouse made of timber or logs, the difference is quite small.
The frame for a bath is usually made of wooden beam 50x100mm, insulation - mineral wool - is laid between the inner and outer skins. The frame is sheathed on the outside and inside with sheet material - OSB or plywood. For interior decoration For bathhouses, lining is used, and for the exterior - lining, siding or blockhouse, which gives the bathhouse the appearance of a log house.
The insulation of such a bathhouse occurs as follows: first comes the internal lining (hardwood lining), then vapor barrier, then insulation (mineral wool 100 mm), waterproofing and windproofing, and finally - external finishing lining.
Used to insulate the house inside vapor barrier film with a layer of foil that should face the inside of the room - the foil will reflect heat and the bath will warm up faster. The floor and ceiling are insulated with vapor barrier and mineral wool, but in the steam room there is no need to insulate the floor.
Construction of a brick bathhouse
IN Lately owners of country houses are increasingly building bathhouses from brick - this is, of course, more expensive, but such a bathhouse is more durable and, importantly, less fire hazardous. Its main disadvantages are that the bathhouse heats up slowly and has high thermal conductivity, to reduce which the walls are lined with clapboard from the inside, and a thick insulating layer is laid between the clapboard and the wall.
The foundation for a brick bath must be very solid: made of rubble, concrete or slag concrete stone, or also made of brick. Sometimes the foundation is made of reinforced concrete, but this is quite expensive.
After a trench at least 30 cm deep and 25 cm wide has been dug under the foundation, a 15-20 cm layer of sand is poured onto its bottom, which is spilled with water and compacted. A layer of crushed stone of approximately the same thickness is laid on top, backfilling is done and everything is filled with concrete. When the concrete hardens, a layer of roofing felt waterproofing is laid on it.
The base is constructed of brick with a masonry height of 4-5 bricks, and ventilation ducts must be provided in it.
Solid (red or silicate) bricks are used for laying walls. Masonry is usually made in one and a half or two bricks, and partitions - half a brick.
The top row of bricks is connected to the bottom using lime mortar; the thickness of the seam should be 12-15 mm.
Masonry begins with the establishment of orders, for which a plumb line is used, a cord is pulled for all rows of masonry and fines are laid out in order.
Laying the walls should begin from the corners, for which halves or three-quarters of bricks are used, the gaps that arise are smoothed with a quarter of the brick.
The first row of bricks is laid across - to waterproof the foundation, after which a lightweight masonry is erected from several half-brick walls, the openings between which are filled with thermal insulation - a mixture of sawdust, fluff lime or light slag.
When building a brick bath Special attention it is necessary to pay attention to hydro- and vapor barrier.
Waterproofing can be of several types:
Painting - in places where moisture penetrates, the walls are coated with bitumen mastic made from bitumen with the addition of lime and asbestos;
Pasting - any kind of tape can be glued to the wall of the house roll materials(for example, roofing felt), and all gaps and cracks are sealed and covered.
For plastering walls, cement-lime mortars containing warm lightweight aggregates - fine slag, expanded clay, pumice - are used. It is advisable to plaster the walls not only from the outside, but also from the inside. But if the walls are lined with clapboard on the inside, there is no need to plaster them.
Construction and equipment of a bathhouse or sauna requires serious knowledge and skills. The North-West Construction Company has significant experience in the construction of such baths - one-story and two-story, according to standard and special projects.
