Decorating the basement of a house: photos of interesting designs. Finishing the basement of a private house: materials, options, methods, which is better.
An important element of the house is the plinth, which protects the lower part of the external walls of the building. It must be manufactured accordingly, and must be durable and resistant to various adverse factors. You should think carefully about how to finish the plinth so that it is stable and at the same time architecturally attractive. External walls below are most often finished with ceramic tiles or clinker, but sometimes decorative stone and other materials are also found.
How to veneer the basement of a house and with what?
The base is top part foundation wall, which is usually located above the ground level at a height of 30-50 cm. This height depends on the place where the house is built, the level groundwater and foundation structures. Higher plinths can be made in a foundation structure partially buried in the ground, if there is a basement.
The main function of the plinth is to protect the lower part of the external walls of the building from mechanical damage(to avoid damage to the waterproofing layer) and protecting the walls from high humidity. Wetting can be caused by heavy rain and melting snow, which is thrown directly under the walls of the building. If built correctly and lined correctly, the plinth will protect the walls from water and will be an attractive architectural accent to the home. However, in any case, you should avoid the accumulation of large snow drifts near the building.
Is the base recessed or protruding?
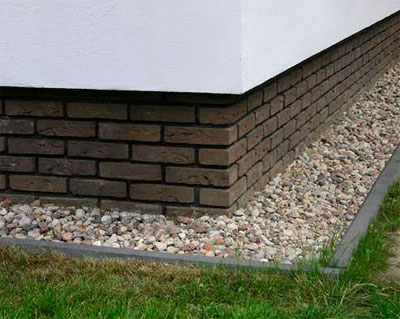
In most cases, typical private houses are built with a sinking base, which is hidden under the facade of the building. In this solution, water flowing from the façade will flow away from the wall, which will provide a higher degree of protection of the walls from moisture.
 The decision on the type of base must be made already at the stage of constructing the foundation, in order to correctly construct the base and select individual layers of external walls.
In the case of a sinking base, a special profile is used that is resistant to rainwater and protects the lower part of the house from mechanical damage and moisture.
In the case of thermal insulation of external walls with mineral wool or polystyrene foam boards, you can also use special starter strips located in the lower protruding part of the facade.
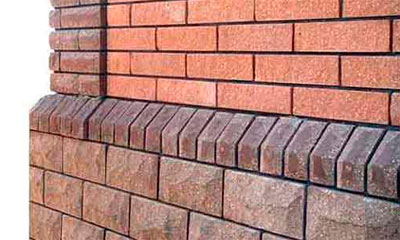 A protruding base is performed less frequently. However, he can be interesting sometimes architectural element building. In the case of a plinth protruding from the facade of the building, its upper part must be reinforced with appropriately selected steel profiles or ceramic tiles.
It is important that the height difference be made by approximately 6-10%, which ensures a smooth outflow of rainwater without its deposition on the wall (facade). In no case should the upper surface of the plinth be horizontal, without a slope, as this will quickly lead to dampness of the walls and damage to the facade at the point of its connection with the plinth.
If we want to veneer the entire base decorative stone, we must choose the right thickness so that adequate water drainage can be achieved.
The protection of the upper surface of the base should protrude approximately 2-5 cm, which will ensure that rainwater drains from the surface without causing dampness to the wall.
The least rare are plinths that are made flush with the wall, that is, in the same plane as it or a smooth façade right down to the ground. Such solutions must be designed individually and require very precise selection of all materials. It is important in this case to ensure proper execution of all façade cladding connections and the selection of durable and frost-resistant materials.
 Ceramic tiles or clinker tiles are quite common materials for plinths. In this case, the frost resistance parameters of the finishing material are very important.
Make sure that the tiles have sufficient resistance to low temperatures in winter and have a water absorption of no more than 8% (for ceramic tiles). Materials that do not meet these requirements may be too fragile for finishing.
Ceramic and clinker tiles can be especially useful in the case of finishing a base that protrudes in relation to the plane of the building facade. Available in various thicknesses, shapes and designs.
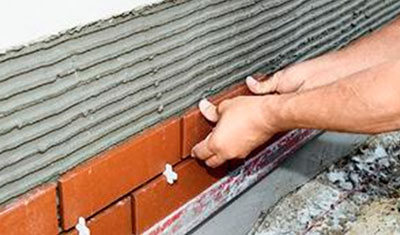
For the strength of the base it is even more important right choice glue. In this case, it is imperative to use elastic and frost-resistant high-quality glue to prevent individual tiles or even entire arrays from peeling off. The tiles must be glued to the plastered surface. Before gluing, it is recommended to lay a special mesh, which will increase the elasticity of the entire structure.

It is also necessary that the grout used is resistant to water and frost. In the case of clinker tiles, it is necessary to use adhesive and grout specifically designed for clinker, which protect against so-called fading (white spots on the surface of the clinker). There are also adhesives and grouts available in the market that are available in a variety of colors, allowing you to choose the color of your tile grout.
If you want to tile the basement of your home, you have a very wide range of colors and patterns to choose from, allowing you to match the finish harmoniously with the building's façade.
An important advantage of finishing with tiles or clinker is that such a surface is easy to keep clean, clean and wash without damage. The tiles are also resistant to mechanical damage, although to a lesser extent than surfaces finished with natural stone (which are more durable than ceramics or clinker).
If you want to cover the base with stone, you should keep in mind that this is a very labor-intensive and therefore more expensive method than finishing with ceramic tiles or basic plaster. This is due to the fact that the correct choice of stone is necessary so that it is possible to maintain approximately equal joint thickness over the entire surface.
To perform this type of finishing, it is usually used:
- large pebbles, although in this case difficulties arise in selecting flat stones close to each other in size;
- crushed stone;
- stone tiles.
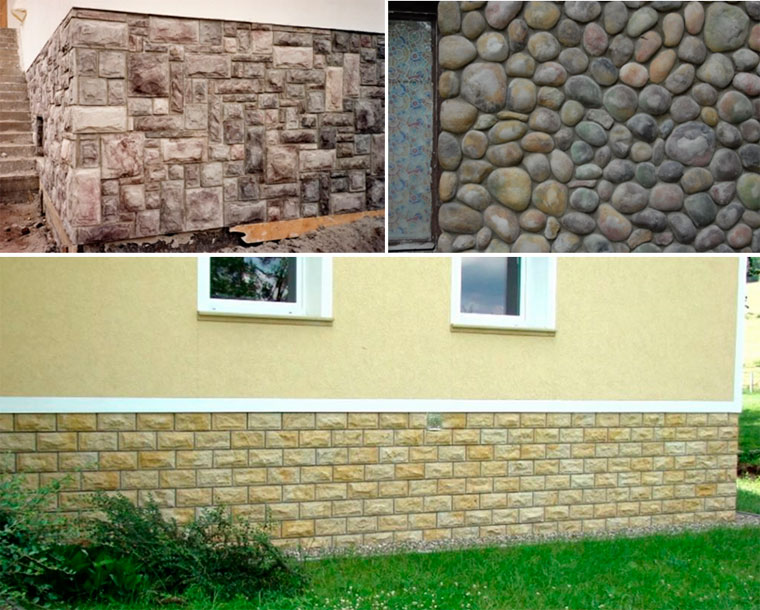
Natural stone tiles are characterized by a very impressive external surface.
Stone tiles and stone are characterized by good properties drainage of rainwater and the ability to easily keep the surface clean. The stone is also very resistant to mechanical damage, which will provide good protection thermal insulation and the lower part of external walls from moisture.
Due to the high labor intensity, finishing the plinth with natural stone is a relatively expensive solution. In addition, it is worth making sure that this type of finish will look harmonious with the architecture of the rest of the house (stone is not always suitable for houses in modern style). In order to save money, the base is often finished with stone panels that imitate the pattern and pattern of natural stone.
There is also the possibility of finishing the surface of the plinth with plaster. For this purpose, acrylic and mineral plasters are used. Despite the fact that both types of plaster masses can be used for external walls, it is still not recommended to use acrylic plaster.

Acrylic and mineral plasters differ significantly in price (not in favor of mineral ones), but when choosing, you should not take into account only the price criterion.
Acrylic plasters come in a much wider range of colors and can also be painted without any major problems in any color you choose. In the case of mineral plasters available on the market, the choice of color is more limited.
Several years ago, mineral plasters were sold as a dry mixture, which had to be diluted with the required amount of water. In the absence of experience, it is not always possible to make the right solution. Now, however, they are available on the market in ready-made masses, which allows them to be applied directly from the container to the walls, as is the case with acrylic plaster. These masses are more expensive than dry mixtures, but after adding the cost work force, it often turns out that the cost will be the same. Ready-made compounds do not require as long drying and protection from water as dry plasters, which often require protection for approximately 3-5 days.
Mineral plasters are more durable than acrylic plasters. However, it should be noted that no plaster will be as resistant to impacts and dents as ceramic or stone.
Advantages acrylic plasters is that they are more elastic and thus better suited for finishing surfaces exposed to variable temperatures. However, they are less resistant to moisture, which can accumulate in some places and damage the surface.
In construction, an important point is the insulation and protection of any element from external factors; its quality will affect energy costs, optimal microclimate and the service life of parts of the building. Since the basis of any building is the foundation, I will talk below about its decorative finishing and protecting the basement floor from moisture and other factors.
Finishing the foundation with facing stone
Which material to choose
Covering the foundation is a completely doable task with your own hands, the main thing is to choose best material, which will combine all the necessary properties. By the way, facing the foundation can also be done during the repair of the old foundation. First, you need to understand why foundation cladding is needed? Although the foundations of houses are built from durable materials, they also need to be protected from moisture, precipitation, wind, mechanical damage and other adverse factors. Therefore, facing the foundation is initially the protection of the foundation of the house and the preservation of its operational properties for a long time. Also, treating the base will help protect the basement from moisture and cold and decorate the house. Since the construction market is full of necessary materials– our task is to choose the best of them.
Finishing the base with stone
A common finish is decorative plaster, its qualities and properties in modern construction do everything the necessary conditions for high-quality surface treatment. This finish is an inexpensive and unpretentious option for decorating and protecting the foundation.
But I would not use plaster for several reasons - firstly, it is a labor-intensive process, and secondly, there are many other materials that can provide high-quality protection for the house and create a noble appearance. Moreover, protecting the basement floor from cold and moisture requires thermal insulation qualities.
Of course, you can use various sidings and slabs, but nothing brings as much nobility to a home as facing stone. Therefore, I opt for sandstone, and you will find out what it is below.

Natural stone cladding
Noble finishes
The foundation cladding should not only fulfill its intended purpose, but also act as a decorative element of the basement floor. Natural stone has always been a noble and durable building material, so finishing the base with stone looks harmonious and rich.
Do-it-yourself plinth finishing
Choosing from all the options, I settled on sandstone, which has many properties:
- Facing stone is a natural building material, time-tested. Its lifespan is simply staggering, more likely to require a home renovation than an old sandstone. The brick foundation, lined with sandstone, looks noble and natural.
- The strength of the material allows it to withstand large physical exercise, therefore, elements protected by sandstone are not susceptible to mechanical damage.
- Repairing an old base using sandstone treatment will help create excellent protection against moisture.
- Due to the ease of installation, you can cover the brick foundation with your own hands.
- Due to its porous structure, sandstone has some thermal insulation properties, which makes it possible to reduce heat loss through the basement floor.
- Facing stone is great for finishing various surfaces, be it the facade of a house, interior walls or a brick foundation.
- The facing stone looks equally harmonious on a brick house or on a wooden one. Not everyone will be able to imagine the look created by a cottage whose base is lined with sandstone.
- The natural texture and patterns of sandstone fit well into a variety of architectural styles.
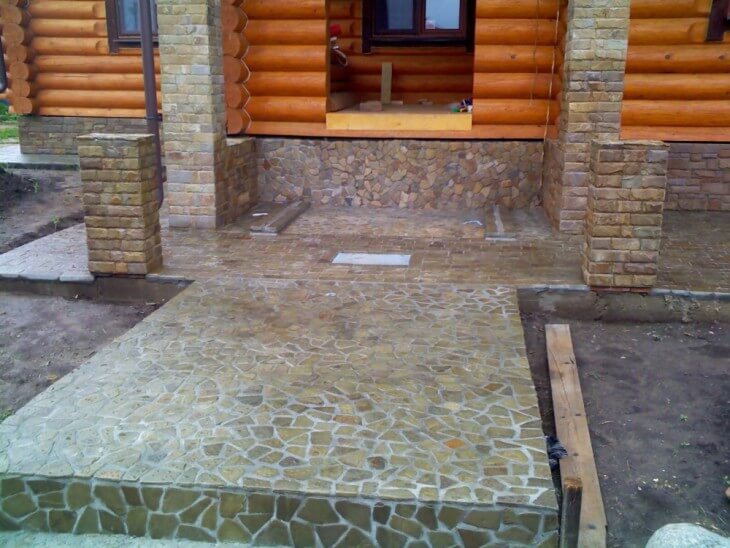
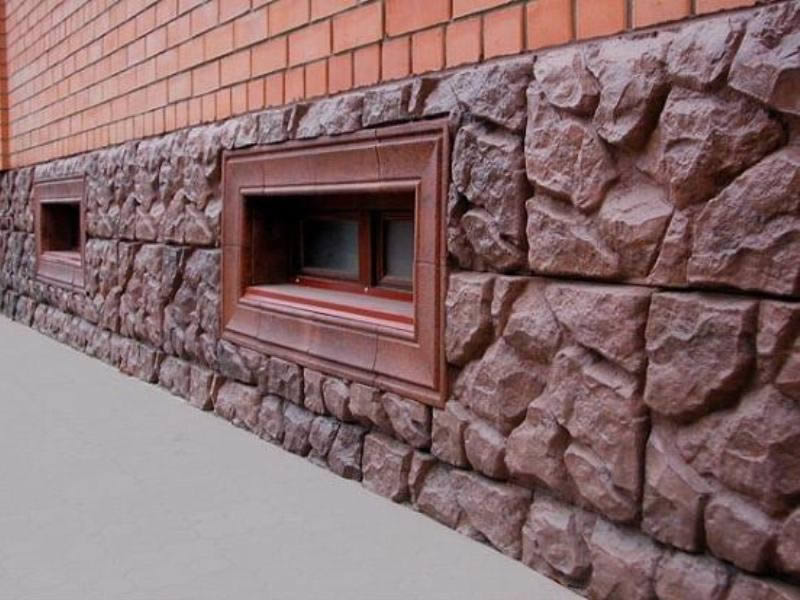
Finishing the base with natural stone
Combining all of the above advantages, facing stone perfectly protects a brick foundation or any other type of foundation. It is worth noting that brick foundation is the optimal surface for finishing with natural materials. This base is easy to process, which allows you to cover the surface with sandstone with your own hands in a short time.
Covering foundation surfaces
Facing stone is a fairly undemanding element, so you can do the renovation of an old basement floor from the outside yourself.
The following tools were useful to me for the repair:
- A metal brush is necessary for preparing the surface and cleaning it.
- A chisel and hammer will be needed in case of repair, to remove the old coating (plaster).
- The ax was useful to me in making notches for better adhesion to the surface.
- I prepared a spray bottle or brush to apply the primer.

Finishing the foundation with stone
If the foundation is heterogeneous, which is rare, use construction mesh, I managed without her.
Having cooked necessary tools, I started renovating the exterior of the basement. He did all the necessary work to prepare the surface, cleaned it well and coated it with a high-quality primer. Next, I took a specialized glue for stone laying and began laying out my future masterpiece step by step. The seams between the elements were filled with mortar and carefully processed. The end result was a great view of the basement.

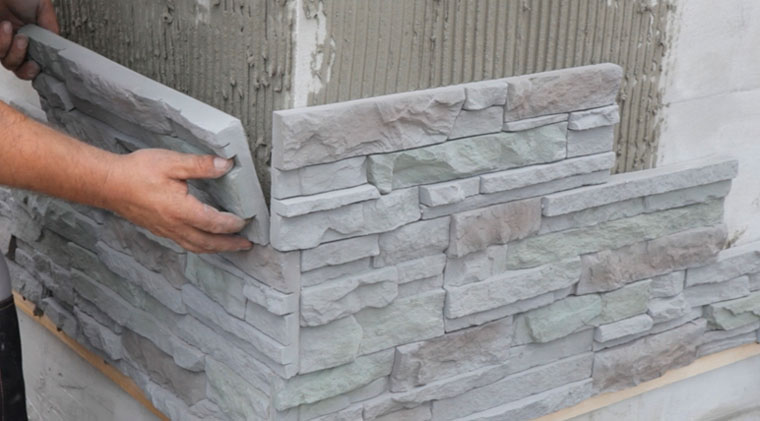
We start doing the cladding from the corner
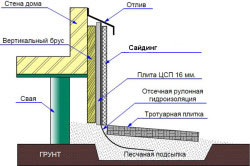
Finishing a screw foundation
Houses with a brick foundation have a huge advantage over their counterparts. The fact is that the construction of a pile foundation does not allow finishing with sandstone, so the question immediately arises - how to cover pile foundation outside. For me, this question was quite interesting, because it is simply necessary to protect the basement from moisture and cold, and it is necessary to decorate the bottom of the building. But if a brick foundation can be finished with sandstone, then what kind of solution can be found here?
Why come up with such a complex base, which is then difficult to choose a finish for, you ask. But a screw foundation is the only optimal solution for unstable and heaving soils. It is the screw foundation that is able to penetrate to great depths and provide reliable support for the house. And the choice of finishing for the base is quite possible using a material such as corrugated sheet.
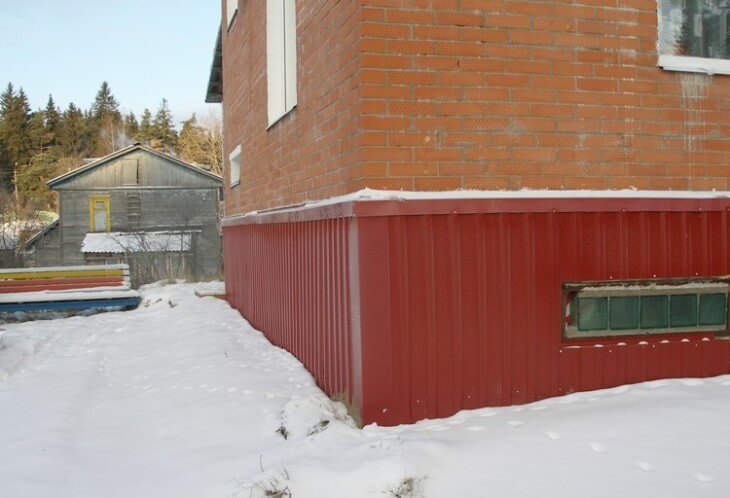
Covering the base with a metal profile
This material appeared back in 1820 and became very widespread in the construction industry. The corrugated sheet is made of galvanized steel using cold rolling, after which it is subjected to the creation of the required shape - trapezoidal, wavy. This is done more to add rigidity than for beauty. Corrugated sheet is a unique material used in the construction of new buildings and renovation of old ones. Steel sheets are used not only for finishing ground floors, but also for repairing roofs and walls. In the assortment you can find profiled sheets for facing stone or “wooden” elements. I was very pleased with this choice, because it makes it easy to create a unique style with your own hands.
In the assortment you can find profiled sheets for facing stone or “wooden” element
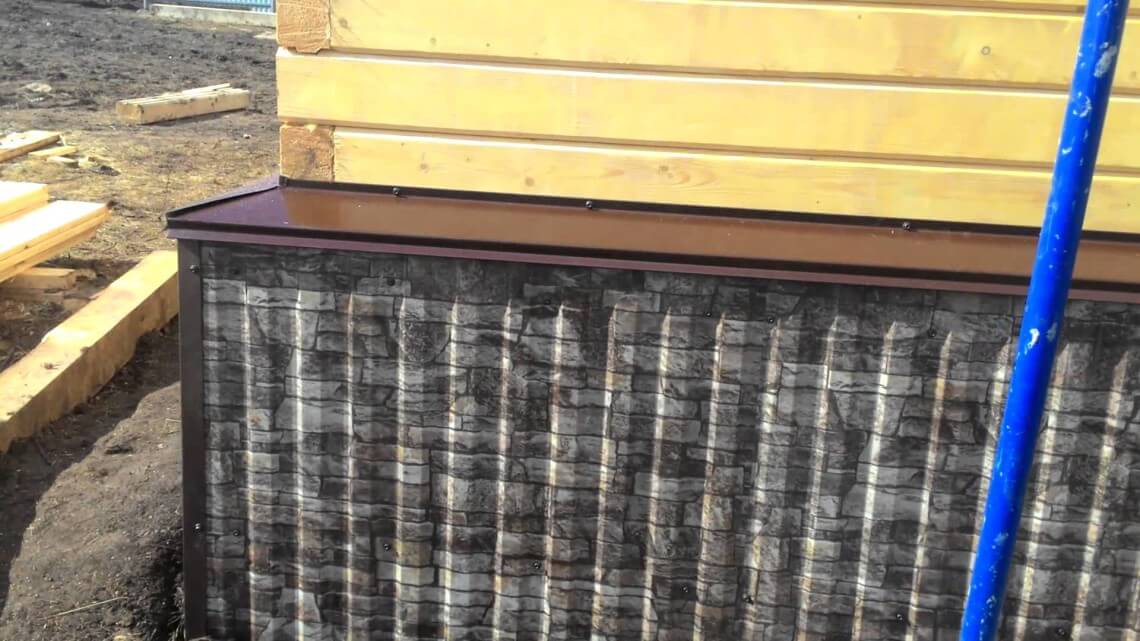
Do-it-yourself cladding of a screw base
Typically, screw foundations are used in the construction of light houses, for example, wooden ones. That's why decorative finishing screw foundation should be in harmony with the wooden elements. Fortunately, I have found a variety of profiled sheets with imitation stone that goes well with wooden houses. The result is an imitation of a completely natural, natural house.
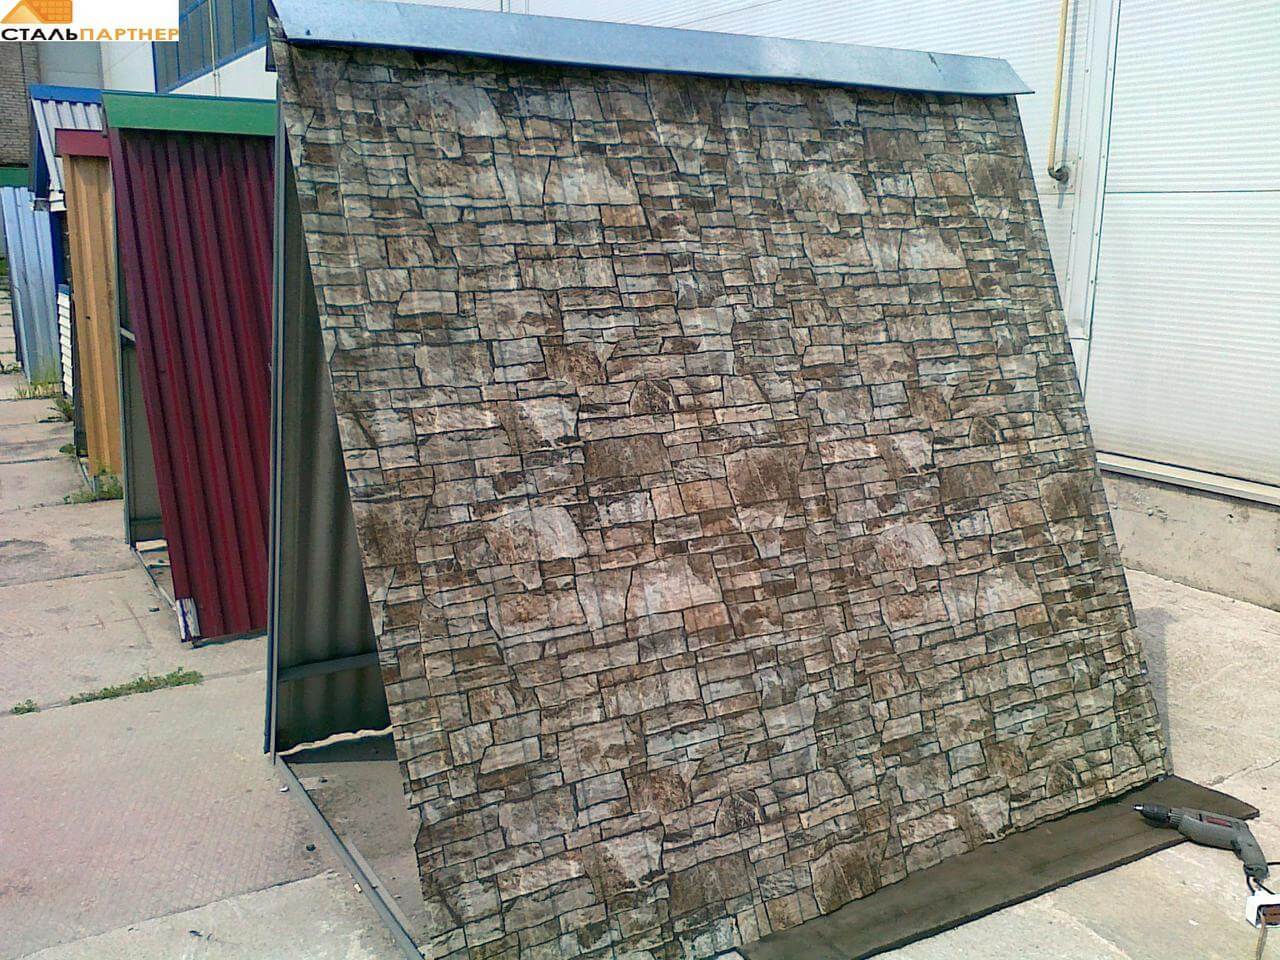
Profiled sheet “under the stone”
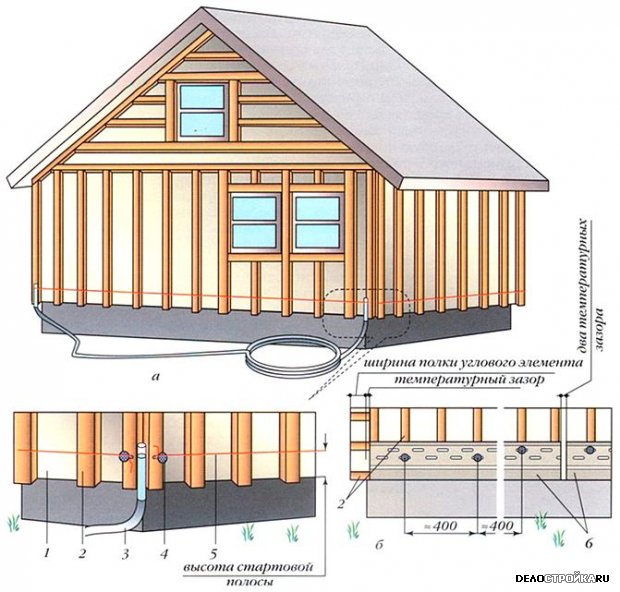
Sheathing a screw foundation is not a difficult task, so I took it on myself and, adhering to the following scheme, did an excellent job:
- For the base of the sheets, I made a wooden sheathing, having previously soaked the parts with an antiseptic solution.
- To avoid deformation of the sheets under the influence of heaving soils, I left a gap between the ground and the element. To do this, I filled the junction of the earth and parts with sand to a depth of 500 mm.
- I used self-tapping screws to attach the sheets to the wooden sheathing. To avoid dents, I tried not to overtighten the fasteners.
- I covered the joints of the material and the corners with additional elements.
This is how, with a little effort, you can cover your foundation yourself.
- Plaster coating of the plinth
- Siding - modern material
- Finishing the foundation with tiles
The basement is the above-ground part of the foundation of a house. Due to the fact that the entire outer surface of the foundation protrudes above the ground level to a fairly large height, it needs protection from the adverse effects of moisture and low temperatures.
To cover the base of a house with decorative or natural stone, you should carefully prepare the surface and apply a mortar or tile adhesive 3-5 mm thick to it.
When splashing raindrops falling from the roof, moisture falls on the base of the building.
Concrete easily absorbs it, and after the onset of frost, the moisture that is inside the monolith freezes and expands, gradually destroying the foundation.
Finishing the base with waterproof and resistant to external influences materials not only protects the base from destruction, but also has an aesthetic function, decorating the appearance of the facade of the house.
Variety of finishing materials
Construction markets are rich in materials that can be used successfully. Among them there are those specially designed for this, but you can also use those that are used for finishing other rooms of the house. The most accessible:
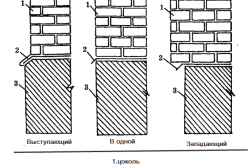
Scheme of types of plinth: protruding, in one and recessed.
- plaster and decorative plaster;
- fake diamond;
- basement or regular siding;
- a natural stone;
- clinker or ceramic tiles.
Each type of finishing involves a technology different from the others. It is worth examining in more detail how to finish the foundation of a house with one material or another and which technology best meets the tasks assigned to it.
Return to contents
Plaster coating of the plinth
Plaster is recognized as the most budget option to protect and decorate the foundation. To apply cement-sand mortar to the base you will need:
- sand;
- cement;
- reinforcing mesh;
- dowels for fastening.
The surface must be prepared for plastering work. It is cleaned of contaminants, and a notch is made on concrete surfaces that have stood for more than a year. If easily peeling areas are found, they must be removed to a durable layer. Depressions and protrusions are leveled.

- A thin plastic reinforcing mesh is attached to the surface of the base with dowels.
- A primer layer of plaster mortar consisting of 3 parts sand and 1 part M-400 cement is applied to the moistened prepared base. Approximately 0.5 parts of water are added. The primer is applied in a layer 8-12 mm thick. Using a brush or scraper, wavy lines 3-5 mm deep are applied to its surface at a distance of 30-40 mm from each other. The primer layer is kept for 7-10 days, constantly moistening it with water (3-4 times a day) and covering it from the sun with matting, burlap or other covering materials.
- Before applying the final layer of plaster, the primer surface is moistened and a layer of mortar 3-5 mm thick is applied, carefully leveling its surface with a trowel if this coating option is needed for painting.
To imitate travertine, the solution is applied sloppily, then lightly smoothed with a steel float. The result is a textured surface with caverns, reminiscent of the texture of decorative stone. For coloring, you can use a pigment that is added to the solution.
You can decorate the plaster coating using a rasp, cutting through contours that imitate brickwork or facing with natural stone.
You can stick hand-made small cakes of mortar onto a moistened layer of plaster. After smoothing the seams, the surface will resemble a wall paved with rounded cobblestones. Painting that imitates the color of natural stone and varnishing will give the base a decorative appearance and protect it from moisture. Fig.1.
Return to contents
Finishing with artificial and natural stone
Artificial stone is a tile made from cement-sand mortar, gypsum or cement mortar with stone inclusions. The range of artificial stone is very wide and its advantage over natural facing stone is its low cost, lightness and ease of installation.

Tools and materials:
- spatula for applying glue or solution;
- ready-made mixture for preparing tile adhesive or cement-sand mortar.
A layer of mortar or tile adhesive 3-5 mm thick is applied to the moistened foundation of the house.
The artificial stone tiles are lightly coated with mortar and glued to the base of the house, pressing and leveling as necessary. If the artificial stone imitates a smooth stone surface that requires pronounced seams, they are rubbed down after the glue has dried. The surfaces of the stone are cleaned of excess grout.
With this method of finishing the base, it is important to protect the protruding upper cut using the same material, or using special finishing elements.
The flat shape is produced in the same way. You should choose a composition specifically designed for gluing stone. After completing the work and cleaning the surface of the stone from excess glue, the stone is dried and coated with hydrophobic compounds and varnish to give a beautiful shiny surface with the effect of a wet stone. Water repellents and varnish protect stone with a porous or layered structure from destruction when moisture enters and freezes.
Return to contents
Siding - a modern material
The choice of siding and facade panels for finishing the basements of houses is often determined by its low cost compared to artificial or natural stone. In addition, installation of siding does not involve dirty work with mortar. Lightness and speed are also his obvious advantages. Appeared in Lately façade panels and siding imitating natural stone are designed specifically for finishing the base.
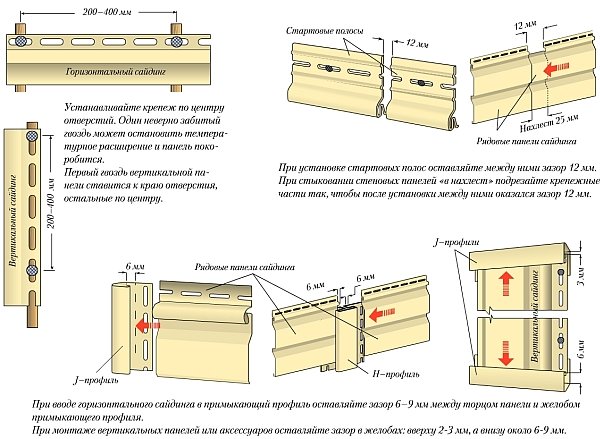
- First, a sheathing made of profiles specially designed for this purpose is mounted on the prepared base. The profiles are fastened with self-tapping screws with dowel inserts to the base. The sheathing elements are fastened to each other using self-tapping screws.
- Separate siding panels are connected to each other with grooves specially made for this purpose. The panels are attached to the sheathing with self-tapping screws.
The material has waterproof properties and does not require additional processing. Finishing elements: external corners, masking overlays, decorative strips help to create neat corners of the plinth and correctly make smooth waterproof transitions from wall to plinth.
The construction of any building always begins with laying the foundation. This is an integral part of construction work, without which it will not be possible to achieve structural strength and balance.
Most often, the foundation rises several centimeters, and sometimes even meters, above ground level. This part is called the base. A bare concrete wall looks unsightly from an aesthetic point of view, so designers recommend decorating it.
Installing panels on the base of the house
There are many different materials for finishing, which differ:
- price;
- quality;
- operational abilities;
- physical and technical characteristics.
Before you start construction works, namely laying the foundation, you need to think in advance about what type of material you would like to finish the basement of the building. In this case, you should take into account the features of the exterior, climate and financial capabilities.
In addition, it is necessary to know and clearly understand why finishing with facing materials is needed: is it just an aesthetic whim or important detail designs?
Covering the base: a necessity or a decorative element?
For most people, the exterior design of a house is one of the important points during its construction. Such nuances are discussed in advance with builders, designers and architects.

Covering the base with decorative tiles
However, few people know that plinth cladding is not only about decorating cold, sloppy concrete. Finishing work initially has a completely different purpose:
- Protecting the foundation from damage. Colonies of fungi or mold can grow on concrete over time. Also, the base is not protected from damage by corrosion and erosion. Constant rain, snow, frost or heat contribute to the appearance of cracks and splits, which in turn threatens the integrity of the building.
- Protection against contamination. The environmental situation in the world contributes to the fact that acid rain falls, and polluted air contains elements that destroy even concrete. If the base often succumbs to such contamination, then very soon it will begin to collapse beyond repair. The consequence will be irreparable destruction of the house. Cladding saves the foundation from such processes.
- Warming function. Despite the fact that the basement is located much lower than the floor of the living space, its excessive cooling helps to reduce the temperature in the house. This is due to the fact that concrete instantly absorbs cold and distributes it vertically along the walls. Even an insulated floor cannot always prevent this process. At the same time, enormous financial resources are spent on heating. However, there is little result from this. In addition, due to exposure to cold, erosion processes can begin or mold can grow, for which cold and dampness are an ideal environment.
- Defence from external influences. The strength and durability of concrete, brick and any other foundation are affected by weather and atmospheric conditions. Ultraviolet radiation gradually destroys the structure. Strong winds, frosts, excessive air humidity, etc. also have a negative impact. Facing materials protect against such factors, which can be easily replaced if necessary. With the base the situation is much more serious.
Based on the above factors, we can conclude: finishing the base is a necessity. No builder can guarantee the strength and reliability of a building without finishing.
Base cladding options
To prevent the destruction of the foundation and ensure comfortable living conditions in the house, the base must be finished with facing materials. You can choose cladding colors and textures that match the rest of the building materials.
There are also special insulation systems for walls. Can be picked up protective covering from corrosion, erosion, fungus and mold.
If you do not know which type of cladding is best, consult a specialist. The architect or builder who is constructing your home is competent in this matter.
Cladding option No. 1: Plastering or painting
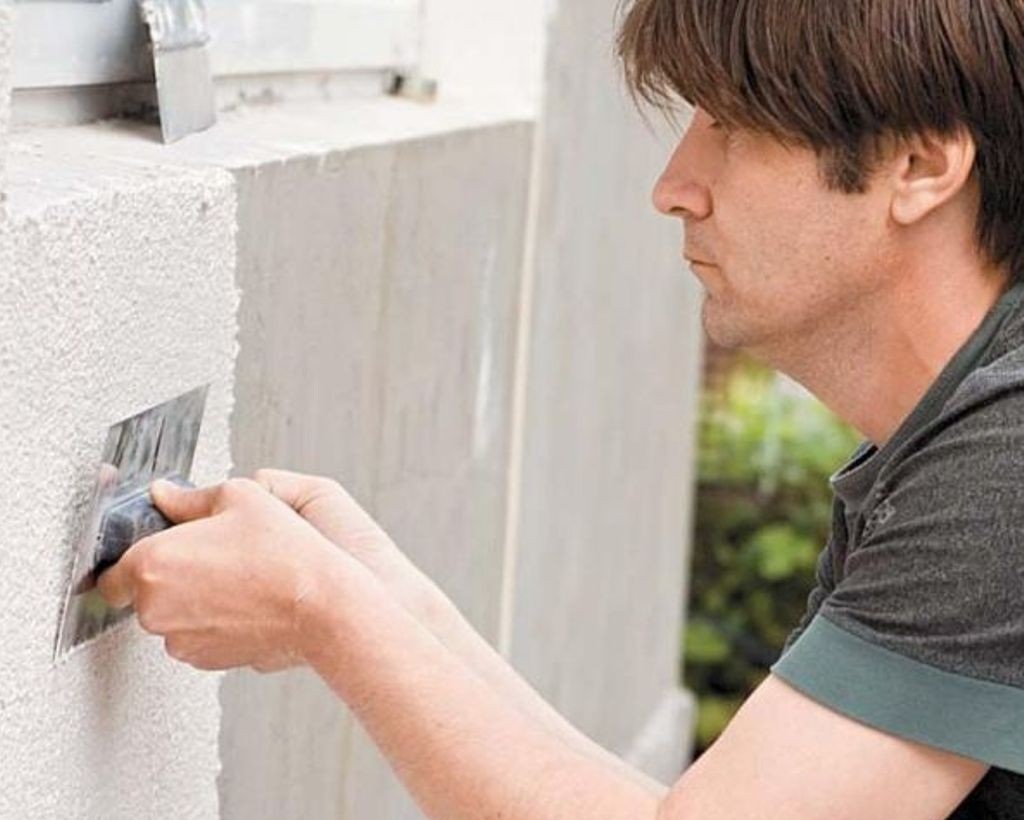
The most popular method of processing the base is plastering. Its fame is associated with its availability and reliability. A layer of plaster strengthens, decorates and protects the structure from environmental influences.

Plastered basement of the house
Features of the material
In order for the plaster to perform its function, you must follow the rules for its application:
- The level of protection and thermal insulation depends on the thickness of the layer. The thicker the layer, the better.
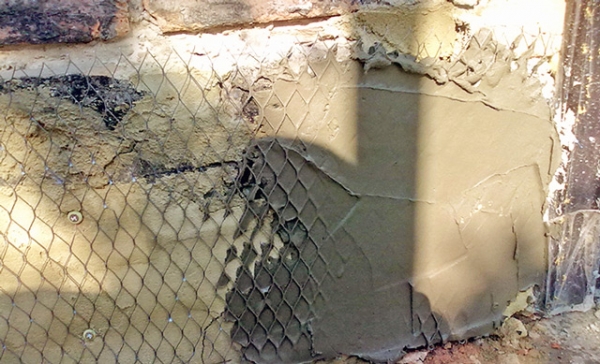
- To ensure a durable and moisture-resistant finish, apply a cement base before plastering.
- The coverage will be uniform when applying two layers. Use decorative plaster as the final coating.
- Reinforcement of the structure will help to avoid cracking and falling off of the top layer.
Important: The classic mortar, cement-sand, is best suited for lining the gap. Apply the composition intended for facade decoration on top.
Installation

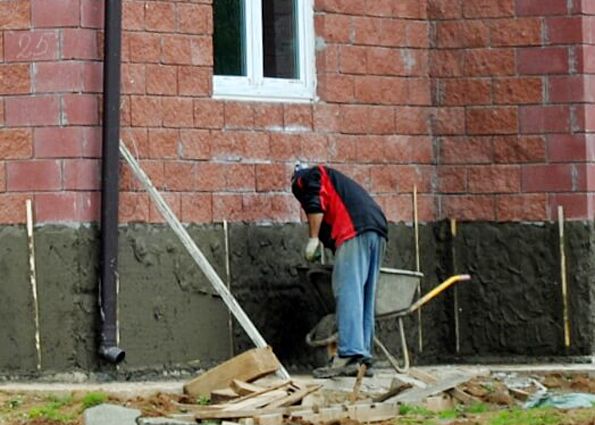
Plastering the basement of a house
| Step-by-step instruction plastering the plinth | |
|---|---|
| Free the basement spaces from excess layers and remove dirt and dust. Also get rid of oil stains. |
| Prime the clean surface with primer. |
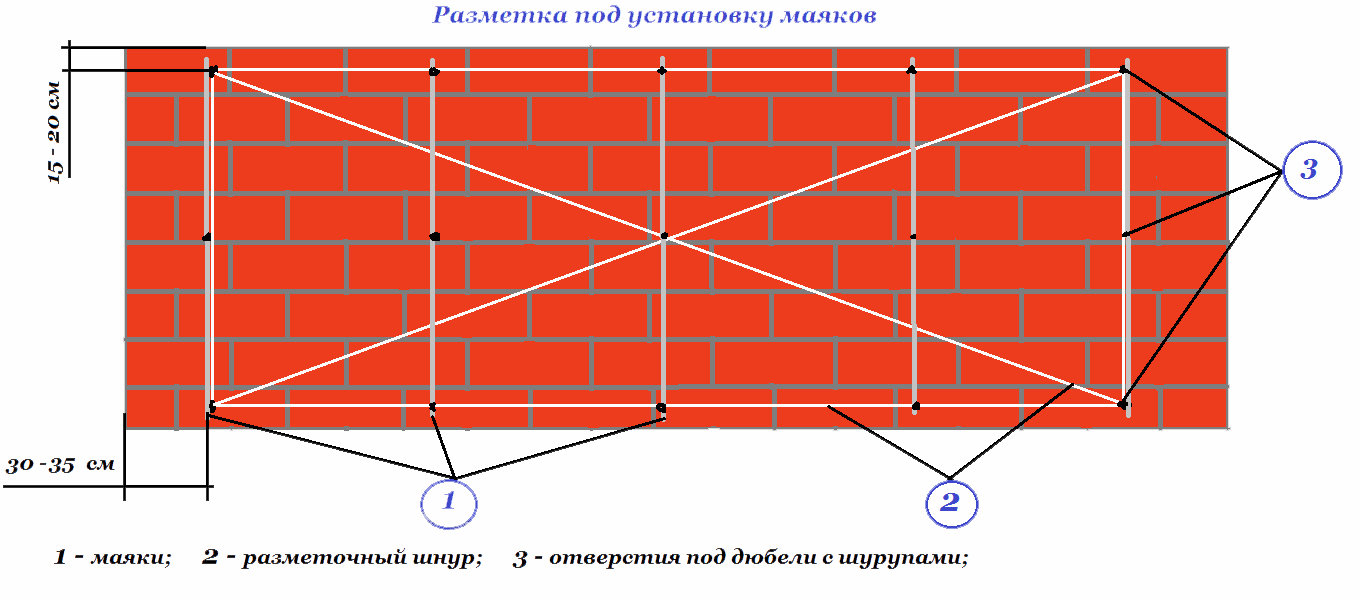
| Stuff the plaster mesh. For 1 sq. m there must be at least 16 fastenings. It will be better if you make 20. Use dowels with wide heads. |
| Screw in the screws and attach plumb lines to them. The distance between the screws and the corners of the wall is 30 cm. Pull the thread in a vertical position over the free screws. Connect the screws using horizontal threads. Place the threads at a distance of 2 cm from the wall. |
| Make beacons and fix them cement mortar. Step – 1.5-2 m. Distance to corners – 30 cm. The most reliable material lighthouses are a steel profile. |
| After the cement hardens, pour cement-sand mortar between the beacons. To cast, use a ladle, level the protrusions and depressions using the rule. Leave to dry for 6 hours. |
| Remove the beacons and smooth the surface with a plaster float. |
| Cover the base surface with plastic wrap. Leave to harden for 2 weeks. Moisten the surface with water once every 2-3 days. This will help with ripening. |
| Prime the base and cover it with decorative plaster. |


Advantages
Plaster for cladding is chosen for the following reasons:
- Relatively low cost of materials and installation work.
- Installation is done by hand: no special tools or equipment are required.
- Simple repair.
- Reliable coverage.
- Possibility of applying decor.
Flaws
Negative features of plaster include:
- Low level of strength compared to analogues.
- Short service life.
- Low thermal insulation.
- Water and moisture permeability.
- Strength degrades over time due to freezing and thawing.
- Installation cannot be carried out if the structure is exposed to direct Sun rays. Negative temperatures and precipitation are also limitations for work.
Since plaster and paint peel off quickly, you need to constantly monitor the condition of the coating on the facade and regularly make cosmetic repairs.
On a note
- You can cover the base with several layers of plaster yourself. To do this, you do not need to do any preliminary work. It is enough to buy plaster of the desired color and cover the concrete with it in several layers.
- If for certain reasons you do not want or cannot plaster the base yourself, hire a master painter-plasterer. A professional will do this work for you efficiently and quickly. However, do not forget that good specialists do not come cheap. But the result is worth it: the base will be durable and protected from all types of damage.
- If you are not satisfied with the color of the plaster, then after drying, you can apply two layers of facade paint on top. Today there are more than 50 shades that can be used to decorate the foundation. In addition, building materials stores sell special decorative plaster of different colors and textures.
- An interesting option would be to decorate the facade with homemade stones. They can be made from ordinary concrete. To do this, create the required form stones with a spatula and let them dry. Then cover the artificial stones with paint or plaster. This design will be cheap, but it will look just great.
Cladding option No. 2: Use of natural and artificial stones
To make the façade look elite and rich, use stone cladding. Each stone has its own advantages and characteristics. Experts advise consulting with builders or architects before purchasing, since in a particular case a particular stone may not be suitable. The following are taken into account: the strength of the foundation, weather and the size of the house.
Types of stone

Types of stone for plinth cladding
In addition to choosing between artificial and natural stone, decide on the texture. The stone comes in the following textures:
- smooth;
- polished;
- chopped;
- sawn
Features of natural stone
Natural stone has various shapes: rectangle, square, circle, non-standard (made to order).
It also has different thicknesses: 0.5 and 1 cm.
This thickness is determined by ease of installation and durability of the structure. As the thickness increases, the stone becomes heavy and there is a risk of spalling.
The positive features of natural stone include:
- High level of strength.
- The surface is produced using special equipment. Therefore, the coating will be uniform without additional work.
- Long service life: more than 10 years.
- You can do the installation yourself.
The complexity of finishing is determined by the size of the stone and the tools for work. You also need to take into account that stone is a heavy material. Therefore, not every surface is suitable for cladding. In cases where the surface cannot withstand the stone, it needs to be strengthened.
How to prepare the surface:

Installation of stone on reinforcing mesh
Important: Tight fastening of the mesh is ensured by metal lugs. Screw them into the mesh.
After strengthening, level the surface with plaster or concrete mortar. Remember that concrete mortar cannot be leveled with sandpaper.
For cladding you will need the following materials:
- building level;
- concrete solution;
- putty knife;
- tile cutter
Tips for cladding:
- Work from the bottom up.
- First of all, lay out the corners and fasten them tightly.
- Create additional insulation with the following materials: polystyrene foam, extruded polyurethane foam, polystyrene foam, mineral wool. This is necessary because the stone itself is cold.
Facing artificial stone
Natural stones look noble, but have significant disadvantages: heavy weight and high cost. Therefore, if you do not pretend to be aristocratic and royal nobility, artificial materials may well replace natural ones. The main thing is to choose the right shape, texture and type of fastening.
Finishing the base with artificial stone
Surface types:
- smooth;
- torn;
- structural;
- embossed.
The following materials are used for cladding: shell rock, granite, sandstone, etc. (see table below).
A special feature of artificial stone of different structures is the ability to create an individual house facade. For such purposes, stone with a torn structure is most often used.
Finishing with artificial stone is practically no different from the technology of cladding with natural materials. Recommendations for leveling and insulation are similar.
Differences in technology:
- There is no need to insulate the surface, since the artificial material has less weight.
- Any surface can be finished by covering the insulating layer with materials such as drywall, plywood or OSB. The stone is installed directly on top of these materials.
For installation, concrete mortar and ceramic adhesive are used. A durable and fresh surface is ensured by applying a coat of primer.
When finishing with decorative stone, the following work is carried out:

Features of natural and artificial species stones
Find out the features of the most popular stones from the table below:
| Coverage type | Material | Photo | Advantages | Peculiarities |
|---|---|---|---|---|
| A natural stone | Shell rock |  | Low cost, high strength, visual appeal. | Heavy weight, difficult to install. |
| Limestone | 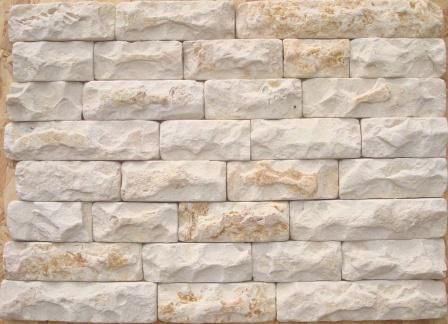 | Affordable price, decorative effect, ability to choose shape, color and texture. | Heavy weight, difficult to operate, risk of making the foundation heavier. | |
| Granite | 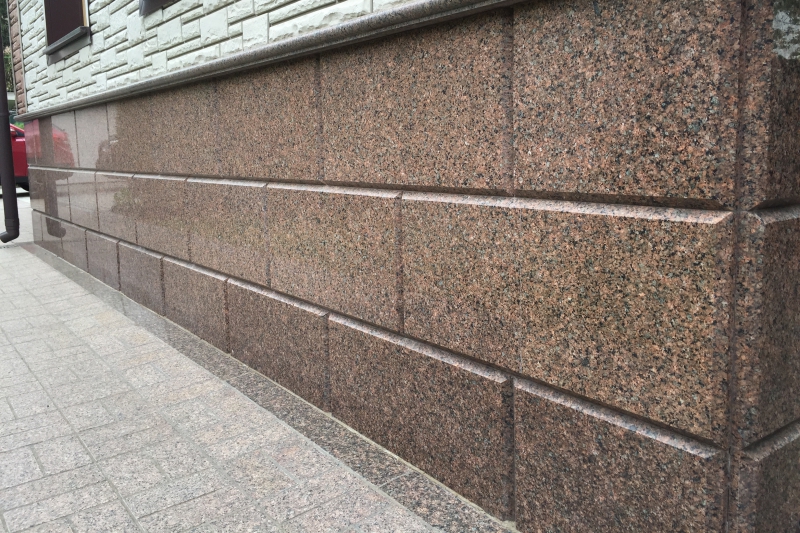 | Refined and rich appearance, resistance to cold and heat. | High cost, heavy weight, risk of foundation collapse. | |
| Marble |  | Durability, aristocratic and rich appearance, 100% protection from damage. | High cost, difficult to install and operate, heavy weight. | |
| Gabbro |  | The appearance and color resembles the starry sky, high strength, protection from cold, heat and moisture. | Sky-high cost, heavy weight, difficult to operate. | |
| Labradorite |  | One of the most beautiful facing stones. Durable, reliable and weather resistant. | The material is more expensive than all others. It is difficult to install and weighs a lot. | |
| Artificial stones | Canyon panels | 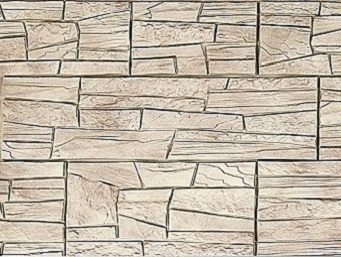 | The panels are not much different appearance from natural stone, but are much cheaper. They are durable, and there are options with insulation. | They are attached to special iron hooks, which is very convenient. |
| Tiles attached with glue |  | The panels are lightweight and easy to use. There is a choice of different colors and textures. | They are attached with glue, so they do not always fit. It is better to choose models that are attached to iron hooks. |
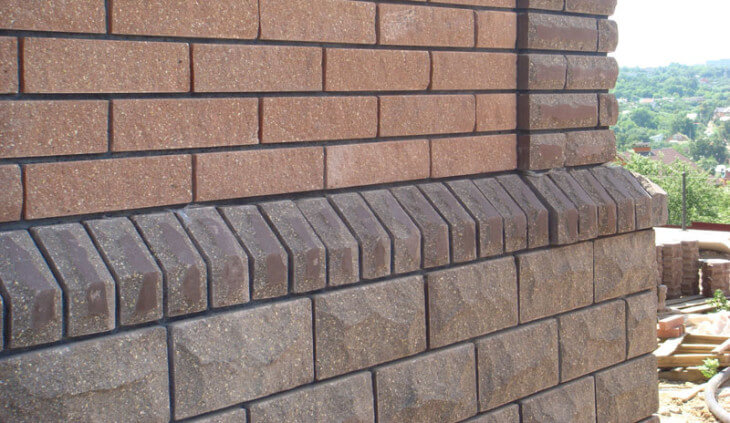
Option No. 3: Finishing with brick or “brick-like”
Brick or its imitation is a classic finish. The material is suitable for any type of exterior without making the structure look cheap.
Brick can be combined with any type of wall and roof decoration, as it looks equally neat and harmonious with all building materials. A special substrate is made under the brick, which serves as insulation for walls and floors in residential premises.
Advantages of brick
Positive aspects of finishing the base with brick:
- High degree of structural strength.
- Possibility to carry out installation yourself.
- No maintenance required.
- Service life is more than 10 years.
- High maintainability.
How to choose the right brick?
If the foundation is designed for heavy loads, choose a regular one building brick. If the building stands on a columnar or strip foundation, use facing brick with light weight.
Properties that a good brick should have:
- Low moisture absorption coefficient.
- Frost-resistant, tolerates low temperatures. Frost resistance is determined by the endurance of thawing and freezing cycles.
- High tensile strength, since the plinth bears part of the weight of the walls.
Preparatory work
The finishing of the base with bricks is done at a distance of 2-3 cm from the external wall insulation. This creates ventilation and prevents moisture accumulation. Normal ventilation will also be facilitated by mortar-free seams, which must be left in the first row.
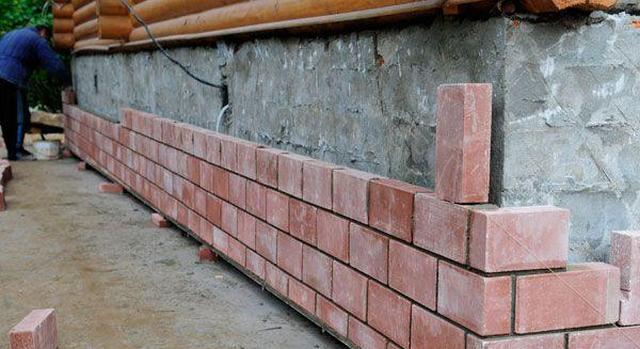
Finishing the base with brick
The facing and load-bearing walls are connected in two ways:
- Placement of galvanized anchors. One end is attached to load-bearing wall, the second - between the rows of masonry.
- Fixing a dowel tied with wire. The ends of the wire are attached between the rows.
Important: Every 1 sq. m must have at least 5 ligaments with load-bearing wall. Place them horizontally every 50-70 cm, vertically every 3-4 rows. In the openings, make more dense strapping.
Methods for preparing the solution:
- Cement and sifted sand 1:4.
- Cement, sifted or river sand, limestone dough 1:7:2 or 1:8:2.
Add water and stir. Make balls from the resulting mixture: they will not crumble in your hand.
The cement sets quite quickly. Therefore, prepare the solution in small batches.
Display Features
Precision and accuracy when forming and opening seams are the 2 basic rules for laying a plinth with bricks.
Let's consider methods of cladding over the foundation.

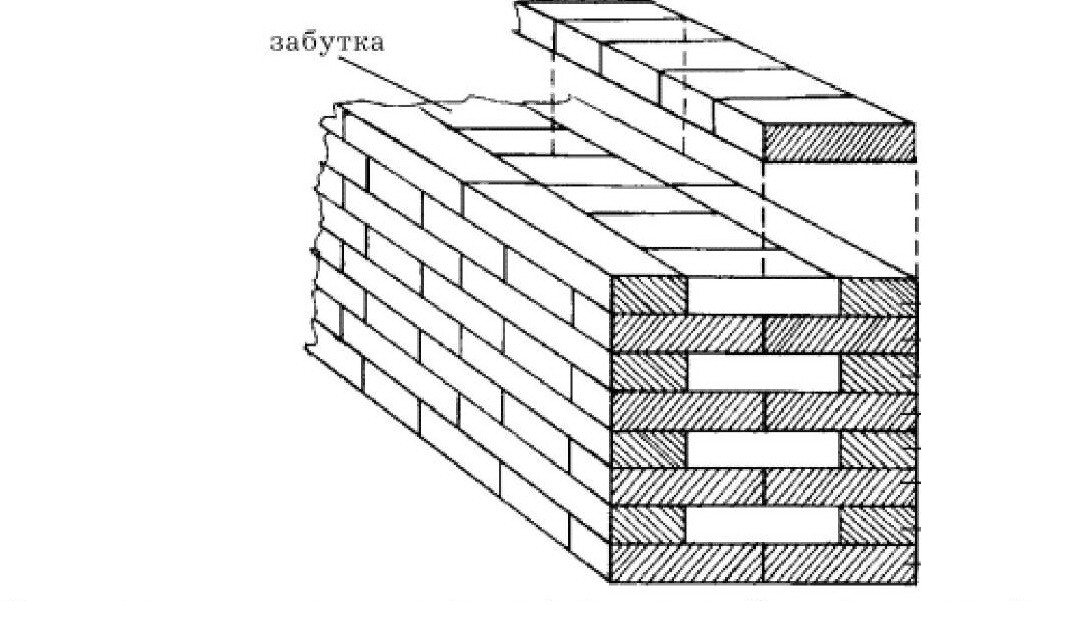
Chain ligation of masonry
Lay out 2 rows of hatching bricks interior wall. Using brick scraps, level the height of the masonry. They are mounted above the rows, laid end to end against the load-bearing wall.
Use a multi-row dressing system. Remove bandages after every third row.
Pay attention to the condition of the foam concrete: if it is poorly dried, after a while the interlocking bricks sandwiched in the rows may be cut off. This is due to different degrees of shrinkage of brick and foam concrete.
Important: To prevent shrinkage from stopping, foam concrete blocks must lie down for some time before starting construction work.
If the final surface will be laid out decorative bricks, start with the installation of the facing verst.
The 1st row is laid with a poke, the 2nd and 3rd with a spoon.
If you use halves of finishing bricks, lay them in a butt pattern.

Laying in reverse
This method differs from the previous ones in the order of installation. First a row is laid exterior finishing, then an internal milepost and a backwater are constructed.
In this case, perform dressing with bonded masonry. Since the bonded masonry has a height of two rows, the dressing is half included in the finishing row.
The main advantage of this method is the reliable fastening of internal and external walls.

- When applying the mortar, make sure that it does not reach the edges of the brick.
- Wipe off excess solution.
- After laying several rows, wipe the walls with a damp cloth.
Features of types of bricks are presented in the table:
| Coverage type | Material | Photo | Advantages | Peculiarities |
|---|---|---|---|---|
| Natural brick | Hyper-pressed |  | There are different sizes (Russian, American). Durable, durable. | The heaviest option, does not absorb water well. |
| Silicate | 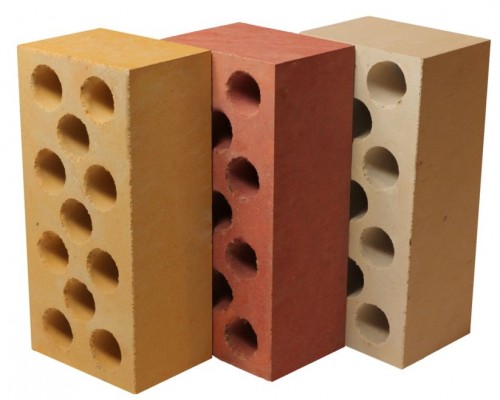 | More economical option. Light weight, easy to operate. | Unstable as a facing material, poor hydro- and thermal insulation. | |
| Ceramic | 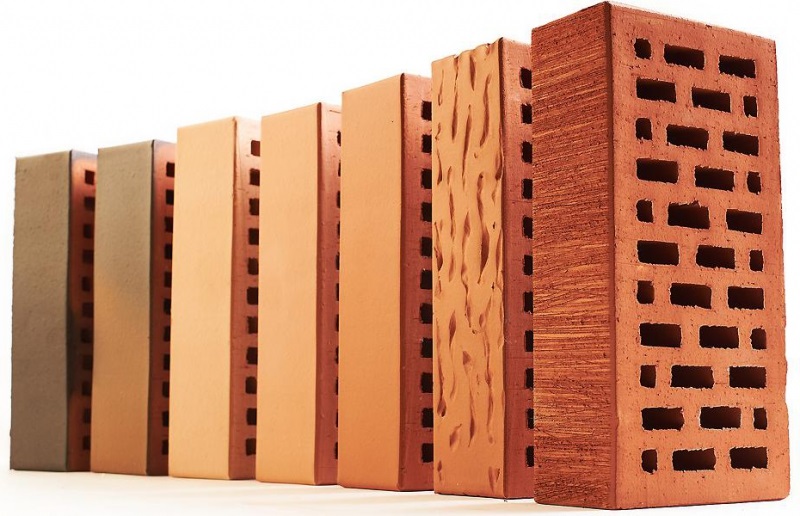 | The best option for cladding among all types of natural bricks. It has an internal filled structure, light weight and high strength. | The material is easy to use, the price is quite high. | |
| Artificial brick | Clinker tiles | 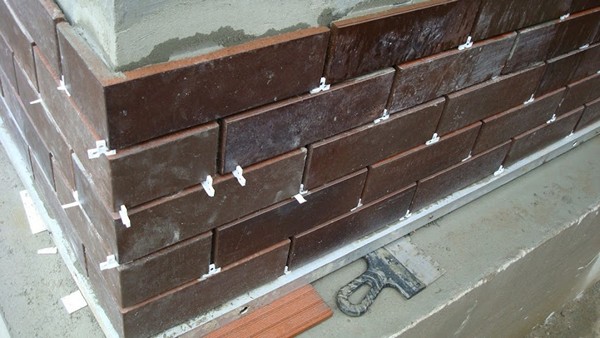 | In terms of technical and physical characteristics, it is not inferior to natural brick. | Light weight, easy to work with material. |
| Plinth panels | 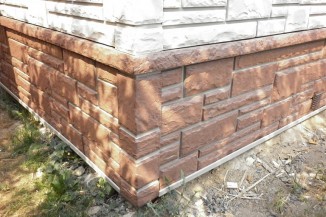 | Looks like real brick, you can order a panel with insulation. | It has a polyurethane foam or polystyrene base, easy to install and use. |
On a note: If you decide to finish the base with brick or “brick-like”, make a separate one strip foundation for facing material. The brick is laid with a small gap from the wall, and the cladding foundation must be connected to the main foundation.
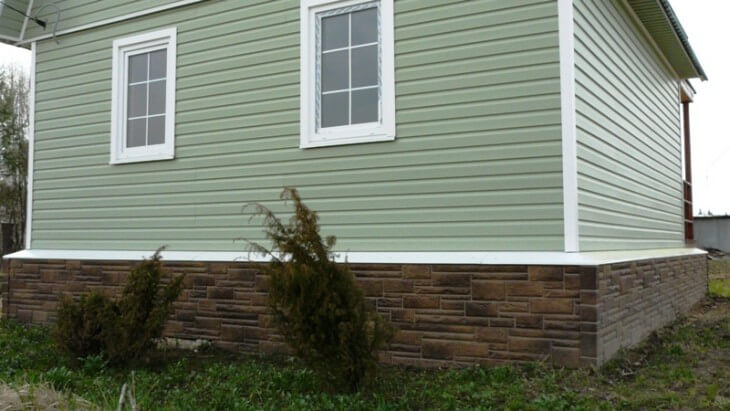
Option No. 4: Siding as finishing
It happens that brick and natural materials should never be used to decorate a particular building. At the same time, plaster may not completely satisfy aesthetic needs. In this case, it is best to give preference to basement siding. It is produced in the form of panels and imitates the pattern, color and texture of natural material. Moreover, siding can be used to cover not only the base, but also all the walls.
Siding options for finishing the basement
On a note: In order for the siding walls and the same base to look harmonious, it is recommended to select materials of different colors for their finishing. As a rule, darker shades are suitable for the base, and the walls should be lined with light siding.
The material consists of the following components:
- polyvinyl chloride;
- fiber cement;
- polymer sand mixtures, etc.
Types of siding
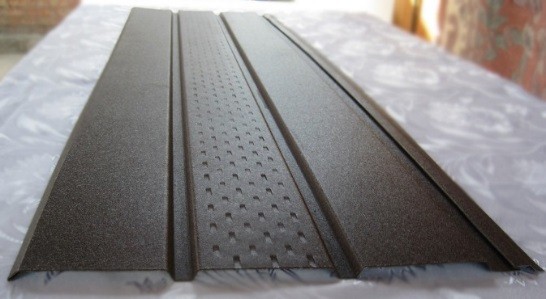
| It is mainly used for roof lining. It can be either solid or perforated to ensure better roof ventilation. |
|
There are three subtypes:
| |
| Such panels are used exclusively for vertical installation. | |
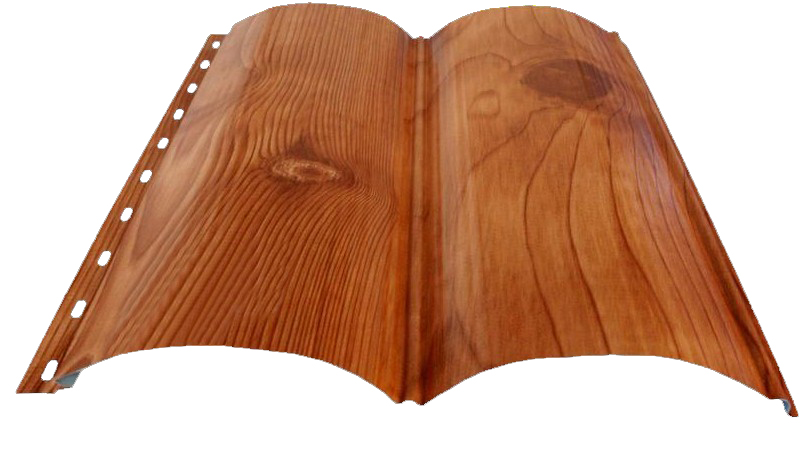
| Metal siding "under the timber". This type of siding externally imitates a round log and is similar to a wooden paneling like a block house. |
Metal siding "under the timber" |
The siding covering is equipped with special panels for fastening. This leaves a gap between the cladding and the wall. It should be filled with insulation or shell rock. Thus, the structure becomes more durable and the level of thermal insulation of the house increases.
In hardware stores you can choose any color, texture and shape of building siding panels. In addition, there are original options, imitating not only stone and brick, but even wooden beams, roughly chopped shingles, ship planks, etc.
Benefits of siding
How to cover a basement with siding
Siding is chosen due to a long list of positive features:
- Simple installation without calling specialists. The parts are connected by locks and latches. Fastening - screws and nails.
- The panels do not lose their original appearance: they do not deform or fade.
- The surface material does not peel or delaminate.
- There are no chips or scratches on the siding panels. They are not afraid of wind pressure and impacts.
- The structures are durable: they last more than 50 years.
- The material can withstand temperatures in the range from -50 to +50 degrees, and is not susceptible to ultraviolet rays.
- The panels look like natural materials.
- PVC does not rot and is not subject to corrosion.
- The material is not interesting to insects, small rodents and other pests.
- Easy care: wash once a year with water and detergent.
Installation
Instructions for carrying out finishing works in the plinth area using siding:
| Clean the base, remove protruding parts, repair cracks and other defects. |
| Attach the profile strips to the wall. For fastening, use dowels. Fix the bottom bar horizontally. It should be located at a distance of 2-3 cm from the ground. The top bar is attached at the top. The middle one is attached parallel to the top and bottom strips, exactly in the middle. |
| Layer down mineral wool and cover with a windbreak. You can use polystyrene foam. |
| Make a starting strip along the bottom bar. The strip must run horizontally. Measure the distance between the basement and the wall. These data will be the dimensions of the corner strip. Attach the corner strip to the corner that is to the left of the structure. |
| Trim the panel along the left edge. Then insert it into the starter bar and push it into the corner. Leave a gap of 6-10 mm. When fixing, do not tighten the screws to the end by 1-2 mm. |
| Next, do everything in the same way to the corner. Before the corner, cut the panel and insert it into the starting strip. Connect to the previous part and secure. Place the bar on the corner and secure it. |
| Cover the top edge with a cornice. You can also use the finishing strip for these purposes. |

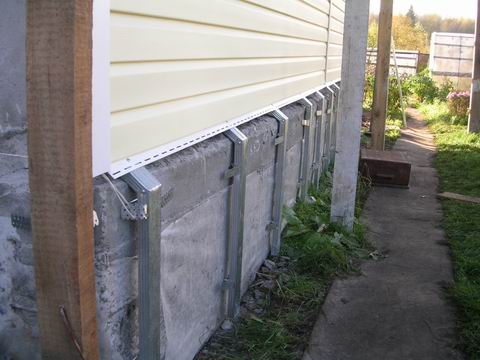


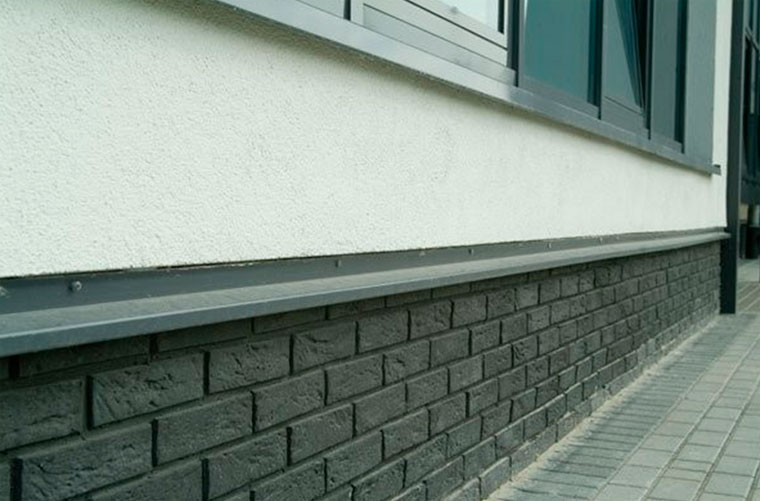
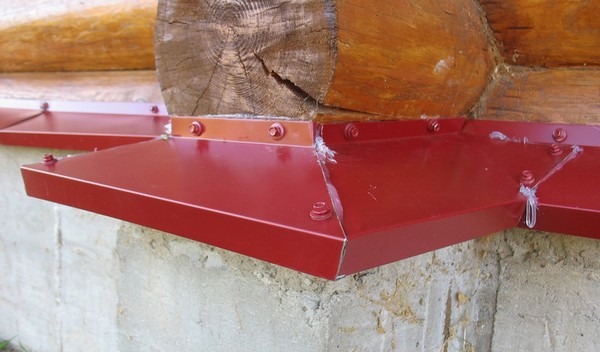
Installation of flashings for finishing the base
First of all, it is worth noting that the base can have a different location. The most successful option is considered to be one in which the foundation protrudes slightly forward from behind the walls, forming a small step. This arrangement is ideal, since the base is protected from excessive moisture, dirt, etc.
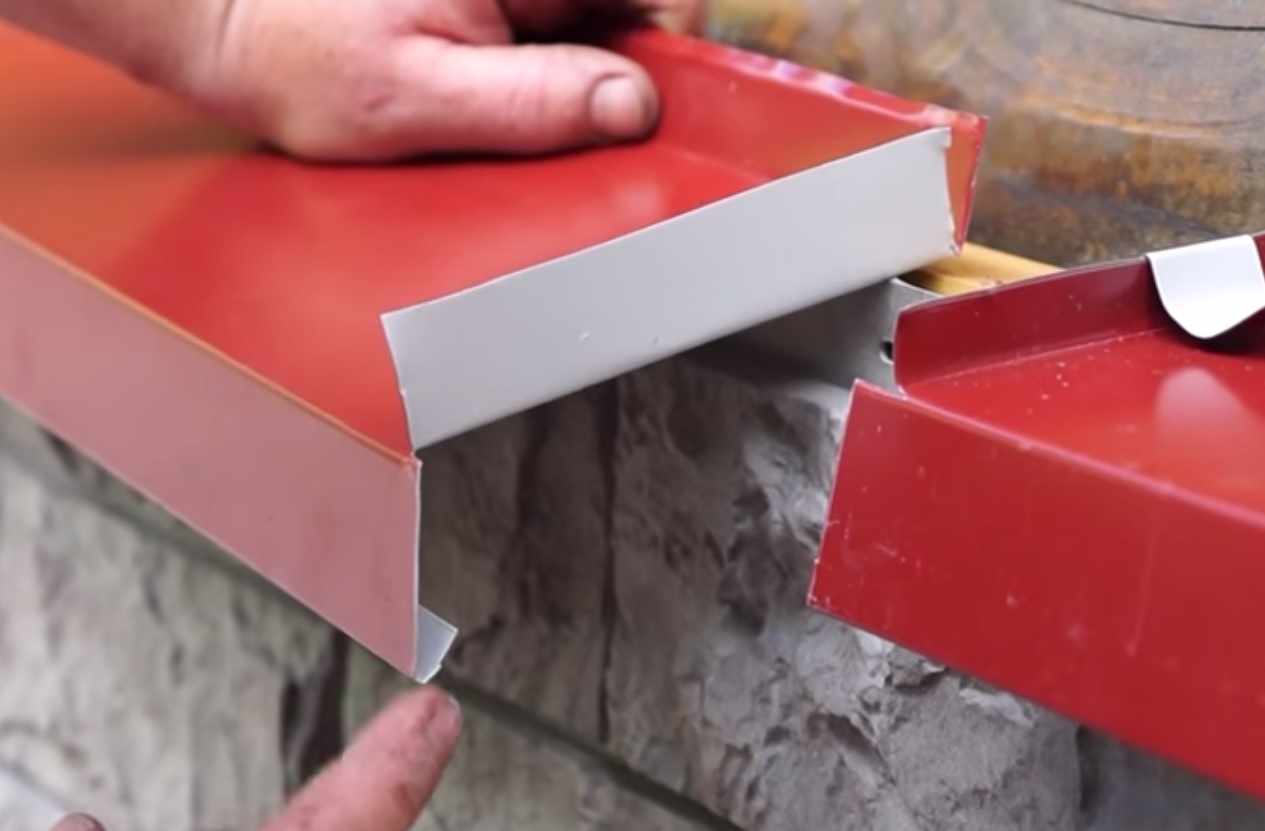
Installation of ebb tides
However, it must be remembered that a mandatory stage of cladding is the installation of ebb and flow. Otherwise, the finishing will have no meaning.
Types of tides
There are these types of ebbs depending on the material they are made of:

Installation

Flashing fasteners to protect cladding
Step-by-step instructions for installing low tide:

Important: To prevent water from being retained during drainage, bend the side of the visor facing the wall up and the opposite side down.
Important: If you hit the plastic with a hammer while bending, you will ruin the structure. Place a rubber pad on top of it. Felt can be used for the same purposes. Leave one edge uncurled.
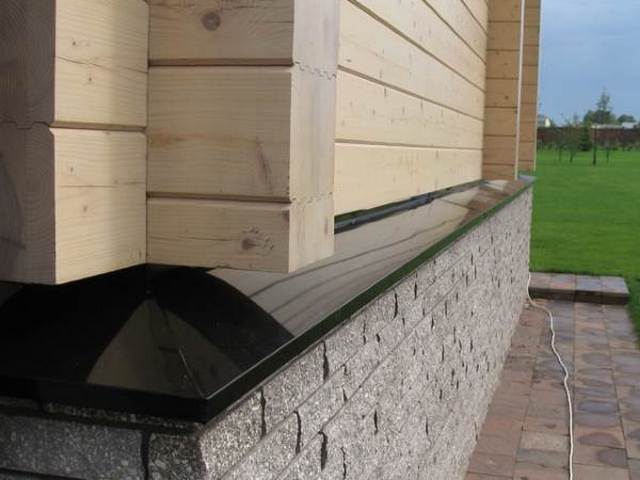
Gloss black option
Video instructions for installing drip sills on a plinth
Consider the following nuances when installing basement flashings:
- To avoid distortions, be sure to make markings before attaching to the foundation.
- Wash the joints with frost-resistant sealant.
- Cut out the outer and internal corners from a single plank.
- The width of the ebb should be no more than 50 cm.
- If the house is wooden, take care of reliable waterproofing: make a polymer or copper coating.
There are a great many options for finishing the base and ebbs. The main thing is to intelligently calculate how much is needed building materials and which cladding will look most advantageous, while matching the type of structure. You also need to evaluate your financial and physical capabilities. Initially, it is better to entrust the work to specialists in order to avoid annoying mistakes due to inexperience.
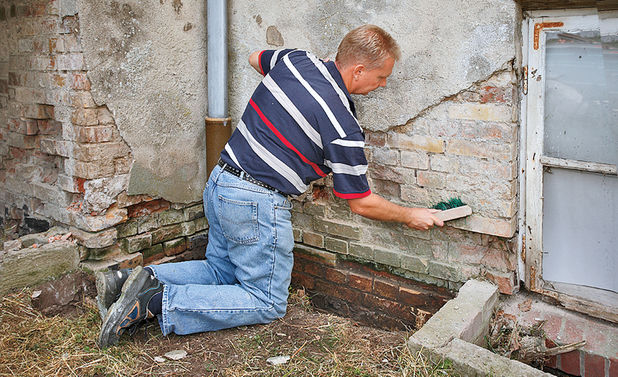
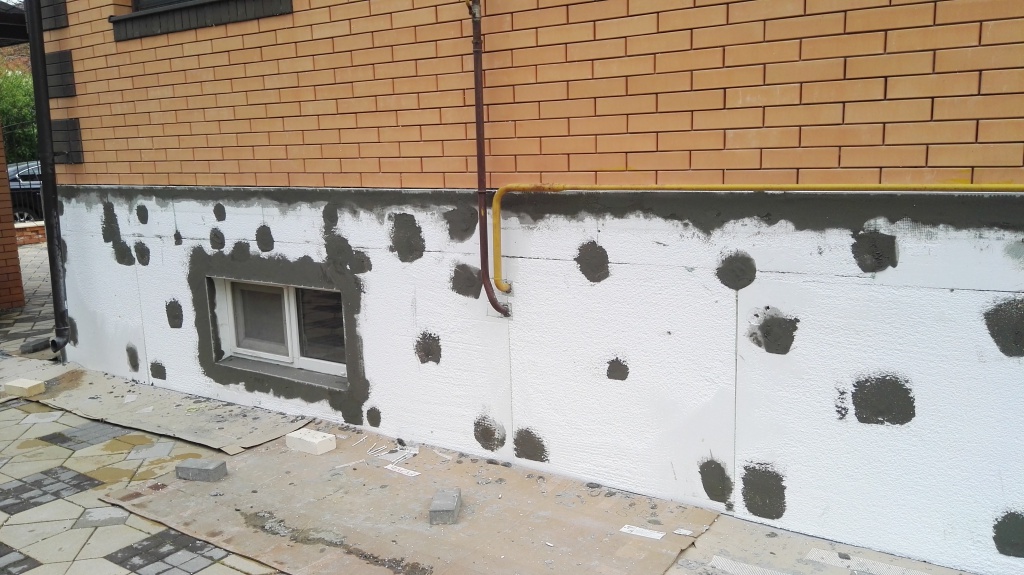
Good day. I bought it not long ago country cottage area 20 acres with two buildings - brick house and a small wooden building for guests. In general, both houses are in fair condition, without serious damage to construction or finishing materials. The only problem - . In both cases it was partially missing or damaged. IN this moment I'm interested in how to inexpensively decorate the base of a brick and wooden house? I wouldn’t want to spend a lot of money, since the buildings are quite large and will require enough material. If it’s not too much trouble, you could also tell us the nuances of installing these materials.
Hello. As far as I understand from your description, both buildings have a strip foundation type.
For brick house It would be necessary to remove the loose areas of plaster or knock off all the old finishing completely. In the case of a wooden building, it is better to completely dismantle the cladding, since according to your criteria, it is cheaper to carry out cladding or imitate natural covering.
It is not clear how you did this, but I think that the quality of the surface has become much better. Additionally, before describing the cladding technology, I will talk in more detail about preparing the surface for further finishing work.
Although in your case the important criterion is the availability and cheapness of the material, I strongly recommend not making a choice of coating only on the basis of these factors.
The protruding type of structure is most susceptible to precipitation and the environment
Finishing the base is not just a decorative cladding of the outer surface. In this case, the material plays the role of more than just cladding and performs a number of tasks:
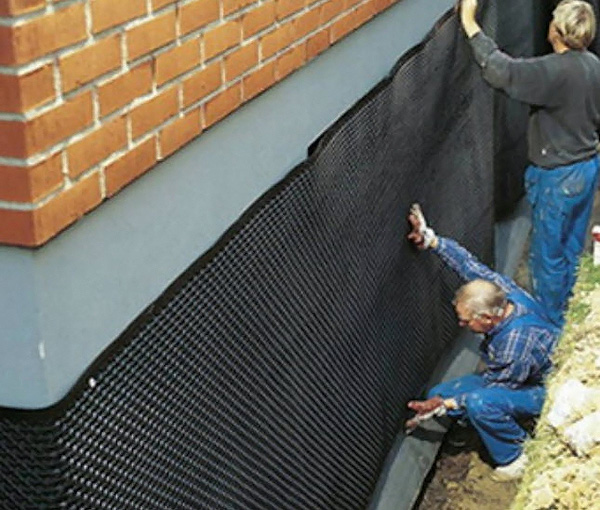
- Structural protection - ensuring protection of the basement of the building from external influences in the form of precipitation, humidity, temperature differences and direct sunlight;
- Protection against various substances and microorganisms - use modern materials helps reduce exposure to harmful and aggressive substances that can cause destruction concrete base. Finishing treatment with an antiseptic and protective compounds eliminates the formation of mold and the development of fungus;
- Protection from cold - the use of combined finishing materials and insulation helps to neutralize the risk of complete freezing of the supporting base and the development of erosion processes in concrete. If necessary, complete insulation can be carried out using a sufficient layer of polystyrene foam materials.
Taking into account and taking into account this information, you can significantly extend the service life of the load-bearing base, avoid the formation of “cold bridges”, and reduce the costs of seasonal surface repairs and heating of the building.
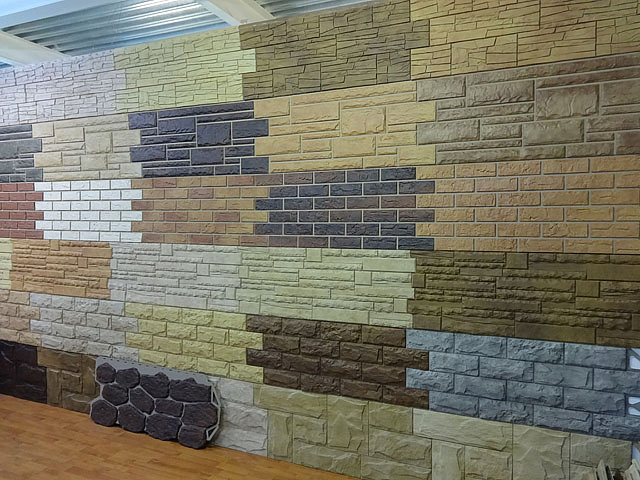
Materials for finishing and covering the base
![]()
The most popular materials for finishing the basement of buildings
The materials used for cladding and cladding the basement of the house can be roughly classified into two groups. The first is facing coatings, which are installed on a liquid base in the form of plaster, cement-sand mixture, etc. The second is facing coverings, which are installed on a pre-assembled frame or sheathing.
This is a conditional division, since the application various materials, first of all, depends on the cost and requirements that are placed on it.
In your case, taking into account that cladding the basement of the house should be inexpensive and accessible, you can use the following materials:
- Plaster is the most affordable and easiest way to finish and improve the base. The plaster has good vapor permeability, the ability to be applied over insulation, wide choice color solutions and decorative layer;
- Imitation of stone - performed using plaster or cement-sand mortar. It is easy to implement with the ability to create an absolutely exclusive surface. Application is possible both on “bare” concrete and on thermal insulation;
- Basement siding - polyvinyl chloride panels with the ability to imitate almost any finishing coating. Mounted on a supporting frame. At the installation stage, it is possible to perform heat and waterproofing work;
- Brick - allows you to create high-quality and reliable protection with the possibility of installing a full-fledged thermal insulation layer and a ventilated gap. Requires high-quality support and adherence to masonry technology. Can be replaced with facing slabs that imitate natural brick and are mounted with a special adhesive composition;
- Base thermal panel - visually resembles base siding mounted on a polystyrene foam board. It is advisable to use when both a heat-insulating layer and finishing work are required.
These are not all the coatings that can be used in work, but they are quite sufficient for cladding the base of both a brick and a wooden structure. If we also take into account the time costs, then it makes sense to collect and prepare a sufficient amount of natural stone.
This approach is not simple, but can be used in areas where you can independently obtain stone such as limestone, shell rock or sandstone.
Below is a table that takes into account the average cost of cladding material. For the calculation, 1 sq/m2 was taken as a more convenient value for assessment.
Preparation and sequence of work with plaster
Technology for performing work using starting and decorative plaster is the easiest to implement. As a plaster composition, you can use ordinary plaster for exterior work, “Bark beetle” plaster, plaster with marble chips, etc.
With due diligence, you can imitate natural stone, clinker or masonry bricks.
To carry out finishing work, you will need to prepare the necessary plaster composition. For normal leveling, you will need to purchase a cement-sand mixture M300-500, a dry composition for starting plastering work, facade paint for external work, antiseptic composition, reinforcing mesh with cells 10×10 mm and wire thickness up to 1 mm.
When creating a decorative layer, you will need special decorative mixtures, which are sold ready-made. This could be “bark beetle” from various manufacturers, finishing putty, etc.
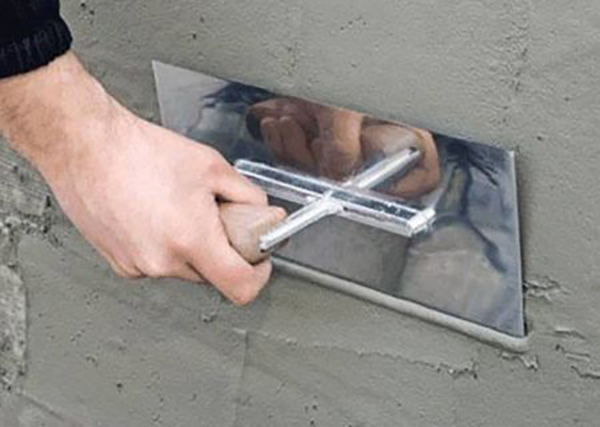
Application of the solution is carried out with any convenient spatula. A rule is used for alignment. The creation of texture is done using a wooden trowel.
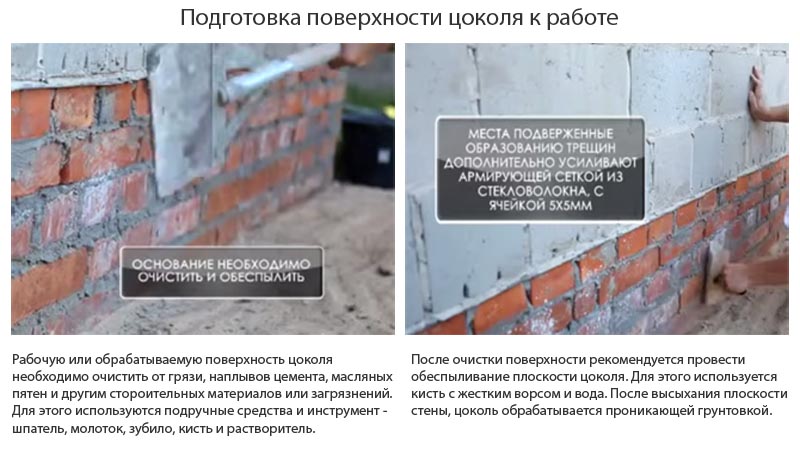
Cleaning and treating the working surface with a penetrating primer solution
Sequentially, the work on covering the base with a plaster composition will be carried out in several stages:

Finishing and imitation of brick or natural stone is carried out at the stage of leveling the composition. So, on a still fresh surface, they go over it as a rule. Next, the seams are unstitched with a small object 1-1.5 cm wide.
After forming the required number of seams, they go over the surface with a rough brush. This will give the necessary texture. The process is repeated over the entire area of the base. Facade paint is used as finishing.
The formation and imitation of masonry is carried out at a similar stage. To do this, the plaster mixture is applied in excess. Next, an arbitrary semicircular or flat shape of the stone is formed from it and the joints are made. As a finishing coat, to give certain shades, you can use exterior paint.
