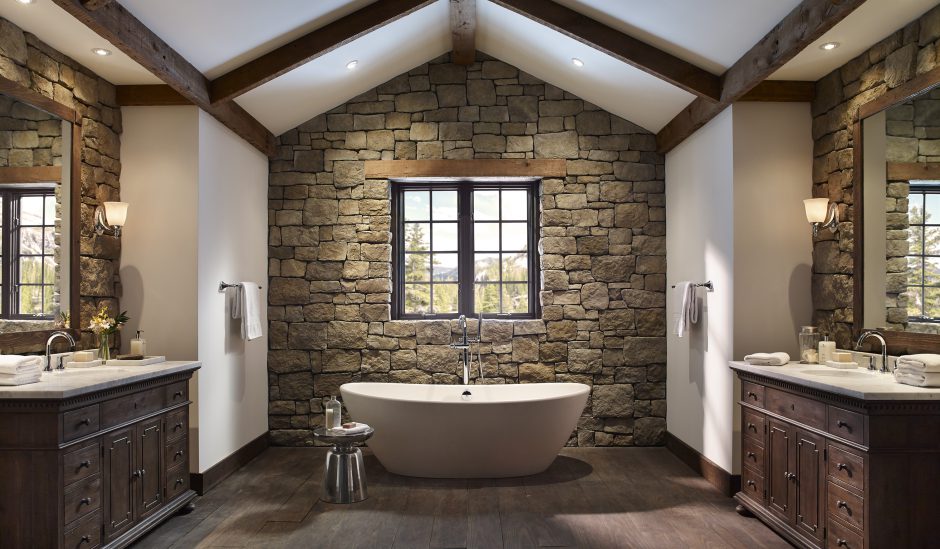
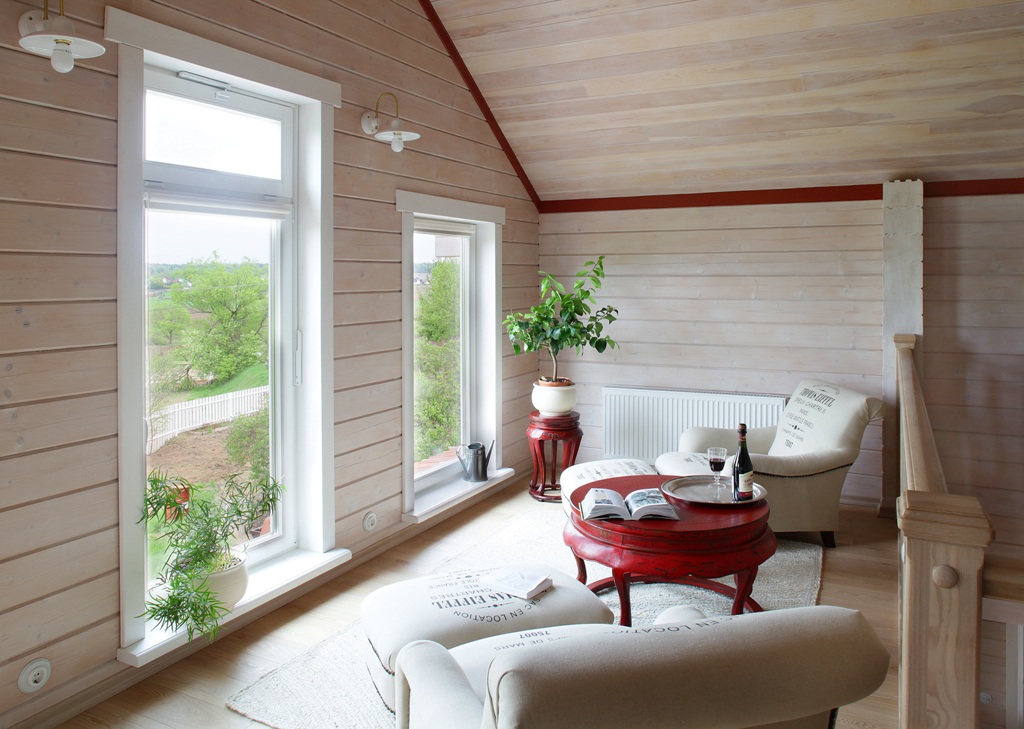
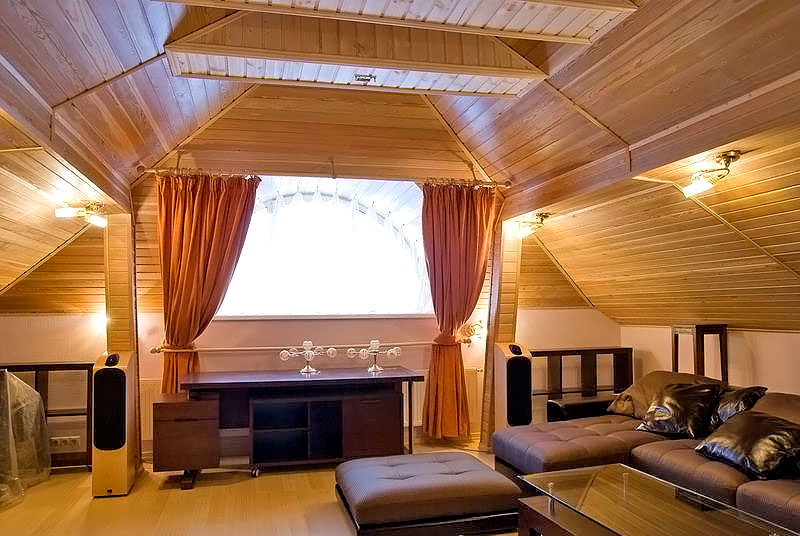
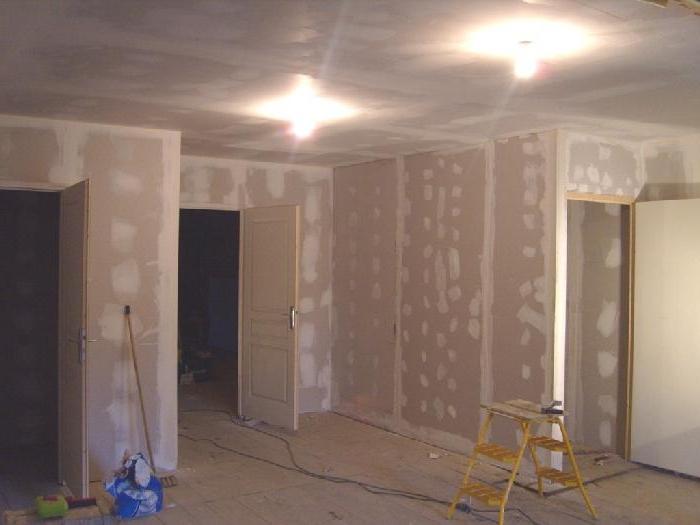
How to sheathe a wooden house from the inside. How to sheathe the walls in the dacha inside inexpensively, to preserve the style and clean ecology in the room.
Decorating any house inside is the final stage of construction or renovation, and how comfortable and beautiful it will be in the house largely depends on it. Finishing wooden house inside will depend on the material of the walls, it can be a bar, a log or.
Although a wooden house has many advantages, it also has a number of disadvantages: it is afraid of fire, high humidity, rodents and insects. Therefore, before starting the decoration inside the house, it is necessary to process the walls and other wooden elements with fire retardants and antiseptics.
Some manufacturers of building materials indicate that a bar or log has already been treated with all impregnations, but for reinsurance, it is better to carry out the processing yourself, especially since this will only further protect the wooden parts.
The choice of material for finishing a wooden house will largely depend on the region in which the house is located, as well as on whether you will live in it permanently or only during a warm period. All this will affect the decision of the question of how to sheathe wooden house inside.
If the house is used only in warm weather, then the walls can not be finished with facing materials, for example, clapboard, but simply varnished or painted, you can also use tinting solutions.
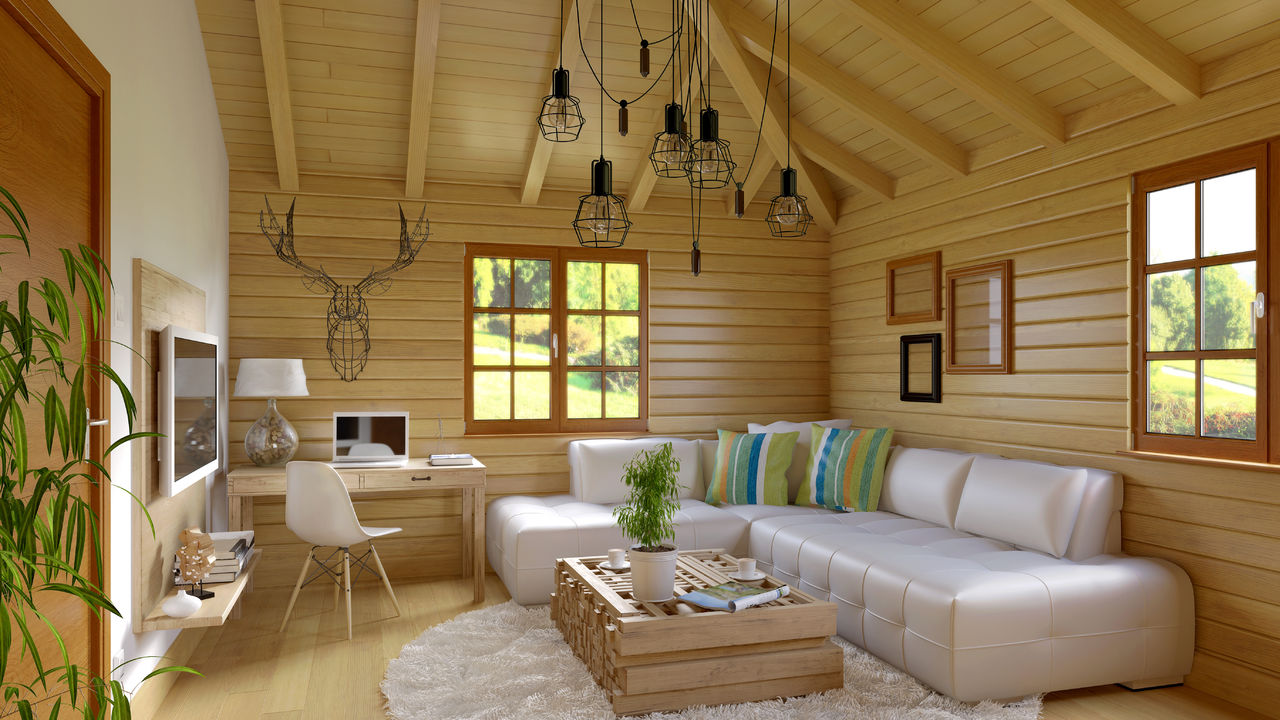
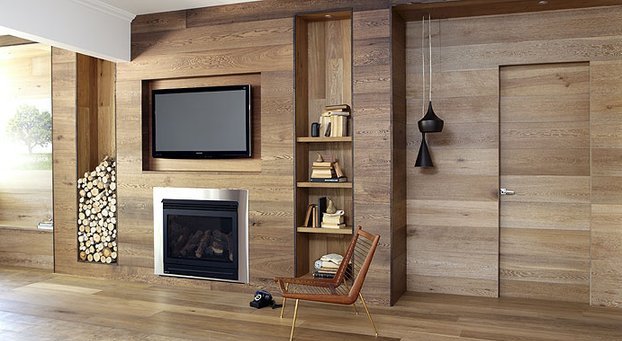
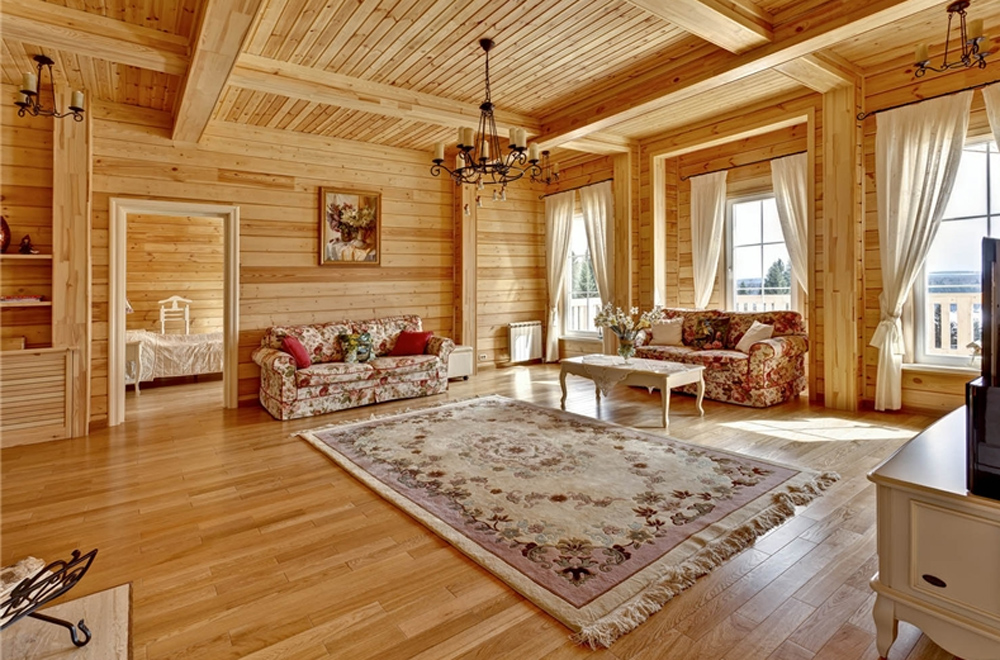
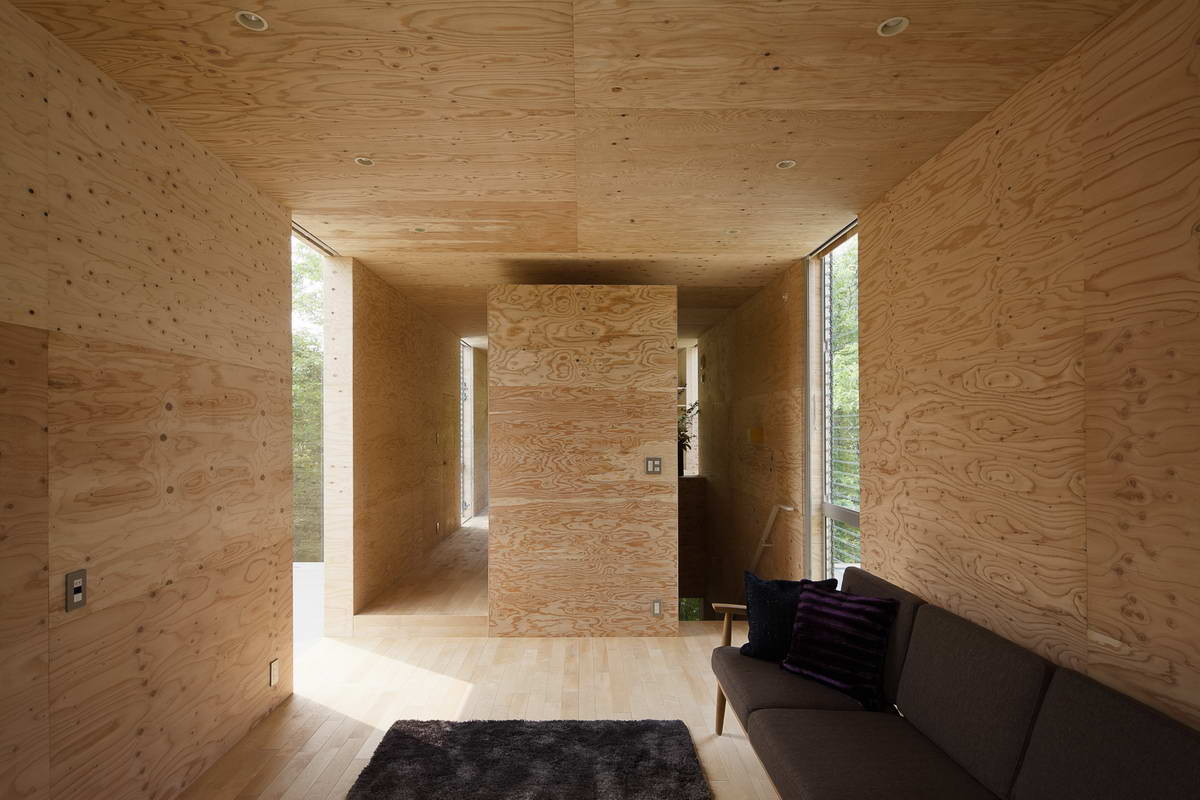
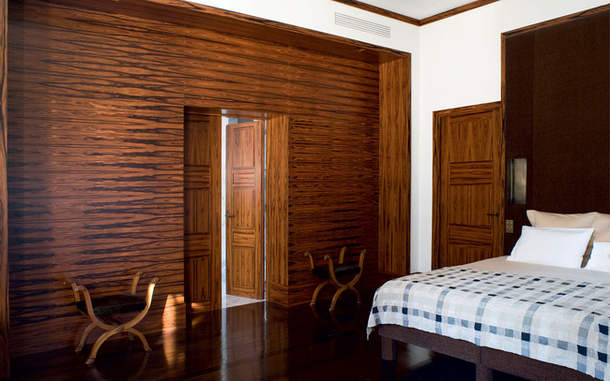
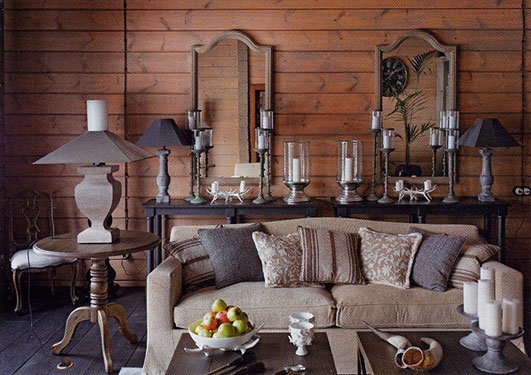
Finishing a timber frame house can be done using decorative plaster, fabrics, leather, tiles and other materials. If you decide to build a wooden one, then most likely you made such a choice deliberately, primarily due to the fact that it is an environmentally friendly material.
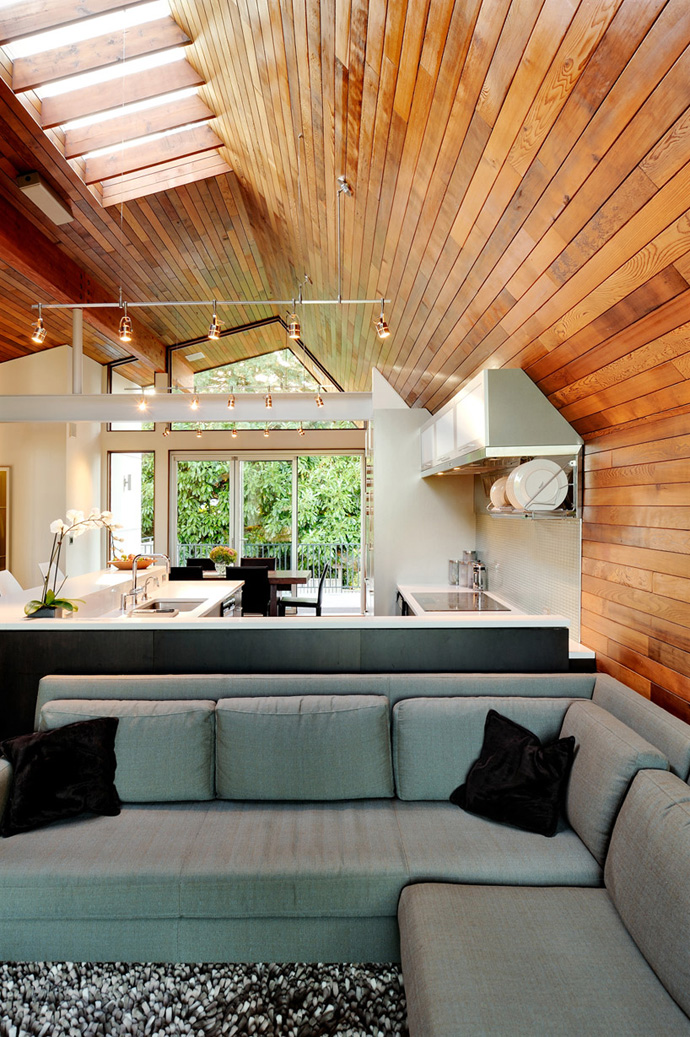
The advantage of a wooden house is that it maintains optimal temperature and humidity, and if you decide to sew up the walls, for example, with plastic clapboard, then you will minimize all the advantages of a wooden house.

In this case, you'd better build a house out of foam concrete or brick. Based on this, it becomes clear that the decoration of a wooden house should be carried out only with natural materials, for example, clapboard or blockhouse. Most experts recommend finishing options in which the material of the house and the finishing material are made from the same wood species.
This is due to the fact that during the operation of a wooden house, factors such as humidity and temperature will affect its structure and finishing materials, so the materials will expand and contract.
If they are made of the same wood species, then their expansion coefficients will be the same. When choosing finishes for certain rooms, one must take into account the characteristics of a particular type of wood.
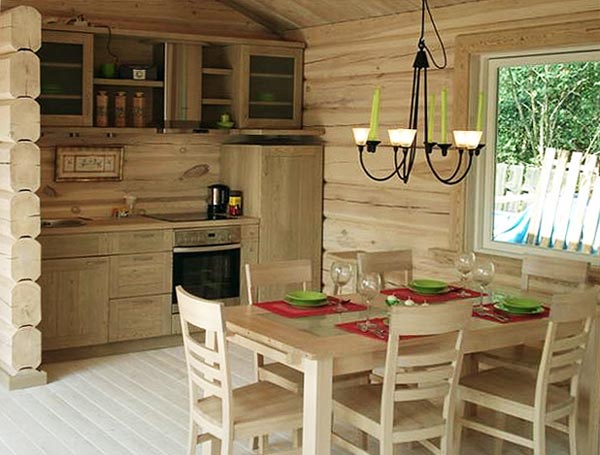
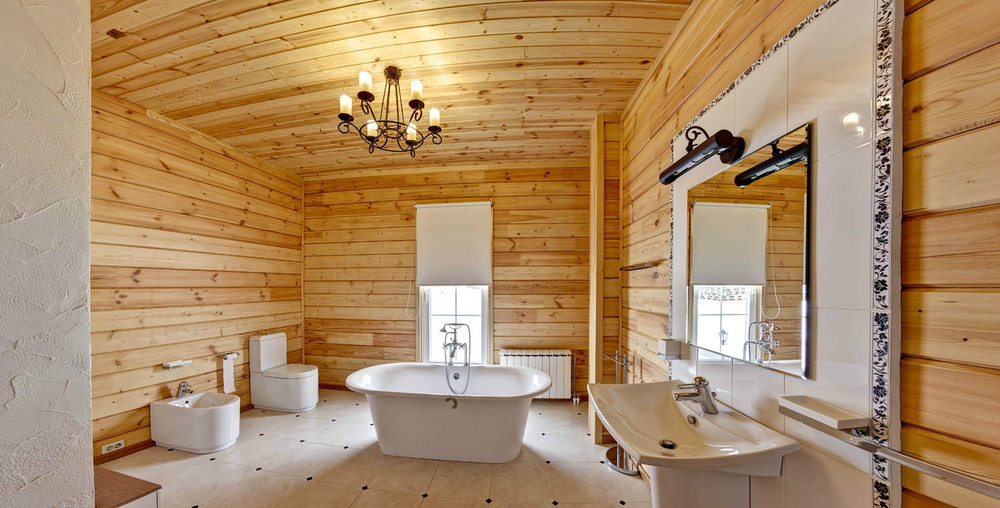
For example, conifers, with strong heating, begin to emit resin, so they cannot be used when decorating a bath, kitchen or bathroom.
If we talk about ash, then it does not tolerate high humidity, therefore, when decorating different rooms of a wooden house, you cannot use the same material, but you must approach it individually.

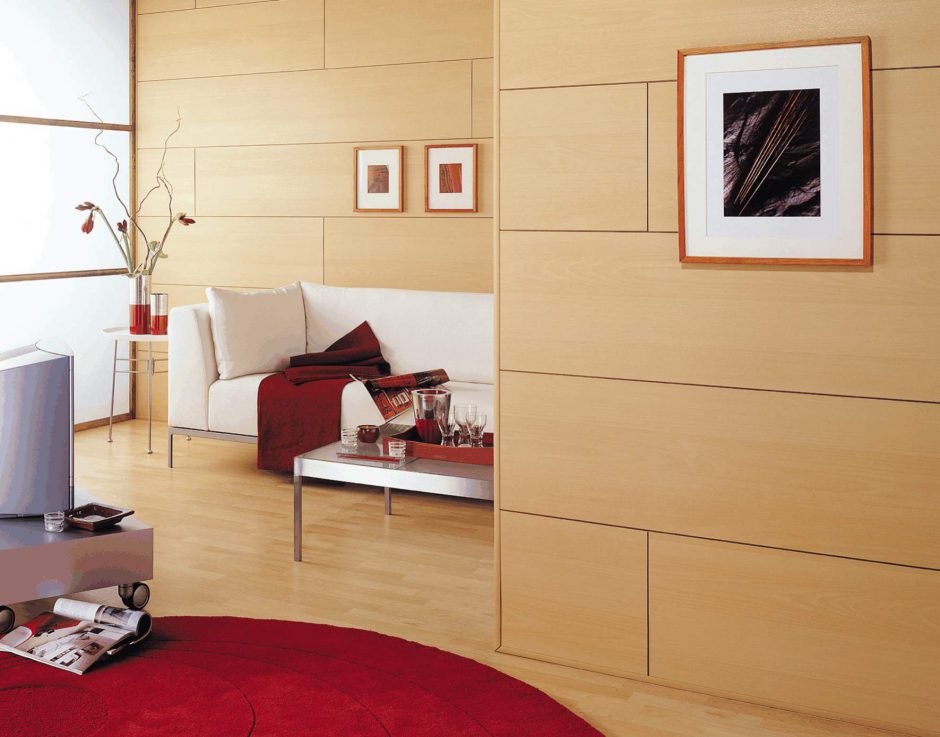
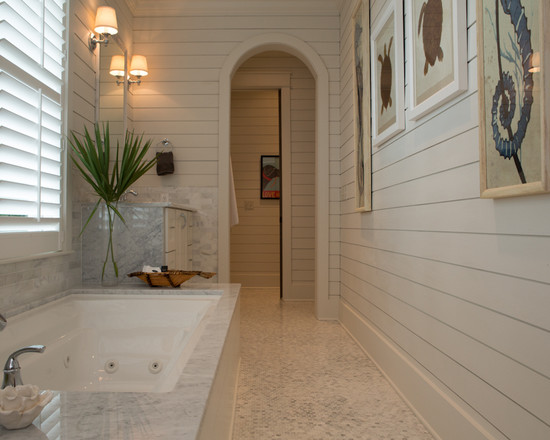
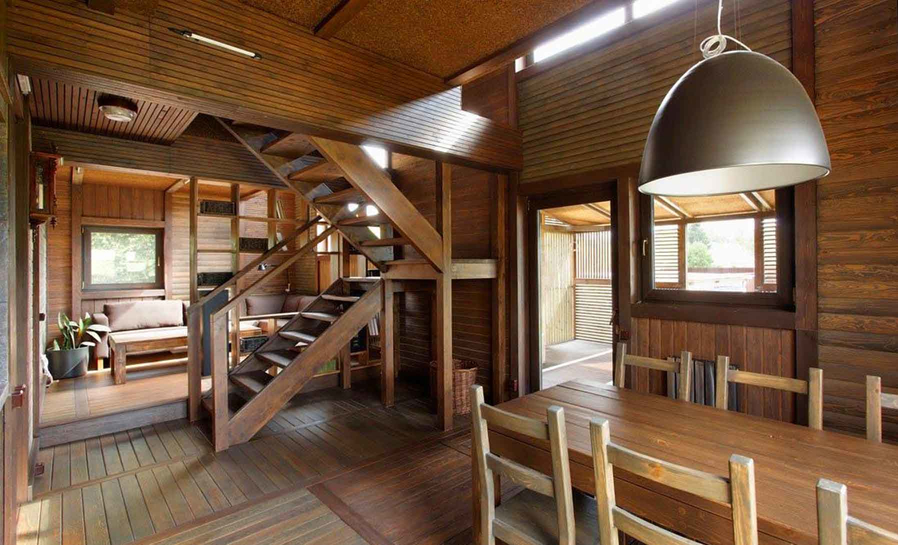
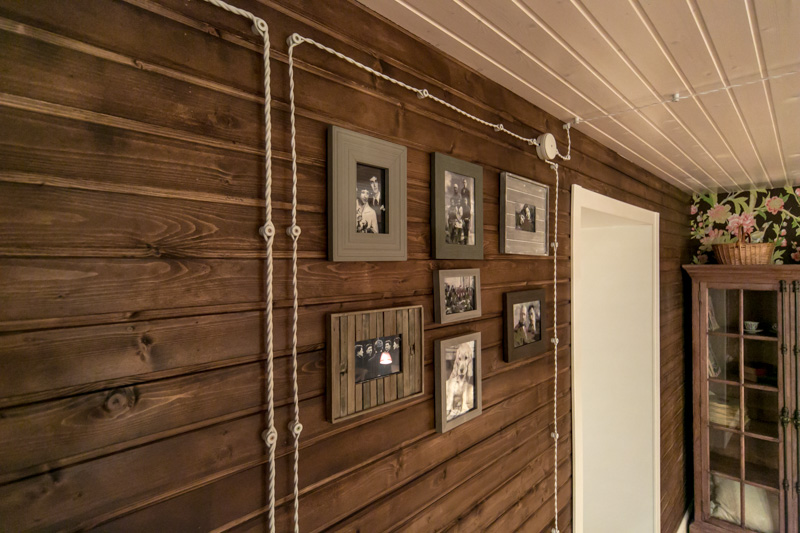
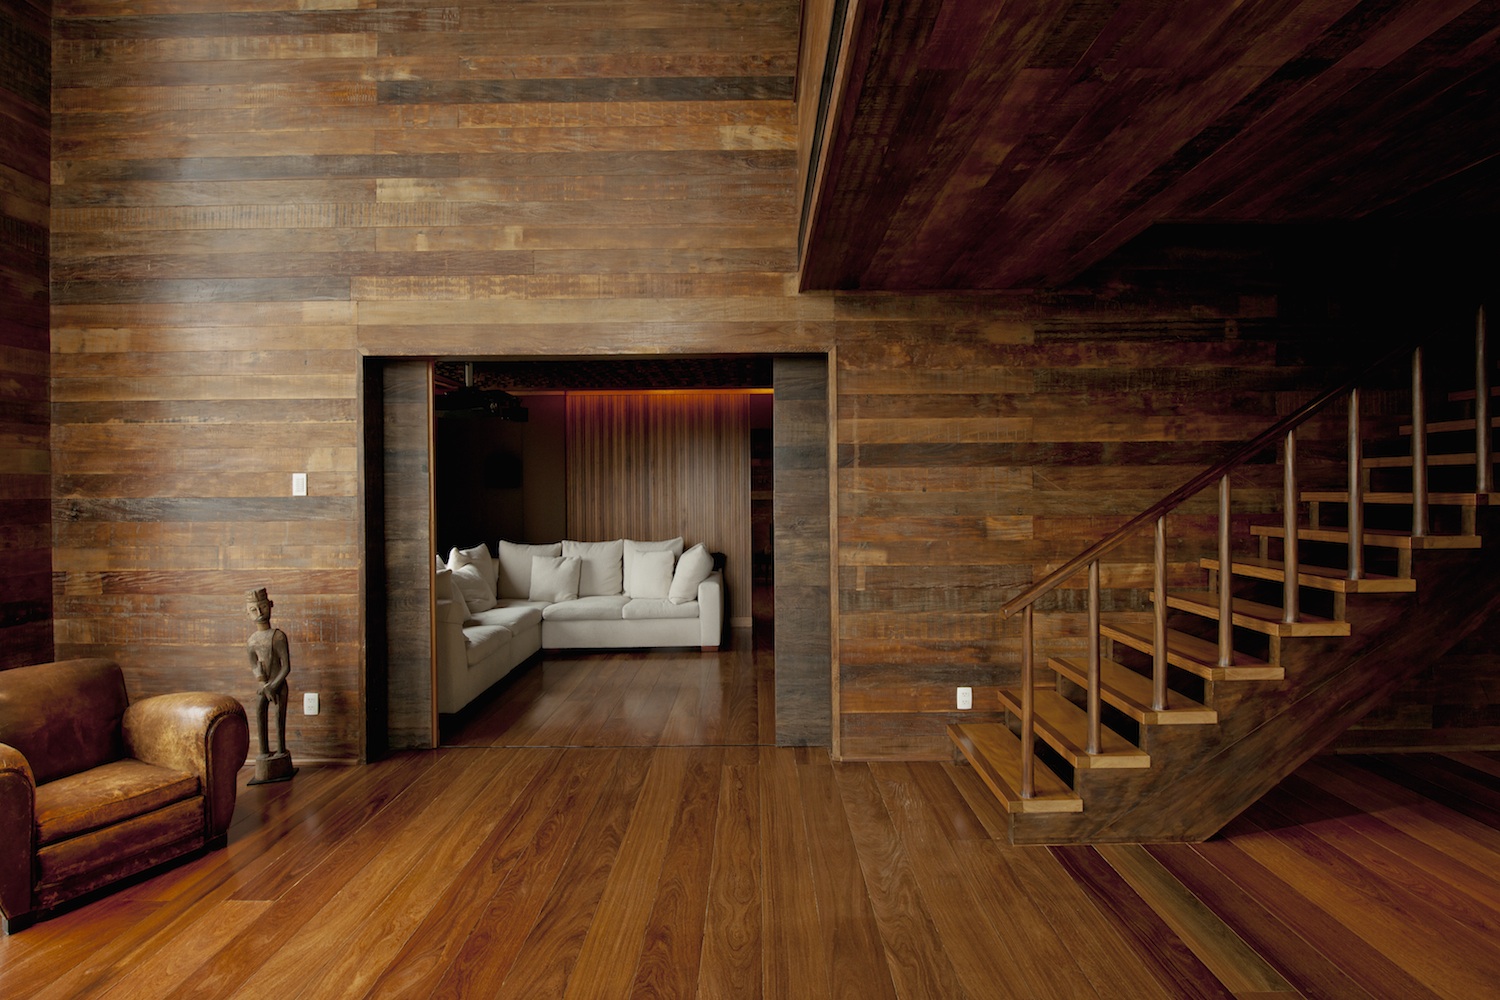
Very often, clapboard is used to decorate an old or new wooden house. The advantages of cladding with wooden clapboard are ease of installation, beautiful appearance and low cost.
You can also hang something on it, since the lining can withstand the load, which cannot be said about drywall.
You can finish with plasterboard, but it must be moisture resistant. Usually this material is used for the construction of partitions to transform the look of an old house or for filing the ceiling.
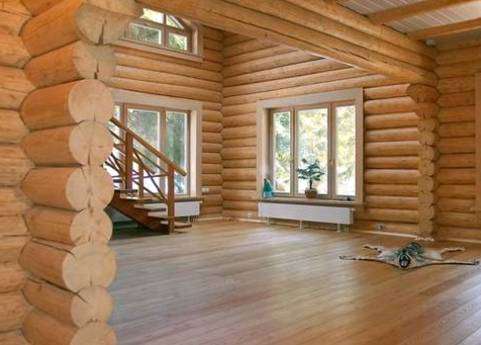
On the one hand, it is flat, and its other side looks like a semicircle, this material is well suited for decorating a wooden house made of logs. If the house is made of timber, then you can arrange it as an imitation of a blockhouse, in this case both sides will be flat.
Using a blockhouse allows you to create an ideal microclimate inside the house, and if you use coniferous wood to decorate the room, this will help prevent respiratory diseases. Using a blockhouse allows you to transform the look of an old house, this material perfectly imitates natural wood.

For interior decoration, lamellas are used, the thickness of which is 20-25 mm, it is not recommended to use a thicker material, since a more powerful crate must be made for it, and you will take a lot of free space in the room.
If you buy lamellas from another batch, then their color may not match, and such a finish will look ugly. In order for the material to acquire room temperature, before its installation, it must lie in the room for at least 2 days.

Using for cladding the walls of the blockhouse allows them to be well ventilated, and all the work can be done by hand.
But besides the advantages, the blockhouse also has a number of disadvantages: it must be periodically cleaned and painted or varnished, dust and cost can accumulate between the lamellas. natural wood high enough.
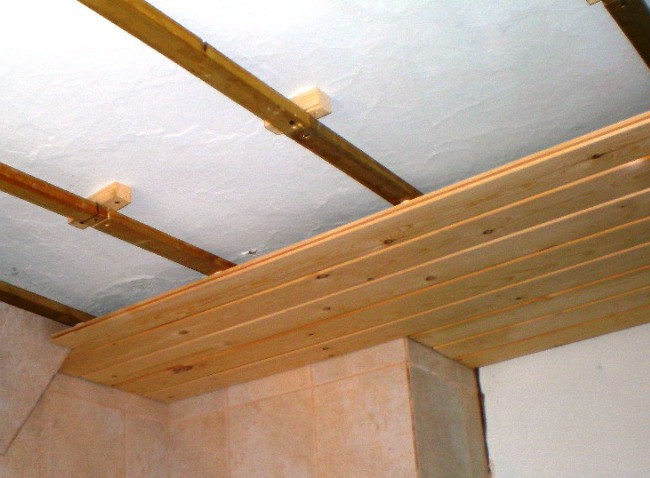
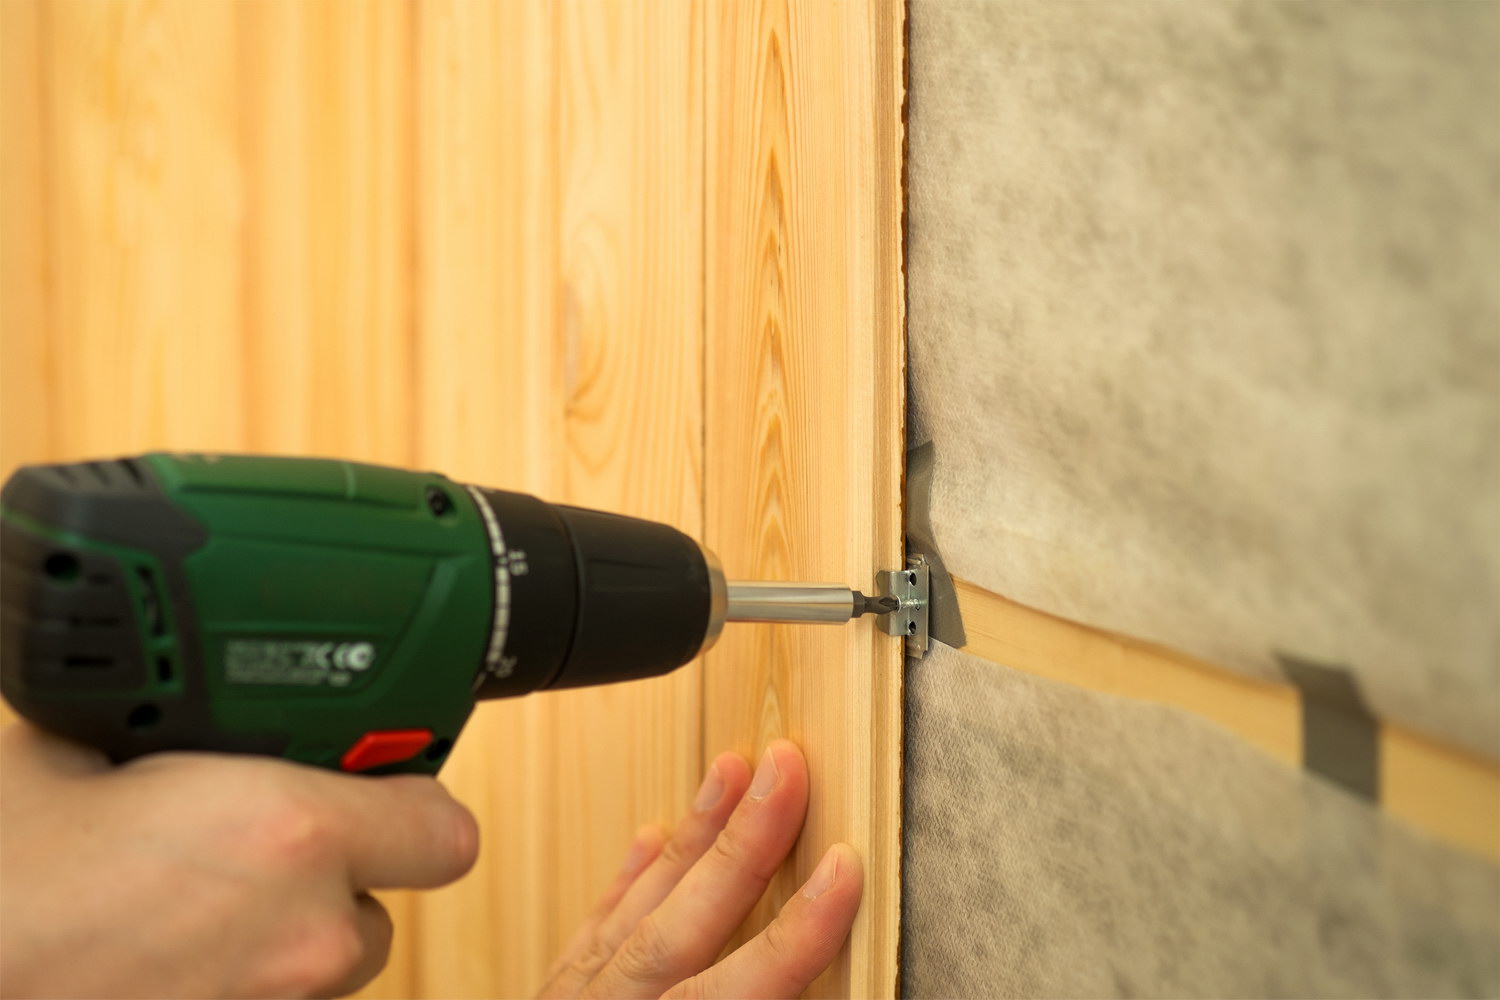
Before installing the blockhouse, it is necessary to make the crate and carry out the processing of the walls. Before that, it is necessary to close up all the cracks in them. A feature of this material is that it can be used indoors, not only for wall decoration, but also for the ceiling.
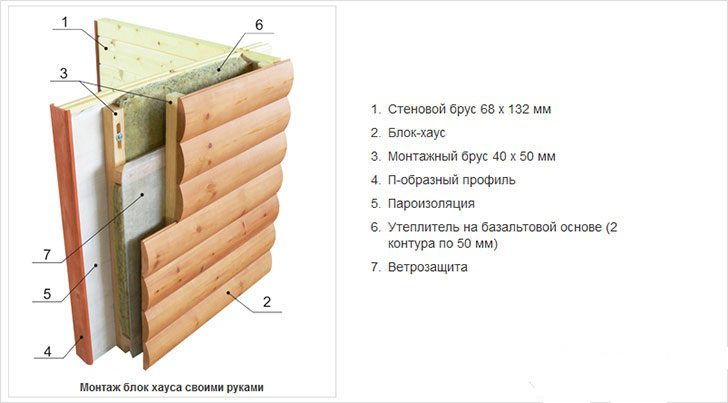
Insulation can be installed between the wall and the blockhouse and thus, you will further improve the heat and sound insulation characteristics of the wooden house.
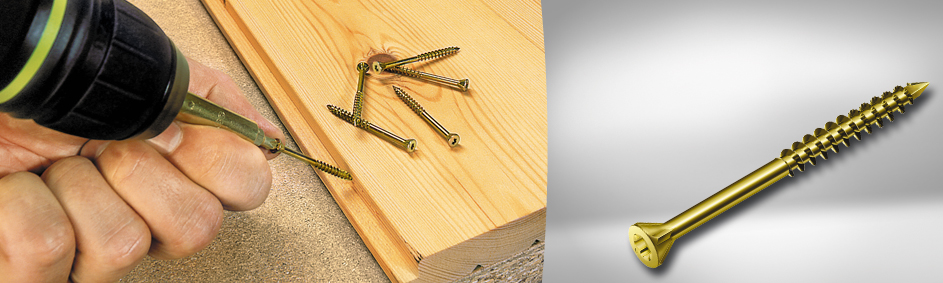
For the frame, a bar is usually taken so that the frame does not deform, it must be dry. The bars are installed vertically in 50 cm increments and the process is controlled with a level.
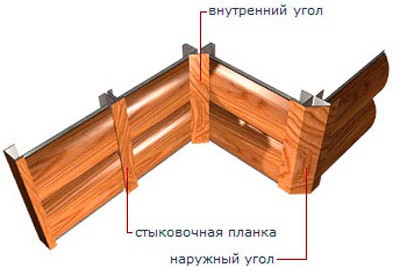
The boards are connected with thorns, which are already on them; special corners are used for finishing the catch.
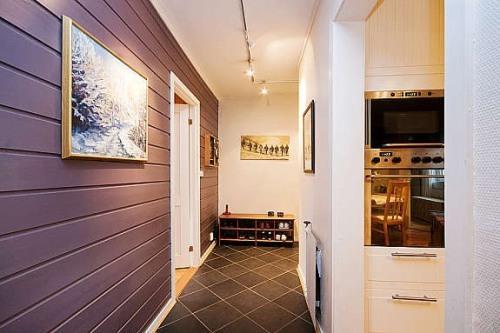
The use of lining
This wall design option is affordable and inexpensive. Modern lining has special fasteners, due to which it is easy to mount, and the connections are strong, the surface is smooth and beautiful.
In ordinary rooms of a wooden house, walls are not covered with plastic clapboard, but it is great for finishing rooms with high humidity, such as a bathroom, kitchen or toilet.
The thickness of the lamellas can be different, if European companies produce strips with a thickness of 13.16.19 mm, then our manufacturers produce boards with a thickness of 12 to 25 mm. The width of the lamellas can also be different: 80, 100, 110mm.
For the manufacture of wooden lining, only well-dried wood with a moisture content of no more than 12% is used, and it is made from different types of wood.
Lining is like this:
- from hardwood such as birch, linden, ash and others. They can be used in any premises, and linden and alder are suitable for a bath;
- softwood lining can be used to decorate living rooms, but it is not suitable for rooms with elevated temperature, as it begins to release resin.
For the manufacture of lining, edged boards are used, since the boards from the core are less durable.
Wood quality:
- extra wood should not have any defects, but some experts believe that such a name was invented simply to inflate the cost of the product;
- class A, in this case, one blind crack or one knot may be found per 1.5 running meters of the board;
- class B allows the presence of 4 knots, two resin pockets on the same section, and there may be contrasting spots;
- class C allows the presence of contrasting spots and stripes, 2 knots up to 25 mm in diameter, resin pockets can be up to 50 mm in size.
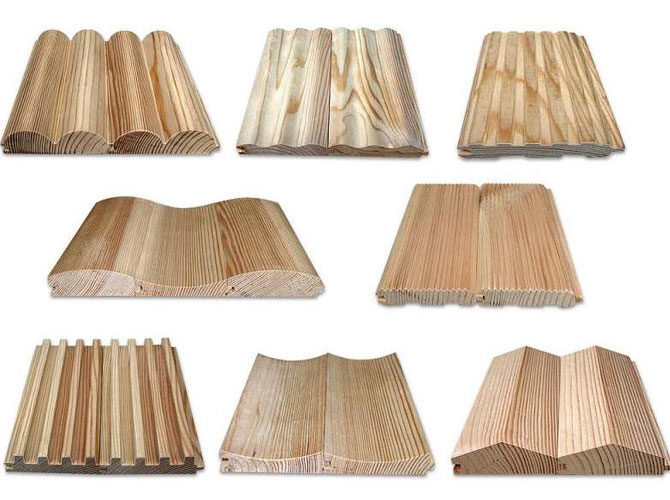
The lining of the standard type has a flat surface, the blockhouse imitates a timber, the softline is similar to the standard, but has rounded contours; the American has different widths at the edges, therefore, after its installation, the effect of an overlap is obtained.
Before facing with clapboard, such preliminary work as demineralization can be performed. This is done when coniferous lining is used. Deresinization is carried out with a special solution or a 25% acetone solution.
It is important that the lamellas must be rinsed with warm water and dried.
The lamellae can be clarified; it is carried out with a solution of ammonia and hydrogen peroxide. May help remove contrasting streaks and blemishes. Opening with varnish can be carried out; for this it is better to use a matt or semi-matt varnish. First, they open it with varnish, dry it, then sand the surface and open it again with a layer of varnish.
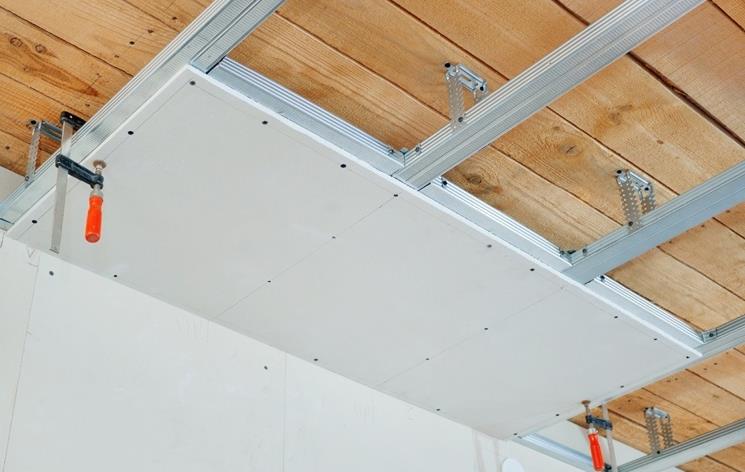
Using drywall
Plasterboard wall covering is usually carried out when it is necessary to hide construction defects or it is necessary to hide communications.
Often the ceiling is trimmed with plasterboard or when it is necessary to make partitions. Wall drywall is used for finishing in a room with normal humidity. For rooms with high humidity, moisture-resistant drywall is used. If the room has an elevated temperature, then cover it with fire-resistant plasterboard.
Installation of this material is also carried out on the crate, it can be either from a bar or from a metal profile, as already mentioned, for facing the walls of a wooden house, such material is practically not used.
Other materials and work with floor and ceiling
To decorate some elements inside a wooden house, for example, to highlight a fireplace, natural or fake diamond... Ceramic tiles can be used in the kitchen, bathroom and toilet.
Plaster and paint can be used to decorate walls, but they are rarely used to cover walls inside a wooden house. If wooden surfaces are painted, then oil paints are rarely used, usually acrylic paints are taken. About the process of external and internal painting.
The walls can be simply opened with varnish, but before that they must be properly prepared, dust, resin residues must be removed and polished. The floor in a wooden house is usually covered with decking or parquet. After its installation, the floor is opened with paraffin and a special varnish. Opening of flooring or parquet with varnish should be carried out at intervals of 2 years.
When decorating the ceiling, so that it does not deform when the house shrinks, the best solution is a tension structure.
What type of finish is the safest and most environmentally friendly? Doesn't emit toxic residues when burning?
Wood materials will always be present in the construction of new homes. This is due to the fact that such houses have an incredibly comfortable and cozy atmosphere. Decorating such a room inside is a rather complex topic, in which there are many nuances that require special attention. Wood is a special material that has many individual properties that must be considered.
At what point can finishing work begin
If you have a fresh blockhouse, just finished, then you will need to give the right time for it to shrink. In the case when glued laminated timber was used for construction, it will take from three to four weeks for its shrinkage. In other cases, the shrinkage of wooden structures requires a much longer period, which is calculated individually. Basically, the time allotted for shrinkage depends on the time construction works as well as on climatic conditions.
In less than a year, the interior decoration of the building does not begin. At the moment of shrinkage, the timber is actively dried, and also crumpled, laid between wooden beams, insulation. Therefore, if you carry out finishing work from the inside, there is a risk that after the final shrinkage, all materials will fall off, or they will be greatly distorted.
In this case, you will have to redo all the work again, so do not rush. It will be better to wait so as not to spend extra money on repeated repairs in the future. As a rule, complete shrinkage occurs in two stages. The first does not last so long, namely a few weeks, after which you will need to additionally lay all the cracks formed with the help of a heater. The second stage of shrinkage at home lasts much longer and can take up to eight months. After that, you should also plug up all the gaps formed with the help of insulation materials.
Each time you fill up the gaps that have formed, new house, it is necessary to raise it by 5-7 cm in order to lay the insulation inside and outside, after which, under the weight of the timber, the insulation is again crushed. At this point, it is worth considering very carefully, since the amount of heat present in the room depends on this. 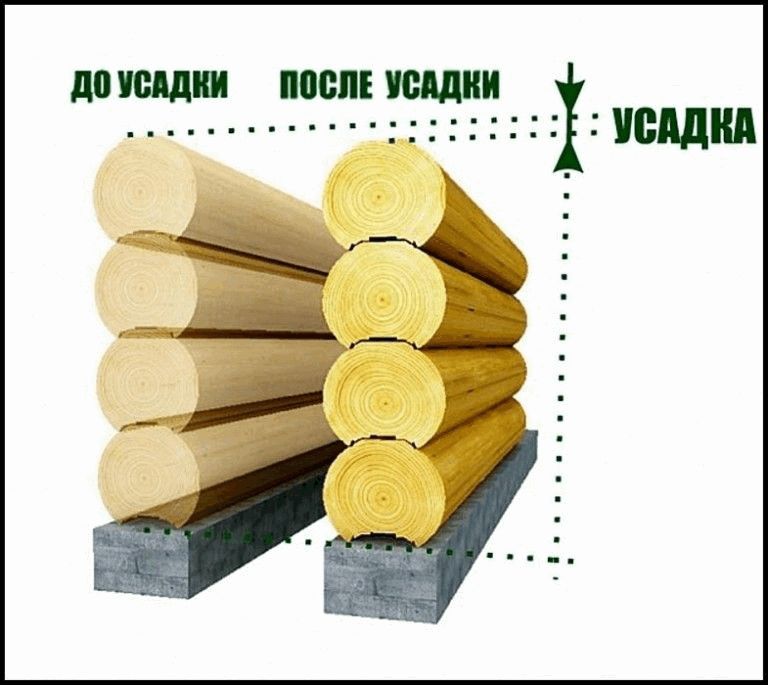
Finishing begins after the second stage of shrinking the house. To determine its end, you will need to regularly take appropriate measurements. So, if there are no significant changes for a couple of months, then you can start finishing work from the inside and outside of the building.
Finishing work options
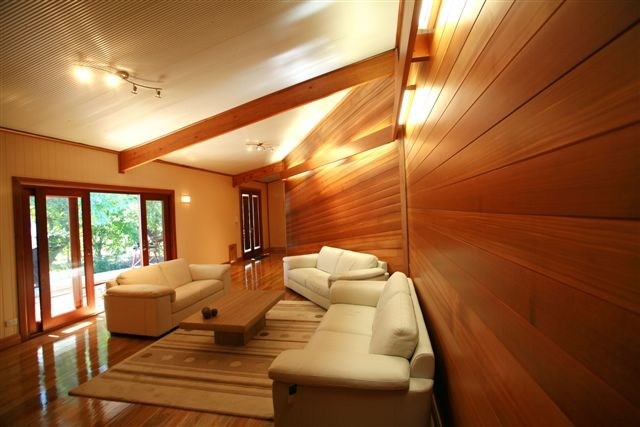
As a rule, an erected log house is not finished from the outside, since outwardly a house made of timber looks attractive. In this case, it will be better for you to save money on the purchase of external finishing materials, and spend them on the purchase of better quality finishes inside the house. In this case, it is advisable to varnish all floors in the room. Walls and ceilings are best covered with water-based paint. This way, you will not paint over the texture of the wood flooring, but it will create an attractive shade. Also, it is advisable to close up all the seams with a special twisted cord, which will serve as good protection against through wind and blowing. 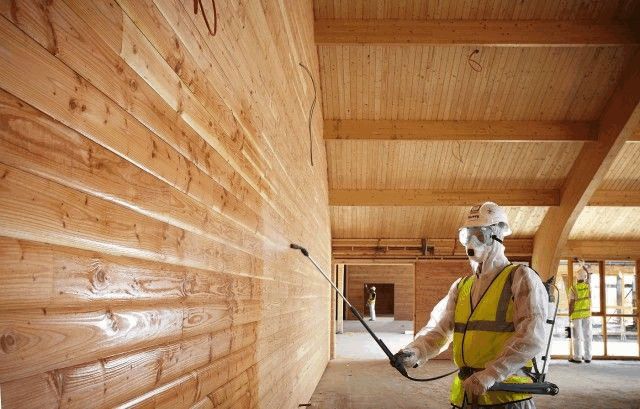
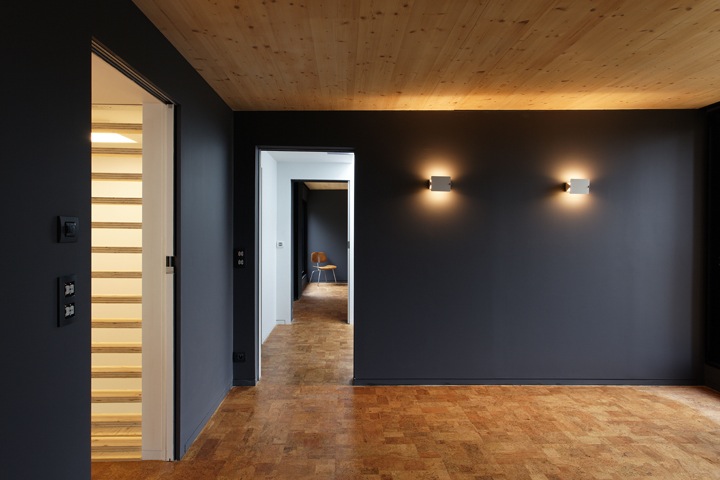
How to sheathe the walls of a wooden house
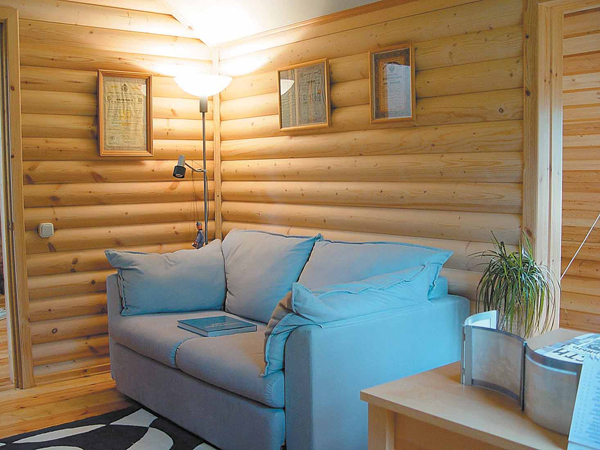
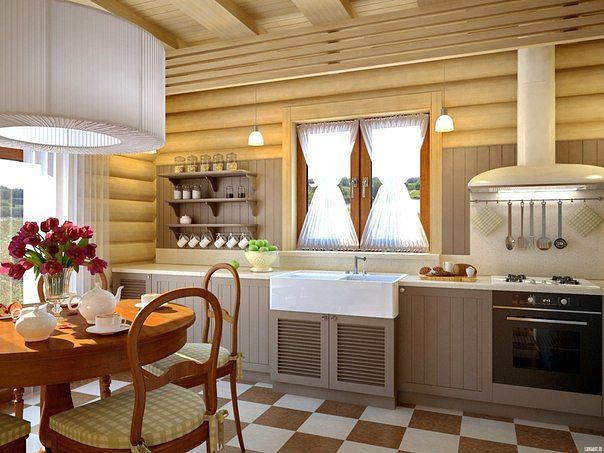
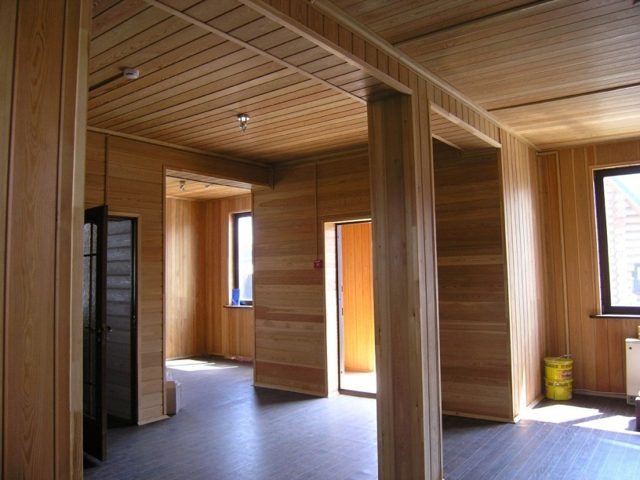
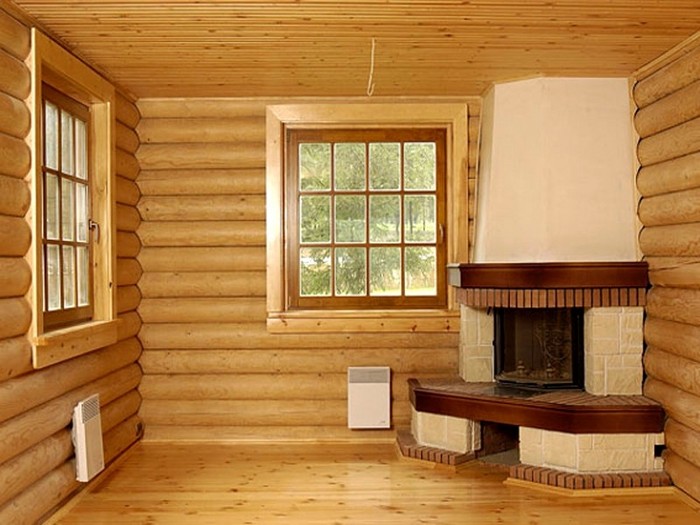
For new log cabins, it is not necessary to use additional facing materials, it is enough just to sand and cover the walls with varnish or paint, depending on your wishes. As for old houses made of timber, grinding will not help here, so you will have to cover the walls additional materials... For a wooden blockhouse, interior decoration can be done using lining. Thus, a pleasant and comfortable atmosphere will remain in the room, and the building will continue to breathe. 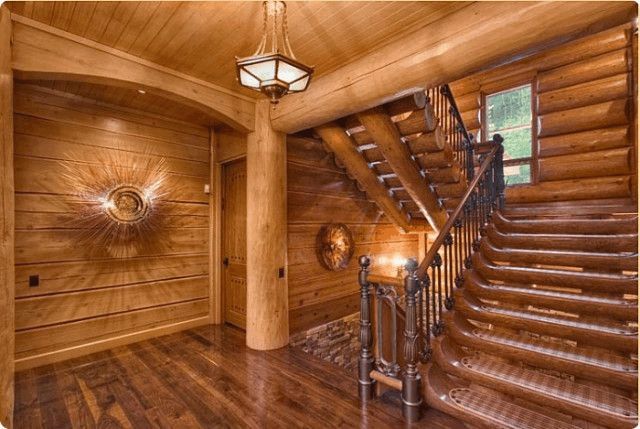
In addition, for finishing work, you can use various materials, including drywall sheets. It is only worth noting that wooden houses must breathe so that there are no places of rotting or the formation of fungus. Therefore, the decoration of such a room begins with the installation of a special lathing. Thus, you can not only level the walls, but also leave a small space for free air circulation. For a house made of wood, this is a very important point. It is worth noting that in such a free space, you can carry out all the necessary communications. However, first, they will have to be reliably protected from any kind of ignition, since the house is wooden, it can flare up in a matter of minutes. 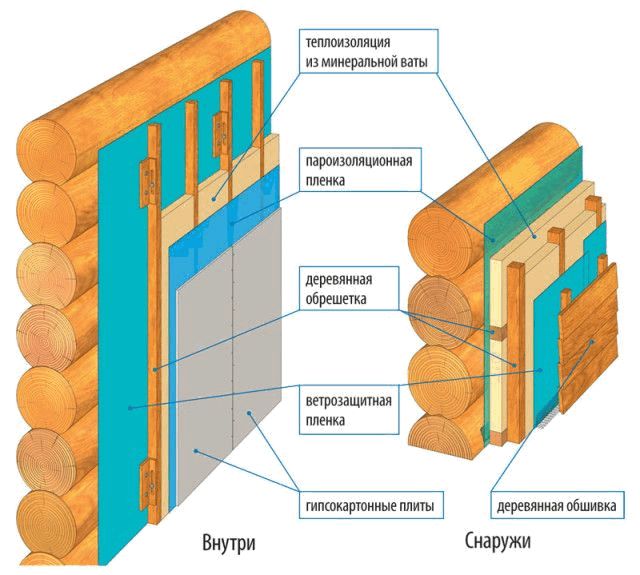
Decorating wooden rooms is not always to your taste, since a small space is retained behind it, as a result of which any insects or animals can settle there, which will be very difficult to get rid of. In this case, it would be better to level the surface of the walls so that the interior decoration is sewn directly onto the wall itself and fits snugly against it.
Using lining for indoor finishing work
This material occupies a leading place if we take into account all the options for materials for interior decoration. In addition, lining is often used for outdoor work, while the impregnating composition only changes. 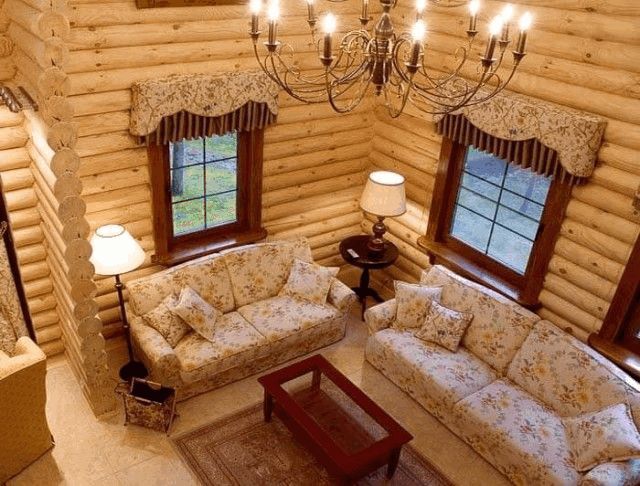
There are many profiles that not only mimic the structure of the wood species, but also have significant differences in size and coverage. For indoor work, material is used no thicker than 2 cm. Such products are not so expensive, but at the same time they perform all the necessary functions. You can position the planks horizontally, vertically or at any angle. It all depends on your imagination and wishes. As you remember, the blockhouse can continue to sit down. The tree can swell under the influence of water, so the finish at the bottom does not fit tightly, it is advisable to leave a couple of centimeters. With the help of lining, you can cover the walls and ceiling, preserving the original atmosphere in the old log house and updating the appearance of the room. Next, it is worth considering how to mount such material. 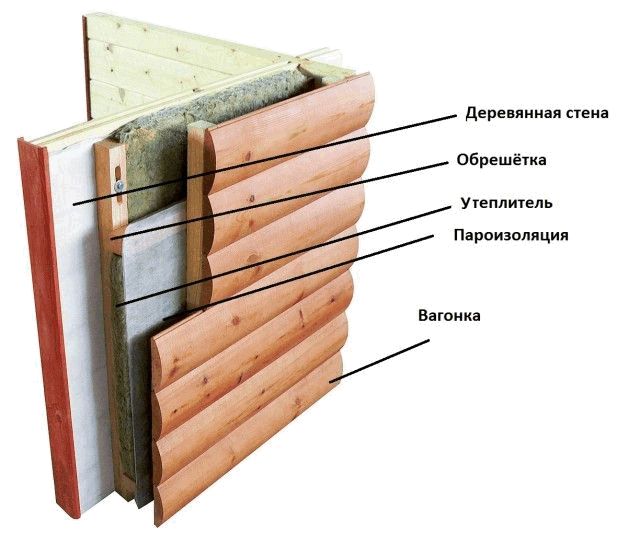
To securely fix the lining on the wall or ceiling, you can use two types of fasteners, namely:
- Self-tapping screws or nails, in either case, the strips are securely fixed to the surface.
- Installation of strips by means of cleats.
Both mounting options are similar, however, when finishing work, you use material made of wood, which tends to dry out, so over time you will have to nail or screw the finishing material again. This procedure can be avoided, but for this you will need to purchase a more expensive type of lining, which has special impregnations. 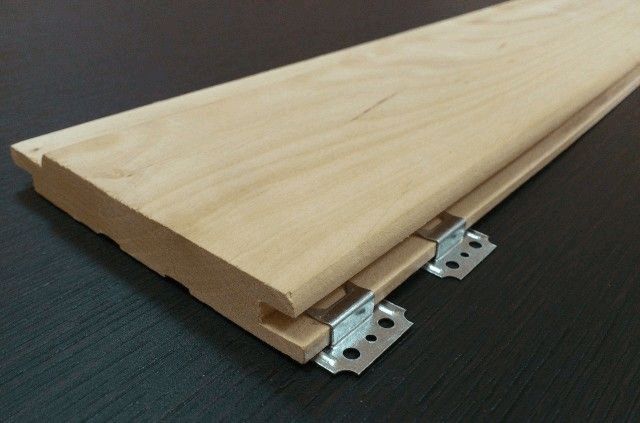 At the end, it is worth paying attention to some materials that can be used for finishing work in wooden frame, namely:
- Wood, the most popular and the best way finishing materials for a log house.
- Bamboo fits perfectly into the atmosphere of wood structures, filling it with oriental thoughts.
- MDF. V recent times, finishing materials from such material are becoming more and more popular due to their low cost.
- Glass. In this case, glass is used with an additional, most often mirror coating.
- Plastic. This option finishing material not so popular for interior work in a wooden room, as the comfortable atmosphere is disturbed.
Wooden houses are very popular today. They are distinguished by their originality.
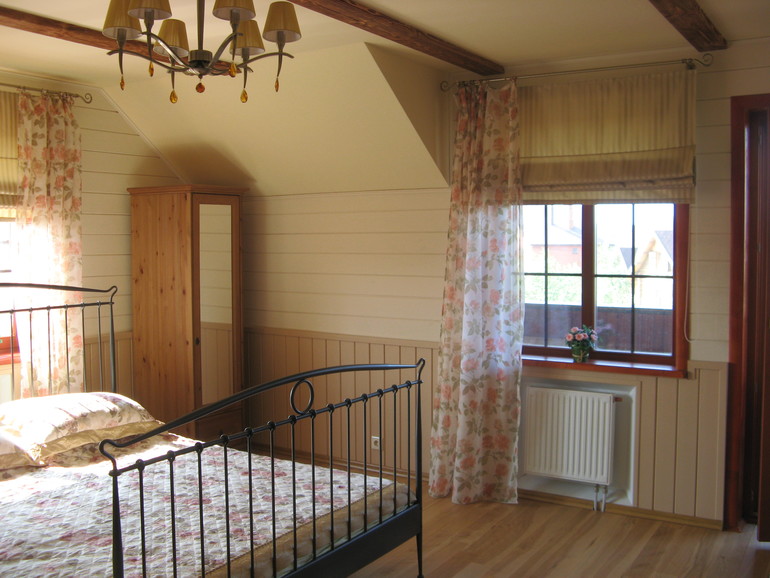
Also, buildings of this type are environmentally friendly. If the house is used throughout the year, then it is imperative to make finishing, which can be internal and external.
Before deciding how to decorate a wooden house inside, you need to get acquainted with the finishing materials in more detail.
How to choose a finishing material
Most often carried out by a wooden structure. How to decorate a wooden house inside?
Today there is a large selection of finishing materials that are very practical and durable, easy to use.
This could be:
- Plastic.
- Wooden lining.
- Siding.
- Drywall.
- Decorative rock.
- Block house.
Plastic in the decoration of a wooden house
To the question: how to decorate a wooden house inside? - many answer that there is no more practical and neat plastic. The price for it is quite affordable.
Typically, plastic in a wooden house is used in the kitchen area or bathroom.
Plastic has excellent technical characteristics:
- It is moisture resistant and practical. Its surface is not capable of absorbing a variety of dirt.
It is also very easy to clean without the use of abrasives that can damage it. A common damp cloth is suitable for cleaning. - Also, plastic is easy to install. You can do it yourself.
Plastic decoration of a wooden house can be done completely in all rooms, or only certain areas can be decorated.
Advice. The plastic will look very interesting in the working area of the large living room. It can be applied not only on the surface of the walls, but also on the ceiling. In this case, it will be more rational to define the interior design initially.
To mount the plastic, you will need the following tools and material:
- Metal profiles.
- Self-tapping screws.
- Screwdriver.
- Dowel.
- Perforator.
- Plastic in sheets or in the form of a lining.
- External and external plastic corners.
Installation of plastic panels:
- plastic is carried out on a special frame, then initially you need to start making it. For this, a crate is constructed from wooden planks and bars.
The width of its cells is not less than 30-50 cm. This will allow more firmly fixing such a finishing material on the frame.
Advice. The timber frame is assembled directly onto the wall surface. This will save time.
It will also not be very convenient to attach the whole structure or its individual elements to the wall.
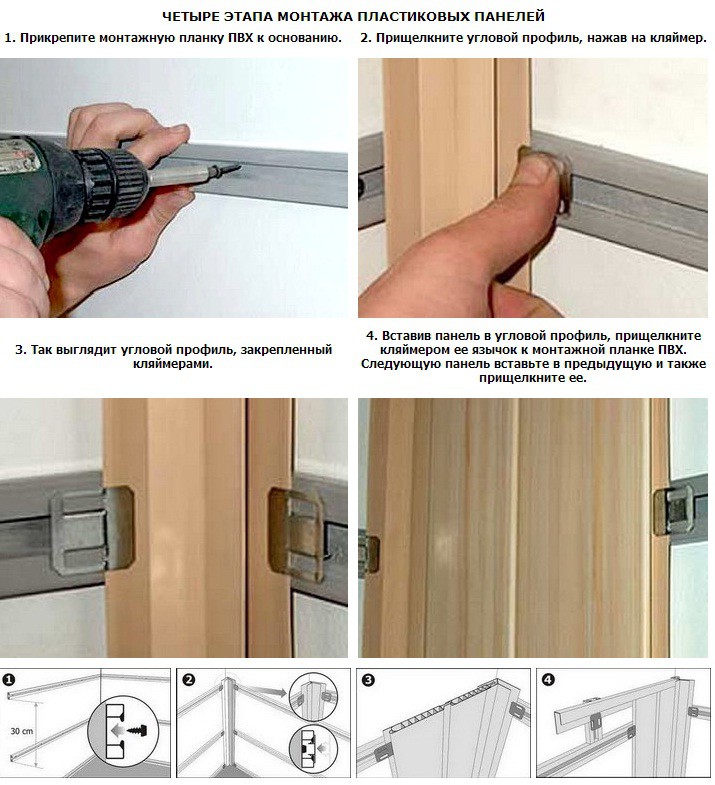
- Before giving preference to plastic in the decoration of a wooden house, it will be necessary to take into account the fact that the use of this material can conceal space. All this happens for the reason that the frame on the wall surface has a certain height.
As a rule, its minimum is 4-5 cm. It is for this reason that it is not recommended to use plastic in small rooms. - The lathing or frame is attached to the wall with a perforator and dowels. Although plastic itself is considered a light finishing material, it will still be necessary to provide the frame with greater reliability and strength.
- As soon as the crate is ready, the plastic is installed. Initially, a starter strip is mounted on the side or top of the frame surface.
She will set the right direction for all finishing materials. It is attached to a tree using a construction stapler or self-tapping screws.
Advice. Best for attaching the starting strip to wooden frame use a stapler. It will not take up much space on the inner surface and will be invisible.
- Plastic is inserted into the starting strip, which has special locks at the end. All joints can be treated with a sealant for greater structural strength, and such actions will also prevent moisture from penetrating into the interior of the room.
- All corners, both external and internal, must be decorated with plastic. Such elements on the surface of the finishing material itself are fastened with a construction stapler.
Advice. So that the staples from the stapler are not visible, they can be covered with putty, which has a similar color to the plastic clapboard. And in order not to carry out such actions, it is best to opt for liquid nails.
This tool is applied to the surface of the corner and the finishing material itself... You need to be extremely careful so that the excess composition does not come to the surface.
Works of this type can be carried out only after the premises are completely finished with plastic. They will be the final stage of finishing work.
Wooden lining in the decoration of the premises of a house made of wood
How to decorate the inside? Of course, it would be more logical to use a natural finishing material - wooden lining.
It is practical and has the same technical characteristics as itself construction material for building a house.
See a photo with an example of such a design of a wooden house from the inside. The choice of this finishing material will add integrity and harmony to the room.
But, it is still worth considering the moment that the tree absorbs moisture very well. It is for this reason that it is not recommended to use it for finishing bathrooms or rooms with high air humidity.
Finishing features:
- To prevent condensation from collecting under the surface of the wooden lining, it will be necessary to carry out not only insulation, but also insulation work. All this will only have a positive effect on the condition of the wooden structure and will significantly increase its service life.
- Foam or polyurethane foam is very often used as insulating materials. Minvata is also very popular, only in wooden houses it must be covered with a layer of other insulating material.
For example, the same foam with a small thickness. Thus, it will last longer, because over time it loses its properties. - The quality and quantity of finishing and insulation works of a wooden house will largely depend on the building material itself. On the surface of a rounded beam, such work is more difficult to carry out than on the surface of a glued one.
All this happens for the reason that the first has a convex surface and before proceeding with the finishing, caulking is performed (filling up the cracks that form as a result of laying wood).
In order to carry out the installation of wooden lining you will need:
- Wooden planks and small blocks.
- Screwdriver.
- Perforator.
- Self-tapping screws for wood.
- Sealant.
- Jigsaw or saw.
Mounting:
- Initially, the area to be finished is determined. It can be a whole room, or it can only be the lower part of the walls.
Wooden planks are attached to the wall surface along a defined perimeter at a specified height. If the entire room is finished with wooden clapboard, then the strips should be mounted both at the bottom and at the top.
- A wooden lining is already being assembled on these planks. It is fastened with self-tapping screws. At the end she has special locks, which help to hold together all the elements of the finishing material.
In principle, the whole process of work is very much like finishing a room with plastic clapboard. The video shows an example of such finishing work.
Advice.
If the surface of the wooden lining is not covered with paint and varnish, then it will need to be coated after the installation is completed. This will give the integrity of the structure and you can use a variety of matting agents to give a different shade to the wood.
Decorative stone in the decoration of wooden walls
This material has become popular relatively recently. It looks very interesting on the surface. wooden walls.
Decorative stone can add zest to the entire interior, since in its appearance it practically does not differ from natural stone.
Material Features:
- Decorative stone is moisture resistant and practical.
- Finishing with its use will be durable.
- It is attached only to a flat surface. It is for this reason that in houses made of rounded beams, it is quite rare to find it in the design of a room, which cannot be said about houses made of glued beams or even logs.
- The process of leveling surfaces in such a structure does not take much time and plaster can be applied.
Advice. Decorative stone is glued with special glue or cement mortar. It is better to add PVA glue to the cement mortar, which will only increase the viscosity.
Installation instructions as such decorative stone does not exist. It is necessary to adhere to certain rules that are also suitable for fixing ceramic tiles.
Before deciding what to decorate the walls inside a wooden house, you need to consult with experts in this field and evaluate specifications all modern finishing materials.
Only then can the right choice be made.
Wood, as a building material, will never go out of our everyday life, the atmosphere in such houses is too good and cozy. The exterior of the felled building is no less magnificent.
Today it is not difficult to give it both a modern and a fabulous look. There are many different technologies for this. But how to sheathe the walls in a wooden house? Their unusual structure probably requires a special approach, because you can't just glue the wallpaper here? Indeed, without preliminary preparation it will not work, and it is worth talking about this in more detail.
Criterias of choice
The choice of finishing material for interior work in a wooden house will depend on the region in which the object is located and how it is planned to be used. If you plan to spend only summer outside the city, then it is quite possible that you would prefer to simply paint, treat with a tinting solution or varnish the wall surfaces, without particularly bothering with their leveling and other fixing work.
The walls of a wooden house, treated with varnish
For year-round living, such solutions may not be entirely adequate. The need to create an interior style, where the appearance of the walls plays an important role, cannot be disregarded. In many cases, their surface should be perfectly flat, which is achieved with decorative cladding.
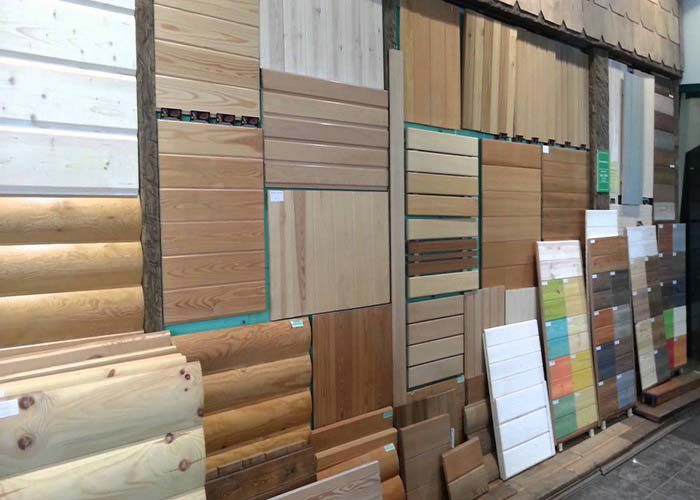
Types of finishing materials
“Ash has proven itself well, which is practically not afraid of high humidity, so that products from it can be used in rooms of any functionality, without restrictions, but coniferous lamellas will release resin when heated, which means that such material in the kitchen is finished it is better not to apply "
What can be used to sheathe walls in a wooden house today? Designers actively use:
1. Wooden lining.
2. Various panels.
3. Block house.
4. Drywall.
5. Decorative stone.
6. Plastic.
If you focus on wood derivatives, then be sure to consider the quality of the wood from which they are made. Ash has proven itself well, which is practically not afraid of high humidity, so that products from it can be used in rooms of any functionality, without restrictions, but coniferous lamellas will release resin when heated, which means that in the kitchen such a material in decoration is better do not apply.
Wall cladding in a wooden house with ash
Walls often carry a weight bearing. Furniture and decor items are attached to them. This should also be taken into account when choosing a material, since it must have an appropriate margin of safety for the implementation of such design delights. To find out how suitable a particular material is for interior decoration, you can get acquainted with its characteristics.
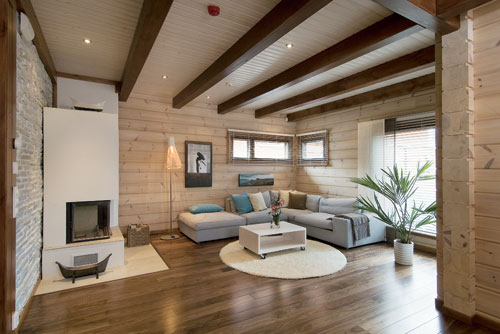
Wooden lining
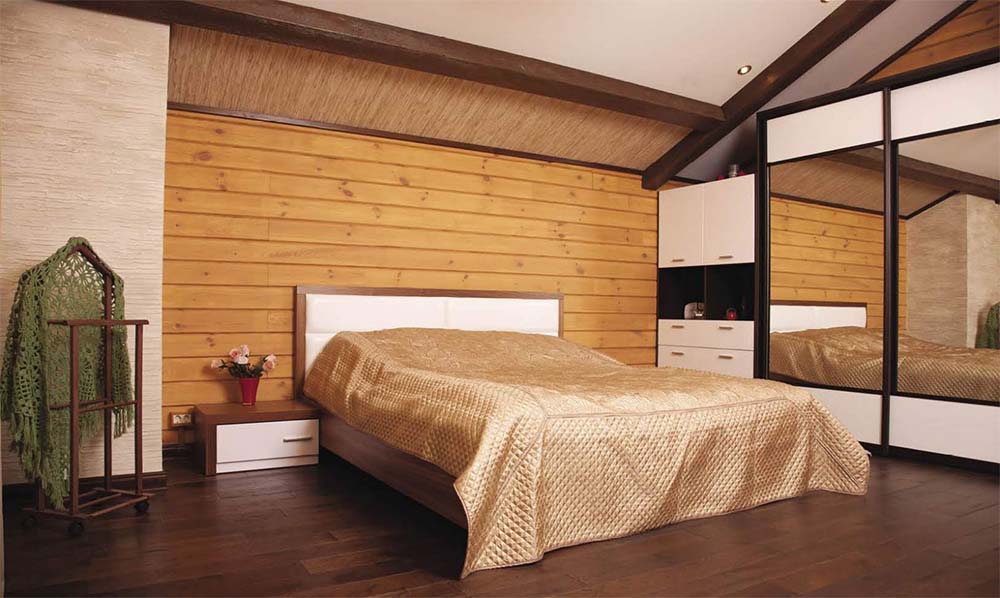
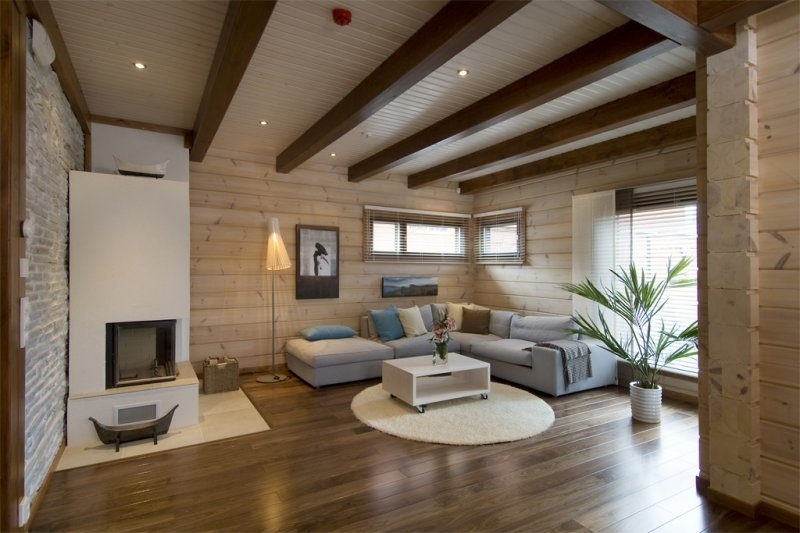
Wood is an easily processed material. It is easy to cut, plan, grind it. The material is characterized by a wide palette of shades and a variety of texture patterns. Wood is an excellent sound absorber and heat insulator. Correct fastening of the skin will allow it to operate for many years.
Wall cladding in a wooden house with eurolining
The energy of the tree is also pleasant. In a room with such a decor, there is no place for depression and despondency. The atmosphere in it always stimulates an increase in mood.
At its core, the lining is an ordinary board with special fastening grooves, which allows the elements to be tightly fitted to each other when sheathing the wall.
The lining has excellent thermal insulation properties
Looking through the product range, look for models designed for interior use. They will also be available in different profiles and sizes. Their surface can be either raw or perfectly smooth, which also facilitates the designer's task when working on creating an interior style.
Types of lining for wall cladding
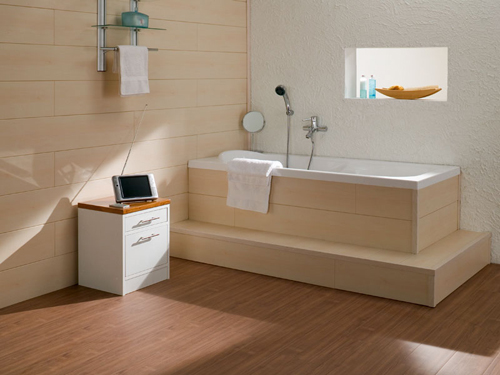
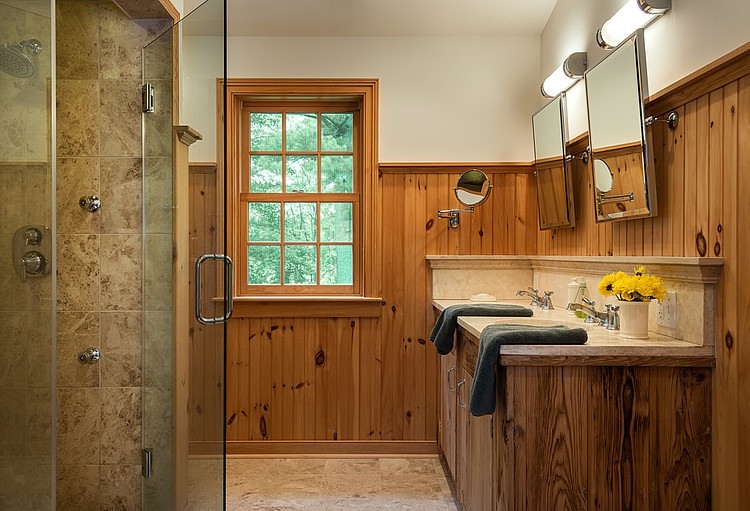
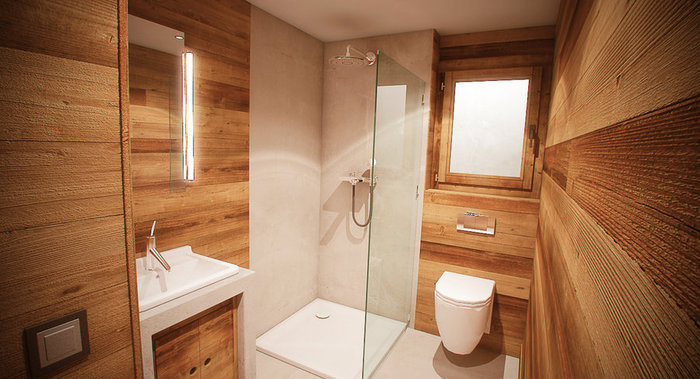
Getting acquainted with the characteristics, pay attention to the type of wood that went into the manufacture of the lining you liked. This item is required if you are not choosing a casing for well-ventilated and dry rooms. For the bathroom, it is better to choose not derivatives of conifers, but options from linden, oak, alder.
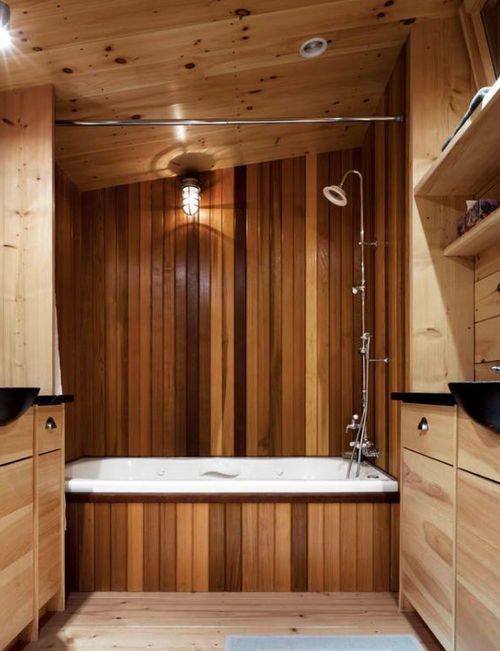
Bathroom cladding with softwood clapboard
Wood paneling is extremely popular. It can be found in almost every home and this stereotyped finishing material often stops lovers of individuality. But still, this fact does not detract from the merits of the lining, because it:
- practical;
- universal;
- environmentally friendly;
- presented in a wide range of species and quality;
- exudes a great aroma.
The lining for wall cladding is versatile and environmentally friendly
The cladding is mounted on frame structure assembled from metal profiles or wooden bars. This is the easiest way to hide unevenness in the bearing surface. Lamellas are fastened to the crate with clamps or in the old fashioned way - with screws and nails.
Wall cladding in a wooden house with clapboard
When choosing a mounting method, consider this nuance. If you purchased a lining that has not passed the chamber drying, then the lamellas will gradually lose moisture, that is, dry out, which means that gaps will certainly appear between them. It is impossible to avoid the process, so you will have to:
1. Accept what is happening.
2. Correct the situation.
Sometimes you have to adjust the cladding several times, so before you nail the lining tightly, think about how you will remove it if necessary. Self-tapping screws can be the best solution in this case. It will be easy to unscrew them during reconstruction.
Fastening the lining with self-tapping screws will allow you to further disassemble the sheathing
You can purchase profiles, during the assembly of which, the cracks from drying remain almost invisible. It can be Softline or Standard.
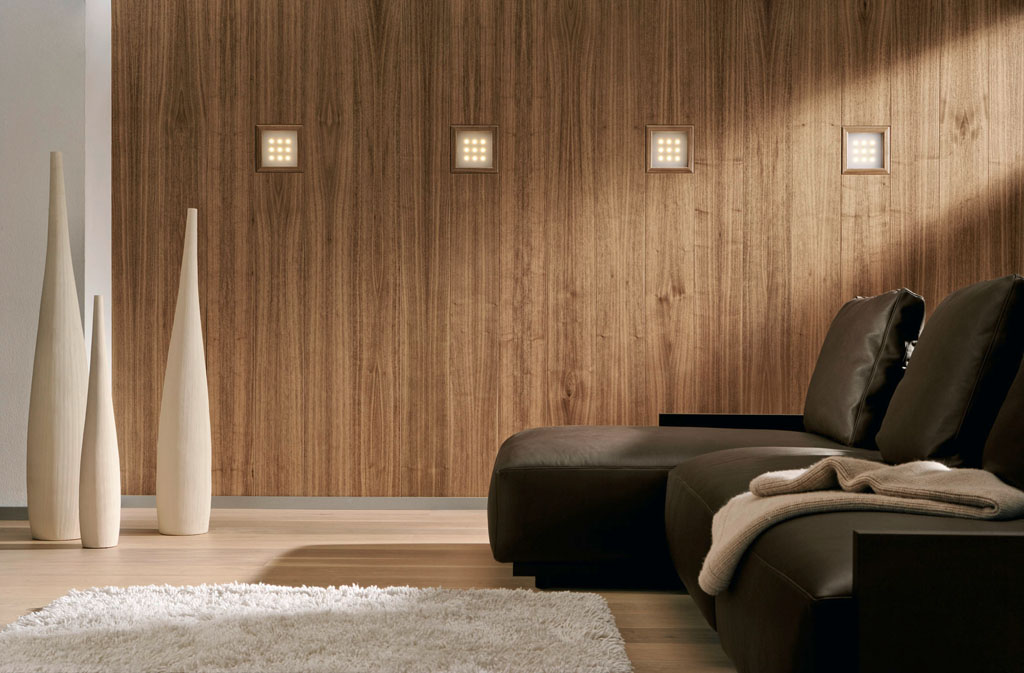
Euro lining
Outwardly, this cladding material is associated with ordinary clapboard, but in terms of its characteristics it is many times superior to it. In the first place comes such a weighty argument as German quality. The lamellas of the Euro lining are well ventilated and have an additional furrow that serves as a moisture removal system. This increases not only the service life of the cladding itself, but also of the wooden wall hiding under it. The Euro-analogue will not have problems with surface deformation associated with swelling, which makes it the No. 1 material for finishing bathrooms.

Wall cladding with eurolining is absolutely not subject to deformation
The surface of the lamellas is perfectly flat and tactilely pleasant. Products are initially treated with protective compounds, which eliminates the need to do this before assembly, as when working with clapboard of a regular class. The beauty of the woody structure and the uniqueness of its design does not suffer from such procedures.
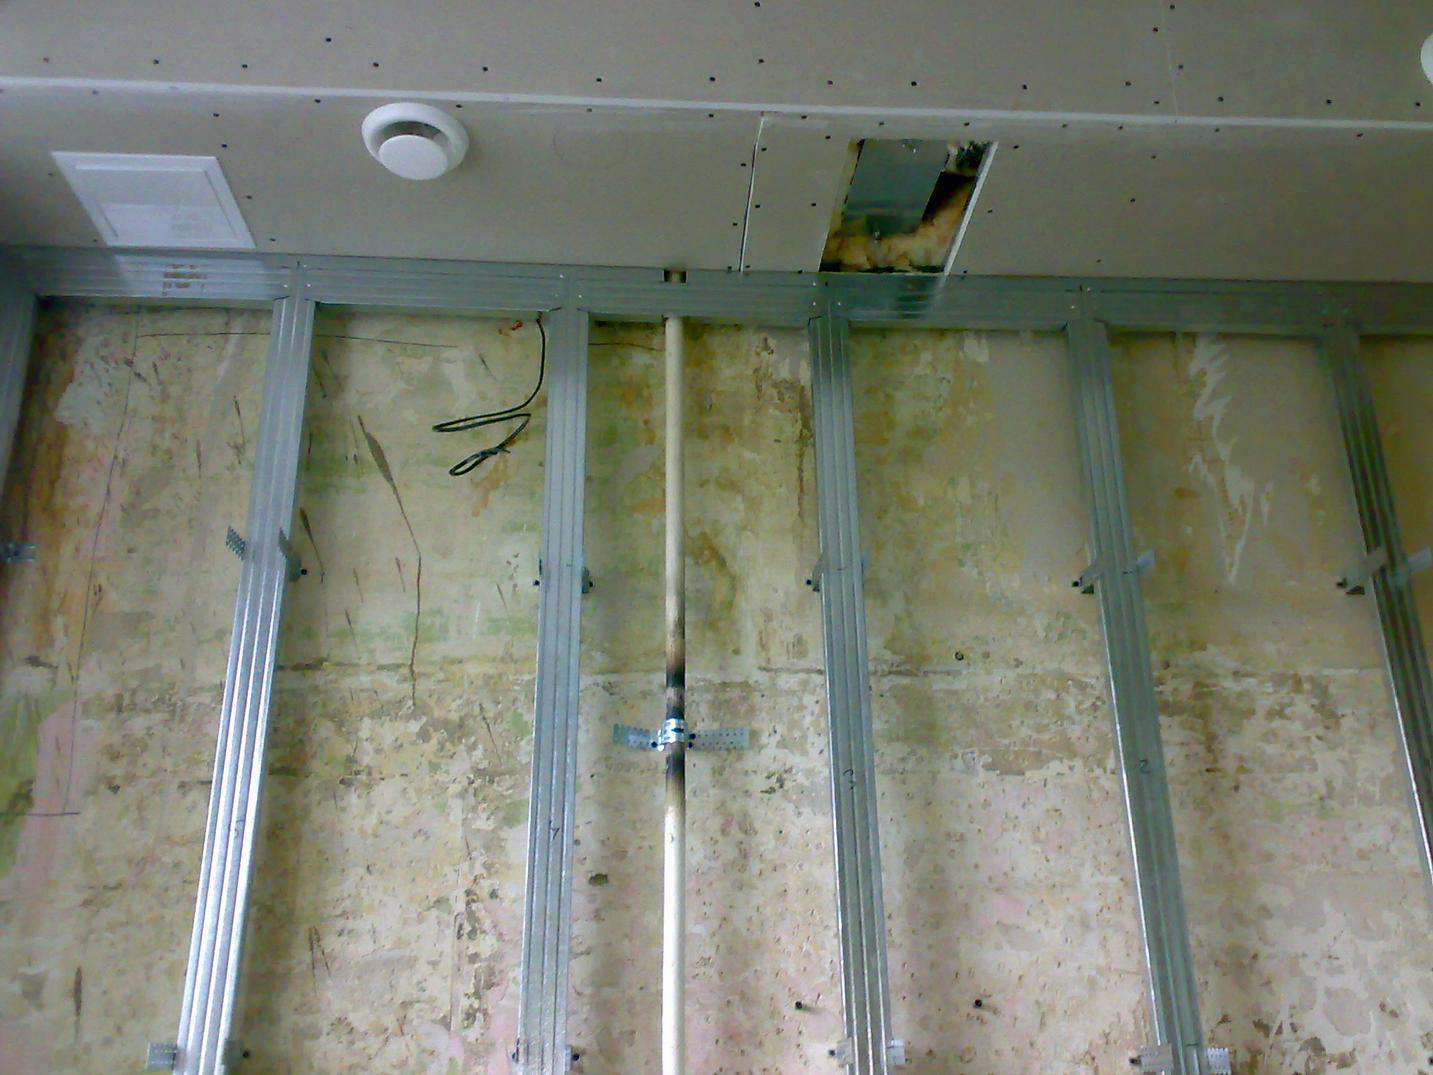
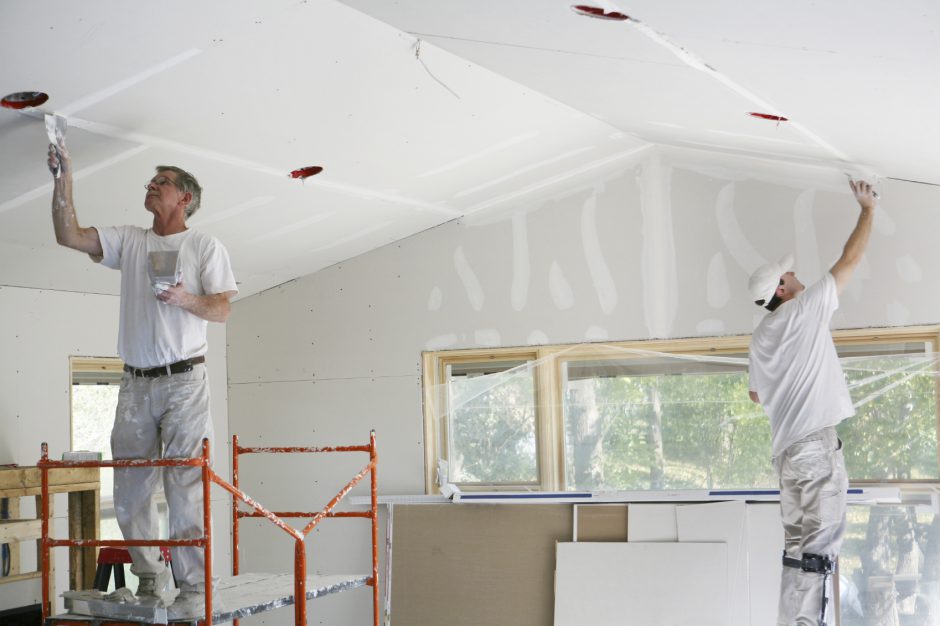
Plasterboard sheathing
Decorating the walls with plasterboard will help to hide construction defects and hide communications. Behind its sheets there is a place for insulation, and they themselves are good heat and sound insulators. The material is able to regulate the microclimate of rooms by absorbing and releasing moisture.

Plasterboard sheathing maintains the indoor climate
Its constructional qualities are incredibly attractive. The drywall sheet can be bent, which allows you to attach walls and corner joints arbitrary shape... If you decide to sheathe the walls in a wooden house with plasterboard, then at the same time protect them from damage by rodents. The secret is that during production, the sheets are impregnated with some chemical compositions that scares away the living creatures.
Plasterboard sheathing will protect the house from rodents
The material is presented in a variety of varieties.
In rooms with normal humidity, they work with plasterboard. In damp rooms, a moisture-resistant type is used, and in places with an elevated temperature and a risk of fire, drywall with a fireproof coating is used.
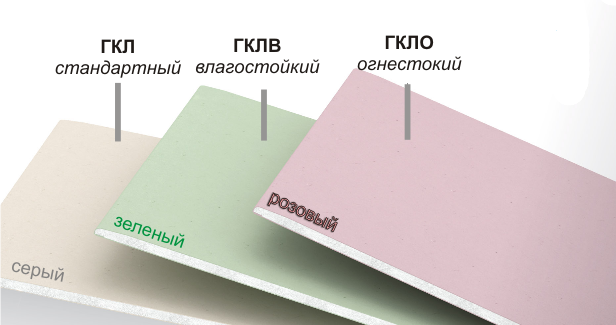
Types of drywall for wall cladding
Any of the presented types is environmentally friendly and has a reasonable price. The large size of the sheets guarantees the speed of installation of the cladding. The resulting surface can be painted or used as a base for laying tiles and applying decorative plaster.
Drywall can be painted in any desired color
The technology of installing plasterboard sheathing in country house made of wood is no different from the process of decorating the walls of city apartments. The frame is assembled in the same way and sheathing sheets are attached to it in the same way.
Since gypsum is a fragile material, it can only be used in the design of houses where the shrinkage process has already been completed. Be sure to leave a few centimeters behind the ceiling and floor. Wooden walls of the house always remain "alive". They swell in damp weather and dry out in the heat. An incorrectly made skin will simply tear. It is possible to ignore these processes of life at home by installing a floating frame, which is provided by non-rigid fastening of the profiles to the wall. Having a reserve of movement, the profiles will be able to keep the drywall in its original position, no matter how the frame behaves.
The process of plastering the walls of a wooden house with plasterboard
It is possible to protect the sheathing surface from cracking by reinforcing all joints and corners with a reinforcing polymer mesh.
It is permissible to sheathe the walls of a wooden house with plasterboard without assembling the frame. In this case, I will attach them to slats, bars and adhesives. Thus, additional space is gained, which is very important for small rooms.
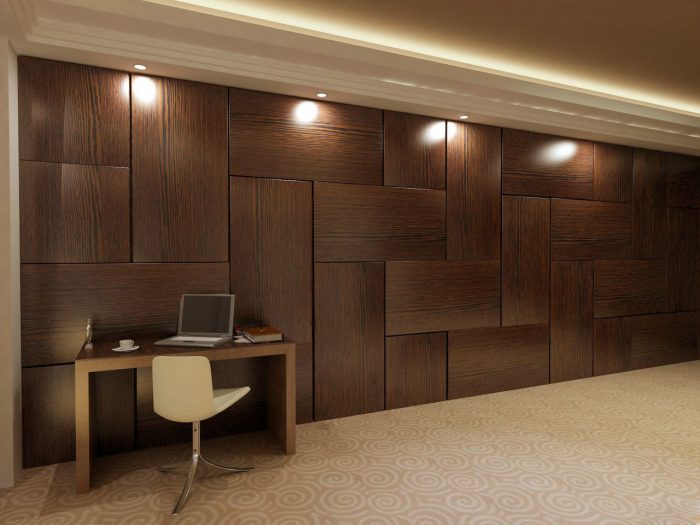
Wall panels for interior decoration of wooden houses
Wall decoration inside country house special panels allow you to diversify the stylistic solutions of interior decor. This is guaranteed by the textured variety of materials.
Wall panels produce:
- from fiberboard;
- bamboo;
- plastic;
- glass;
- skin.
The most popular are fiberboard panels. They came to interior design not so long ago. The classification of the material is based on species diversity.
Decorating the walls of the house with fiberboard panels
Type-setting rack and pinion models have a small width (10-30 cm), various lengths (from 2.5 m to 6 m) and thickness (8-2.5 mm), which are very reminiscent of a wooden lining. The association is strengthened by the presence of a similar tenon / groove connection scheme and the method of attaching the cladding to the walls of a wooden house, where staples and clamps are used.
Rack Fibreboard Panels
Tiled types are also presented in a variety of sizes and colors, which allows you to hide walls behind real panels or reproduce the most incredible designs in the cladding by combining tiled panels of different shades and shapes.
Finishing with tiled fiberboard panels
Sheet options are offered in an equally wide range of sizes and are very similar in appearance to hardboard sheets. Their surface can have just a single color, and be decorated using the 3d technique.
Fiberboard sheet panels for walls
The laminated coating of fiberboard panels imitates both the structure of natural materials such as marble, granite, wood, tiles, metal, and pleases with fantasy motifs. Elements can be covered with bright patterns, ennobled with mirror inserts, picture reproductions, stucco or thematic subjects.
Laminated fiberboard panels imitate natural wood
Fiberboard panels are durable. Self-tapping screws are securely fixed in them, so that there will be no problems with fixing the shelves of lamps and other accessories. For all types of fiberboard wall panels, you can choose suitable fittings and moldings for decorating joints and hiding wall defects.
This includes:
1. Moldings.
2. Corners.
3. Skirting boards.
4. Plinth strips.
5. Platbands, etc.
With the help of such elements, a single interior style is formed, so you should not refuse to use them.
MDF panels, in view of their water resistance, are most often used in the decoration of bathrooms. The option is cheap, convenient and environmentally friendly. Panels of this type are easy to install, have good thermal insulation performance, are durable, wash well and have a fairly aesthetic decor. You can easily find them in the texture you want.
MDF panels are ideal for bathroom cladding.
Glass panels are often used not as an independent cladding, but as inserts. More voluminous areas can be seen in rooms with a specific purpose. They decorate a working wall in a kitchen or bathroom. Glass slabs can be completely made of colored raw materials or have only a surface decorated with corrugation, photo printing, tonic or drawings.
Kitchen apron decorated with glass panels
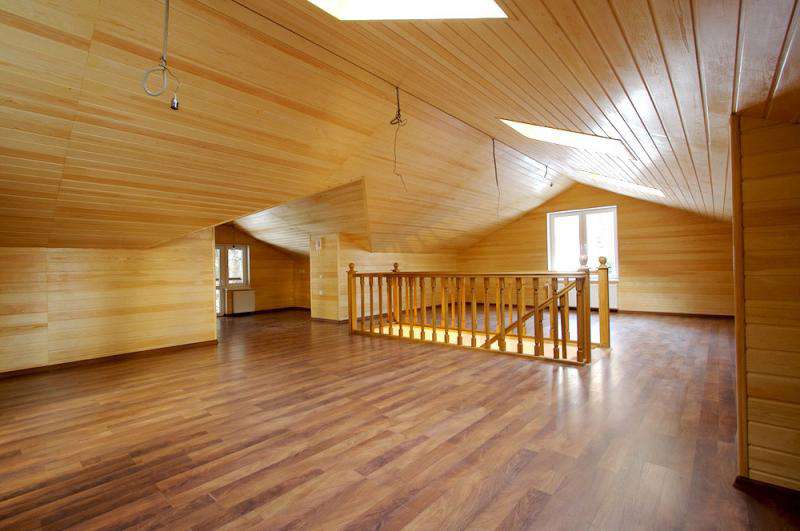
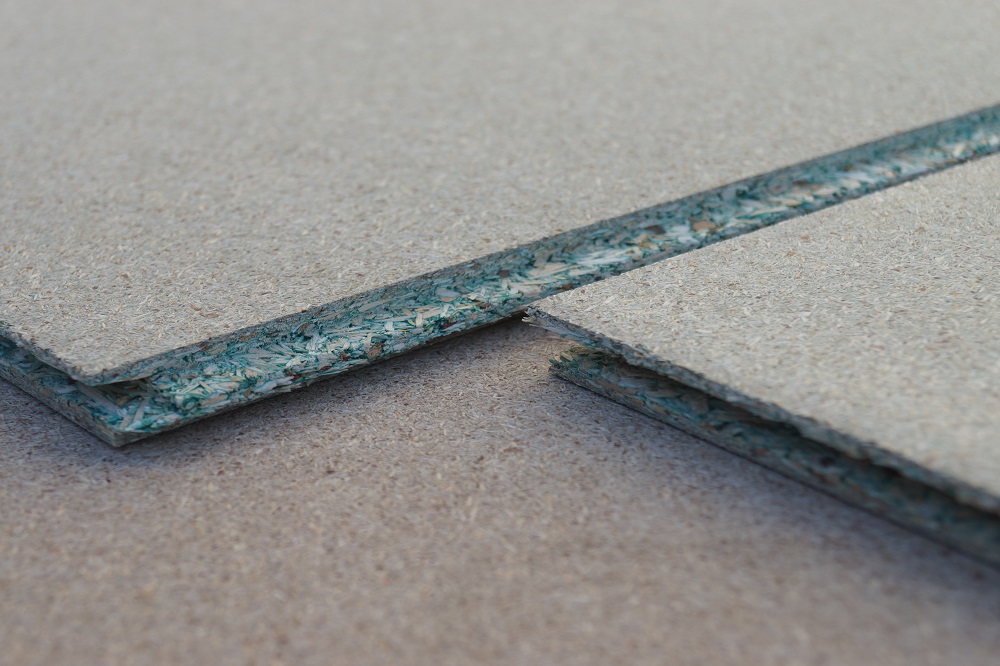
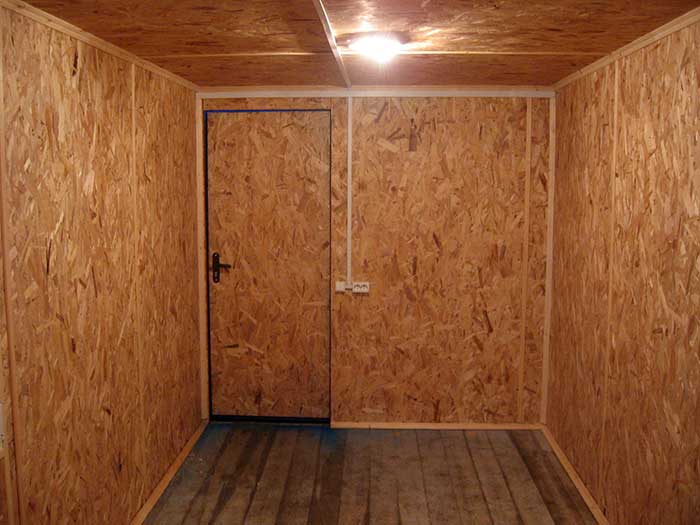
OSB boards have a special method of production, providing for a cross arrangement of layers of shavings in the outer and inner layers, which makes them several times stronger than similar products made of MDF and chipboard. Despite this, powerful slabs have excellent flexibility, which makes it possible not only to sheathe the walls with them, but to give the room a completely new look, somewhere by smoothing the corners, somewhere, on the contrary, by creating acute-angled protrusions.

Decoration of premises with durable OSB panels
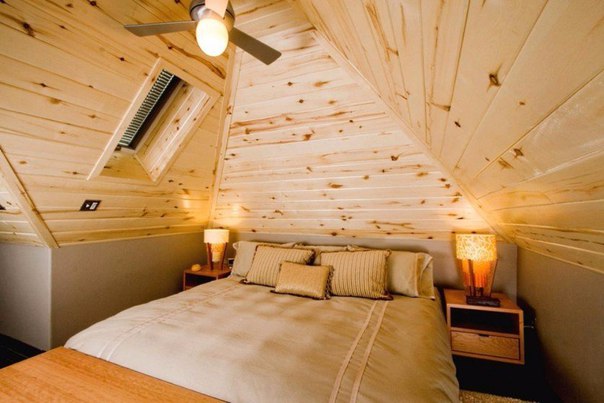
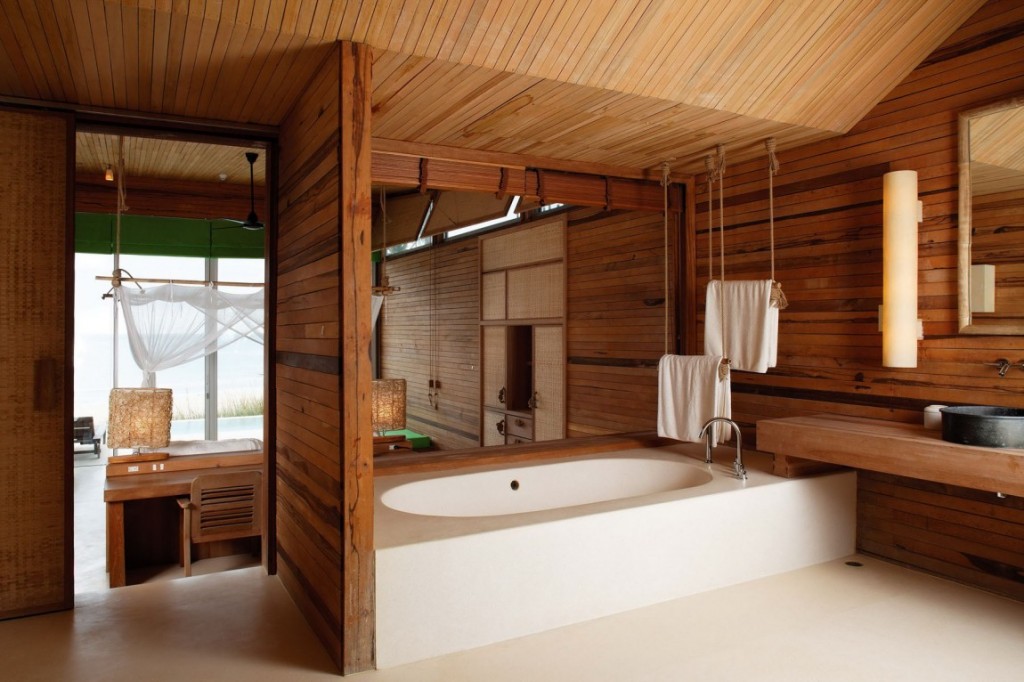
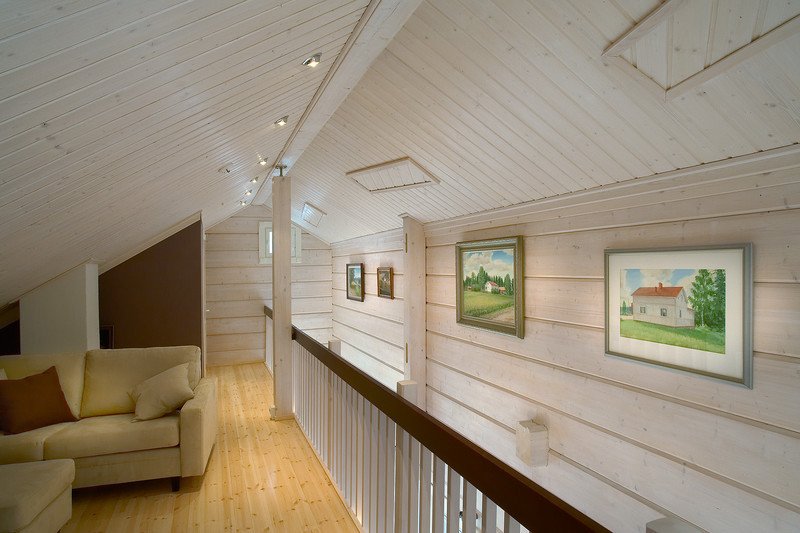
The non-standard structure of the OSB allows them to hold the screws well even when they are re-screwed into an existing hole. The material has excellent water resistance, which significantly expands the scope of its use. OSB is most in demand in the decoration of attics.
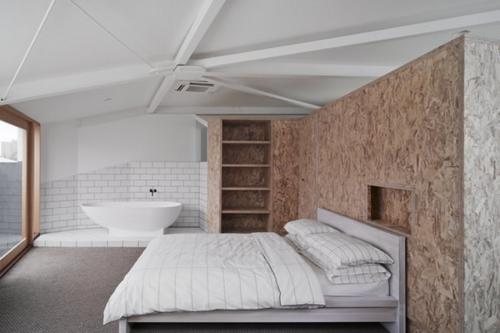
OSB boards are popular in attics
Oriented strand board contains formaldehyde, so finishing with them in areas where you spend a lot of time, such as in the bedroom, is undesirable.
Magnesium glass sheet (MF) is very good for finishing log walls. Fiberglass reinforcement improved the flexibility of the material and increased the permissible radius of curvature of the sheets to 3 meters. The risk of it breaking or cracking is minimal.
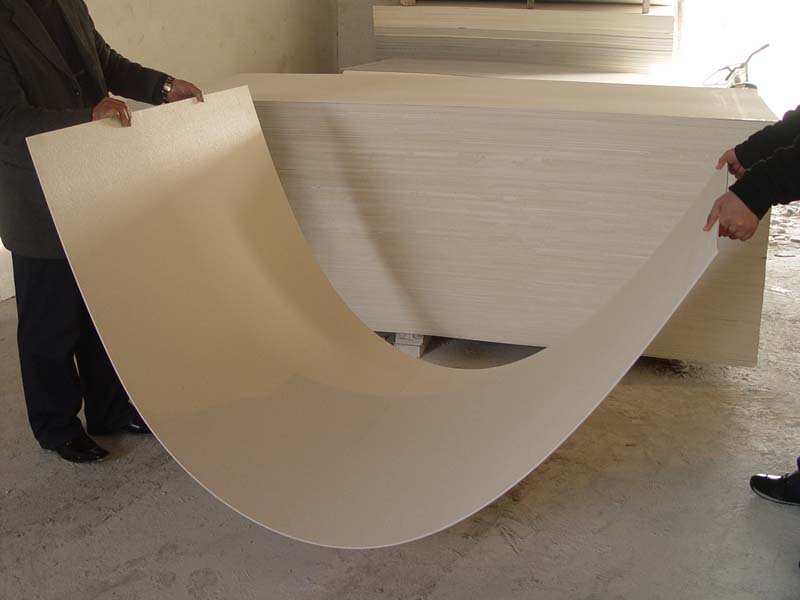
Magnesium glass sheet has excellent flexibility
SMP lightweight, fireproof, moisture resistant. They can not only decorate the walls in a country house, but also use them to create interior partitions different forms... The front side of the sheet is prepared for painting, laminating, wallpapering, etc. It does not need to be putty and primed first.
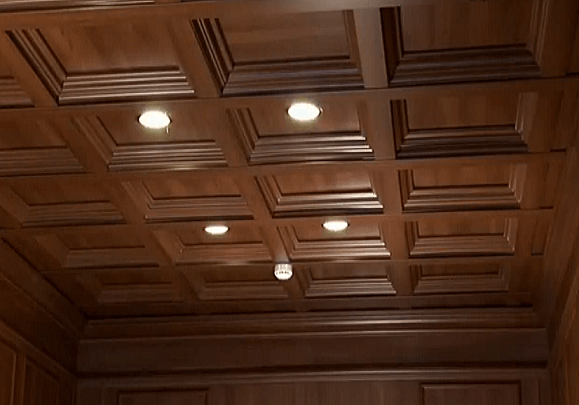
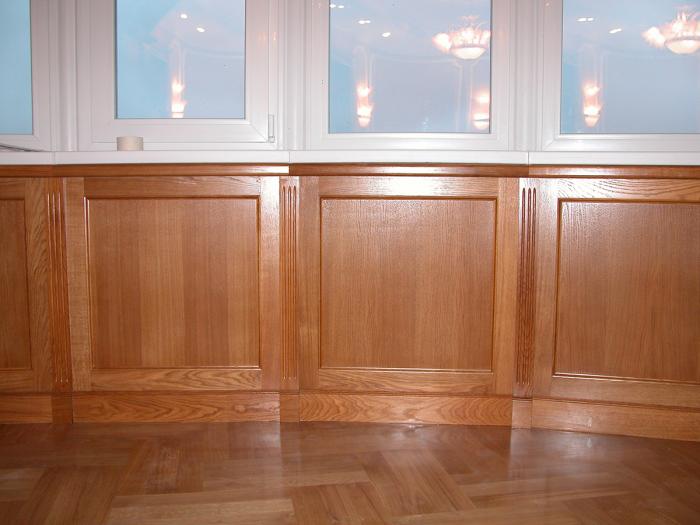
Block house
In appearance, the block house resembles an ordinary board, only with a convex cylindrical shape of the front side and non-standard processed edges, which allow you to quickly mount individual elements into a solid canvas. Sheathing from this material will help maintain the unique microclimate inherent in wooden houses. On interior decoration take lamellas no thicker than 25mm. For their fastening, a crate is designed.
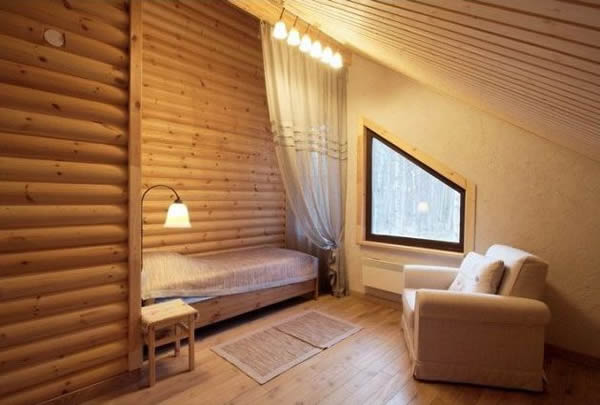
Wall cladding in a wooden house with a block house
Having decided to decorate a country house with a block house, you need to remember that this material is always purchased with a 10% margin. Naturally, these are additional costs, but buying it in insufficient quantities, you risk ruining the decor of the entire room. The block house of different parties, like the wallpaper, differs in color shades, so it will be unrealistic to find an absolutely identical version to the purchased one. Adding lamellas from another series will significantly reduce the aesthetic result.
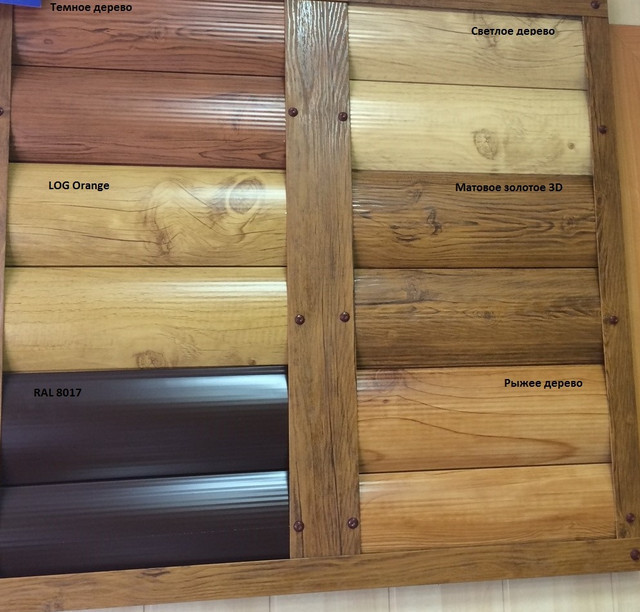
Block house colors
The block house wall cladding looks great, but requires maintenance. During its operation, you will have to regularly clean the surface from dust deposited on it and renew the varnish coating.
The disadvantages include the laboriousness of the sheathing process itself. Before starting to equip the frame, it is necessary to close up all the cracks in the wall of the log house and solve the issue of laying a heat-insulating layer, which, in combination, will also become a sound wave damper. But with such a "flaky" wall decoration in a country house it will always be warm and quiet. The sounds of the outside world will not disturb your peace.
Block house assembly scheme
These small disadvantages of a block house are offset by a whole list of advantages, including:
- high-quality ventilation;
- ease of installation;
- strength;
- healing effect.
The block house wall cladding is distinguished by its strength
In addition, this type of finish can act as a connecting link in the decor, combining the beams and forging elements present in the interior into a complete composition, for example. The wall cladding with a block house is self-sufficient in aesthetic terms and by itself, without additional inclusions, because it looks like a surface cut from logs.
Block house wall cladding is self-sufficient
Decorative stone cladding
Actively use decorative stone in interior design country houses made of wood steel not so long ago, although it looks very interesting on their walls. His presence can set the tone for the whole environment. Most often they are issued frame houses and buildings made of glued beams, but in log cabins and rooms with walls made of rounded beams, decorative stone is rarely used. This is due to the fact that its slabs require mounting exclusively on a flat surface.

Decorative stone in the interior design of a wooden house
As for the quality of such cladding, in addition to high aesthetics, it is characterized by strength and practicality. It will last a very long time. Since the material is waterproof, it is permissible to use it not only in the decor of halls, living rooms and halls, but also in the design of bathrooms, kitchens, indoor pools and other areas of a house with high humidity.
Wall cladding in a wooden house with durable decorative stone
Plastic in the decoration of the walls of a wooden house
Plastic is a practical and outwardly attractive material that allows you to very neatly finish surfaces. He has a reasonable price. Basically, such cladding is used in wooden houses: in hallways, bathrooms, kitchen areas.
Bathroom wall cladding with plastic panels
In addition to being moisture resistant, plastic is also very practical. To clean surfaces from it, you do not need to use expensive abrasives. It is quite possible to put them in order by simply wiping with a damp cloth.
Plastic panels are easy to clean
Plastic cladding is not difficult to install. You can do it yourself, without involving specialists, which is also important with a limited budget.
Features of cladding wooden walls in wet rooms
When decorating rooms in a wooden house where a microclimate with high humidity is expected, it is necessary to use only materials that can withstand its effects on the wall cladding. On those surfaces that will not be in direct contact with water, you can use moisture-resistant drywall or Quick Decal boards as a finish. Those walls, where water will often get into and in large volumes, are best hidden behind plastic, decorative stone slabs or ceramic tiles.
Moisture resistant Quick Dec slabs
It is important to saddle the sheathing airtight so that the wooden walls hidden behind it do not rot and bloom from water leaks. It will not hurt to pre-treat their surface with moisture-proof compounds. When decorating the walls, special attention is paid to the areas located behind the bathroom, toilet bowl, adjacent sinks.
When interior wall decor work begins
"It's better not to rush and let the new building stand for at least 10 months."
The finishing of the "fresh" log house can be started not earlier than the shrinkage process is completed. For a building made of laminated veneer lumber, this period lasts about four weeks, for the rest it stretches for many months. To calculate the time required for the shrinkage of a new house, you need to know the percentage of moisture content of the raw materials used for construction, the climatic features of the zone where the cottage is installed, and take into account the duration of construction. In any case, it is better not to rush and let the new building stand for at least 10 months. During this time, the logs themselves will dry out, and the insulation that lies between the crowns will wrinkle. Outwardly, it is difficult to notice the processes taking place with the eye, however, if you neglect the recommendations and sheathe the walls before the end of the shrinkage, then you can clearly see that it is quite active. The finish will certainly distort, cover it with a network of cracks, or even tear it altogether. In general, nothing will save you from alteration, even the arrangement of a floating frame.
Conclusion
How and how to sheathe the walls in your wooden house is up to you, but remember that you can count on a pleasant looking environment only if the process of decorating them is done correctly from the first steps.
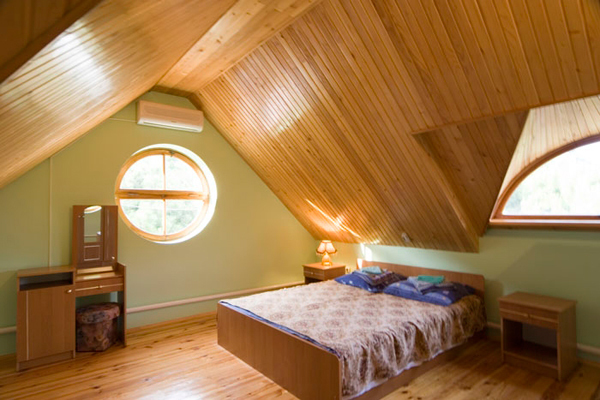
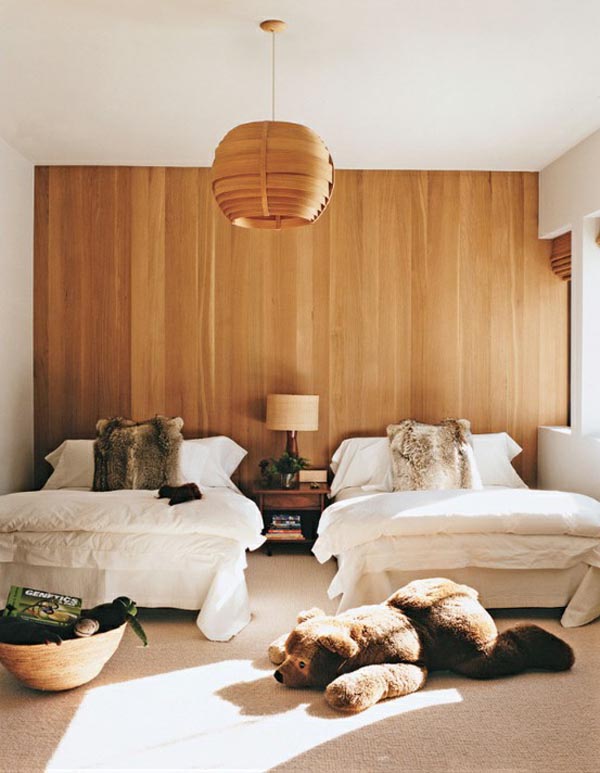
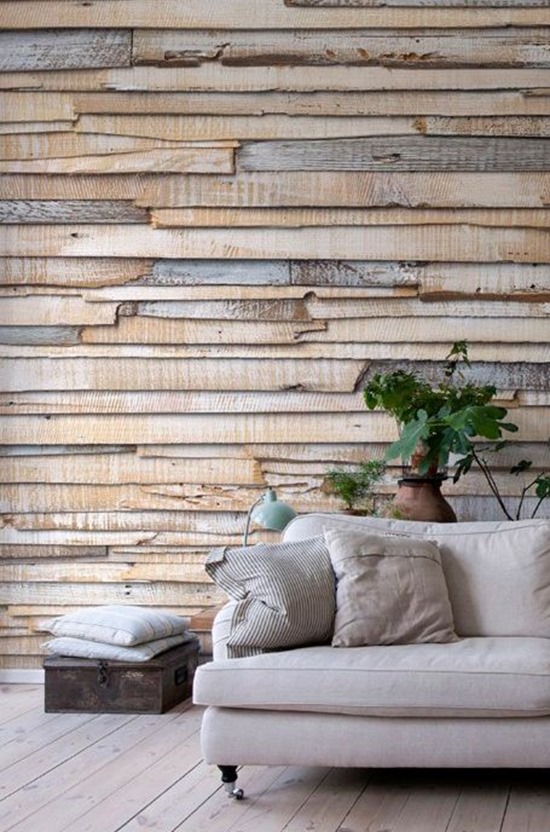
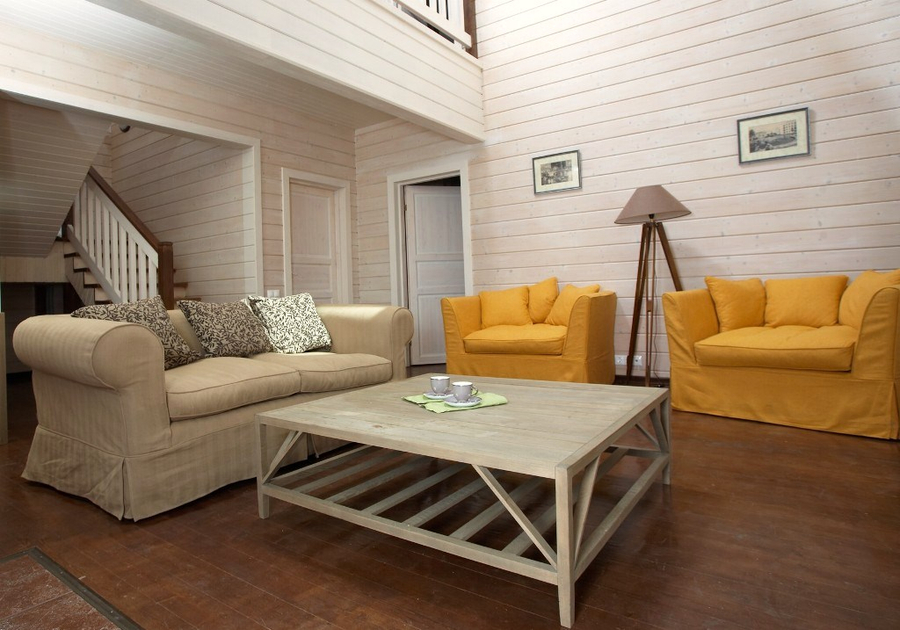
Photo gallery - wall cladding in a wooden house
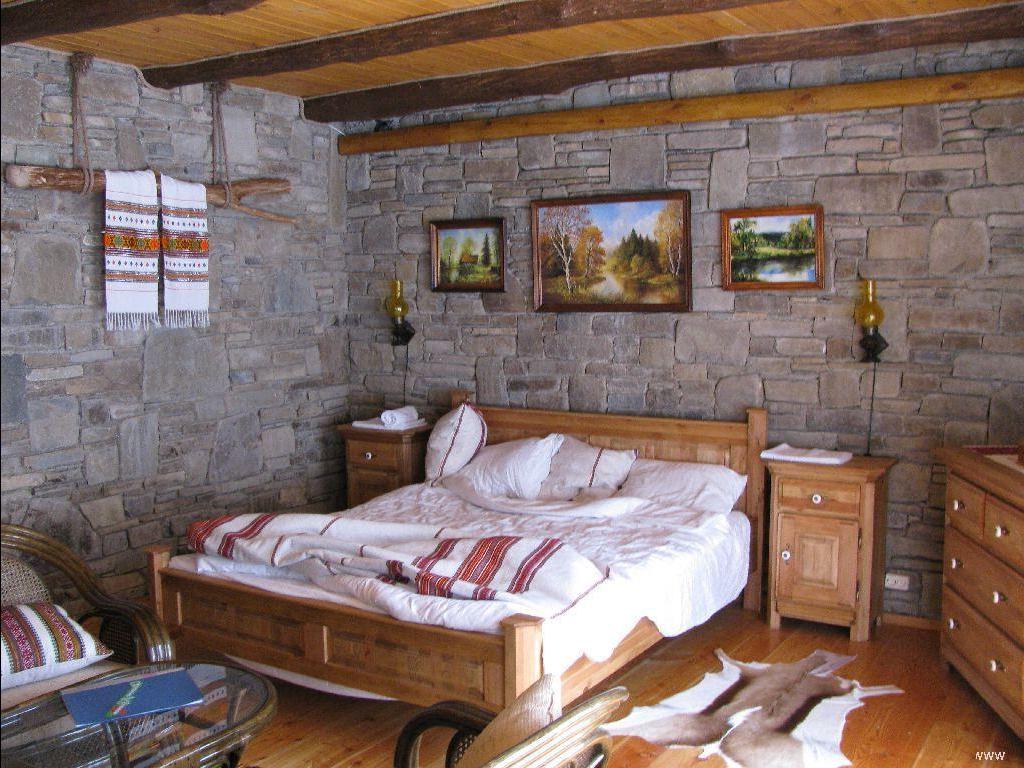
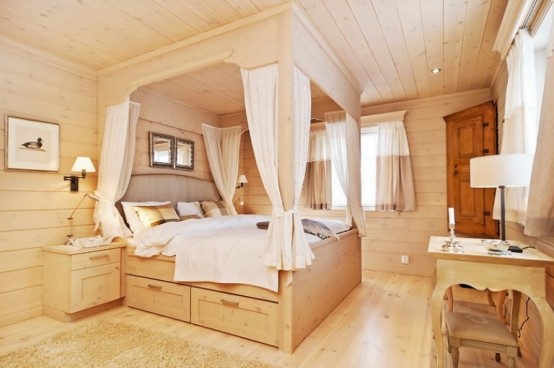

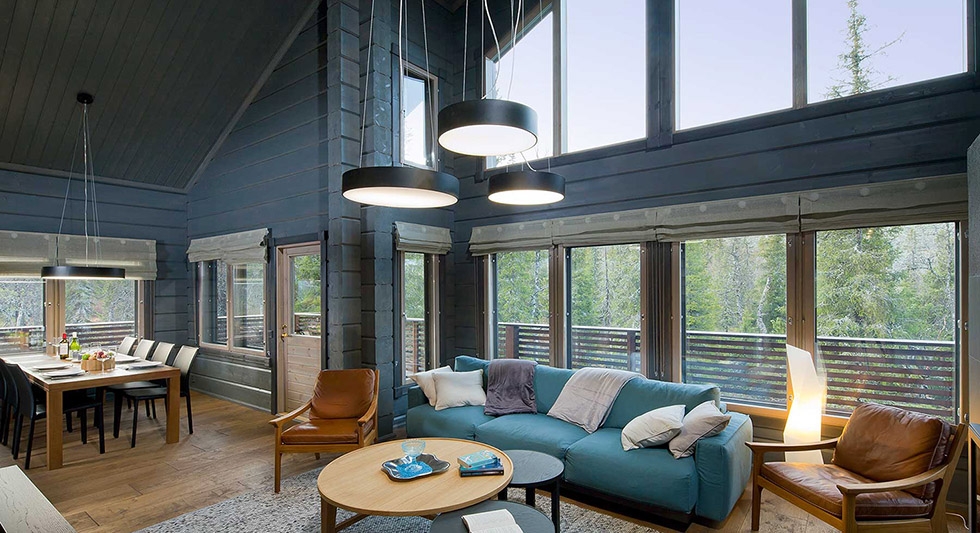
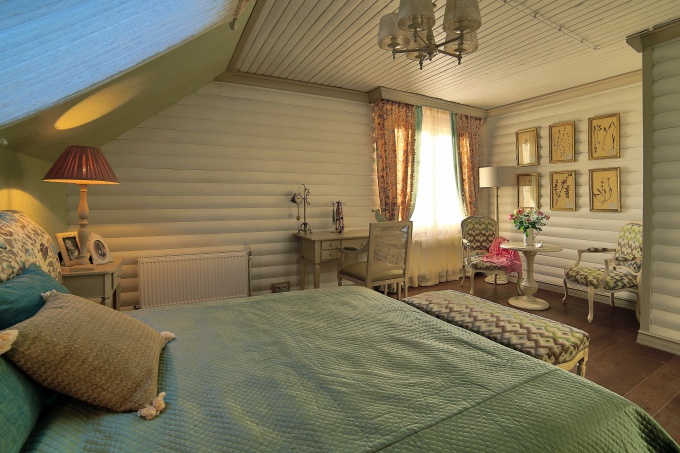
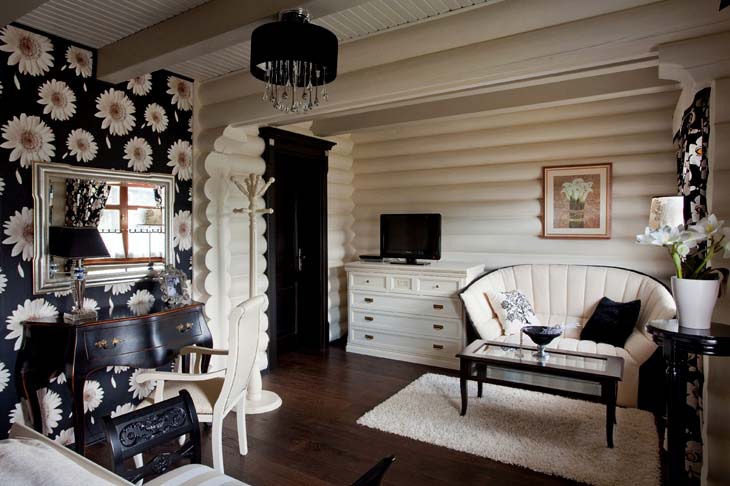
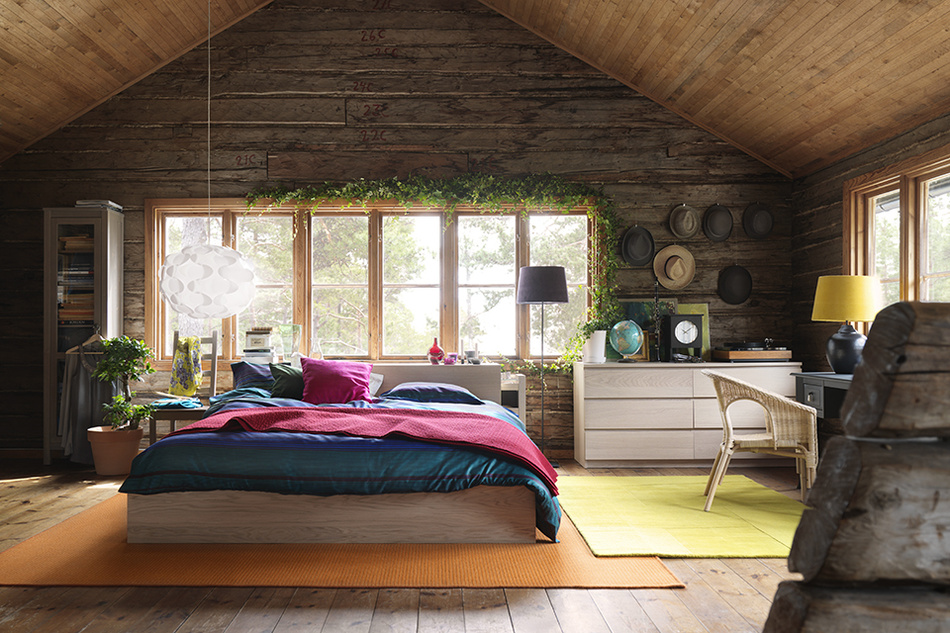
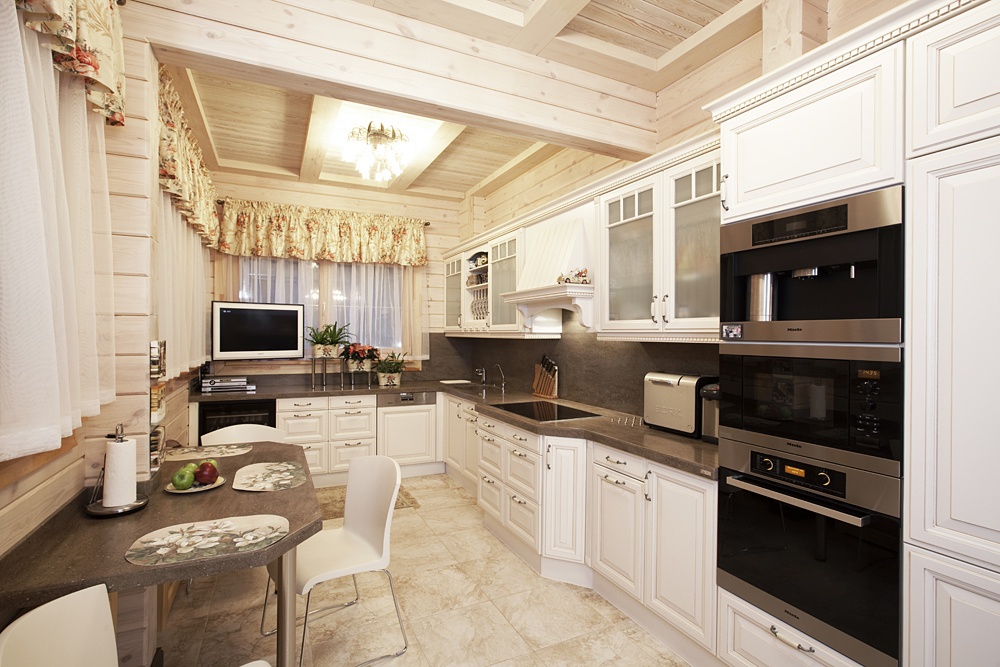
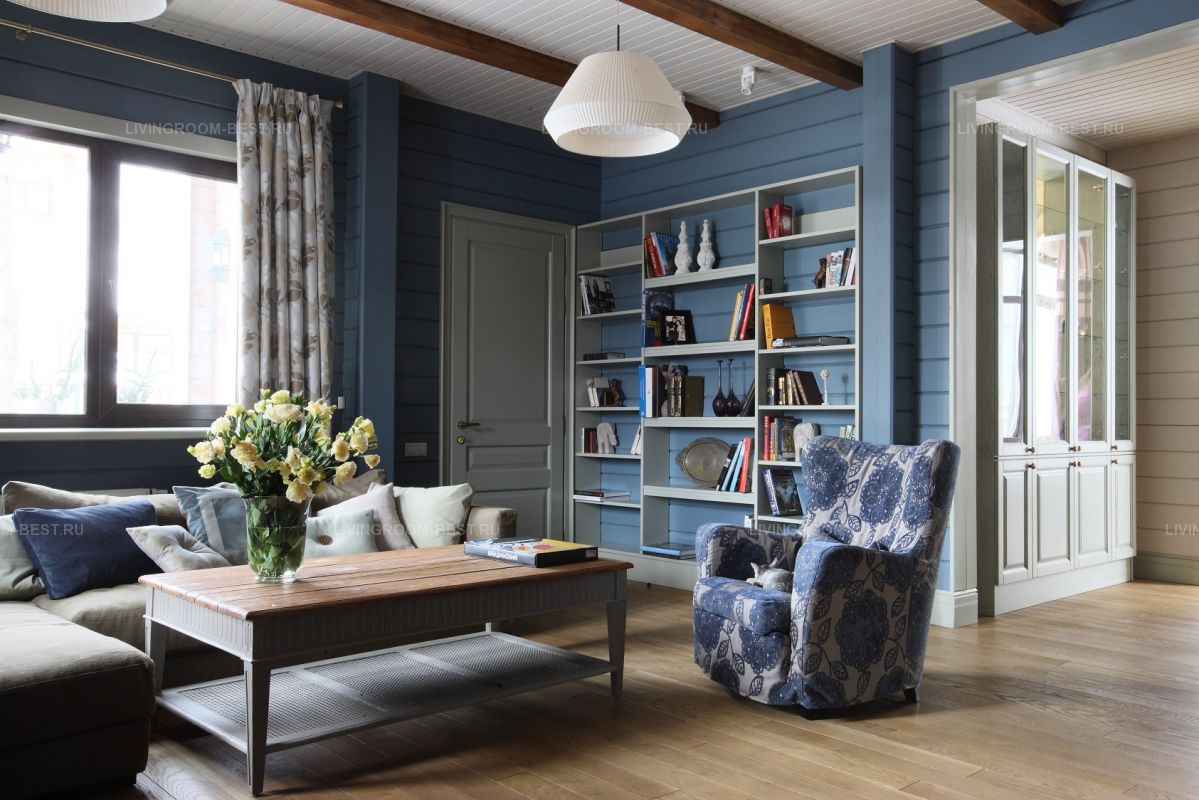
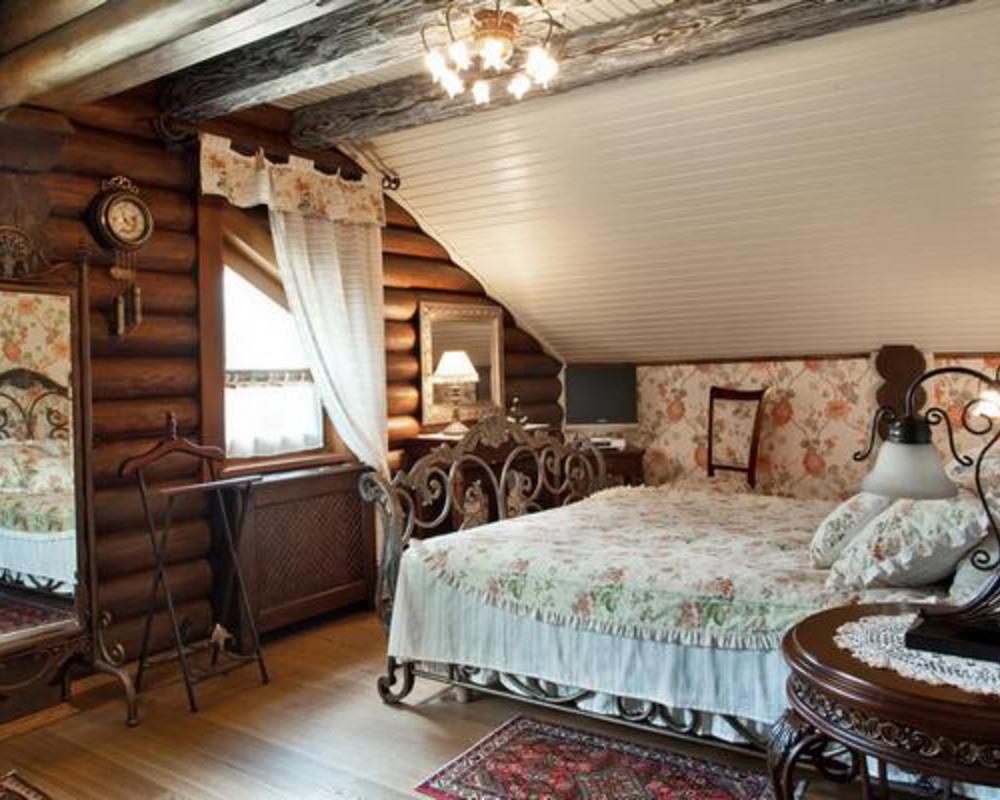
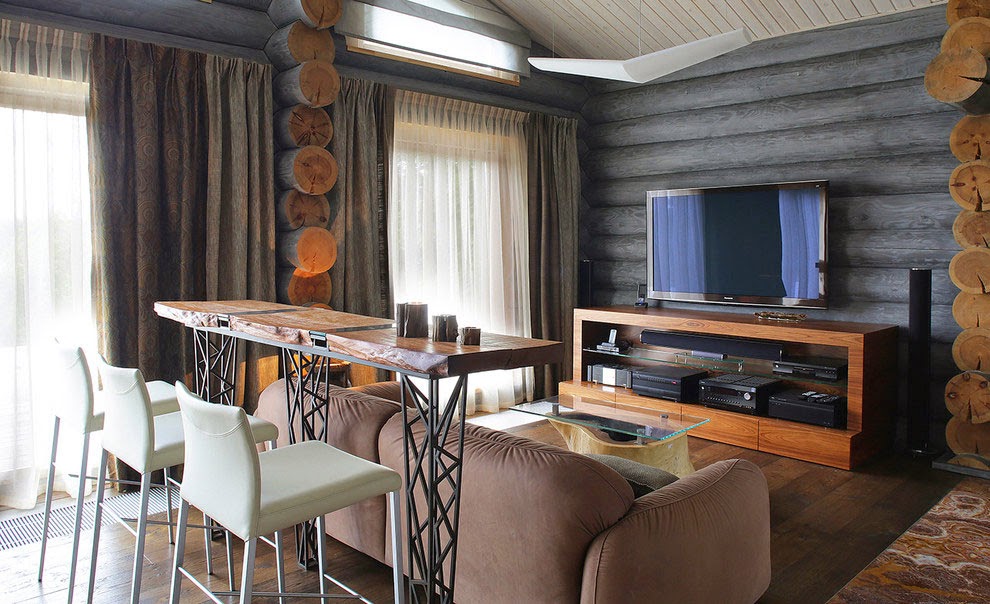
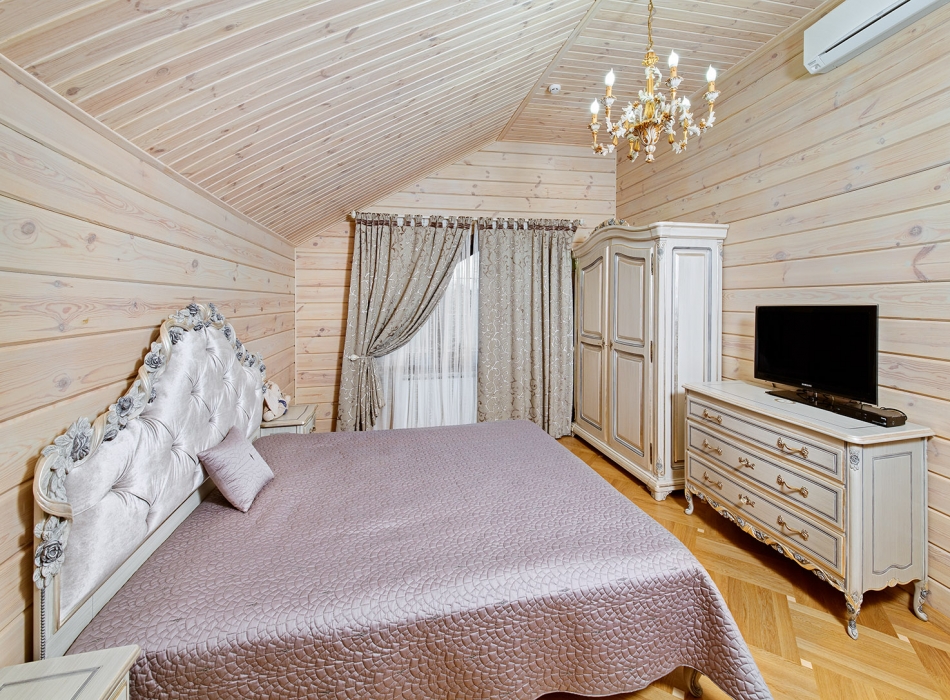
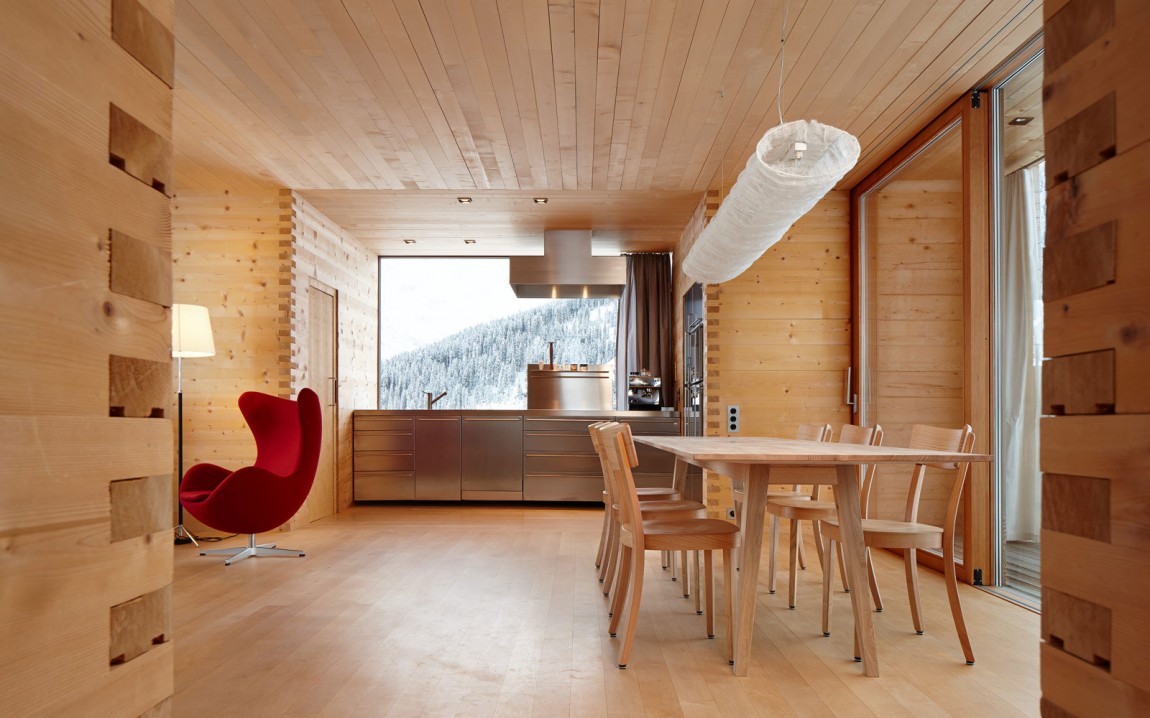
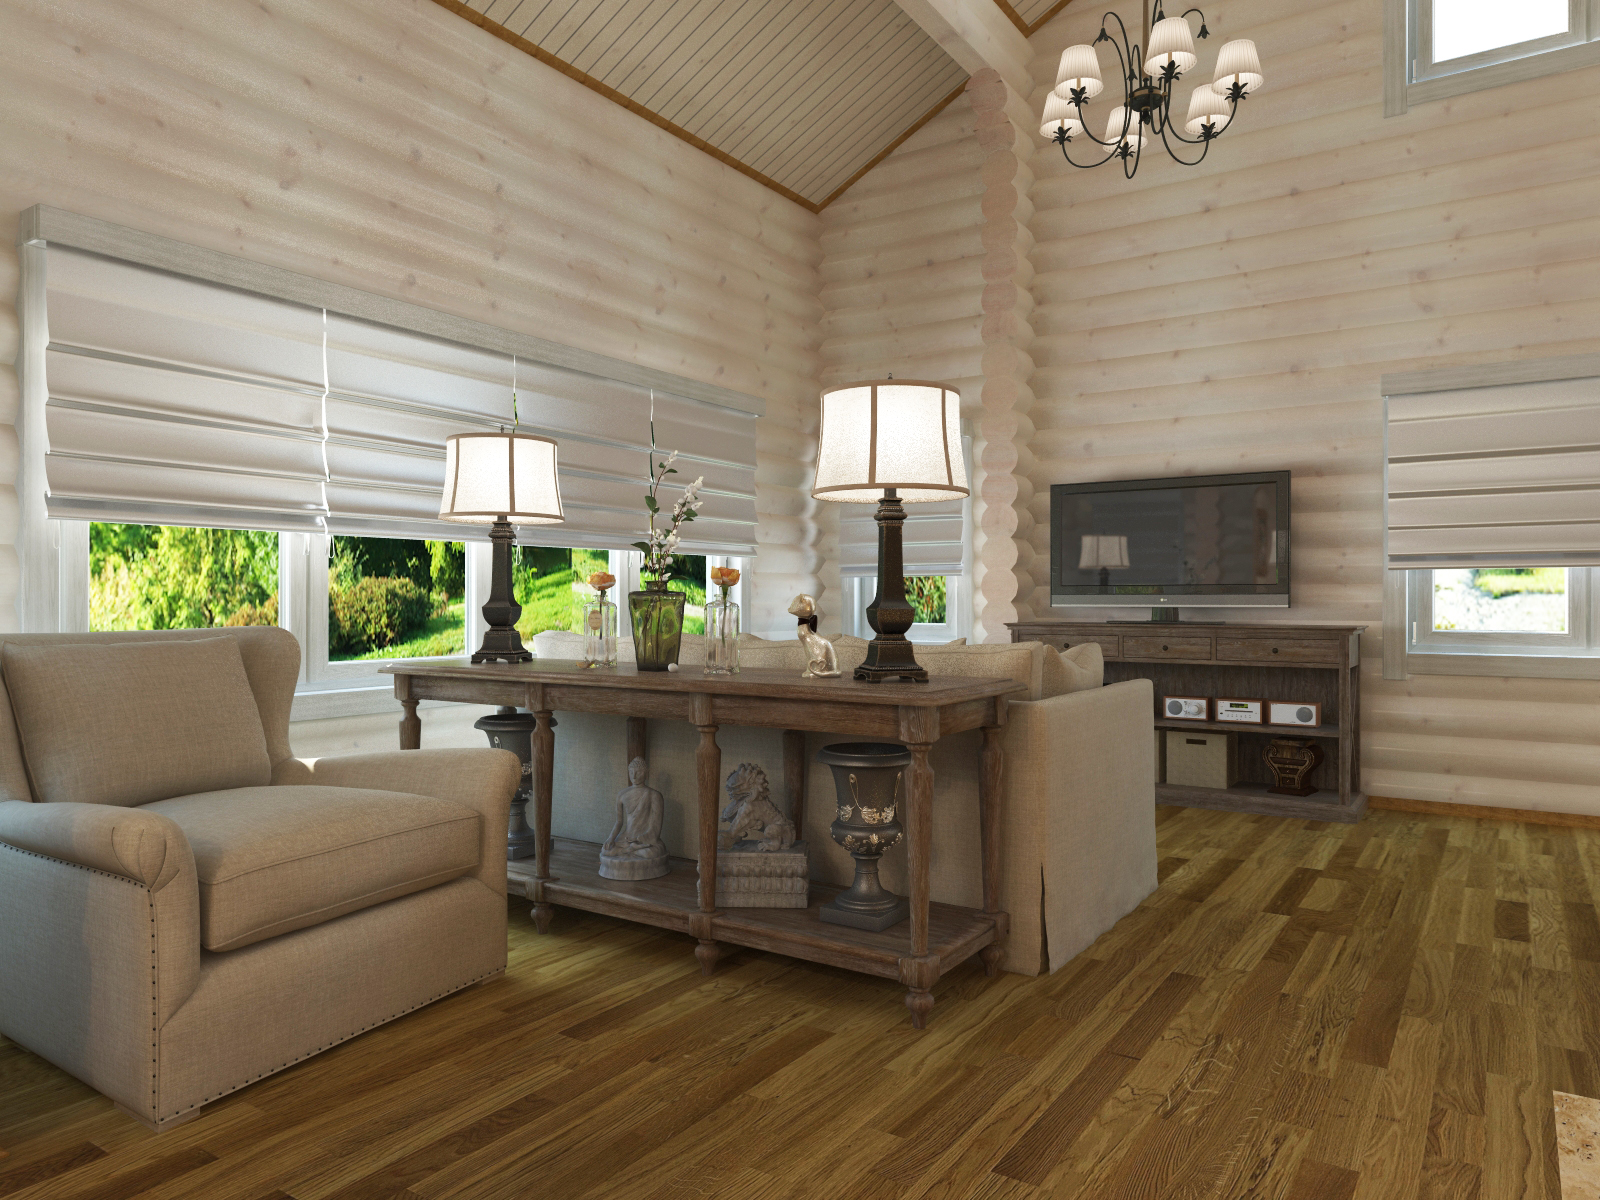
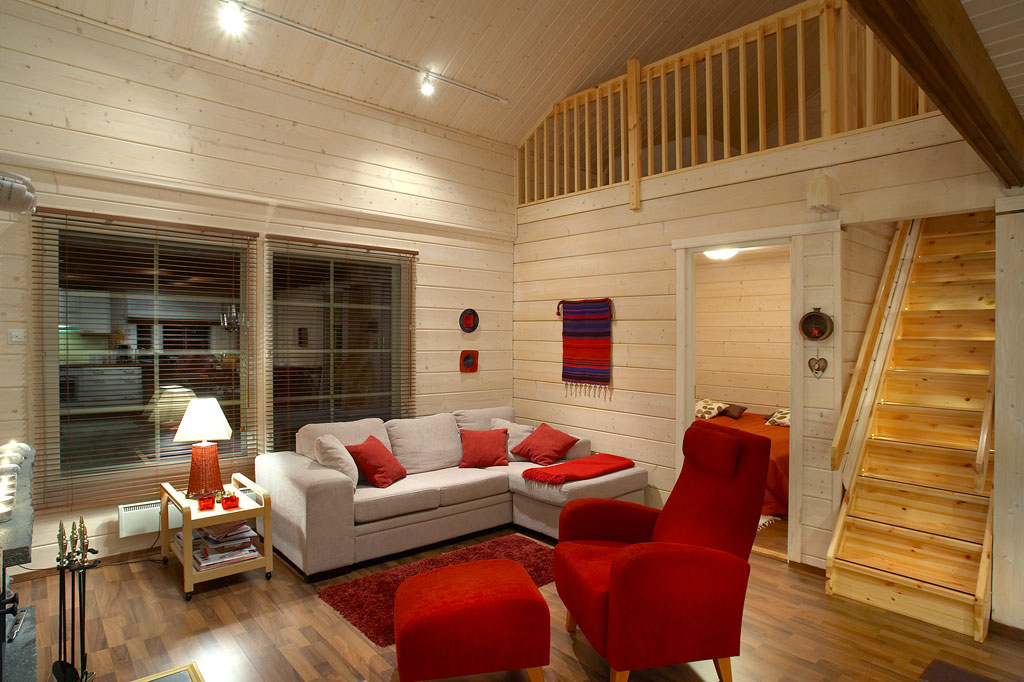
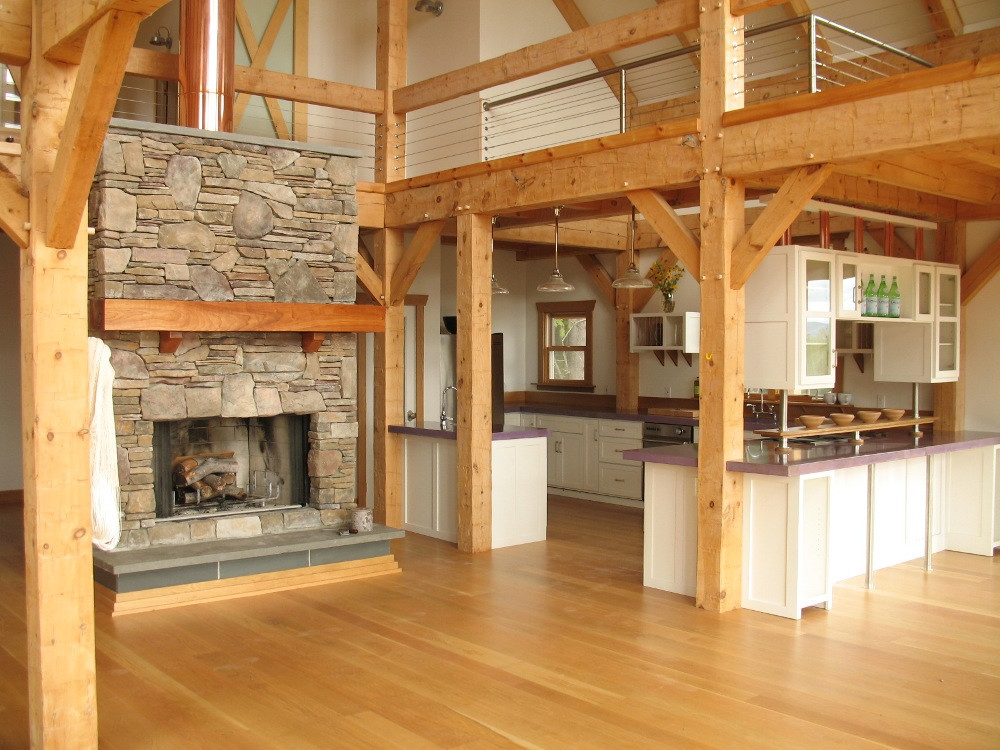


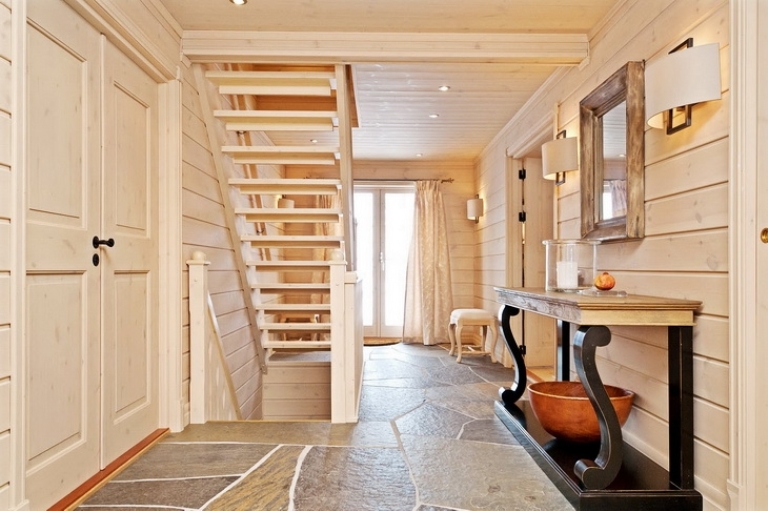

![]()

![]()


Inside finishing works are the final stage in the construction of private houses. The decoration of a wooden house depends on the material of the walls. That is why, before starting work, all wooden elements should be treated with antiseptic agents. In this article, we will tell you in detail how to sheathe a wooden house from the inside and how to choose the right material.
Basic requirements for facing material
Wall cladding in a wooden house should be taking into account the shrinkage of the structure. The shrinkage process directly affects the selected material. Before revetting the structure, pay attention to the following points:
- Seasonality of residence. The house is not always used for permanent residence... When sheathing inexpensive materials there is a possibility of their deformation or cracking, because in winter, there will be no comfortable temperature inside the house.
- Construction parameters. The weight load-bearing structures is of great importance, since when they shrink, they can significantly deform the decorative coating.
- Environmental standards of the material. Not all products meet environmental standards, even the most expensive product can release toxins or formaldehyde compounds.
- Cost and appearance. Cheap doesn't mean bad. Not always expensive material is able to be of high quality and harmoniously fit into the overall interior.
When choosing a material, consult with experts and study the reviews, then you can clearly answer the question of how to sheathe the walls in a wooden house.
Material characteristic
A log house can be sheathed using the following products:
- lining;
- drywall;
- block house;
- PVC panel;
- MDF panel;
- wood material: OSB, chipboard or plywood.
Now let's look at each cladding material in more detail.
Using lining

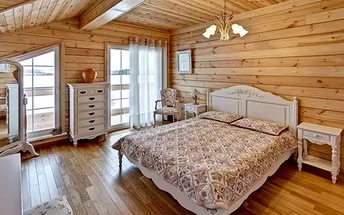
The lining is a simple board with built-in special grooves, due to which the tree fits snugly together. The photo shows the floor and walls finished with clapboard
The disadvantage of using lining is its stereotyped nature, such an internal design looks good, but it is unlikely that it will work to give some individuality to the rooms. Of the advantages of the lining, it can be noted:
- a huge selection of wood species;
- various types of product processing;
- environmental friendliness of the material;
- pleasant aroma inside the house.
For information! Before sheathe the rooms with clapboard, it is necessary to assemble the frame from wooden or metal bars. This method will help eliminate all kinds of surface irregularities.
Using a block house
If you like a rounded log, but you do not know how to sheathe a house inside from a bar, a block house will be the ideal option. This material is widely used in the decoration of cottages, the tree is able not only to decorate the room, but also to give maximum comfort and coziness. Of the advantages of this material, it is worth noting:
- high environmental friendliness, products are made from natural varieties of wood, which undergo special drying;
- mechanical strength allows the product not to lose its appearance and positive characteristics;
- possesses aesthetic appearance, is able to decorate any home;
- simple way of fastening.
For information! Block house made of coniferous wood allows maintaining a favorable microclimate inside the building, and hardwood products are highly resistant to moisture.
The disadvantages include:
- low vapor permeability;
- high flammability of the material.
Block house looks great inside a wooden house
Using drywall
Recently, drywall is often used to decorate wooden buildings. However, experts do not recommend using gypsum, because it has several disadvantages. If you execute internal work immediately after the construction of the house, when the drywall shrinks, it can crack or deform. It is also worth noting that after fixing the gypsum sheets, they must be plastering and painting. The joints are sealed, which makes the space in the house clogged.
PVC panel
If you want to save money, but do not know how to sheathe a house from a bar inside, a plastic panel is the most economical option. Of the advantages, it can be noted:
- ease of mounting;
- high resistance to moisture;
- a large selection of color palette panels.
The disadvantages of the material include:
- low environmental friendliness;
- panels are not able to pass steam and air;
- when ignited, they quickly melt and release hazardous and harmful substances for human health.
According to home owners, the main area of application of plastic panels is non-residential or utility rooms.
Using MDF panels
MDF panels are produced from a more environmentally friendly material than plastic. The surface of the product is quite smooth, which does not require complex finishing. Fastening of the panels can be performed either by directly fixing to the wall, or using a frame device. Manufacturers produce MDF panels of various designs, colors and textures, with their help you can decorate any room in the house.
It is worth noting that the MDF panel is able to additionally insulate and soundproof the walls.
Important! In rooms where heating is not provided or there is high humidity, it is absolutely impossible to use MDF!
Interesting colors can make rooms unique and stylish. The photo shows a room sheathed with MDF
Use of wood material
All products made of wood material (OSB, plywood and chipboard) are used to perform rough work, but they are practically not used for final finishing work. In addition, in the production process, wood products are treated with special adhesives and impregnations, which evaporate and negatively affect human health.
For information! Sheet plywood is considered the safest wood product that is used for finishing finishing work... It is used as a base, leveling the wall, for pasting wallpaper.
We carry out the cladding of the house inside
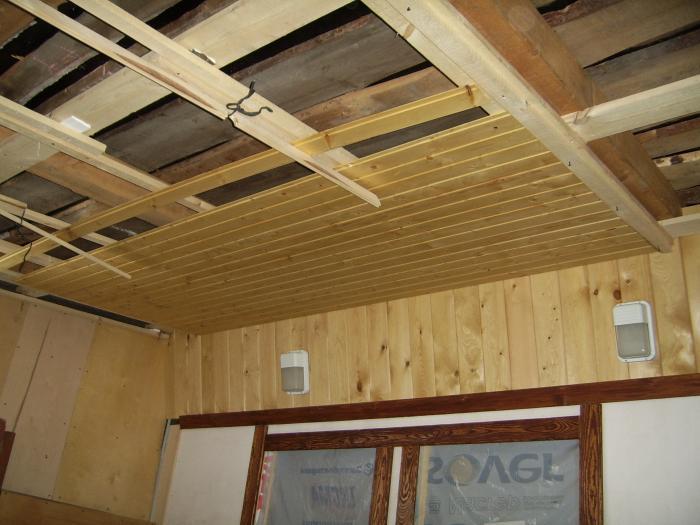
Most often, the owners of private wooden houses use lining as cladding. As a rule, plastic lining is used for rooms with high humidity, and wooden cladding panels are used for other rooms. Wooden lining perfectly insulates, insulates and favorably affects the microclimate. First, from a bar, the lining is prepared, i.e. treated with a special bioprotective agent. Wood processing helps to protect the material from decay, mold and various insects. Further, all products are thoroughly dried. The installation of the lining is carried out on the crate. The frame is assembled from ready-made slats and the lathing is fixed to the wall with self-tapping screws at a distance of 50 cm. A small gap is left between the wall and the cladding, which performs the function of ventilation. If the structure requires additional insulation, lay a special material and cover it with a vapor barrier. At the end, a crate is built on which wooden cladding panels will be mounted.
The installation of the lining is performed in two ways:
- horizontal;
- vertical.
The horizontal method starts by laying from the ceiling to the floor, with the grooves pointing downwards. This arrangement will prevent debris, dust and other foreign objects from entering the grooves of the boards. To obtain even and high-quality masonry, we advise you to check the evenness of the wall every 10-15 panels.
The vertical method starts with laying the panels from the corner. A kleimer is fixed in the groove of the rear wall, which is carefully nailed to the battens of the crate. The first panel is fastened with nails, the head of which is closed decorative corner... The installation of the lining is performed, as in the horizontal method, with the obligatory insertion of the boards into each other. Fasteners carefully press the material, and as a result, it is built into a single canvas. The last cladding panel is also fixed with nails. The final stage will be decorating internal and external joints using decorative skirting boards, slats and corners. If desired, the panels can be coated with a special varnish, which will create protection against moisture and temperature extremes. The photo shows the final finishing inside the house
The presented characteristics of materials will take into account the features of the structure, its internal design, and will also help you to easily answer the question of how best to sheathe your house.
